10 posts tagged with "vscode"

View All Tags

· 2 min read

Exactly a year ago, Github announced codespaces and gave the option to join the beta. If you are having your repository in github and need to contribute to an open source project or if you want to commit something quickly to the repository this is one of the feature that you might be interested in, It supports developers to do it on the browser on any device.

It allows developers to use a fully-featured, cloud-hosted development environment that spins up in seconds Directly within Github. This will help you to start contributing to a project immediately from any machine, all without needing to install anything locally. If you are a developer, you should be a fan of this one. As we’ve all been adopting practices like social distancing and remote working, development teams have become more distributed. In this post, i wanted to share one of the productivity tips on how to open your code directly from the browser via codespaces.

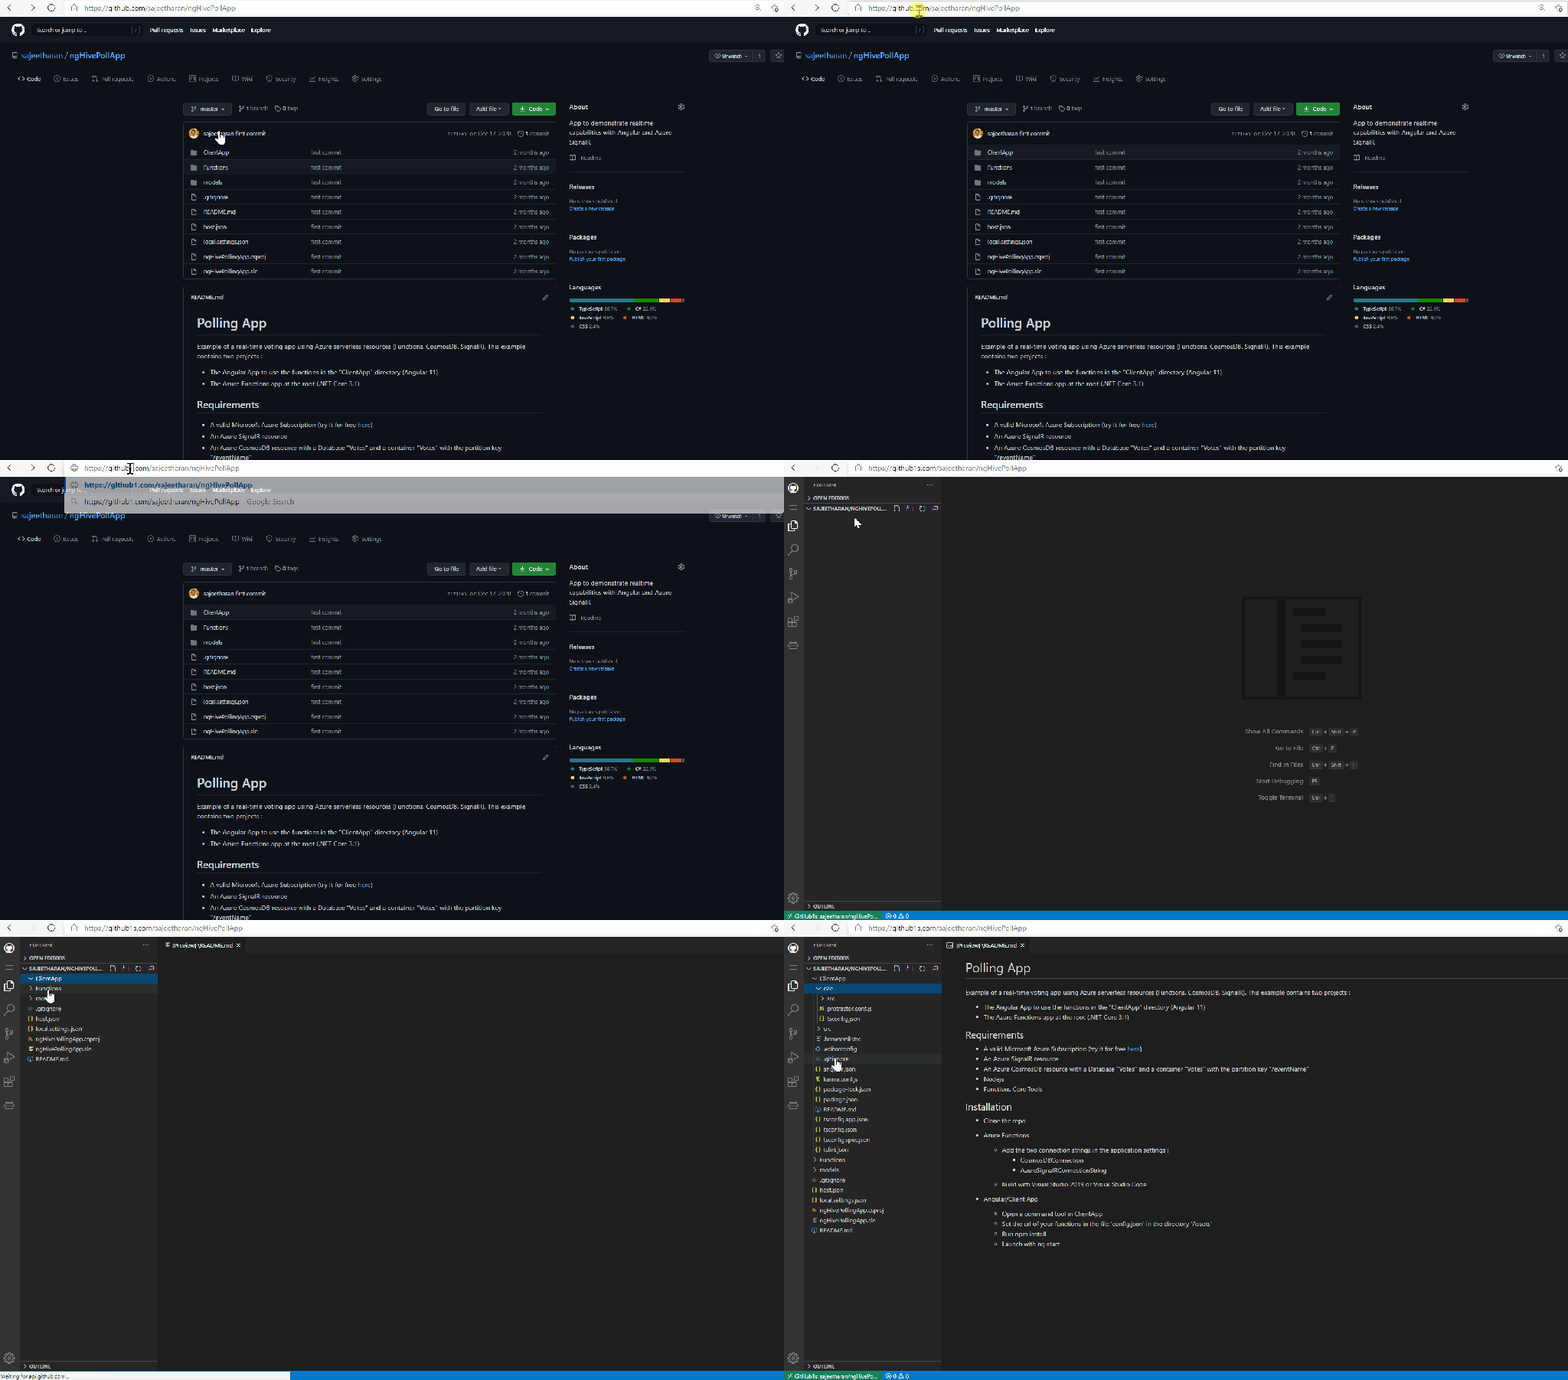
You just need to open your repository and add "1s" after github when viewing the codebase on browser and github codespaces loads up instantly.

Here is the action below!

One thing to note here is that, this feature is not directly from the Github codespaces itself, it is enabled via the 1s which is sort of a middleware repository enabling this! However it's a great feature and worth exploring it!

Hope this enable more developers to contribute to Opensource world instantly. Cheers!

· 8 min read

Overview

Are you are .Net developer interested in building Microservice based applications to the Cloud?. Recently i gave a talk about announcements on DotNet ecosystem and building Cloud Native applcitions with Tye and i decided to write on the same topic . Tye is an amazing project from Microsoft to ease the development, deployment with two fundamental cloud native technologies such as Docker and Kubernetes. If you have been deploying Applications in production using containers, you must be already aware of how complex steps you need to make in order to get your application running. I have worked on multiple projects where I have to run many modules as dependencies at the same time, even though I was only  working on one of them. There has always been a requirement for a tool to start, deploy applications with a  simple command to your desired environment without spending much time on creating docker files, configurations etc.

What is Project Tye?

Tye is an experimental developer tool from the .NET team at Microsoft that makes developing, testing, and deploying microservices and distributed applications easier. It comprises a local orhestrator to assist the developers to develop microservices, deploy them to kubernetes with minimal configuration and steps.

  • Service discovery via configuration conventions makes Developers to expose their API with proper documentation
  • Add dependencies (Redis, SQL Server, etc.) without writing docker files
  • Run and debug locally using containers and Kubernetes
  • Local dashboard for metrics, logging, debugging
  • Automatically dockerize and deploy to Azure Kubernetes Service

What I like really like about Project Tye is that it has a very small footprint and it is so simple to get started with after spending so many years with docker and K8s. It offers the following capabilities,

Getting Started

Let's see how to get started with project Tye. You need to have the following Prerequisites in order to run the following application successfully.

  • Azure Subscription (Free Trial)
  • Dotnet SDK latest
  • Visual Studio / Visual Studio Code
  • Docker/Kubernetes Extension VSCode ( Optional)

You can install Project Tye as a global .NET tool. In order to install the utility, you need to run the following command in your terminal

dotnet tool install -g Microsoft.Tye --version "0.2.0-alpha.20258.3"

To verify that Tye was installed properly you can run the following command that should output the current version installed:

> tye --version

Create a Simple Application

This section will demonstrate how to use Tye to run multi-project application.

Step 1 : Make a new folder named dotnetconfApp

mkdir dotnetconfApp
cd dotnetconfApp

Step 2 : Create a frontend project with Razor

dotnet new razor -n frontend

Step 3 : To run the frond end project, execute the following command

tye run frontend

As you could see above tye will do two things: start the frontend application and run a dashboard. Navigate to http://localhost:8000 to see the dashboard running.

The dashboard should show the frontend application running.

  • The Logs column has a link to view the streaming logs for the service.
  • the Bindings column has links to the listening URLs of the service.

Project Tye Dashboard

Add Multiple Projects

Step 1 : Let's go ahead and add a Web API to fetch the data for the front end application. If you haven't already, stop the existing tye run command using Ctrl + C. Create a backend API that the frontend will call inside of the microservices/ folder.

dotnet new webapi -n backend

Step 2 : Create a solution file and add both projects

dotnet new sln
dotnet sln add frontend backend

You should have a solution called dotnetconfapp.sln that references the frontend and backend projects.

Step 3: Run the multiple projects with tye . Execute the following command within the solution folder,

tye run

The dashboard should show both the frontend and backend services. You can navigate to both of them through either the dashboard of the url outputted by tye run.

Make the Communication between the frontend and backend

As you see above, we have both the backend and frontend applications running, let's make them communicate. By default, tye enables service discovery by injecting environment variables with a specific naming convention.

Step 1: Open the solution folder with VSCode or Visual Studio

Step 2 : As we need to fetch and bind the data from the sample WebApi , lets add a Contract named WeatherForecast.cs to the frontend project and it should match the contract that exist in the backend project WeatherForecast.cs

using System;

namespace frontend
{
public class WeatherForecast
{
public DateTime Date { get; set; }

public int TemperatureC { get; set; }

public int TemperatureF => 32 + (int)(TemperatureC / 0.5556);

public string Summary { get; set; }
}
}

Step 3: Add a file WeatherClient.cs to the frontend project with the following contents:

using System.Net.Http;
using System.Text.Json;
using System.Threading.Tasks;

namespace frontend
{
public class WeatherClient
{
private readonly JsonSerializerOptions options = new JsonSerializerOptions()
{
PropertyNameCaseInsensitive = true,
PropertyNamingPolicy = JsonNamingPolicy.CamelCase,
};

private readonly HttpClient client;

public WeatherClient(HttpClient client)
{
this.client = client;
}

public async Task<WeatherForecast[]> GetWeatherAsync()
{
var responseMessage = await this.client.GetAsync("/weatherforecast");
var stream = await responseMessage.Content.ReadAsStreamAsync();
return await JsonSerializer.DeserializeAsync<WeatherForecast[]>(stream, options);
}
}
}

Step 4 : Add a reference to the Microsoft.Tye.Extensions.Configuration package to the frontend project

dotnet add frontend/frontend.csproj package Microsoft.Tye.Extensions.Configuration  --version "0.4.0-*"

Step 5 : Register  this client in frontend by adding the following to the existing ConfigureServices method to the existing Startup.cs file:

...
public void ConfigureServices(IServiceCollection services)
{
services.AddRazorPages();
/** Add the following to wire the client to the backend **/
services.AddHttpClient<WeatherClient>(client =>
{
client.BaseAddress = Configuration.GetServiceUri("backend");
});
/** End added code **/
}
...

This will connect the WeatherClient to use the correct URL for the backend service.

Step 6 : Add a Forecasts property to the Index page model under Pages\Index.cshtml.cs in the frontend project.

...
public WeatherForecast[] Forecasts { get; set; }
...

Change the OnGet method to take the WeatherClient to call the backend service and store the result in the Forecasts property:

...
public async Task OnGet([FromServices]WeatherClient client)
{
Forecasts = await client.GetWeatherAsync();
}
...

Step 7 : Change the Index.cshtml razor view to render the Forecasts property in the razor page:

@page
@model IndexModel
@{
ViewData["Title"] = "Home page";
}

<div class="text-center">
<h1 class="display-4">Welcome</h1>
<p>Learn about <a href="https://docs.microsoft.com/aspnet/core">building Web apps with ASP.NET Core</a>.</p>
</div>

Weather Forecast:

<table class="table">
<thead>
<tr>
<th>Date</th>
<th>Temp. (C)</th>
<th>Temp. (F)</th>
<th>Summary</th>
</tr>
</thead>
<tbody>
@foreach (var forecast in @Model.Forecasts)
{
<tr>
<td>@forecast.Date.ToShortDateString()</td>
<td>@forecast.TemperatureC</td>
<td>@forecast.TemperatureF</td>
<td>@forecast.Summary</td>
</tr>
}
</tbody>
</table>

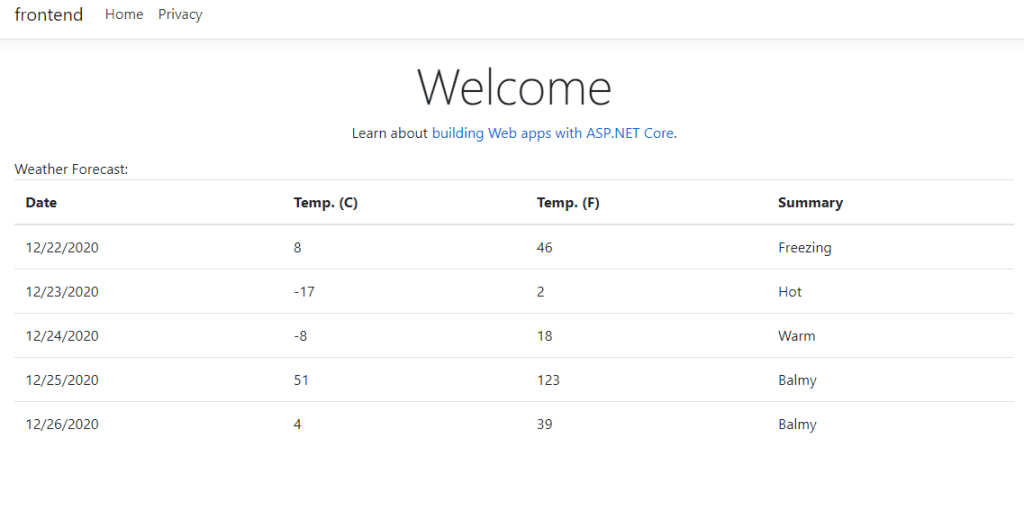
Step 8 : Run the project with tye run and the frontend service should be able to successfully call the backend service!

When you visit the frontend service you should see a table of weather data. This data was produced randomly in the backend service. Since you are seeing the data in a web UI in the frontend means that the services are able to communicate.

If you are getting any issues with the self signed scertifications, you need to run the below commands,

dotnet dev-certs https --clean
dotnet dev-certs https --trust

Let's deploy to Kubernetes

Step 1 : Provision the Kubernetes Cluster, since we will be using Azure Kubernetes Service , you can provision it by either CLI or using Azure Portal

Step 2 : Let's authenticate and get the required credentials

az aks get-credentials --resource-group dotnetconfsl-rg  --name dotnetconf

Step 3: You need to have either Docker registry or Azure container registry created where docker images of the frontend and backend will be pushed.

Step 4 : Now everything is ready do easy deploy the solution. Navigate to the solution folder and execute following:

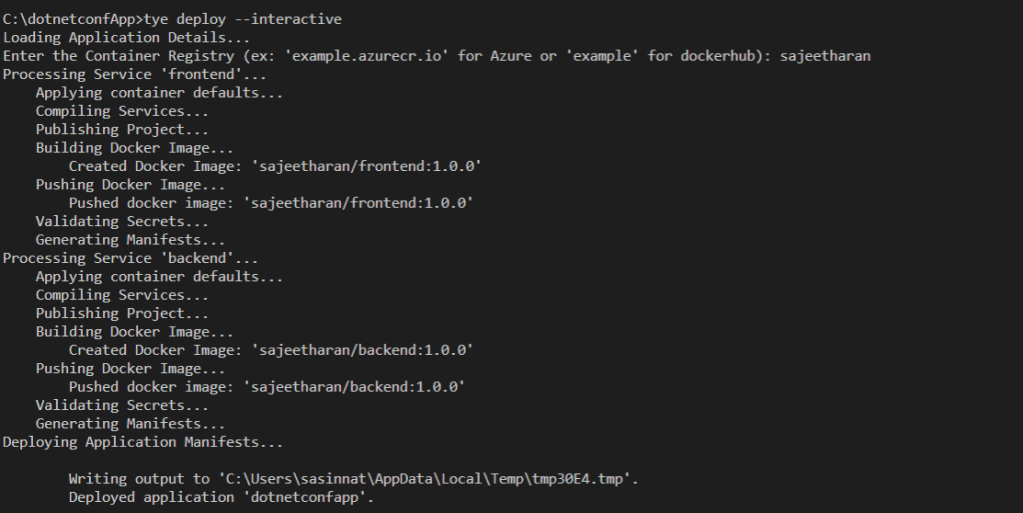
tye deploy --interactive

You will be prompted to enter the Container Registry (ex: 'example.azurecr.io' for Azure or 'example' for dockerhub) where the Kubernetes service is installed.

The deployment process has built the docker container and pushed repositories to my registry:

Test the application

If you are using VScode with the Kubernetes extension installed, once you authenticate to Azure using Azure extension, you will be able to navigate to the cluster and click on Workloads -> Pods -> Right Click Get

You can also explore the running pods from the Azure portal or using Cloudshell as well. You'll have two services in addition to the built-in kubernetes service.

You can visit the frontend application by port forwarding to the frontend service.

kubectl port-forward svc/frontend 5000:80

Now navigate to http://localhost:5000 to view the frontend application working on Kubernetes. You should see the list of weather forecasts just like when you were running locally.

Some important Notes:

⚠️ Currently tye does not provide a way to expose pods/services created to the public internet.

⚠️ Currently tye does not automatically enable TLS within the cluster, and so communication takes place over HTTP instead of HTTPS.

Conclusion:

In this post I explained how easy it is to get started with Project Tye and How to run a simple web application. You can certainly do the same adding an external dependency like SQL server or Redis cache without creating docker files manually. In short, Tye simplifies the multiple gestures for all the services within an application to a single command. Even though Project Tye is an experimental tool , you can watch out for more features around service discovery, diagnostics , observability, configuration and logging when it comes to building cloud native applications with Microservices. Certainly it's a great addition to the tooling what .Net ecosystem provides and hope you will consider exploring it more. Cheers!

· 5 min read

I just uninstalled Visual Studio 2017 and installed Visual Studio 2019 and the transition was very smooth. The installation just took 17 minutes and its faster than the time it took to install earlier versions. I managed to explore few features and it looks quite impressive. I decided to list down the top features that i noticed after exploring them.

(i) Live Share :

The top feature according to me and for almost every developers out there is Live Share. It allows multiple developers from different locations who are working remotely to collaborate and to jointly edit the same code in Visual Studio 2019 in real time.Almost 35 developers can work together on code at the same time and Live Share can be used with both VSCode and VisualStudio and you do not have to install any dependencies or libraries. Is not that cool?

Live sharing is straight forward with a single click of a button, simply requiring you to click on the Live Share button, hit 'Start collaboration session'.

1

The same can be done on VSCode as well. Amazing thing here is you get to see each and every action of other developer and what he/she is doing. There's also an audio channel so you can talk to those collaborating with you. With this real problem of collaboration is solved.

(ii) Smarter IntelliCode for AI:

One of the coolest thing that every developer like about Visual Studio is IntelliSense support. With Visual Studio 2019 IntelliCode's intelligent suggestions, with a wider range of AI-powered assistance for the auto complete and auto-formatting feature for AI developers and for even someone who wants to get started with AI.

(iii) New search and project templates

The new Visual Studio 2019 header search box, seen at the top of the screen, is designed to find anything in Visual Studio — including menu items, settings,
tool windows and more. The tool uses fuzzy search that return the correct information even if you make a typo(like google).

4.png

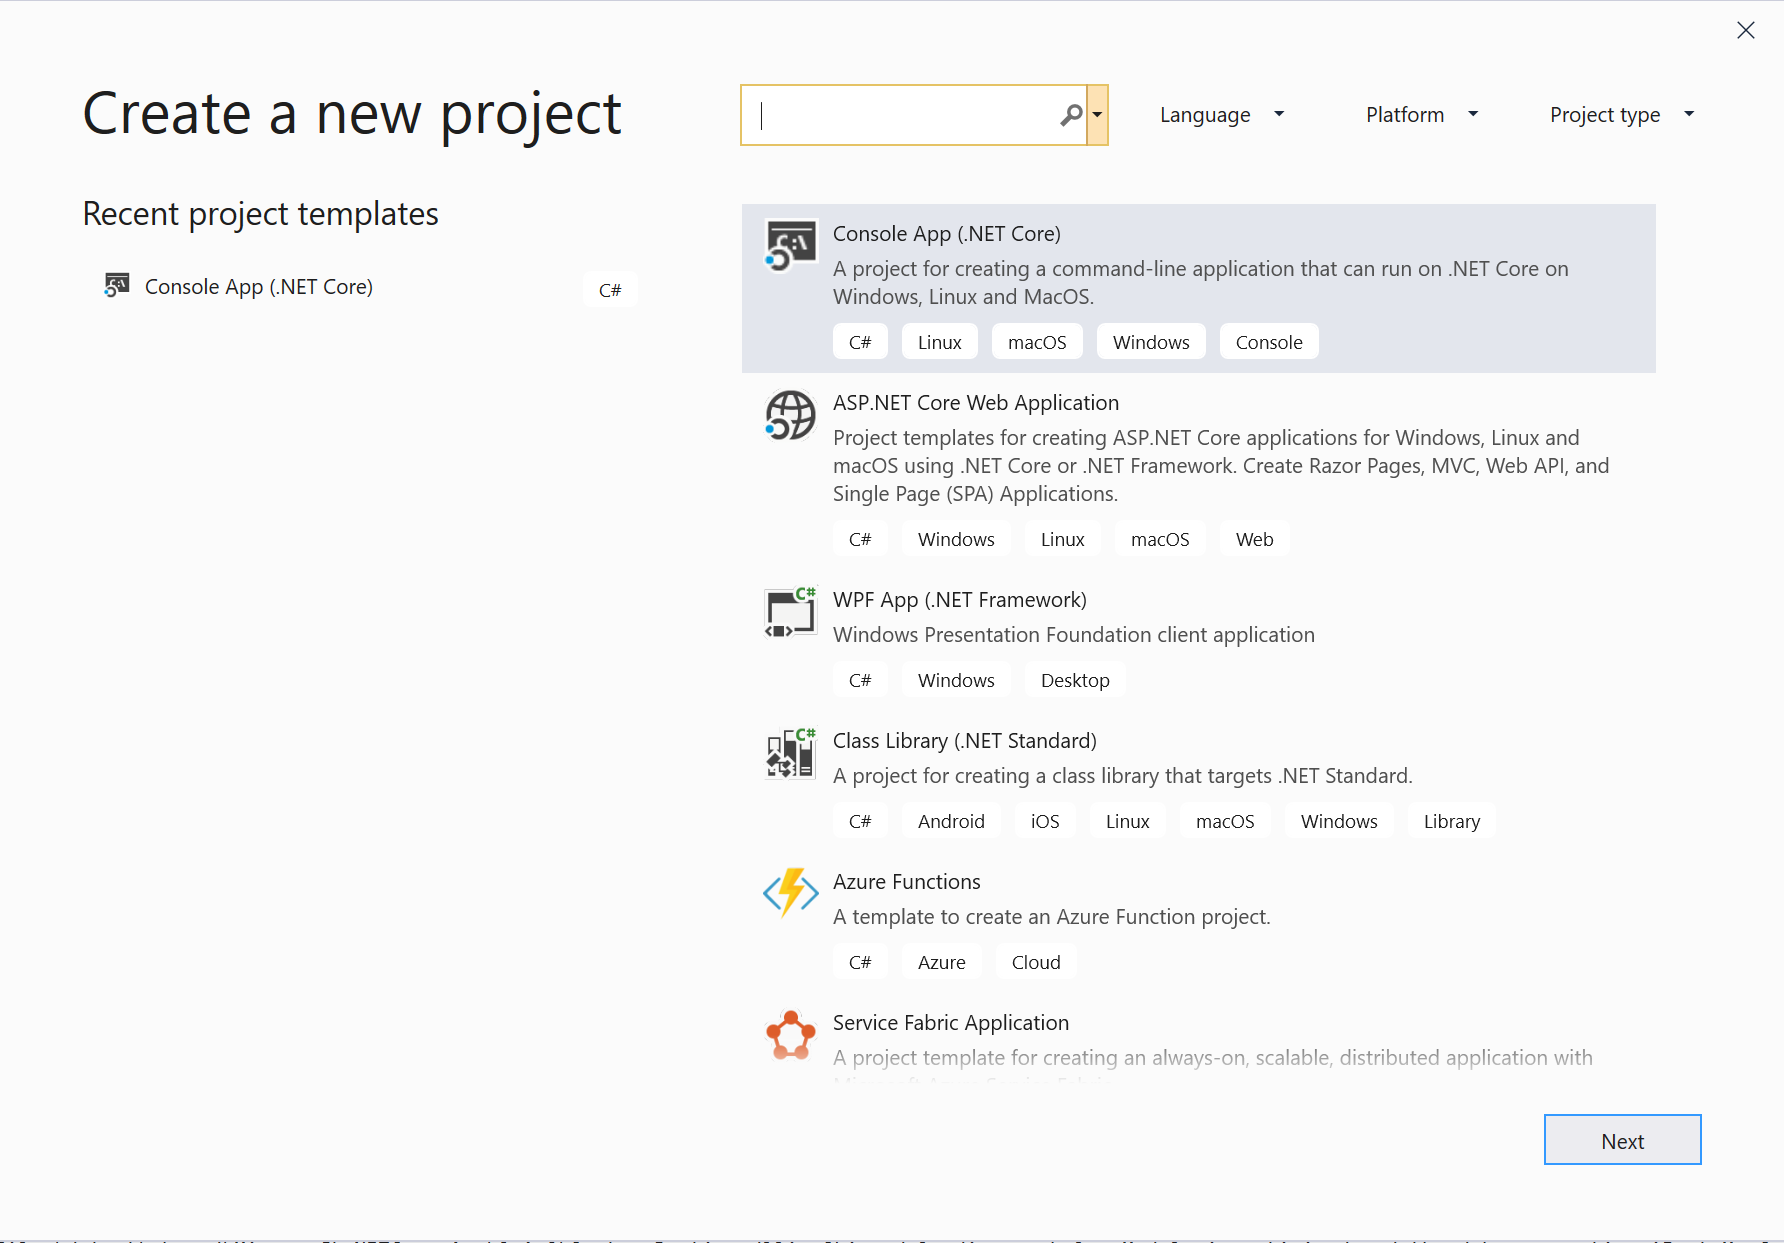
Additionally, fresh look of the new project window is really cool. You get to search for the project you want to create in the typehead, rather than having it as a treeview in the earlier versions of visual studio. Also you could add a filter on the window with the provided options as follows.

5

Microsoft is no more a typical Microsoft as you see above. you get to explore different types of languages with different platforms with Visual studio 2019.

(iv) Fresh Start window

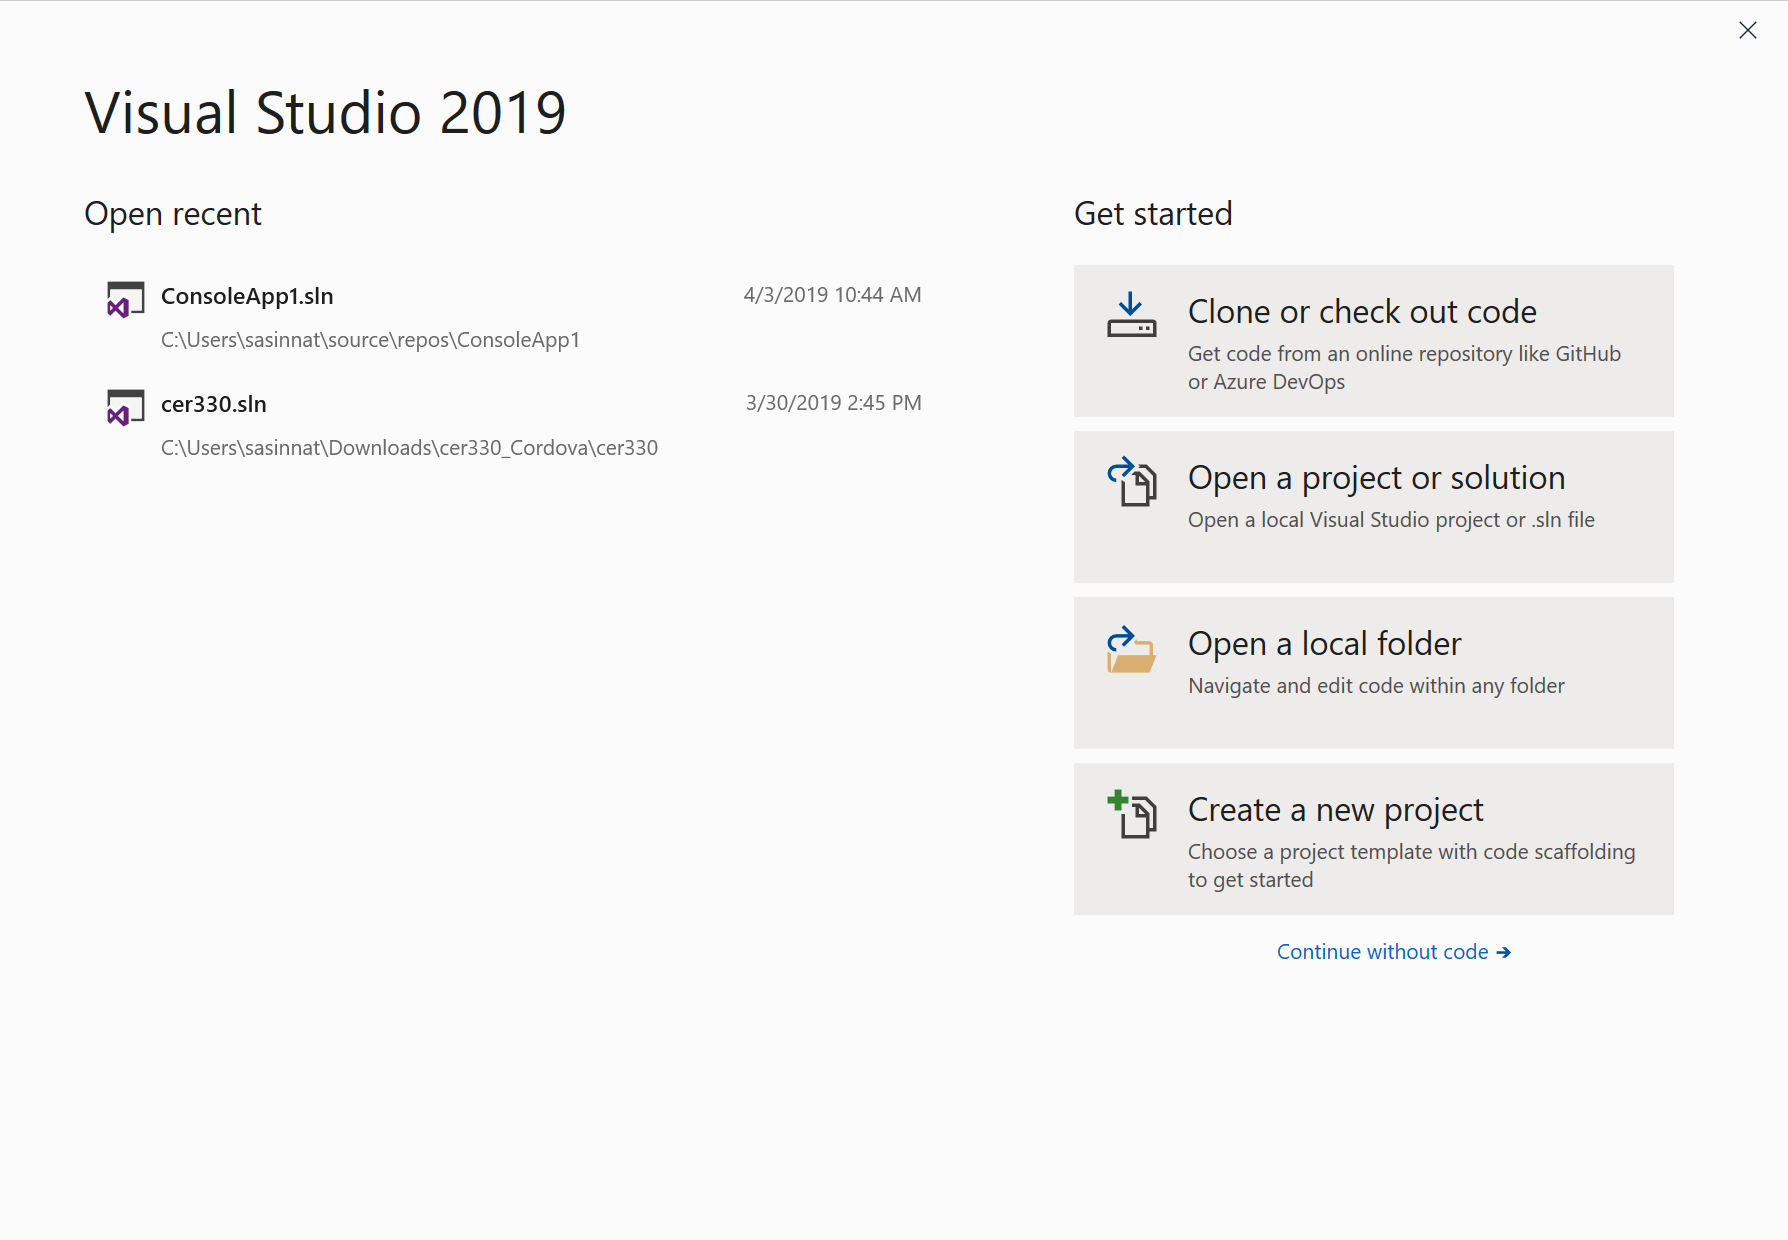
One other thing which i liked the most in visual studio is the ever fast loading screen of the start window. The team has used asynchronous way to load the previous/recent projects which loads in few seconds which is very faster compared to the previous versions of visual studio.

6.PNG

As you can see, you can now clone or check out a GitHub repository directly from the Start window with devops integration. This is really amazing.

(v) Developer friendliness

There are n number of cool things have been added to visual studio 2019 to make developers life easy which includes the following features,

DeCompiled resources :

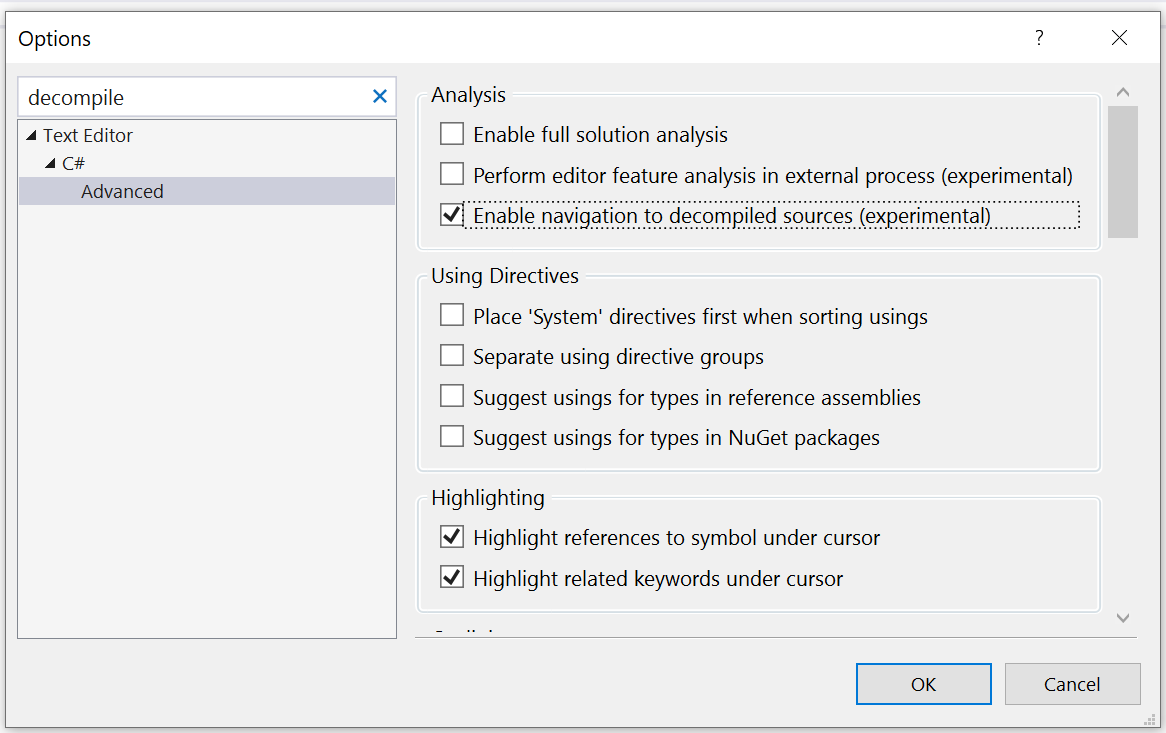
Now you can debug and step into the external packages you pull in from Nuget and anywhere! You can enable this by Go to the top menu bar. Select Tools > Options. Type “decompile” into the search bar. The Advanced section of Text Editor for C# will appear. Click on Advanced. Check the box that says Enable navigation to decompiled sources

7.PNG

Code CleanUp:

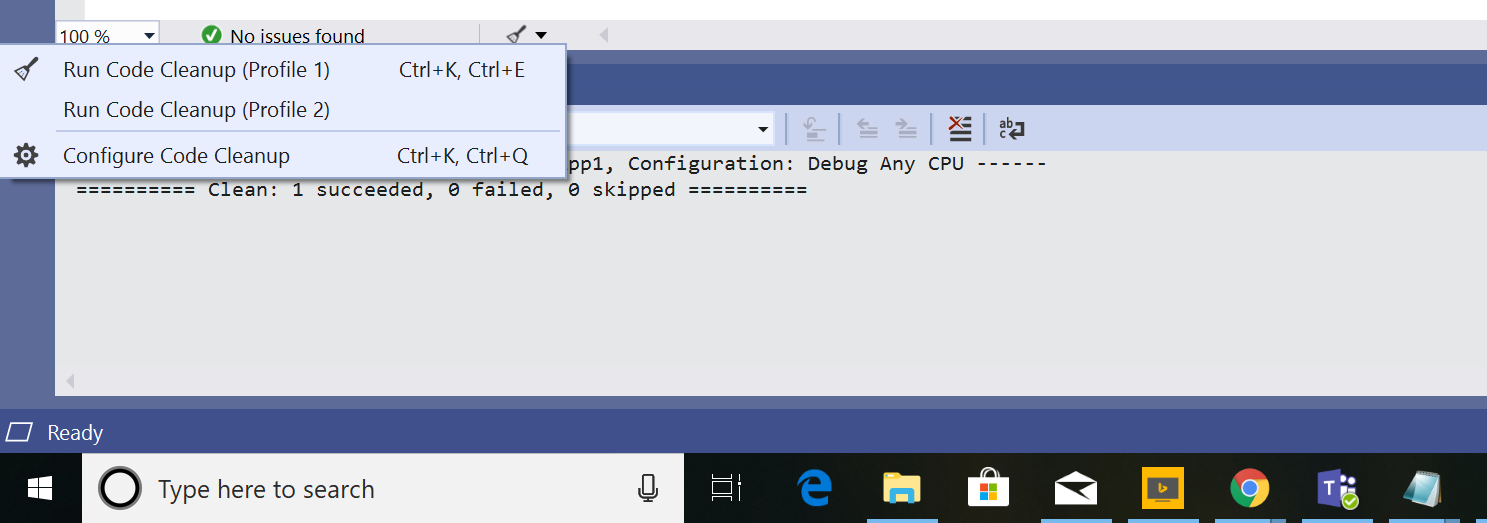
In VSCode and VS2017, Similar to Format Document, this new feature allows you to configure a predefined set of several rules to clean up in your code all at once. To set this up, follow the steps below.

Click the little broom icon at the bottom of the window. Select Configure Code Cleanup.

8.png

You do not have to manually do things anymore.

Solution Filter:

Are you working on the same project for longer years?. Ever had a monolithic solution with way too many projects inside of it? Does it all take a while to load? Now you can save the state of your solution with only the desired projects loaded up. I will not be explaining in detail, certainly this is supported in VS2019. This is a nice way to keep everything organized and loading fast when first opening up the solution in Visual Studio 2019. This can be really refreshing for any enterprise developer who is working on several projects.

But Wait, There’s More!

Interested in what else this new Visual Studio 2019 has to offer? You can get to know by checking out the Release Notes and FAQ.

I already started loving the new features, performance and collaboration improvements inside Visual Studio 2019. What about you? Don't wait just get started by downloading from here.

· 9 min read

The wait is over and Angular 7 is out, finally time has come to write about some tips to build fast angular application. In this blog i will share my experience with practices that you need to follow when you are starting a new project.

There are three primary things important when you are starting to build an application with Angular.

  1. Project Architecture
  2. Application Infrastructure
  3. Conventions,Formating and Tooling

CONVENTIONS,FORMATTING AND TOOLING

  • Always place the Angular application outside your backend code

Keep the application in its own repository so that can be deployed/version separately. It will also help in tooling. One key rule is to treat it as a real application.

  • Use VS Code for best experience

Encourage your team to switch to VS Code which has immense support for development with Angular. It has strong support for extensions used in Angular projects and well-regarded by front end community.

  • Use Tooling

It will kill all the disagreements. Use VSCode extensions such as TSLint, Angular Language ervice, Prettier, EditorConfig and SCSS intellisence.

  • Naming and Syntax Conventions

Always use Singular for Modules and Singular or Plural for  components/ services/ directives and pipes

  • Use Angular style commit messages

Examples :

'feat(notification.service): add display param'

'refactor(order models): rename couponId to couponCodeId

  • Use Codelyzer to do statistical analysis on Angular/Typescript code

It's a set of tslint rules for static code analysis of Angular TypeScript projects. If you are doing continuous deployment configure with your pipeline.

  • Follow consistent structure

If you are using Angular-Cli always follow the same pattern to generate the necessary files so that it will be consistent throughout the application.

  • Absolute path for ES Modules

Always use absolute path that would help in refactoring(moving files around or renaming) and very easy to organize files.

  • Do not use null and assign default values

In the templates always use safe navigation type operator which can help in preventing the following annoying errors "cannot read property "name" of undefined"

  • Choose Intelligent defaults and be consistent

'' for string - declare string with default value ""

0 for number - declare number with default value 0**[]** for arrays - declare array with default value []

  • Build small reusable components

Don't make your component code go more than 300 lines. Split the pieces that can be reused in a component and make them as a new component. The component should be made as dumb as possible. It should not dependent on any inputs or outputs provided, it should work simple. General rule of thumb is to make the last child in the component tree to be the dumbest. Reusable components reduce the duplication of code and you can make changes easily.

Components should deal only with the presentation logic Don't have logic other than the presentation logic. Components are designed for presentational purposes and only should focus on what the view should do. Business logics should be separated out to services/methods from the presentation/view logic.

  • Use trackBy in ngFor Loops

DOM manipulations are always expensive, immutable practices always generate a new collection which will result in bad performance. When your array changes, Angular will be rendering the whole DOM tree, when you use trackBy, it will know which elements has changed and will make changes only to those particular elements.

  • const vs let

Make use of let and const wherever its appropriate. It will help a lot in identifying issues when a value is reassigned to a constant accidentally with a compile error and it improves the readability of the code.

  • Pipable Operators

With Angular version above 5.5 , you can use pipeable operators which are tree-shakable (only the code need to execute will be included when they are imported) and it will be easy to identify unused code in the component files.

  • Subscribe in template

Rather than subscribe in service or async popes unsubscribe themself automatically it will make the code simpler by stopping the need to manually manage subscriptions which could cause a memory leak. When using subscribe, the risks can be eliminated by using a lint rule to detect unsubscribed observables.

  • Clean up subscriptions

When you subscribe in the component to observables, make sure you unsubscribe from them completely with operators like take,takeUntil,Unsubscribe etc

  • Use appropriate Operators

switchMap: when you want to ignore the previous emissions when there is a new emission mergeMap: when you want to concurrently handle all the emissions

concatMap: when you want to handle the emissions one after the other as they are emitted

exhaustMap: when you want to cancel all the new emissions while processing a previous emisssion

  • Stop using any:type everything in the code

Always declare variables or constants with a type other than any. This is the advantage that you have with Typescript when you have good typings in your application which makes refactoring easier and safe and also avoid unintented issues.

  • Use lint rules as you need

TSLINT has various options built-in already like no-any, no-magic-numbers, no-console, etc that you can configure in your tslint.json to enforce certain rules in your code base

  • Dont Repeat Yourself

One of the common mistake that i did as a developer was copy paste the same code in all components. Do not repeat or have the same code in different places in the code base. Extract the repeating code and make them as a generic method which could be used in different components.

  • Avoid Logic in component templates

Place the logic in the component file rather than on the template such as && condition since it cannot be possible to unit test also it is prone to more bugs when changing template code

APPLICATION INFRASTRUCTURE

  • Lazy load everything

When you are building application with large number of modules always do lazy loading which could improve your application performance by large margin. Angular CLI makes this easy and helps break up your app into logical bundles. With Lazy loading users only pay for what they want. For example, Sensitive (admin only) code will not be downloaded for users that don't have access.

  • Analyze your bundle

If you are using any bundling mechanism always analyze the size of the bundle generated. You can use webpack-bundle-analyzer for example and you can improve the performance there on.

Install source map explorer

  • npm install -g source-map-explorer

Build with source map

  • ng build --prod -sm

Inspect your bundle

  • source-map-explorer dist/vendor*.js
  • Use Debug.Service.ts to track errors

It is always good to have a common debug service to assist with the development. This service could replace the calls to console.log.  You can use Visual studio extension codelensto track down the calls with console.log.This service can be toggled at run time with local storage value and needs to be switched off with production builds.

  • RXJS Operators

When using it becomes handy to handle so many operations with Rxjs operators. Always remember to include/import only the things you need. Also make sure to add noUnusedLocals in the tsconfig.

  • Use ES Modules for helper functions

With ES Modules it is really easy to import only available when thy are needed.

  • Keep environment values in environment files

It becomes really easy and very helpful to manage environment values when it comes to continuous improvement and continuous deployment.

  • Avoid Base classes / Inheritance

Even though Angular is build with Typescript, many of the developers tend to use services from a base class. This should be only if necessary. It will result in restricting the flexibility as when your app grows and use cases changes.

Also create a utility.services.ts to contain all the base helper services. For ex: debug.service.ts , notification.service.ts  session.service.ts can be placed within utility.service.ts which helps in preventing app wide changes to base constructor.

  • Use Obseravable/State Management Patterns

It is really important to follow Redux patern (RxJS) to have a better state management in application. Also in components use ngUnsubscribefor complex Observable management in Components. Use shareReplayoperator and/or async pipe for simpler cases

  • More things to consider on Application

Always consider browser caching and application versioning. Test the update process and the experience across browsers. Always figure out user experience and continuously work on it. Use global error handler to store report errors to API and do not access Document or Window Objects manually.

PROJECT ARCHITECTURE

  • One of the primary thing that you need to consider before starting a project is the architecture on how to build flexible,simple,fast application. It needs lot of planning and consistency to get the basement correct. Building things is really hard enough. When it comes to building Angular application i would recommend to follow the following Guidelines
  • One best place to start with good practices is by following the recommended style guide. You need to take what works for your team and skip what does not work. Also try to learn from others mistakes or any other projects that you've already worked with.
  • While designing module,s it is really important to know about how to structure your modules and what should go under Feature/Core/Shared Modules.

  • Keep a flat file structure as long as possible which means you should not add hierarchy with less than 20 files and you can always move files as the app grows larger.
  • Maintain your application version using the package.json which could be embedded in your app.
  • Use package management tooling to guarantee reproducible dev environment and builds.
  • Set custom host for the application by changing the default url.
  • Use proxies if you are integrating with an API.
  • Lets look at what you can do while implementing the above architecture in your application

Follow this repository in order to get started

The above are the some of the most important practices that you need to follow when you are starting a  new project with Angular. Hope this helps someone out there.
· 4 min read

Recently I started experimenting with Azure's CosmosDB and developed few applications using the same. To start with it this blog will help all the Azure/CosmosDB developers out there to easily setup with visual studio code. I will be sharing how to connect to Azure CosmosDB without using the portal in local machine.

To start with it, You should have visual studio code installed on your machine. If not download it from here.

We need to setup an extension with visual studio code as a initial step. Azure CosmosDB extension for visual studio code gives developers set of cool commands to work with CosmosDB. With the help of Azure CosmosDB extension developers can easily do the actions which could be done on the azure portal such as Create,delete,modify databases,Collections,views and documents. Also the hierarchical representation will provide a better way to understand the structure of database.

Step 1:

To start with, you must install the Azure CosmosDB from the market place. So, search for Azure Cosmos DB extension in the market place and click on install

Go to View - > Extensions or press Ctrl + Shift + X

Once the extension is installed, you can find Azure CosmosDB in explore section of visual studio code.

Step 2:

To explore the different types of commands with Azure Cosmos DB, open show all command palate and search for Cosmos. It will list down a different set of commands that you can play with,

Go to View - > Extensions or press Ctrl + Shift + P              

Step 3:

Now the extension is installed successfully. Lets see how to connect to Azure CosmosDB  in local machine. Move back to Azure CosmosDB extension section in the explorer panel. Sign in to Azure account to view the CosmosDB accounts inside the visual studio code alternatively you can select “Attach Database Account”

Select the specific Database Account API, in this case it is DocumentDB and enter the connection string copied from the portal

To get the connection string from the Azure Portal, navigate to the respective CosmosDB  Resource, and from the left side panel Settings –> Keys -> Connection String Copy the Primary Connection String.

Now you can see the database displayed with the account provided in the azure CosmosDB explorer pane.

That’s it Now you can Add, Modify Database, collection, and documents within Visual Studio Code. Play around with all the commands and features of the extension.

Step 4: Installing Azure Cosmos DB Emulator

Azure Cosmos DB Emulator provides a local environment that emulates the Azure CosmosDB service for your development. With the Azure Cosmos DB Emulator, you can develop and test your application locally, without creating an Azure subscription and without internet connection. With the extension we installed already you can connect with Local Emulator as well.

Download Azure CosmosDB emulator:

You can download emulator from Microsoft Download Center.

  1. Extract setup and run emulator exe.
  2. Once you completed the setup, type Azure Cosmos DB Emulator in Start menu.

Start the local Azure CosmosDB Emulator, and make sure it’s running.

Verify the access by exploring the local emulator on this address.

https://localhost:8081/_explorer/index.html and you should see a screen as follows.

Step 5:

Once you verify your Azure Cosmos DB Emulator is running, you can go back to Visual Studio Code and try to attach the emulator by selecting Connected with Azure Cosmos DB Emulator option

After 1 or 2 minutes, you can find your local Cosmos DB data also mapped in Visual Studio Code.

As a developer I found this extension is very powerful and if you are developing Azure based solution with Visual Studio code, you must start exploring this.

Start building application with cosmosdb today 😊 Cheers!