
3 posts tagged with "data"

View All Tags

· 5 min read

Traditional Architecture :

In a traditional Application with the normal approach, transactional use-cases usually involve persisting data in a few SQL tables or in a NOSQL database. When the changes are performed on the object the database is updated to match the new state.

The traditional approach works well in case if you do not need to know the changes that object has gone through, but in modern systems customers always comes up with a requirement to get the log of changes that particular entity has gone through. With the traditional approach, there is no way of knowing what the user had in the object before changing it, or at which point of time the contents changed. We can still solve this with the traditional way by storing the extra information about the modifications but the solution becomes more complex.

For example in traditional approach,

https://gist.github.com/sajeetharan/2d9921571c67f7038ec5a4053882b85f

Which will create an entry for each insert in the SQL database as follows,

2019-02-03_13-10-23

The current state is saved in a relational database. We load the object, change it and save  it back.

EventSourcing Architecture :

In the eventsourcing solution, we look at the problem as a sequence of events that occur and save the occurrence of events as it is. The events contains all details about what actually happened at particular point of time. These are historical information and once it is saved it should not be modified.

https://gist.github.com/sajeetharan/825ec83fd780b7670146649bf6d4a0ce

All events for a certain product are stored. Their data and sequence define the current state of the product. Event is the easiest way to remember what happened at a certain time. Event sourcing comes with an advantage of having audit trail by itself and to get full understanding of what the system is doing.

Event Sourcing Architecture with AzureCosmosdb and EventHub

To implement event sourcing in your application, Microsoft azure provides the following services to  full fledged solution and we will discuss in this blog.

Lets look at the diagram below,

NEW_LEGAL

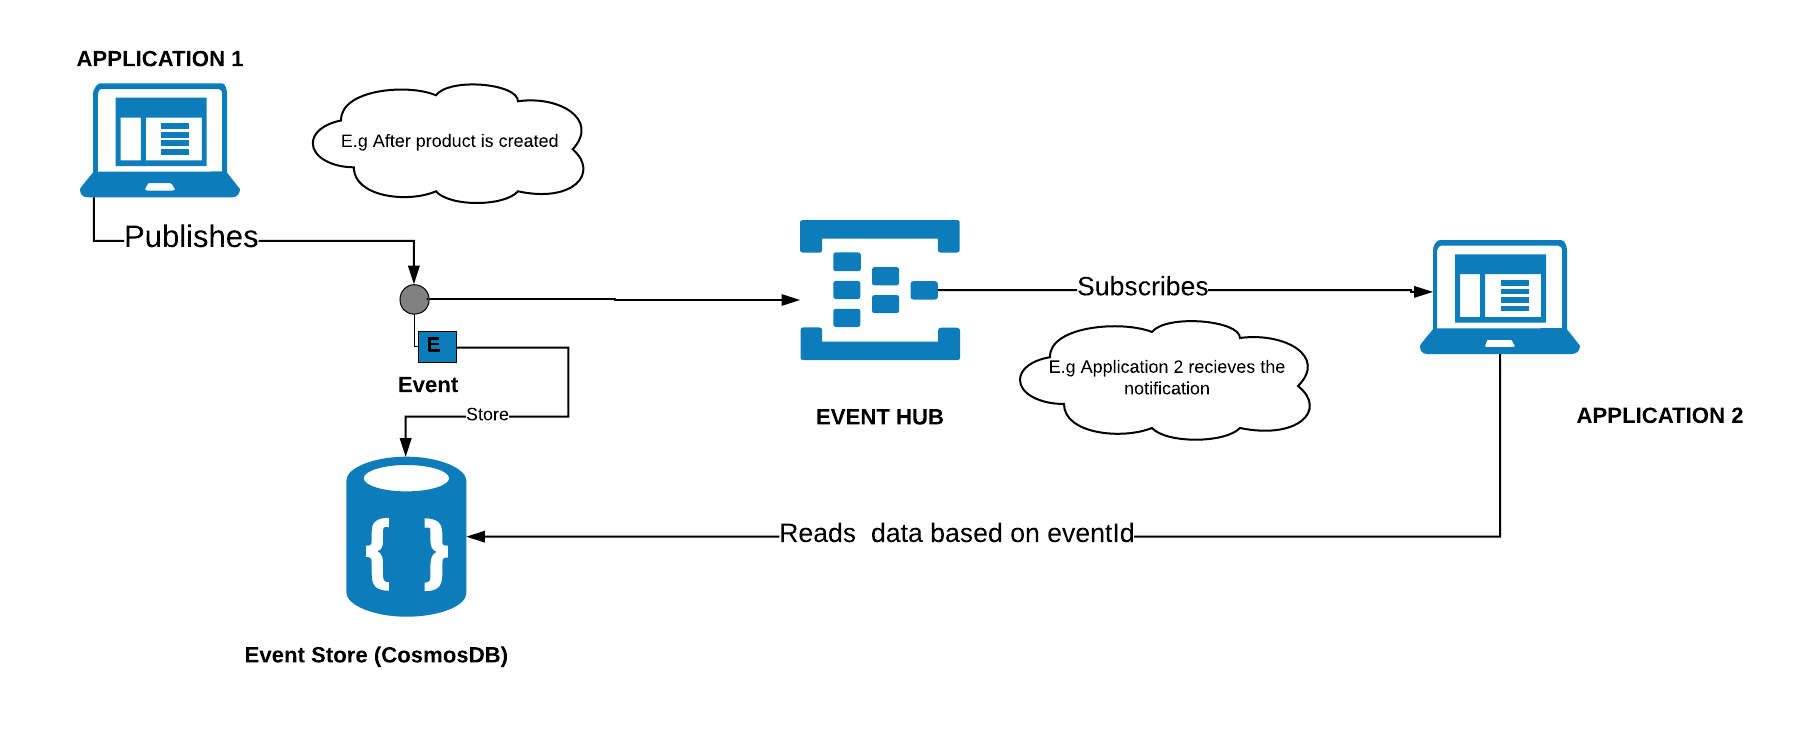
Application 1 stores the data in the traditional database and your customer needs the changes that has been done on the product. The above architecture will easily fulfill the requirement with the event sourcing.

Components involved in the architecture as follows,

Azure EventHub

Azure Eventhub is a managed service to receive and process millions of events per second. It is intended to handle event based messaging in huge scale. This could be used in an product if you have devices application publishing events and send them to eventhub. It will create a stream of all these events which can be read by different applications in different ways. Eventhub provides interfaces such as AMQP and HTTP to make it easy to send messages to it. In Eventhub we can define consumer groups which lets us to read stream of events. We can decide on consumer group based on the number of receivers(applications)

CosmosDB

Azure Cosmos DB is a globally-distributed, multi-model database as a service build for low latency and elastic scalability.  It supports the following options to store the data and it is highly available from anywhere in the world,

  • Key-value
  • Column-family
  • Document: MONGO or SQL
  • Graph

I will be not going in detail as there are enough blogs to get started with CosmosDB. In the above architecture there will be millions of events created after each update hence we need to store them in the cosmosdb with the state of the object. This way brings a lot of benefits. First, the event store with cosmosdb becomes your canonical source of truth that describes the updates applied to your domain in an unbiased form.

Implementation:

Application 1:

Whenever user updates an object in the application1, there will be notification message sent to the EventHub with an ID (unique id for each message) that something has happened on application. We could make use of epoch timestamp with 8 digits to make sure it is a unique one. A sample payload would look like,

{"MessageId": 1547632386819}

Note:  As Eventhub can have a message of maximum size 256k it is always better to have minimum size of message.

Once the notification is sent, the state of the object is stored in the eventstore(cosmosdb).

Application 2:

Application 2 will have an EventHub receiver which runs on the background which will subscribe to the EventHub and get the latest message. Once the id is retrieved by the receiver, it can request the eventstore with the id and get all the changes prior to the id as follows,

https://gist.github.com/sajeetharan/c34965a606c8afff9d02f2a3a17522bf

which will create the documents in Cosmosdb as,

2019-02-03_16-55-58

With the above approach ensures that all changes to product are stored as sequence of events. When we look at broader picture, it also ensures that all changes to application state are stored.

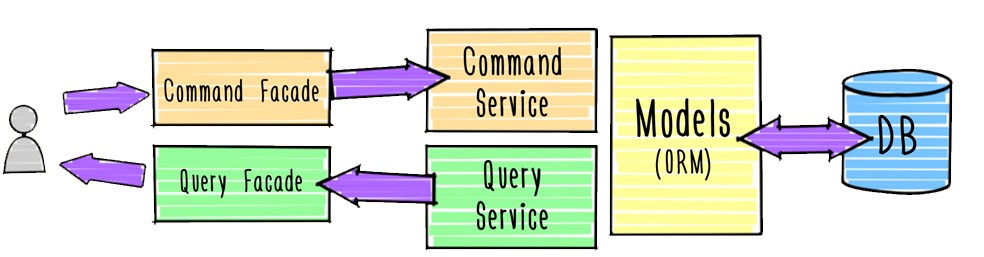
This is the simple architecture diagram to implement event sourcing in your application. One of the very good pattern to implement event sourcing is by using CQRS(Command Query Responsibility Segregation).

test

Lets look at the etail implementation with the code in the upcoming blogs. Hope this will help someone out there to implement event sourcing in your application if you are using Azure platform.

· 4 min read

Recently I started experimenting with Azure's CosmosDB and developed few applications using the same. To start with it this blog will help all the Azure/CosmosDB developers out there to easily setup with visual studio code. I will be sharing how to connect to Azure CosmosDB without using the portal in local machine.

To start with it, You should have visual studio code installed on your machine. If not download it from here.

We need to setup an extension with visual studio code as a initial step. Azure CosmosDB extension for visual studio code gives developers set of cool commands to work with CosmosDB. With the help of Azure CosmosDB extension developers can easily do the actions which could be done on the azure portal such as Create,delete,modify databases,Collections,views and documents. Also the hierarchical representation will provide a better way to understand the structure of database.

Step 1:

To start with, you must install the Azure CosmosDB from the market place. So, search for Azure Cosmos DB extension in the market place and click on install

Go to View - > Extensions or press Ctrl + Shift + X

Once the extension is installed, you can find Azure CosmosDB in explore section of visual studio code.

Step 2:

To explore the different types of commands with Azure Cosmos DB, open show all command palate and search for Cosmos. It will list down a different set of commands that you can play with,

Go to View - > Extensions or press Ctrl + Shift + P              

Step 3:

Now the extension is installed successfully. Lets see how to connect to Azure CosmosDB  in local machine. Move back to Azure CosmosDB extension section in the explorer panel. Sign in to Azure account to view the CosmosDB accounts inside the visual studio code alternatively you can select “Attach Database Account”

Select the specific Database Account API, in this case it is DocumentDB and enter the connection string copied from the portal

To get the connection string from the Azure Portal, navigate to the respective CosmosDB  Resource, and from the left side panel Settings –> Keys -> Connection String Copy the Primary Connection String.

Now you can see the database displayed with the account provided in the azure CosmosDB explorer pane.

That’s it Now you can Add, Modify Database, collection, and documents within Visual Studio Code. Play around with all the commands and features of the extension.

Step 4: Installing Azure Cosmos DB Emulator

Azure Cosmos DB Emulator provides a local environment that emulates the Azure CosmosDB service for your development. With the Azure Cosmos DB Emulator, you can develop and test your application locally, without creating an Azure subscription and without internet connection. With the extension we installed already you can connect with Local Emulator as well.

Download Azure CosmosDB emulator:

You can download emulator from Microsoft Download Center.

  1. Extract setup and run emulator exe.
  2. Once you completed the setup, type Azure Cosmos DB Emulator in Start menu.

Start the local Azure CosmosDB Emulator, and make sure it’s running.

Verify the access by exploring the local emulator on this address.

https://localhost:8081/_explorer/index.html and you should see a screen as follows.

Step 5:

Once you verify your Azure Cosmos DB Emulator is running, you can go back to Visual Studio Code and try to attach the emulator by selecting Connected with Azure Cosmos DB Emulator option

After 1 or 2 minutes, you can find your local Cosmos DB data also mapped in Visual Studio Code.

As a developer I found this extension is very powerful and if you are developing Azure based solution with Visual Studio code, you must start exploring this.

Start building application with cosmosdb today 😊 Cheers!

· 3 min read

It's been exactly 2 years since i started to learn Angular and it's sad that i dint write even a single blog on the same. Finally decided to start a series on the same topic. AngularJS is a JavaScript MVC Framework that integrates two-way data binding, web services, and build web components. There are enough number of blogs and tutorials to follow on the same.

The current product which i am working is a data visualization tool which is built on AngularJS  and has many visualization  been integrated with D3.js.

In this blog, will be describing how to build a directive using d3.js and angular.

Directive is very powerful feature of AngularJS. It easily wired up with controller, html and do the DOM manipulations.

Building a Decomposition Force directed d3 directive:

 App.directive('forceGraph', function() {  
return {
restrict: 'EA',
transclude: true,
scope: {
chartData: '='
},
controller: 'hierarchySummaryCtrl',
link: function(scope, elem, attrs) {
var svg;
elem.bind("onmouseover", function(event) {
scope.svg = svg;
console.log("hierarchy svg", scope.svg);
scope.$apply();
});
scope.$watch('chartData', function(newValue, oldValue) {
if (newValue) {
scope.draw(newValue.data,newValue.id);
}
});
scope.draw = function(rootData,divID) {
var width = 400,
height = 320,
root;
var force = d3.layout.force()
.linkDistance(80)
.charge(-120)
.gravity(.05)
.size([width, height])
.on("tick", tick);
var divid = "#" + divID;
d3.select(divid).selectAll("*").remove();
svg = d3.select(divid)
.append("svg").attr("viewBox", "0 0 400 400")
.attr("width", '100%')
.attr("height", '100%');
var link = svg.selectAll(".link"),
node = svg.selectAll(".node");
root = rootData;
update();
console.log(svg);
scope.setSvg(svg[0][0].innerHTML);
function update() {
console.log(nodes)
var nodes = flatten(root),
links = d3.layout.tree().links(nodes);
var nodes = flatten(rootData),
links = d3.layout.tree().links(nodes);
force.nodes(nodes)
.links(links)
.start();
// Update links.
link = link.data(links, function(d) {
return d.target.id;
});
link.exit().remove();
link.enter().insert("line", ".node")
.attr("class", "link");
// Update nodes.
node = node.data(nodes, function(d) {
return d.id;
});
node.exit().remove();
var nodeEnter = node.enter().append("g")
.attr("class", "node")
.on("click", click)
.call(force.drag);
nodeEnter.append("circle")
.attr("r", function(d) {
return Math.sqrt(d.size) / 5 || 4.5;
});
nodeEnter.append("text")
.attr("dy", ".25em")
.text(function(d) {
return d.name + ", Count: " + d.size;
});
node.select("circle")
.style("fill", color);
}
function tick() {
link.attr("x1", function(d) {
return d.source.x;
})
.attr("y1", function(d) {
return d.source.y;
})
.attr("x2", function(d) {
return d.target.x;
})
.attr("y2", function(d) {
return d.target.y;
});
node.attr("transform", function(d) {
return "translate(" + d.x + "," + d.y + ")";
});
}
function color(d) {
return d._children ? "#FFEB3B" // collapsed package
:
d.children ? "#F44336" // expanded package
:
"#D32F2F"; // leaf node
}
// Toggle children on click.
function click(d) {
if (d3.event.defaultPrevented) return; // ignore drag
if (d.children) {
d._children = d.children;
d.children = null;
} else {
d.children = d._children;
d._children = null;
}
update();
}
// Returns a list of all nodes under the root.
function flatten(root) {
var nodes = [],
i = 0;
function recurse(node) {
if (node.children) node.children.forEach(recurse);
if (!node.id) node.id = ++i;
nodes.push(node);
}
recurse(root);
return nodes;
}
};
}
};
});

My Repository With the sample