Back in January, I started building skills for AI coding agents — domain-specific guidance that helps agents like GitHub Copilot, Claude, and others produce better code in areas they'd otherwise struggle with. My domain happened to be Azure Cosmos DB, but the lessons apply to anyone writing skills for any technology.
Six months later, what I learned about how to write for AI agents turned out to be far more interesting than the domain knowledge itself.
I recently had the incredible opportunity to join Scott Hanselman on the Azure Developers Show to talk about something I've been deeply passionate about — turning coding agents into Azure Cosmos DB experts with the Agent Kit.
This session was special to me, not just because of the topic, but because of the person I got to share the stage with.
I'm excited to announce the release of Angular Agent Kit - a collection of AI coding agent skills designed specifically for Angular developers. This toolkit extends the capabilities of AI coding assistants like GitHub Copilot, Claude Code, Cursor, and Gemini CLI with deep Angular expertise.
Angular Agent Kit is a collection of skills that follow the Agent Skills specification. These skills are packaged instructions and scripts that extend AI agent capabilities, enabling them to provide expert-level guidance on Angular development.
While AI coding assistants are powerful, they sometimes lack the specialized Angular knowledge needed to provide optimal recommendations. Angular Agent Kit bridges this gap.
As someone who works extensively with Angular and AI development tools, I noticed a gap between generic AI coding assistance and Angular-specific expertise. The rules in this kit are distilled from years of Angular development experience, official Angular documentation, and community best practices.
Contributions are welcome! If you have Angular best practices that should be included, or improvements to existing rules, please check out the CONTRIBUTING.md file for guidelines.
I'm thrilled to introduce Angular Visual Storybook - an interactive learning resource that transforms complex Angular concepts into easy-to-understand visual infographics. Whether you're a beginner starting your Angular journey or an experienced developer looking for quick reference guides, this comprehensive collection has something for everyone.
Angular Visual Storybook is a static website that provides a comprehensive visual guide to Angular development through 26 beautifully designed infographics. It's built with pure HTML5, CSS3, and JavaScript - no frameworks required! The project is perfect for visual learners and developers who prefer a structured, comprehensive approach to learning Angular.
# Clone the repository
git clone https://github.com/sajeetharan/angular-graphic.git
cd angular-graphic

# Using Python
python -m http.server 8000

# Or using Node.js
npx http-server

# Then visit http://localhost:8000
In last November 2021, Cosmos DB team has announced support for patching documents with SQL API which was the top requested features in the user voice. This is a useful and long-awaited feature among users. Prior to this announcement the only way to change the stored document was to completely replace it. Users will be able to perform Partial updates with all the Cosmos DB SDKs ( JAVA, . Net , JS ) and also Cosmos DB REST API.
Use Case:
Let's look at a scenario of a dashboard application where user need to display the System and it's features. User has decided to use Cosmos DB as a database to store the data of a System and it's features. A sample document would look as follows.
You can refer my previous blog on How to setup Rest Operations with Postman. Once you've configured the setup with the underlying database and container. Here we need to insert a new Object within the Features array, certainly we can leverage the Single Add Operation. And the sample request Body will be like,
Patch Url : [https://account/dbs/dbName/colls/Patch/docs/id of the document](https://account/dbs/dbName/colls/Patch/docs/id of the document) and the header "x-ms-documentdb-partitionkey" is set to the partition key value which is the "ApplicationId" "App-01". And we need to specify the path as "/Features/-"
Add new JSON object under Features Array
On a successful response, in the backend you will see that a new Object that is shown above will be added to the Features array.
Patch Scenario 2: Update the Application Description in the root Object to "Testing Patch with REST API"
Patch Scenario 3: Update only a specific Feature object in array for a given Features parent object like FeatureName . Let's assume if we need to update the Object at the 0th index and then update the First Features Object,
Patch Scenario 4 : Perform all the above operations as a single request
Since Partial document update supports up to 10 operations in a single request, all the above operations can be merged. User needs to combine all the operations as one as below,
As a Developer, If you have a requirement to have list of work items which are approved to be displayed in a Grid View. You would tend to query for all approved work items and display them in the grid, one point to note is that since the amount of approved work items might grow over time, hence loading the data would get slower and slower due to having to download more items. In general, this is where pagination comes into play in front end development, which means you don't need to necessarily download all records, just download a page of records at a time. If you are using Cosmos DB as a backend, this feature is supported out of the box via the use of Continuation Token. Cosmos DB SDKs utilize a continuation strategy when managing the results returned from the queries.
One of the frequent questions I have come across on forums is on How to Implement Pagination with @azure/cosmos SDK with JavaScript. With this post , I wanted to keep it simple and add a very minimal quick start on how to implementation pagination with .js SDK. You can follow the steps given in the repository.
Create a CosmosDB Account of type SQL API and database named 'javascript' and collection named 'products'
Insert the data 'ProductsData.json' to CosmosDB using the Data Migration Tool
execute.ts is the start point of the application which invokes the CallPagination method defined in the pagination.service.ts.
import dotenv from "dotenv"
import { Helper } from './helper';
import PaginationService from './pagination.service';

dotenv.config()

const cosmosDB = new Helper();
const pageMod = new PaginationService(cosmosDB);


const callPagination = async () => {
    const result = await pageMod.executeSample(2, "")
    console.log({
        data: result.result,
        dataLength: result.result.length,
        hasMoreResult: result.hasMoreResults,
        contToken: result.continuationToken
    });
};

callPagination();
Implementation is really simple as we are passing a simple query that has more than 40 records and we set the pageLimit as 5 which is the max number of items to be returned in single call.
Azure Data Lake is a big data solution which allows organizations to ingest multiple data sets covering structured, unstructured, and semi-structured data into an infinitely scalable data lake enabling storage, processing, and analytics. It enables users to build their own customized analytical platform to fit any analytical requirements in terms of volume, speed, and quality.
Cloud Scale Analytics with Azure Data Services: Build modern data warehouses on Microsoft Azure
In the context of above, the book "Cloud Scale Analytics with Azure Data Services" book is your guide to learning all the features and capabilities of Azure data services for storing, processing, and analyzing data (structured, unstructured, and semi-structured) of any size. You will explore key techniques for ingesting and storing data and perform batch, streaming, and interactive analytics
The book also shows you how to overcome various challenges and complexities relating to productivity and scaling. Next, you will be able to develop and run massive data workloads to perform different actions. Using a cloud based big data-modern data warehouse–analytics setup, you will also be able to build secure, scalable data estates for enterprises. Finally, you will not only learn how to develop a data warehouse but also understand how to create enterprise-grade security and auditing big data programs.
By the end of this Azure book, you will have learned how to develop a powerful and efficient analytical platform to meet enterprise needs.
In this blog post you will learn about the Azure Cosmos DB SQL API queries and How to get started with Cosmos DB SQL API. I recently published a video on youtube and decided to have it available in blog as well. Azure Cosmos DB is a fully managed NoSQL multi model database service provided by Azure which is highly available, globally distributed, and responds back within the minimum latency in single digit millisecond. It's becoming the preferred database for developers on Azure to build modern day applications.
You can access the slides here and repository for the queries here.
Azure supports multiple data models including documents, key-value, graph, and column-family with multi models APIs such as SQL,Mongo,Cassandra,Gremlin and Table. SQL APi is one of them and its oldest offerings on cosmos db. SQL API is also known as Core API which means that any new feature which is rolled out to cosmos db usually first available in SQL API accounts. It supports for querying the items using the Structured query language Syntax which provides a way to query JSON objects.
Also cosmos db SQL API queries can be done using any SDK we provide with Net, Java, Node and python.
Azure Cosmos DB SQL API
Azure Cosmos DB is truly schema-free. Whenever you store data, it provides automatic indexing of JSON documents without requiring explicit schema or creation of secondary indexes.
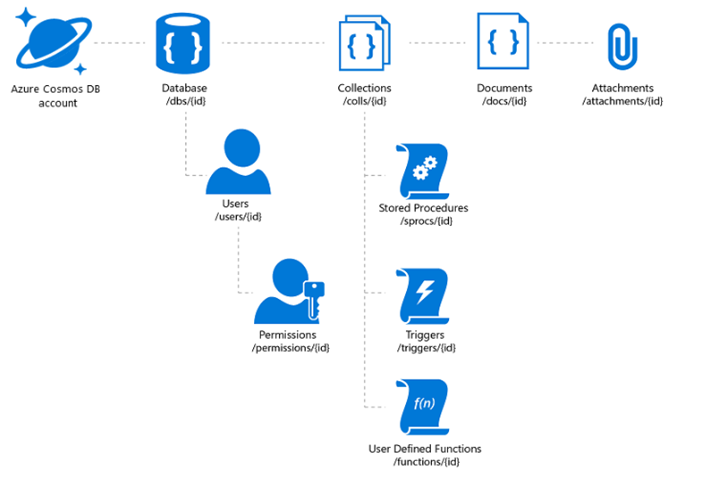
The Azure Cosmos DB database account is a unique name space that gives you access to Azure Cosmos DB.
A database account consists of a set of databases, each containing multiple collections, each of which can contain stored procedures, triggers, UDFs, documents, and related attachments.
With the Cosmos DB SQL API , you can create documents using a variety of different tools :
Portal: The Data Explorer is a tool embedded within the Azure Cosmos DB blade in the Azure Portal that allows you to view, modify and add documents to your Cosmos DB API collections. Within the explorer, you can upload one or more JSON documents directly into a specific database or collection which i will be showing in a bit
SDK: Cosmos DB database service that was released prior to Azure Cosmos DB featured a variety of SDKs available across many languages
REST API : As we mentioned previously, JSON documents stored in SQL API are managed through a well-defined hierarchy of database resources. These resources are each addressable using a unique URI. Since each resource has a unique URI, many of the concepts in Restful API design applies to SQL API resources
Data Migration Tool: The open-source Cosmos DB data migration tool which allows you to import data into a SQL API collection from various sources including MongoDB, SQL Server, Table Storage, Amazon DynamoDB, HBase and other Cosmosdb collections.
For this overview demo , I will be using a dataset Tweets which contains Tweets by users across the world on certain tags says #Azure and #Cosmosdb
To replicate the demo you can use the Emulator which you can download from here Cosmosdb Emulator . Or you can create a Cosmosdb free tier account which is handy for developers.Azure Cosmos DB free tier makes it easy to get started, develop, test your applications, or even run small production workloads for free. When free tier is enabled on an account, you'll get the first 1000 RU/s and 25 GB of storage in the account for free.
In this demo let me migrate this sample dataset tweets which has 1000 recent tweets from users who actually tweeted about different technologies. I have uploaded the dataset in my github account and we will be using the same to understand different queries.
Create a CosmosDB Account of type SQL API and database/collection named Tweets
Insert the data inside the folder Tweets to CosmosDB using the Data Migration Tool
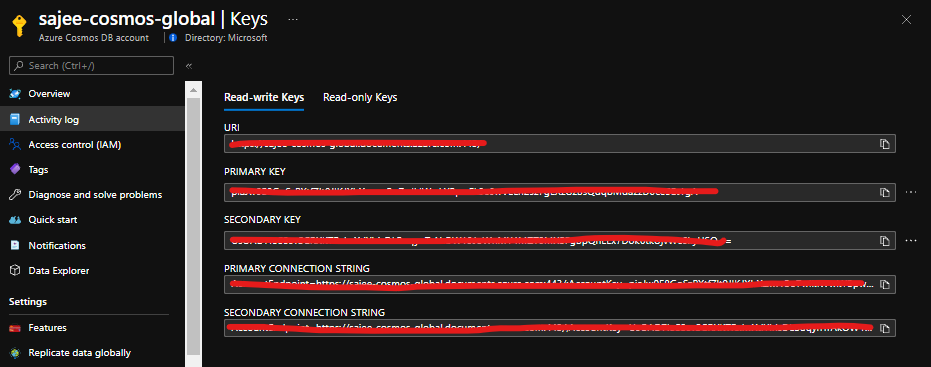
Once you created the Cosmos DB account on Azure , Navigate to Settings -> Key and copy the Endpoint and the Url for the Cosmos DB account and replace the values in the Program.cs ( This is not recommended for production use , use Keyvault instead).
Obtain Keys and Endpoint from Azure portal
  // The Azure Cosmos DB endpoint for running this sample.
  private static readonly string EndpointUri = "https://sajee-cosmos-notebooks.documents.azure.com:443/";
  // The primary key for the Azure Cosmos account.
  private static readonly string PrimaryKey = "==";
Before dive into the queries , let me explain one of the most important thing to deal with queries in Cosmos DB. In Cosmos DB SQL API accounts, there are two ways to read data.
Point reads – Which denotes you can do a key value lookup on a single item id and a partition key. Point reads usually cost 1 RU With a latency under 10 Milli seconds.
SQL queries - SQL queries consume more Rus in general than the point reads . So if you need a single item, point reads are cheaper and faster.
As a developer we tend to execute select * from table which might cause you more RUs since you are reading the whole data across multiple partitions.
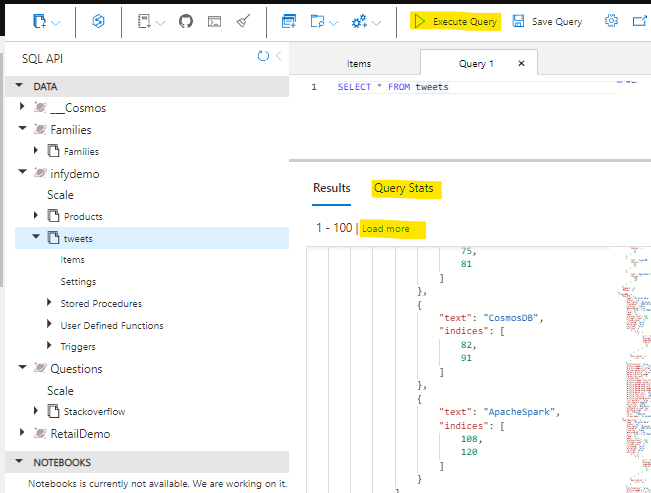
To retrieve all items from the container, in this case let's get all the tweets. Type this query into the query editor:
SELECT *
FROM tweets
...and click on Execute Query!
Cosmos DB SQL API queries
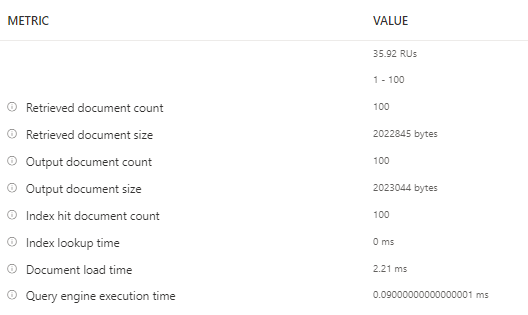
Few things to note here are, It retrieves the first 100 items from the container and if you need to retrieve the next 100, you could click on load more , under the hood it uses the pagination mechanism. Another handy thing here is that you can navigate to query stats and see more details on the query such as RUs, Document size, Execution time etc.
When referring to fields you must use the alias you define in the FROM clause. We have to provide the full "path" to the properties of the objects within the container. For example, if you need to get the RetweetCount from the container for all the items.
Lets see how we can find out the hashtags that have been used in all the tweets. We can use the JOIN keyword to join to our hashtags array in each tweet. We can also give it an alias and inspect its properties.
Let's see the JOIN in action. Try this query:
SELECT hashtags
FROM tweets
JOIN hashtags IN tweets.Hashtags
Now that we know how to join to our child array we can use it for filtering. Lets find all other hashtags that have been used along with the known hashtags (#Azure, #CosmosDB):
SELECT hashtags
FROM tweets
JOIN hashutcDate IN tweets.Hashtags
WHERE hashtags.text NOT IN ("CosmosDB", "Azure")
We can use a feature called Projection to create an entirely new result set. We could use this to create a common structure or to make it match a structure we already have.
Try this query:
SELECT tweets.CreatedBy.Name AS Name,
		tweets.FullText AS Text,
		tweets.CreatedAt AS CreatedTime,
        tweets.TweetDTO.metadata.iso_language_code AS LanguageCode
FROM tweets
The SQL API supports javascript User defined functions, there that you can use on this server called displayDate which removes the time parts of a UTC date string.
This is the function :
function displayDate(inputDate) {
    return inputDate.split('T')[0];
}
Let's have a go at using it
SELECT tweets.CreatedAt,
    udf.displayDate(tweets.CreatedAt) AS FormattedDate
FROM tweets
The SQL API also supports stored procedures written in JavaScript which enables you to perform ACID transactions over multiple records. This allows scalable and almost unlimited expandability on the functionality Azure Cosmos DB can offer.
These are some of the basic queries to get started with CosmosDB SQL API. If you want to get to know more about SQL API the following references would be useful.
Microsoft introduced App Service Static Web Apps in Preview at Build 2020 as"Azure static web apps", a service which allows web developers to build and deploy website to any environment from Github repository for free. Developers can deploy applications in minute while taking the advantage of scaling and cost savings offered by azure functions as backend. One of the frequent questions that i heard from the developers was the availability of Azure Devops support with Azure static web apps.
I have already published an article which demonstrates how to deploy to Azure Static Web Apps using GithubActions. Azure static web apps team announced the public preview of Azure Devops with Azure static web apps yesterday.
In this post you I will walk you through on how to deploy an angular application to Azure static web apps using Azure Devops.
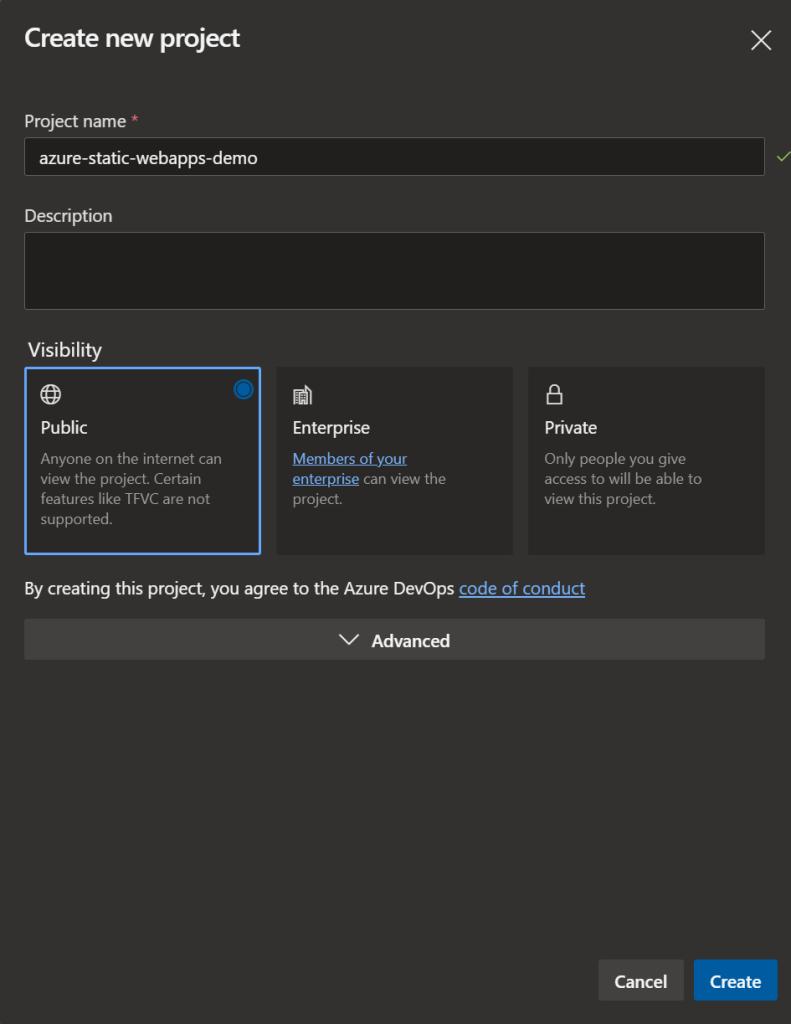
Navigate to Dev.Azure.com and create a new Devops Repository as below
Azure Devops repository
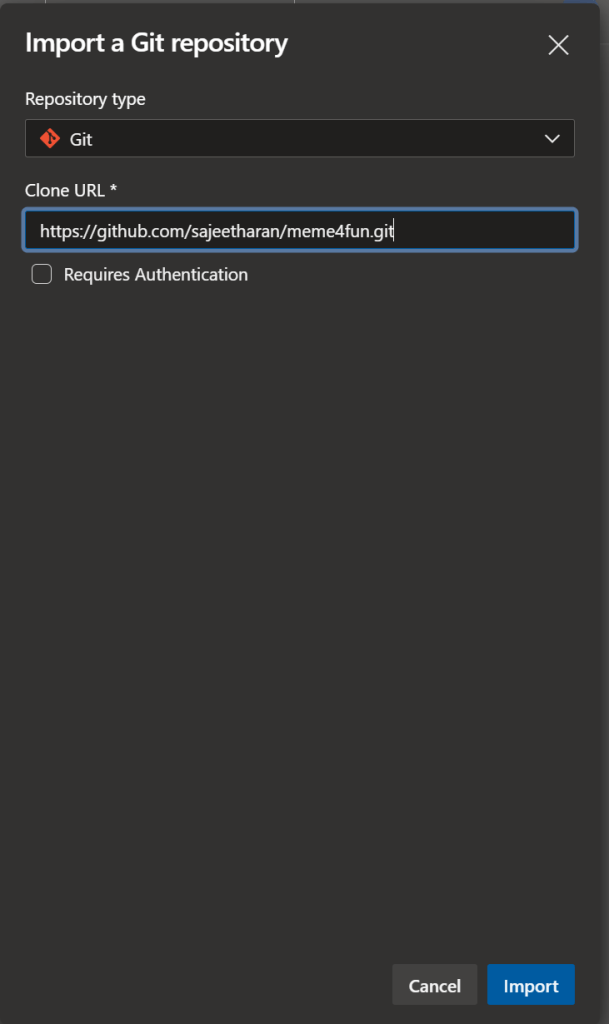
Step 2 : Import your static web application to Azure Devops repository
https://github.com/microsoft/static-web-apps-gallery-code-samplesNext step is to import the web application from any source control to your newly created Azure Devops repository. In this case i am importing the same "Meme generator" app which was made of Angular. Meme4Fun is an app to create custom programming memes from a picture and it also identifies features of people in the image which is available as part of code samples for Azure static web apps.
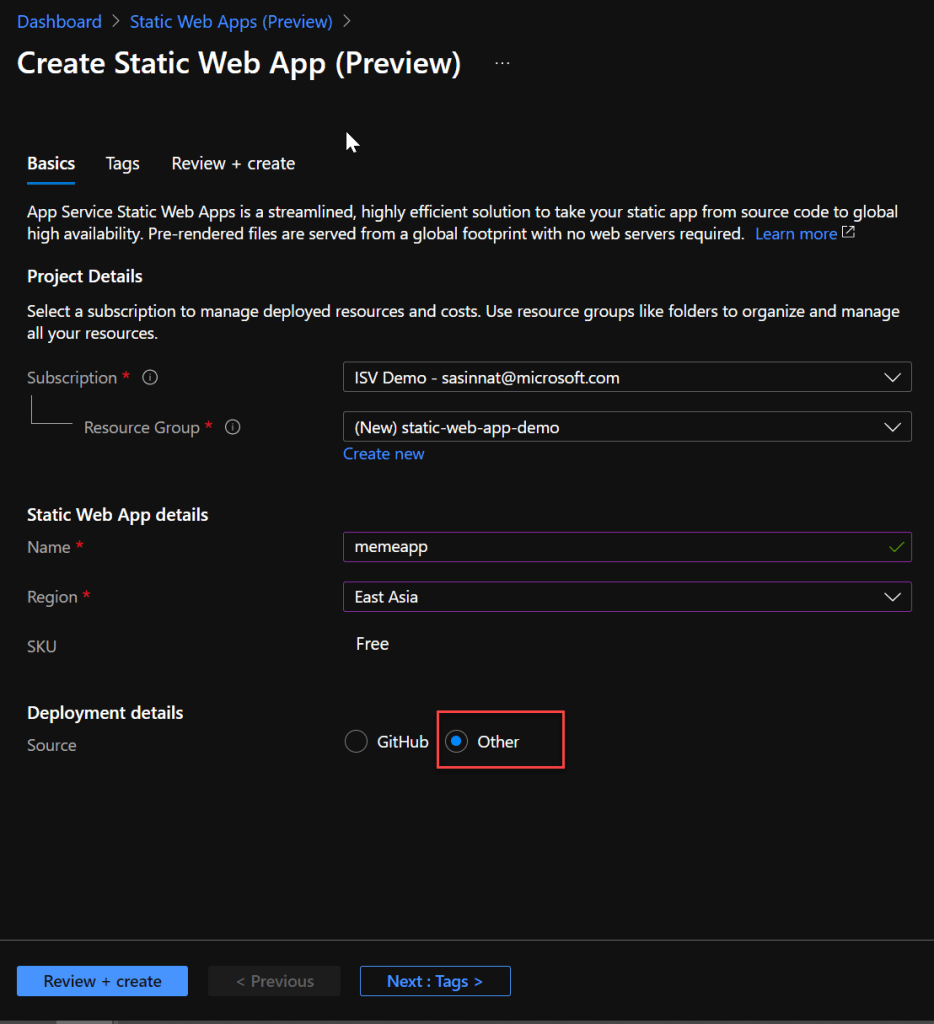
Next step is to create the static web application on azure, navigate to azure portal and create a new resource by searching for Static Web apps, and create it.
Note : Since I am going to leverage Azure Devops as the deployment method, select Other as the option.
Choose Devops as the Deployment
Once the deployment is successful, navigate to the new Static Web Apps resource and select Manage deployment token.
If you are using Azure Devops to deploy applications in the past, you will need to have the pipeline in plact to deploy to particular resource. In this case, lets create a build pipeline to deploy the angular application.
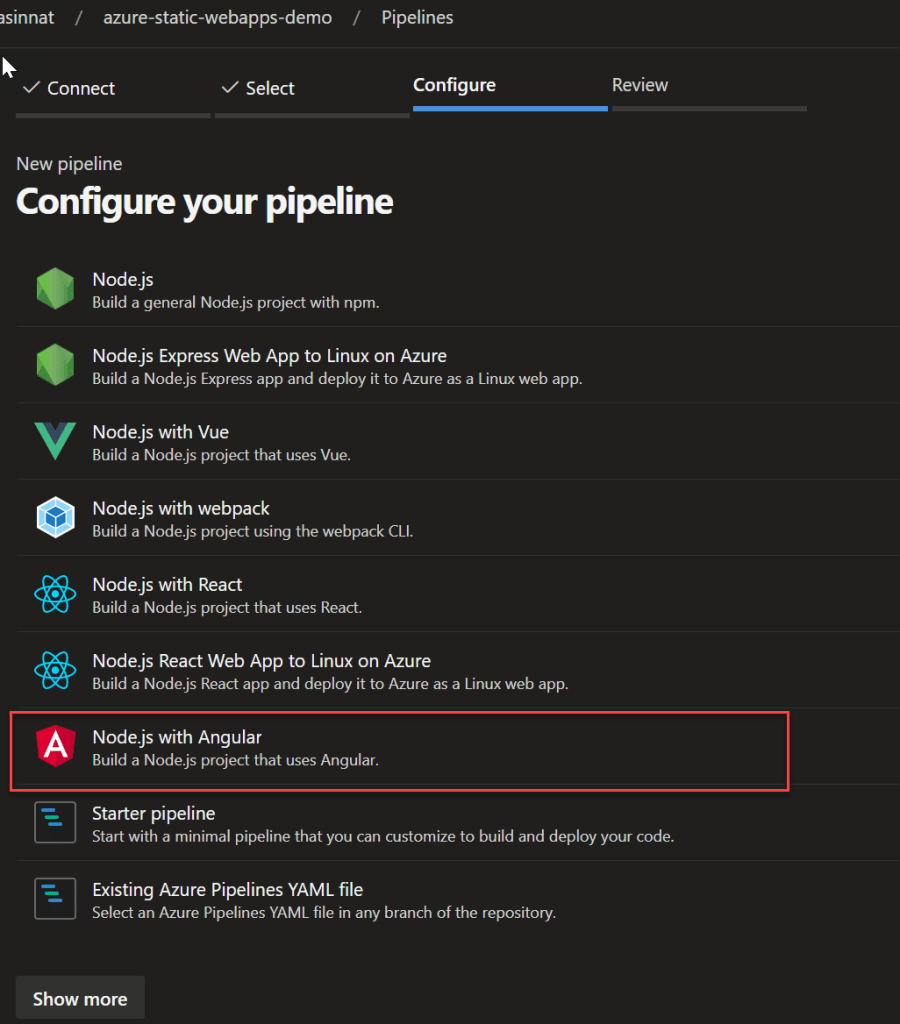
Next step is to select the template, since we are deploying an angular application, you can select the template as angular with nodejs
Angular template
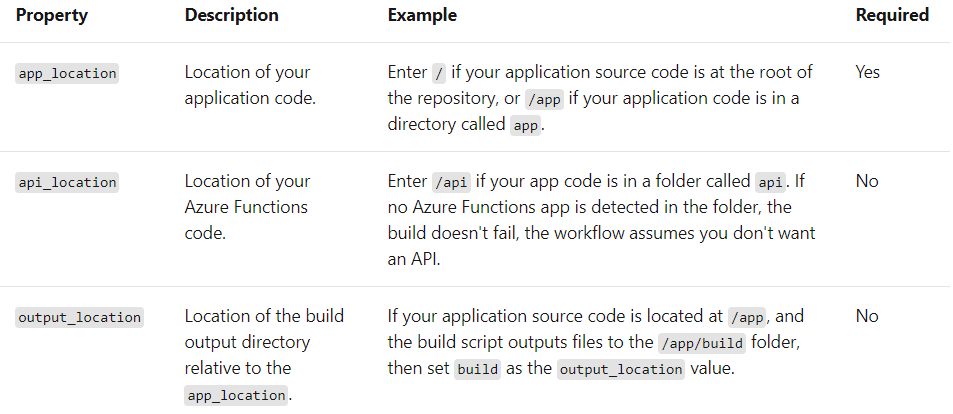
Also for static web apps it is important to include the following step in the yaml which has the app_location, api_location, and output_location , you need to pass those values if you have those details if not keep it empty.
and the final configure YAML will look similar to the below,
# Node.js with Angular
# Build a Node.js project that uses Angular.
# Add steps that analyze code, save build artifacts, deploy, and more:
# https://docs.microsoft.com/azure/devops/pipelines/languages/javascript
trigger:
- master
pool:
  vmImage: ubuntu-latest
steps:
- task: NodeTool@0
  inputs:
    versionSpec: '10.x'
  displayName: 'Install Node.js'
- script: |
    npm install -g @angular/cli
    npm install
    ng build --prod
  displayName: 'npm install and build'
- task: AzureStaticWebApp@0
  inputs:
      app_location: "/"
      api_location: "api"
      output_location: "dist/meme4fun"
  env:
      azure_static_web_apps_api_token: $(deployment_token)
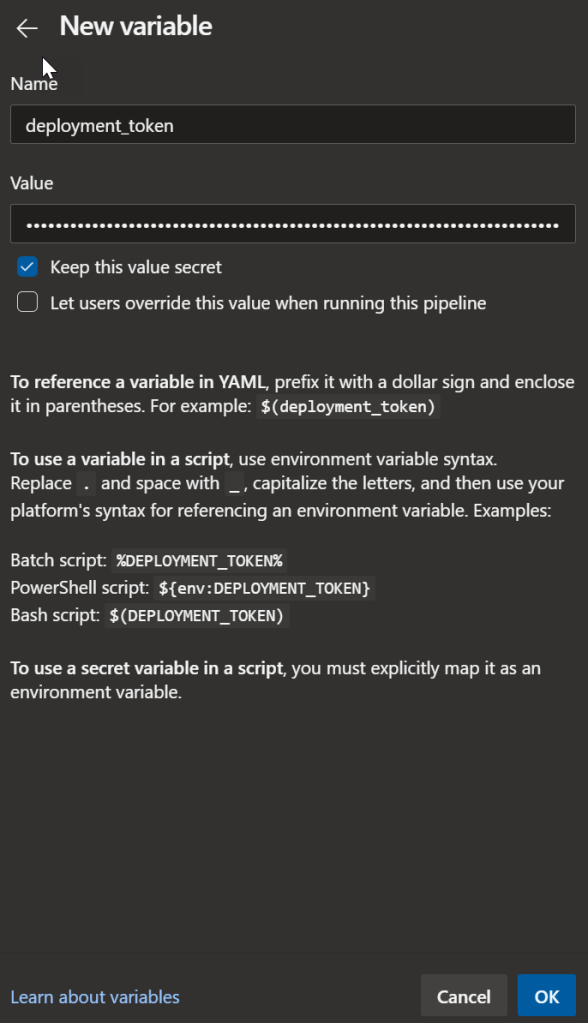
Next step is to provide the The **azure_static_web_apps_api_token** value is self managed and is manually configured. Select Variables in the pipeline and create a new variable named as "deployment_token"(matching the name in the workflow) below.
Add new Variable
Paste the deployment_token value which was copied from Azure portal
Make sure to check "Keep the value secret" and save the workflow and run.
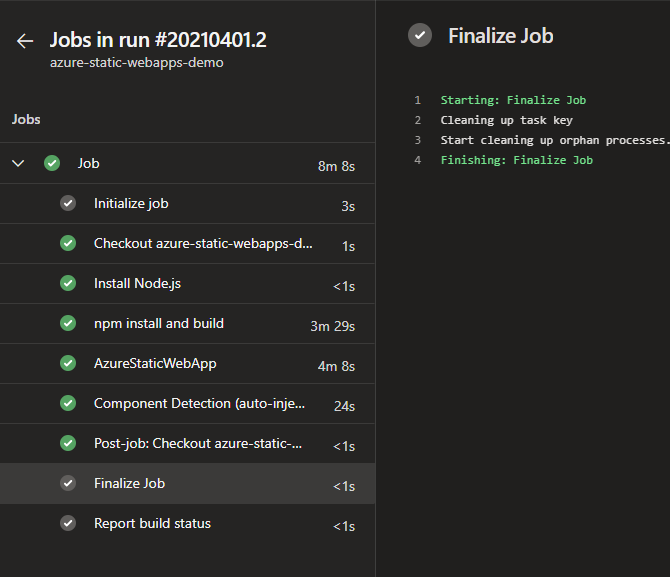
With that step Azure Devops will execute the pipeline and deploy the application to azure static web apps.
Successful deployment
Now you can access the application from the static static web app from the URL.
Static web app with azure devops deployment
If you had any trouble in executing the above steps, you can watch the same tutorial published as a video here.
It's great to see that with few steps of configuration, i was able to deploy the application with Azure Devops. If you have enabled backend support with the azure functions, it can be deployed as well. Support with Azure Devops has been one of the most requested features by developers and great to see it in live now. It's your chance to explore various application deployments with different frameworks, hope this is useful. Cheers!
As per a survey, 57% of young individuals agreed they do not have the right connections to find a mentor and more than 50% of them couldn't find a job that they are passionate about. As a result I was exploring if there is any platform that would solve this major problem. Yes, there are some existing online apps but those don't serve the complete purpose to the extent that i expected. I decided to start a pet project to build this platform during my spare time , in this post i will be sharing the architecture of the application and how i was able to quickly spin up this application.
As i explained in the previous posts, Cosmosdb and Azure Functions are great combo to build applications and deploy in quick time without worrying about underlying infrastructure. You can read about some of the reference architectures i have posted in the past from the below links,
MentorLab has been made to scale up the existing students and mentors using Azure Services and Serverless Architecture to provide a cost-economic one stop solution which is dependable and truly secure. The objective is to give the students a platform which is built on a serverless architecture and can be remotely accessed irrespective of geographic location.
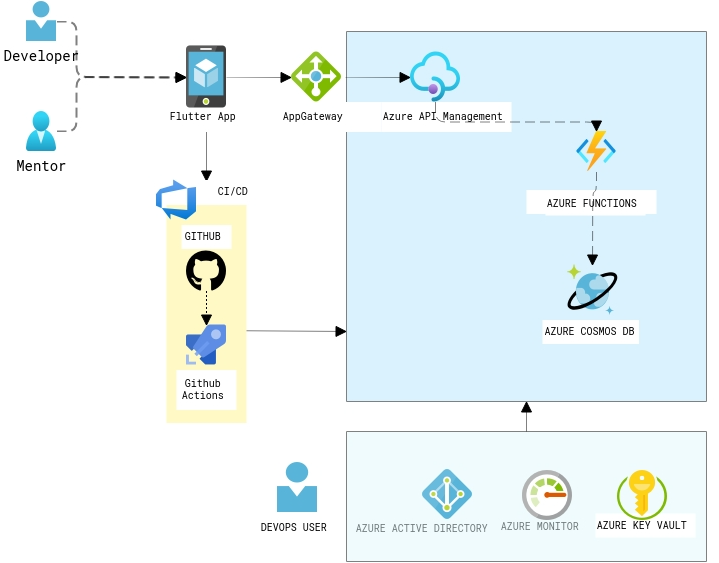
Flutter App is the front end application which is accessed by Mentor and Developer with different types of logins, All the requests from the mobile app will be router via the AppGateway. The backend APIs are built as servelress APIs with Azure functions with the support of Cosmosdb Trigger. Cosmosd's serverless feature is a great offering when building these kind of applications, as it is a cost-effective option for databases with sporadic traffic patterns and modest bursts. It eliminates the concept of provisioned throughput and instead charges you for the RUs your database operations consume. In this scenario, i have chosen Mongo API for the CRUD operations. The APIs are registered as endpoints with the Azure API management with right policies in place.
Some of the additional components you could see in the diagram are the CI/CD pipelines with Github Actions and Azure AD B2C for the authorization, Key vault for storing the connection strings,keys in a secured way. And finally application insights to generate the related metrics and for troubleshooting.
It nearly took just 3 days to build this application and going forward i am planning to add more features such as video conferencing with the help of Azure Communication and Media services . All these components just costs 36$/Month to host this application on Azure.
Hope this reference architecture helps you to kickstart your work for similar application. Feel free to add your thoughts/Questions as comments in the section below. Happy Hacking!
If you are hosting your application on any environment whether it's in cloud or on-prem, an effective monitoring helps to increase the uptime by proactively notifying us of critical issues so that you resolve them before they become problems. An effective monitoring is a part of Devops process which helps you to achieve the following,
A proactive approach.
Get visibility of your infrastructure and application issues
React fast to an issue and mitigate quickly.
Increase your application availability
Reduce application downtime
I have been involved in lot of discussions with customers and partners on how to setup alerts in order to proactively get to know the issues and help the customers. One of the frequent questions i noticed is that about how to setup SMS alerts. In this post i wanted to cover about how to setup SMS alert on Azure at a minimal cost.
There is no SMS notification service readily available on Azure as of now. Even though Azure Communication Service which Integrate SMS into existing applications and workflows with Azure services Logic Apps and Event Grid is still in preview and not supported in many countries. In this case you could integrate with any of the SMS providers. In this case i will use one of the famous SMS provider which i have used in many of the projects in the past.
Step 1 :Create the Resource Group
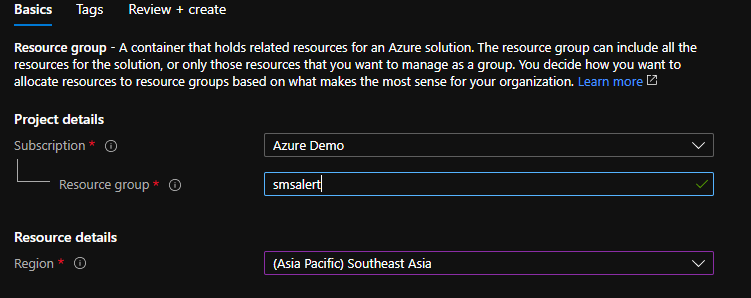
As the first step, we need to create the resource group that contains all the resources needed. In your case, you might already have an Azure environment with all the resources. Navigate to Azure Portal and create the resource group named “smsalert”
Create Resource Group
Step 2 : Create the application and deploy on Azure VM
In this case, i will be focusing on setting up alerts on a Virtual Machine, If you already have an application deployed on any compute services such as AppService or AKS you could replicate the same steps. You might not need to do this step as its about application deployment. I will use the Devops starter resource to deploy a Dotnet core application and choose VM as the compute option to deploy my application.
Search for Devops starter in the search bar and create a new ASPNet core application and choose VM as the destination to be deployed.
Deploy ASPNET core app using Devops starter
Once the application is deployed you could access the application from the url and you can login to the VM as well.
ASPNetCore app on VM via Devops starter
Now we have the application deployed on VM, assume if you want to monitor the performance and setup alert whenever it breaches certain condition, lets setup azure monitor integrated with Logic apps.
Step 2 : Create Logic app Integrated with Twilio
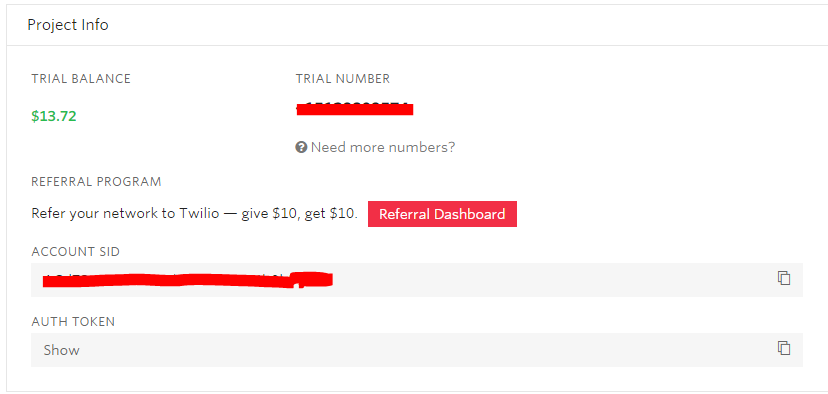
You need to setup a Twilio account inorder to send the SMS alerts, the free tier gives a worth of 15$ credits which would be enough for 4000 messages. You will also get a number to send SMSes from the account portal. If you need a custom number you can set it up with extra cost.
Twilio SMS account
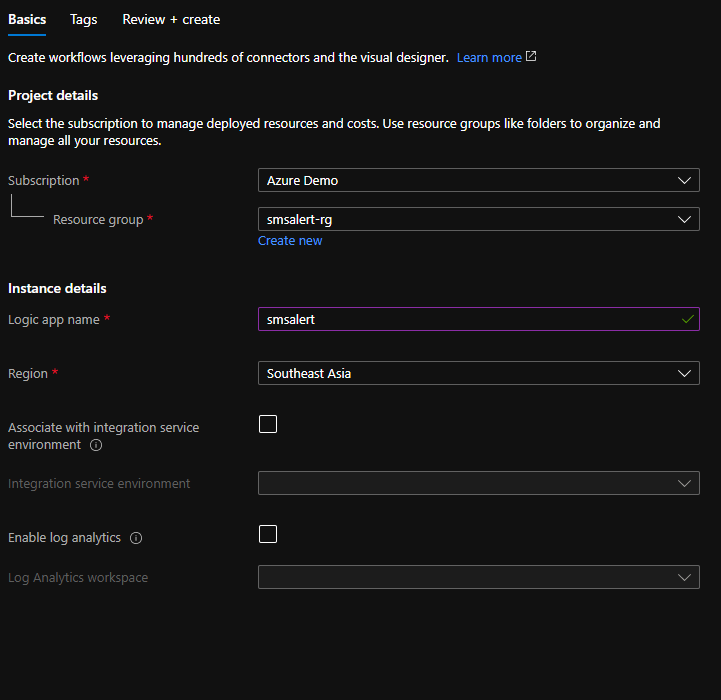
Let's create the logic app, you can search for Logic app resource on the search bar and create a Logic app with the name smsalert under the same resource group.
Logic App to send SMS alerts
Next step is to configure the steps in logic app , whenever a request is received from the azure monitor, we need to send the SMS to relevant members in the team which can be configured with 2 steps as below,
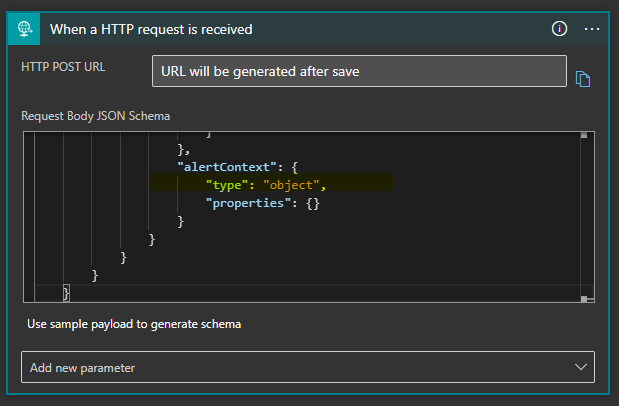
Add the first step as when an http request is received and we need to map the schema of alert inorder to get the information from the alert and to send the sms. Paste the schema object in the request body.
Next step is to add the twilio connector inorder to send the SMS when an alert is recieved. you can configure the twilio send text message step as below, you need to pass the account SID and the access token in the configuration.
You can also pass a custom text which consists of any of the parameters that recieved from the alert, say for ex. CPU percentage, time etc.
Twilio configuration
Now we are ready with the logic app integrated with Twilio, next step is to create the alert rule on the vm to send the SMS
Step 3 : Setup Alert Rule to send SMS notification.
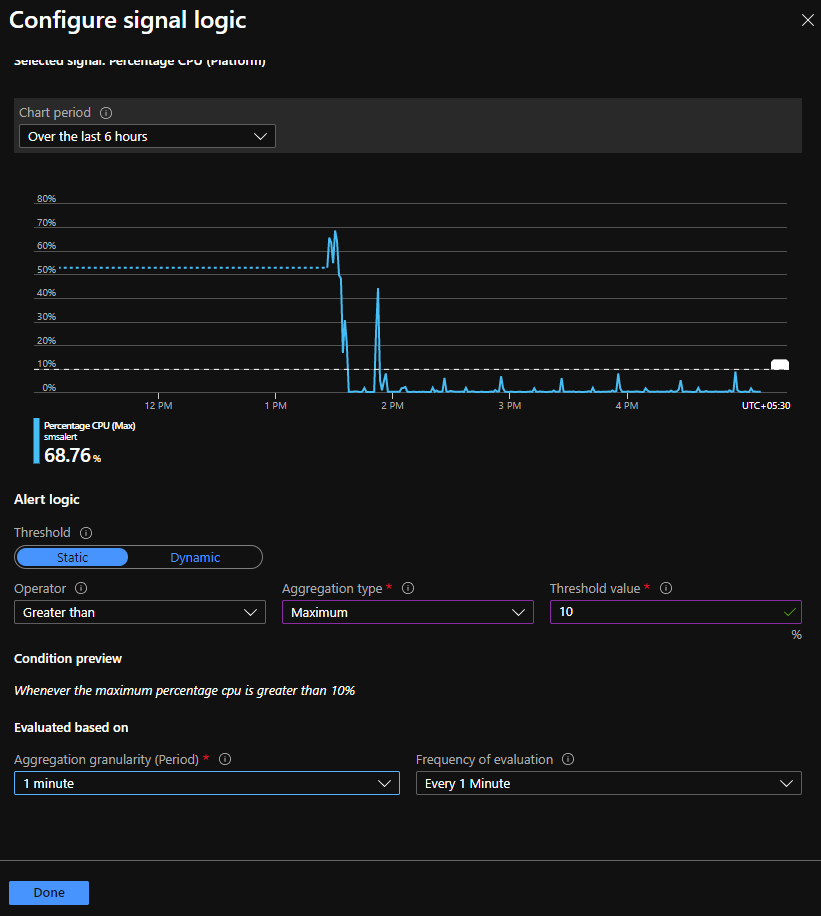
Open the VM resource , on the blade navigate to Alerts and click on new alert rule, by default you can see that the resource is selected as the VM, next step is to setup the condition when you need to fire the alert, this can be a combination of multiple configurations, you can choose it from the predefined configurations. In this case i will choose the condition as "When the percentage CPU goes above 10%".
Setup condition for Alert
Fire alert when the CPU percentage goes over 10% over a period of 1 min
We are good with the condition just for this demo purpose, but you can play around multiple conditions in combinationas you need for your environment.
Step 4: Add Action Group
In the "Add action group" section, we have to create an Action Group Name and we need to choose the Logic app as action and select the logic app which you have created in the above step,
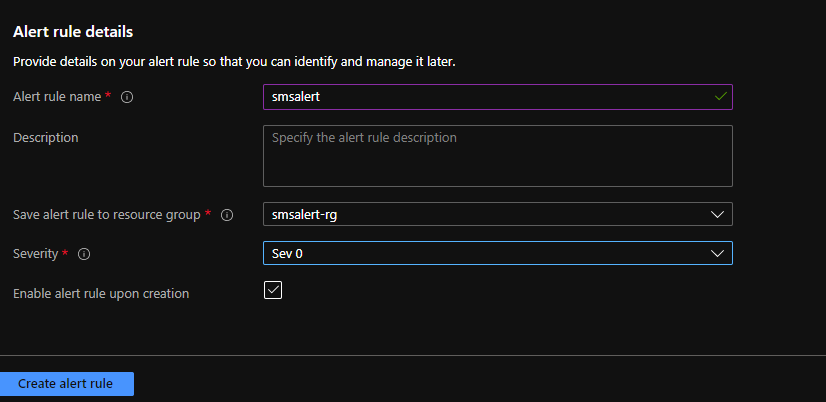
Once you are done with the action group, just pass the alert rule details and set the severity level.
We are done with all the steps needed to send the SMS alert, now whenever the CPU usage goes above 10% the configured number will get an SMS message. If you want to send the SMS to multiple members in the team, you could just use the for condition in logic app and send it to multiple members.
Step 5 : Manage Alert Rules
You can also manage the alert rules based on the severity and if the action has been taken on those alerts and recrtified from the manage alerts section.
That's all i wanted to cover in this post, one thing to note is that i have seen many customers who already have setup email notifications via the Azure monitor, but SMS is not still readily available in all countries if you've noticed.
Hope this helps to setup SMS alerts on any resource that you use as compute option to run your application. Cheers!
Exactly a year ago, Github announced codespaces and gave the option to join the beta. If you are having your repository in github and need to contribute to an open source project or if you want to commit something quickly to the repository this is one of the feature that you might be interested in, It supports developers to do it on the browser on any device.
It allows developers to use a fully-featured, cloud-hosted development environment that spins up in seconds Directly within Github. This will help you to start contributing to a project immediately from any machine, all without needing to install anything locally. If you are a developer, you should be a fan of this one. As we’ve all been adopting practices like social distancing and remote working, development teams have become more distributed. In this post, i wanted to share one of the productivity tips on how to open your code directly from the browser via codespaces.
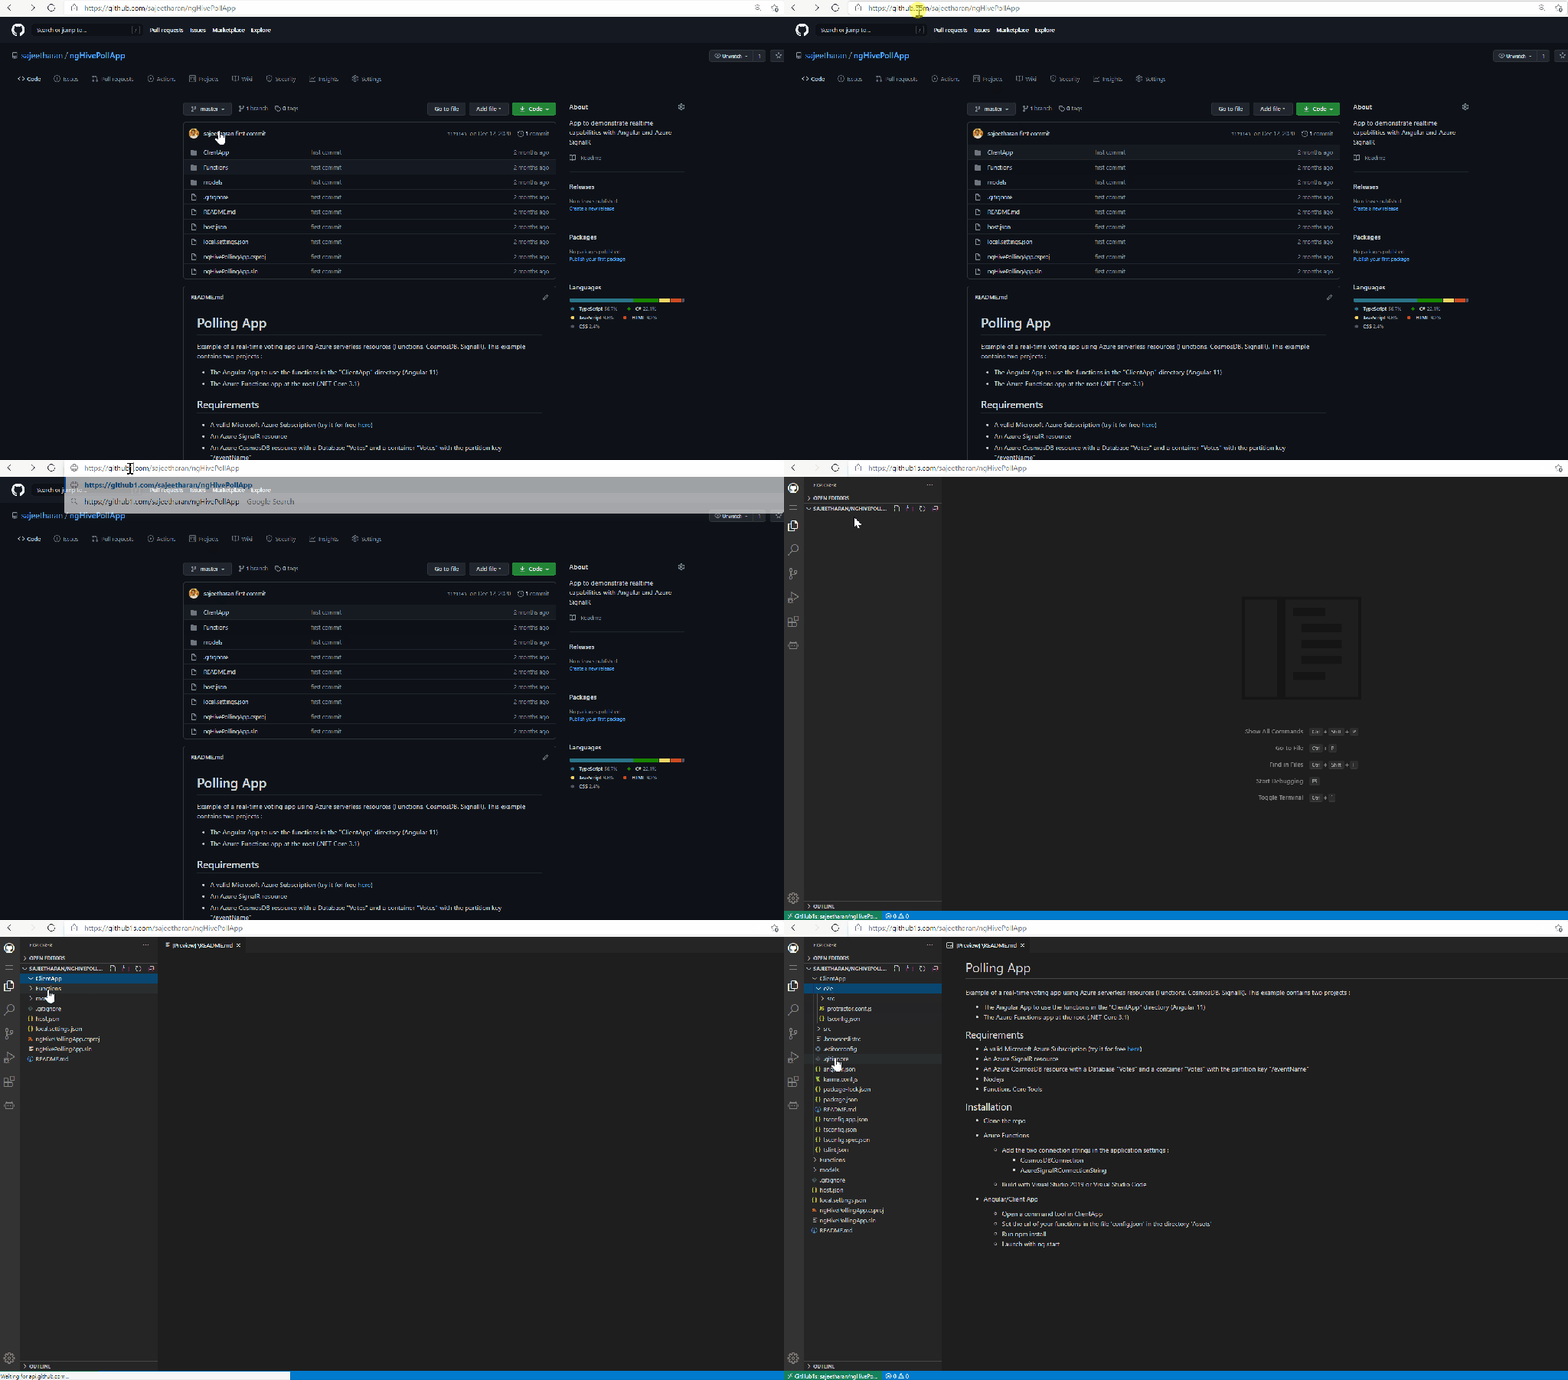
You just need to open your repository and add "1s" after github when viewing the codebase on browser and github codespaces loads up instantly.
Here is the action below!
One thing to note here is that, this feature is not directly from the Github codespaces itself, it is enabled via the 1s which is sort of a middleware repository enabling this! However it's a great feature and worth exploring it!
Hope this enable more developers to contribute to Opensource world instantly. Cheers!