
3 posts tagged with "visual-studio"

View All Tags

· 5 min read

I just uninstalled Visual Studio 2017 and installed Visual Studio 2019 and the transition was very smooth. The installation just took 17 minutes and its faster than the time it took to install earlier versions. I managed to explore few features and it looks quite impressive. I decided to list down the top features that i noticed after exploring them.

(i) Live Share :

The top feature according to me and for almost every developers out there is Live Share. It allows multiple developers from different locations who are working remotely to collaborate and to jointly edit the same code in Visual Studio 2019 in real time.Almost 35 developers can work together on code at the same time and Live Share can be used with both VSCode and VisualStudio and you do not have to install any dependencies or libraries. Is not that cool?

Live sharing is straight forward with a single click of a button, simply requiring you to click on the Live Share button, hit 'Start collaboration session'.

1

The same can be done on VSCode as well. Amazing thing here is you get to see each and every action of other developer and what he/she is doing. There's also an audio channel so you can talk to those collaborating with you. With this real problem of collaboration is solved.

(ii) Smarter IntelliCode for AI:

One of the coolest thing that every developer like about Visual Studio is IntelliSense support. With Visual Studio 2019 IntelliCode's intelligent suggestions, with a wider range of AI-powered assistance for the auto complete and auto-formatting feature for AI developers and for even someone who wants to get started with AI.

(iii) New search and project templates

The new Visual Studio 2019 header search box, seen at the top of the screen, is designed to find anything in Visual Studio — including menu items, settings,
tool windows and more. The tool uses fuzzy search that return the correct information even if you make a typo(like google).

4.png

Additionally, fresh look of the new project window is really cool. You get to search for the project you want to create in the typehead, rather than having it as a treeview in the earlier versions of visual studio. Also you could add a filter on the window with the provided options as follows.

5

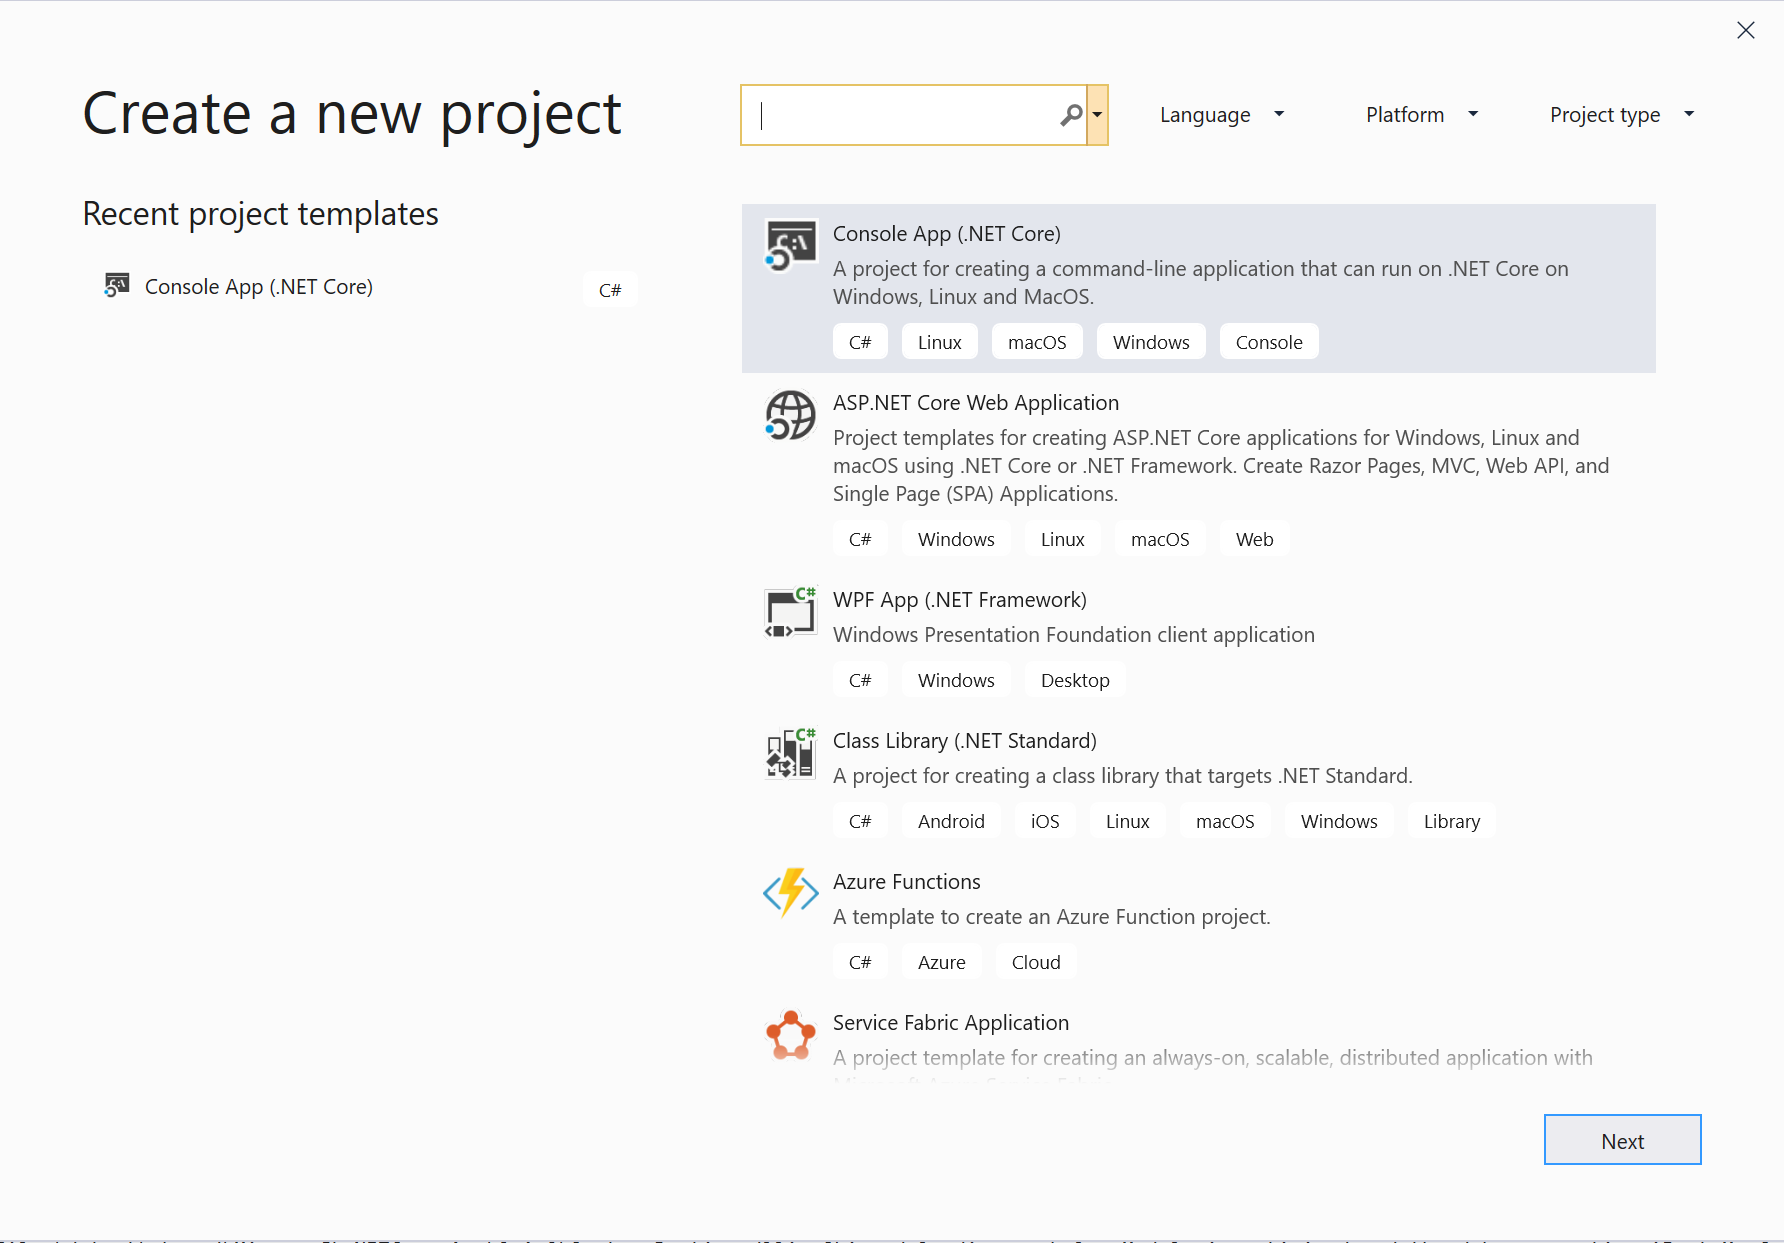
Microsoft is no more a typical Microsoft as you see above. you get to explore different types of languages with different platforms with Visual studio 2019.

(iv) Fresh Start window

One other thing which i liked the most in visual studio is the ever fast loading screen of the start window. The team has used asynchronous way to load the previous/recent projects which loads in few seconds which is very faster compared to the previous versions of visual studio.

6.PNG

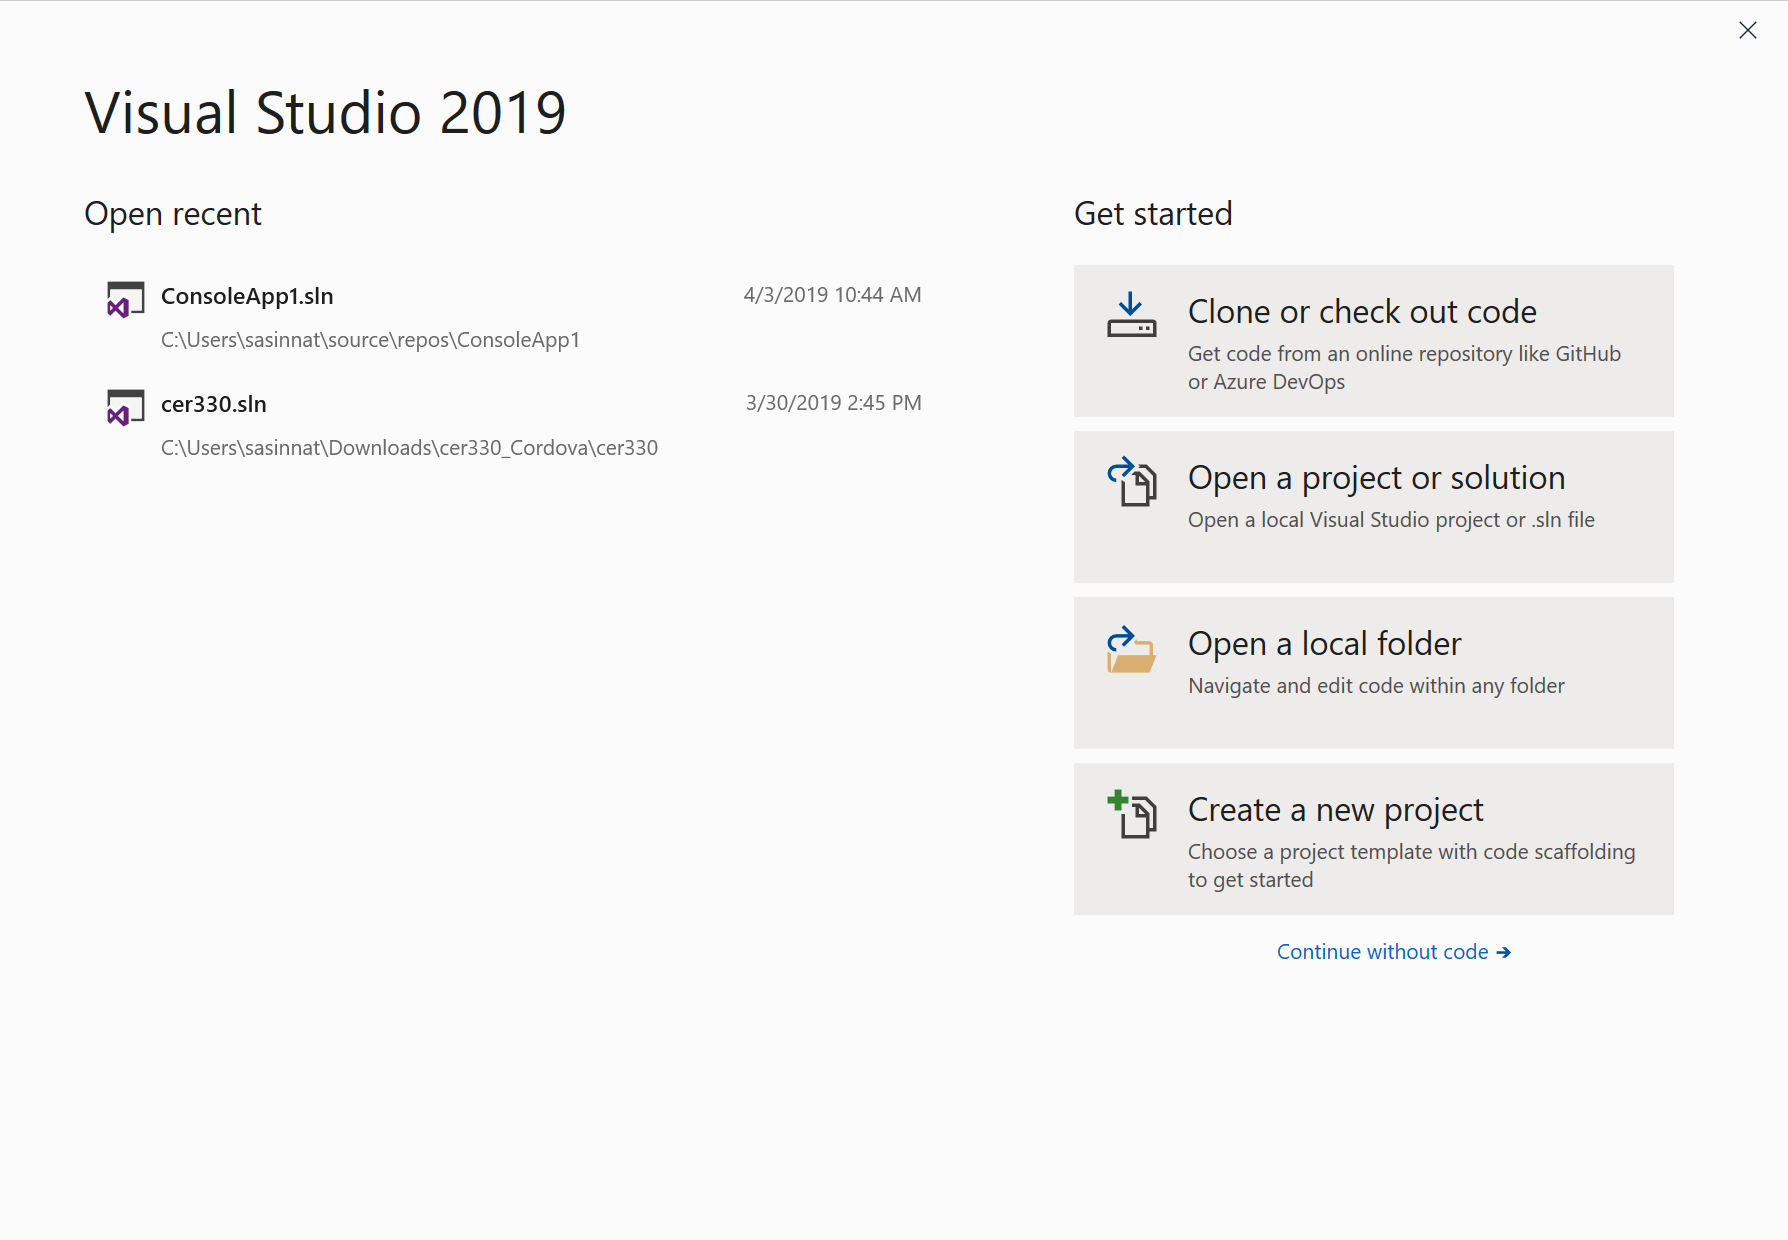
As you can see, you can now clone or check out a GitHub repository directly from the Start window with devops integration. This is really amazing.

(v) Developer friendliness

There are n number of cool things have been added to visual studio 2019 to make developers life easy which includes the following features,

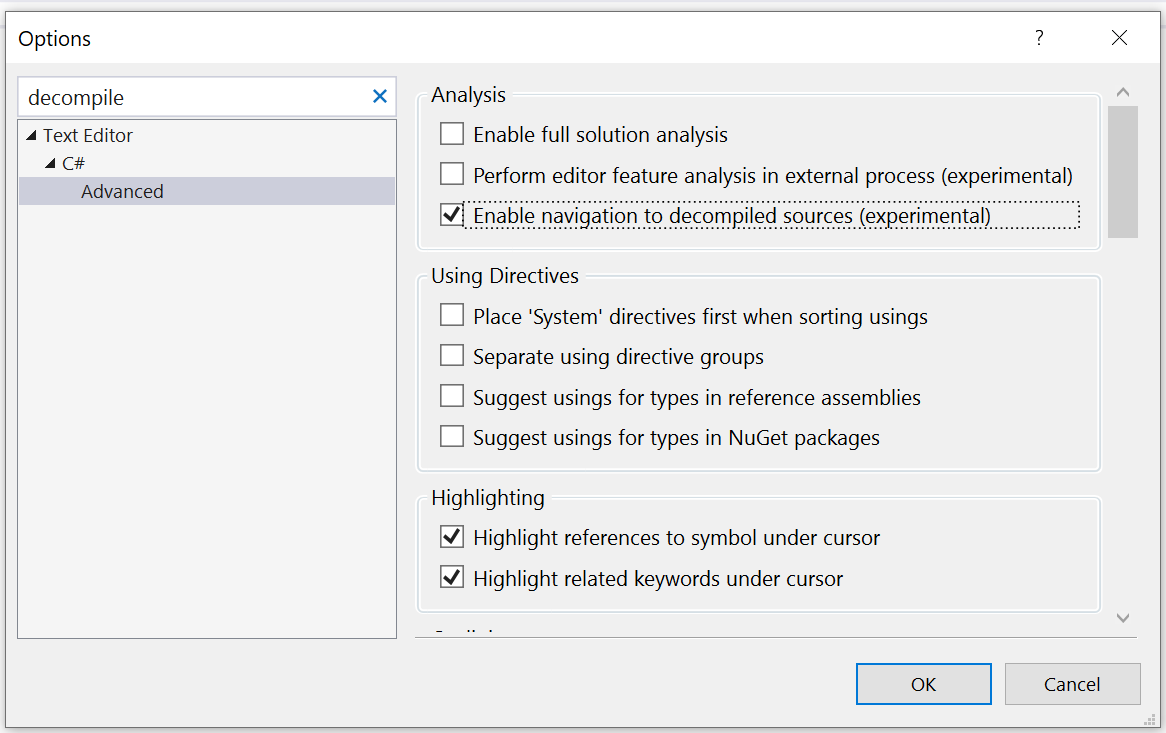
DeCompiled resources :

Now you can debug and step into the external packages you pull in from Nuget and anywhere! You can enable this by Go to the top menu bar. Select Tools > Options. Type “decompile” into the search bar. The Advanced section of Text Editor for C# will appear. Click on Advanced. Check the box that says Enable navigation to decompiled sources

7.PNG

Code CleanUp:

In VSCode and VS2017, Similar to Format Document, this new feature allows you to configure a predefined set of several rules to clean up in your code all at once. To set this up, follow the steps below.

Click the little broom icon at the bottom of the window. Select Configure Code Cleanup.

8.png

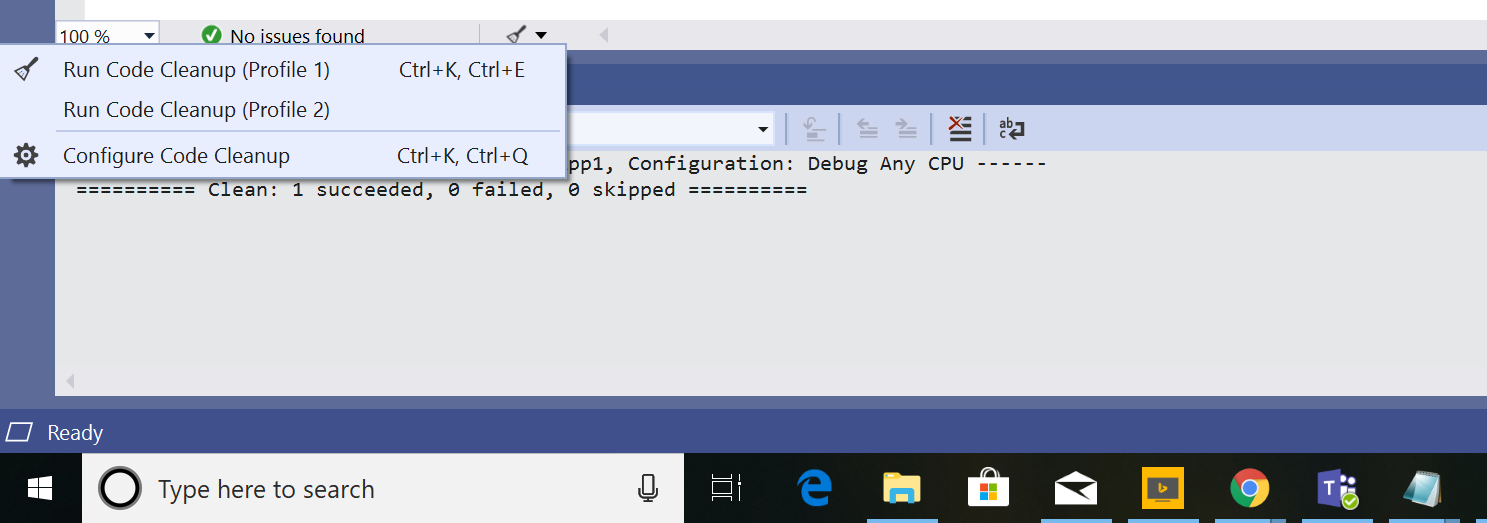
You do not have to manually do things anymore.

Solution Filter:

Are you working on the same project for longer years?. Ever had a monolithic solution with way too many projects inside of it? Does it all take a while to load? Now you can save the state of your solution with only the desired projects loaded up. I will not be explaining in detail, certainly this is supported in VS2019. This is a nice way to keep everything organized and loading fast when first opening up the solution in Visual Studio 2019. This can be really refreshing for any enterprise developer who is working on several projects.

But Wait, There’s More!

Interested in what else this new Visual Studio 2019 has to offer? You can get to know by checking out the Release Notes and FAQ.

I already started loving the new features, performance and collaboration improvements inside Visual Studio 2019. What about you? Don't wait just get started by downloading from here.

· 4 min read

My first post for the year 2018 and i wanted to write something about a technology in which i have vast experience and passionate about. This blog will be very useful for those who want to start with angular for developing web applications.In this blog i am going to set up Angular 5 app using Visual Studio Code. I will be using Angular CLI for our sample application. The following are the steps needed to create your first angular application using angular5.

Steps

  • Install Node.js.
  • Install Angular CLI.
  • Design our  Angular App.
  • Launch  App in the browser.
  • Displaying our custom information on a page.

1. Install Node.js

In this approach, the first step is to install Node.js. If you have not installed nodejs in your machine visit the website and download according to your OS. You will see the following display.

Download and install the latest LTS version as per the configuration of your machine. The current version of Node LTS is 8.9.3. Installing node.js will also install npm (node package manager) on your system.

Next step is to make sure everything related to node is installed, To check the version of node and npm installed on your machine, run the following command in command prompt.

  • node -v 
  • npm -v

which will be as follows,

2. Install Angular CLI

We are done with the step1, next is to install angular cli. For those who are very new to angular , angular cli is a command line interface for angular applications. After installing node and npm, the next step is to install Angular CLI. Run the following command in a command window.

  • npm install -g @angular/cli

The above command will start Angular CLI installation on your machine. This might take bit of time  based on the internet connectivity.


 3. Design our  Angular App.

That's all folks, we have setup the necessary environment to start coding. Lets create our application in a folder named Angular5Demo. Run the following command to create a folder for our application.

  • mkdir Angular5Demo

lets navigate to our created folder, so run the following command.

  • cd Angular5Demo

we are in the same folder where our application resides, so lets create our template/structure for our application using angular cli. run the following command

  • ng new myFirstApp

if you have missed anything the following screen shows the steps and the output.

Lets see the code in visual studio code editor. Type code. in the command prompt.

  • code .  

Which will open up the code in the visual studio code. And that’s it.  You can see the following file structure in Solution Explorer. We have created our first Angular app using VS Code and Angular CLI.

4. Launch  App in the browser

 To launch the application and to start the web server run the following command 

  • ng serve 

After running this command, you can see that it is asking to open http://localhost:4200 in your browser. So, open any browser on your machine and navigate to this URL. Now, you can see the following page.

We'll leave the web server as it is while we look into the code of this application. Again open the code inside the path by typing the foolwoing command.

      code .

  1. D****isplaying our custom information on a page.

Now, Let's display a message saying "" using JSON data on the page instead of the message “Welcome to app!”. To achieve this, open /src/app/app.component.ts file. Change it as follows or according to the data you want to see on the page.

and HTML template as,

Change the value of title property to a JSON object as shown above.  You can see the updated web page as shown below.

With angular cli If the web server is running and you make any changes in the Angular application, then you don’t need to refresh the web page. It will automatically update itself as you save the application code file. You can now play with the appellation by using various JSON objects also by making requests.

That's it folks, we have learned about creating our first Angular 5 app using VS Code and Angular CLI. Please post your valuable feedback in comments section.

· 2 min read

I've been a .Net developer since the beta days of .Net 3.0, Now i find myself doing less and less coding related with .Net related stuffs. However, the new strategy from Microsoft  encouraged all the developers including me to once again start doing some .Net work from time to time. One of the highlighting tool among them was the Visual Studio Code.

Sublime text has been my favorite text editor all these time.When i downloaded it and looked at the first time my impression was nothing more than a plain editor with very little added value. Before VS code I have tried all popular editors - Sublime, Atom, Brackets etc. After trying it for few weeks now I feel developers  have everything they need .

Some of the highlights of VS Code are as follows,

  • Default integrated git system is really awesome.
  • Powerful debugging option.
  • Very smart code completion.
  • Huge list of Languages Support
  • Multi panel for side by side editing
  • Always-On IntelliSense
  • Debugging support
  • Peek Information like grammer correction
  • Command Palette

Choice of editor is a personal preference. If you like an lightweight IDE environment that's cross platform, you might enjoy VS Code. Give it a try, you will definitely love it.