As a Developer, If you have a requirement to have list of work items which are approved to be displayed in a Grid View. You would tend to query for all approved work items and display them in the grid, one point to note is that since the amount of approved work items might grow over time, hence loading the data would get slower and slower due to having to download more items. In general, this is where pagination comes into play in front end development, which means you don't need to necessarily download all records, just download a page of records at a time. If you are using Cosmos DB as a backend, this feature is supported out of the box via the use of Continuation Token. Cosmos DB SDKs utilize a continuation strategy when managing the results returned from the queries.
One of the frequent questions I have come across on forums is on How to Implement Pagination with @azure/cosmos SDK with JavaScript. With this post , I wanted to keep it simple and add a very minimal quick start on how to implementation pagination with .js SDK. You can follow the steps given in the repository.
Create a CosmosDB Account of type SQL API and database named 'javascript' and collection named 'products'
Insert the data 'ProductsData.json' to CosmosDB using the Data Migration Tool
execute.ts is the start point of the application which invokes the CallPagination method defined in the pagination.service.ts.
import dotenv from "dotenv"
import { Helper } from './helper';
import PaginationService from './pagination.service';

dotenv.config()

const cosmosDB = new Helper();
const pageMod = new PaginationService(cosmosDB);


const callPagination = async () => {
    const result = await pageMod.executeSample(2, "")
    console.log({
        data: result.result,
        dataLength: result.result.length,
        hasMoreResult: result.hasMoreResults,
        contToken: result.continuationToken
    });
};

callPagination();
Implementation is really simple as we are passing a simple query that has more than 40 records and we set the pageLimit as 5 which is the max number of items to be returned in single call.
In this blog post you will learn about the Azure Cosmos DB SQL API queries and How to get started with Cosmos DB SQL API. I recently published a video on youtube and decided to have it available in blog as well. Azure Cosmos DB is a fully managed NoSQL multi model database service provided by Azure which is highly available, globally distributed, and responds back within the minimum latency in single digit millisecond. It's becoming the preferred database for developers on Azure to build modern day applications.
You can access the slides here and repository for the queries here.
Azure supports multiple data models including documents, key-value, graph, and column-family with multi models APIs such as SQL,Mongo,Cassandra,Gremlin and Table. SQL APi is one of them and its oldest offerings on cosmos db. SQL API is also known as Core API which means that any new feature which is rolled out to cosmos db usually first available in SQL API accounts. It supports for querying the items using the Structured query language Syntax which provides a way to query JSON objects.
Also cosmos db SQL API queries can be done using any SDK we provide with Net, Java, Node and python.
Azure Cosmos DB SQL API
Azure Cosmos DB is truly schema-free. Whenever you store data, it provides automatic indexing of JSON documents without requiring explicit schema or creation of secondary indexes.
The Azure Cosmos DB database account is a unique name space that gives you access to Azure Cosmos DB.
A database account consists of a set of databases, each containing multiple collections, each of which can contain stored procedures, triggers, UDFs, documents, and related attachments.
With the Cosmos DB SQL API , you can create documents using a variety of different tools :
Portal: The Data Explorer is a tool embedded within the Azure Cosmos DB blade in the Azure Portal that allows you to view, modify and add documents to your Cosmos DB API collections. Within the explorer, you can upload one or more JSON documents directly into a specific database or collection which i will be showing in a bit
SDK: Cosmos DB database service that was released prior to Azure Cosmos DB featured a variety of SDKs available across many languages
REST API : As we mentioned previously, JSON documents stored in SQL API are managed through a well-defined hierarchy of database resources. These resources are each addressable using a unique URI. Since each resource has a unique URI, many of the concepts in Restful API design applies to SQL API resources
Data Migration Tool: The open-source Cosmos DB data migration tool which allows you to import data into a SQL API collection from various sources including MongoDB, SQL Server, Table Storage, Amazon DynamoDB, HBase and other Cosmosdb collections.
For this overview demo , I will be using a dataset Tweets which contains Tweets by users across the world on certain tags says #Azure and #Cosmosdb
To replicate the demo you can use the Emulator which you can download from here Cosmosdb Emulator . Or you can create a Cosmosdb free tier account which is handy for developers.Azure Cosmos DB free tier makes it easy to get started, develop, test your applications, or even run small production workloads for free. When free tier is enabled on an account, you'll get the first 1000 RU/s and 25 GB of storage in the account for free.
In this demo let me migrate this sample dataset tweets which has 1000 recent tweets from users who actually tweeted about different technologies. I have uploaded the dataset in my github account and we will be using the same to understand different queries.
Create a CosmosDB Account of type SQL API and database/collection named Tweets
Insert the data inside the folder Tweets to CosmosDB using the Data Migration Tool
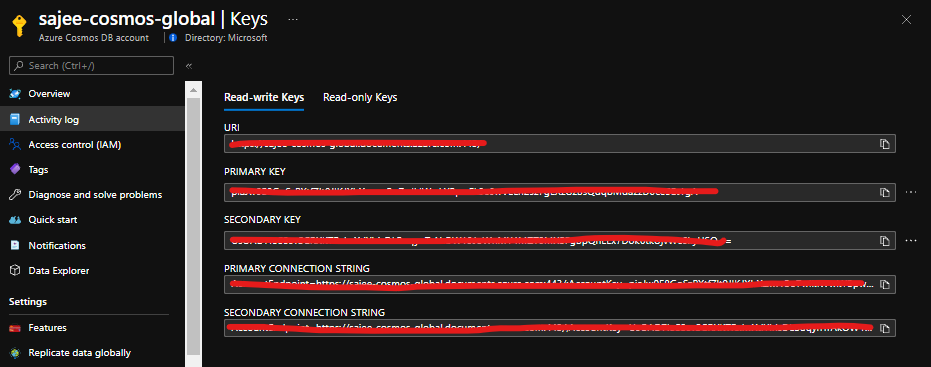
Once you created the Cosmos DB account on Azure , Navigate to Settings -> Key and copy the Endpoint and the Url for the Cosmos DB account and replace the values in the Program.cs ( This is not recommended for production use , use Keyvault instead).
Obtain Keys and Endpoint from Azure portal
  // The Azure Cosmos DB endpoint for running this sample.
  private static readonly string EndpointUri = "https://sajee-cosmos-notebooks.documents.azure.com:443/";
  // The primary key for the Azure Cosmos account.
  private static readonly string PrimaryKey = "==";
Before dive into the queries , let me explain one of the most important thing to deal with queries in Cosmos DB. In Cosmos DB SQL API accounts, there are two ways to read data.
Point reads – Which denotes you can do a key value lookup on a single item id and a partition key. Point reads usually cost 1 RU With a latency under 10 Milli seconds.
SQL queries - SQL queries consume more Rus in general than the point reads . So if you need a single item, point reads are cheaper and faster.
As a developer we tend to execute select * from table which might cause you more RUs since you are reading the whole data across multiple partitions.
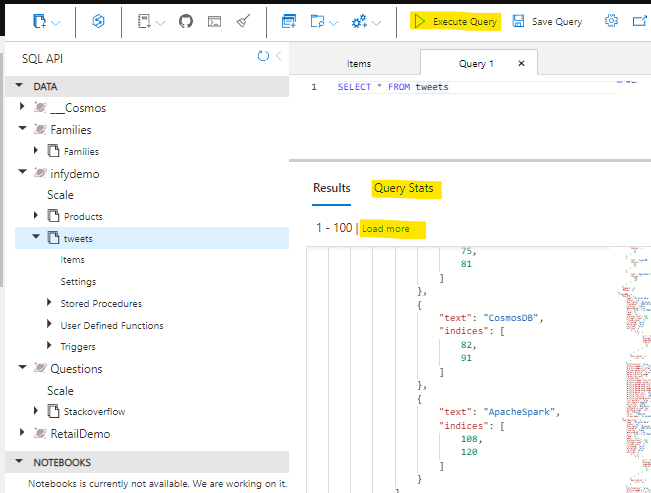
To retrieve all items from the container, in this case let's get all the tweets. Type this query into the query editor:
SELECT *
FROM tweets
...and click on Execute Query!
Cosmos DB SQL API queries
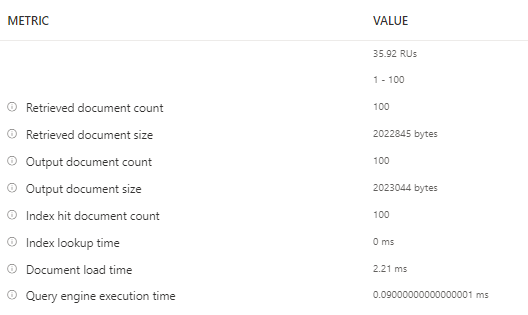
Few things to note here are, It retrieves the first 100 items from the container and if you need to retrieve the next 100, you could click on load more , under the hood it uses the pagination mechanism. Another handy thing here is that you can navigate to query stats and see more details on the query such as RUs, Document size, Execution time etc.
When referring to fields you must use the alias you define in the FROM clause. We have to provide the full "path" to the properties of the objects within the container. For example, if you need to get the RetweetCount from the container for all the items.
Lets see how we can find out the hashtags that have been used in all the tweets. We can use the JOIN keyword to join to our hashtags array in each tweet. We can also give it an alias and inspect its properties.
Let's see the JOIN in action. Try this query:
SELECT hashtags
FROM tweets
JOIN hashtags IN tweets.Hashtags
Now that we know how to join to our child array we can use it for filtering. Lets find all other hashtags that have been used along with the known hashtags (#Azure, #CosmosDB):
SELECT hashtags
FROM tweets
JOIN hashutcDate IN tweets.Hashtags
WHERE hashtags.text NOT IN ("CosmosDB", "Azure")
We can use a feature called Projection to create an entirely new result set. We could use this to create a common structure or to make it match a structure we already have.
Try this query:
SELECT tweets.CreatedBy.Name AS Name,
		tweets.FullText AS Text,
		tweets.CreatedAt AS CreatedTime,
        tweets.TweetDTO.metadata.iso_language_code AS LanguageCode
FROM tweets
The SQL API supports javascript User defined functions, there that you can use on this server called displayDate which removes the time parts of a UTC date string.
This is the function :
function displayDate(inputDate) {
    return inputDate.split('T')[0];
}
Let's have a go at using it
SELECT tweets.CreatedAt,
    udf.displayDate(tweets.CreatedAt) AS FormattedDate
FROM tweets
The SQL API also supports stored procedures written in JavaScript which enables you to perform ACID transactions over multiple records. This allows scalable and almost unlimited expandability on the functionality Azure Cosmos DB can offer.
These are some of the basic queries to get started with CosmosDB SQL API. If you want to get to know more about SQL API the following references would be useful.
Exactly a year ago, Github announced codespaces and gave the option to join the beta. If you are having your repository in github and need to contribute to an open source project or if you want to commit something quickly to the repository this is one of the feature that you might be interested in, It supports developers to do it on the browser on any device.
It allows developers to use a fully-featured, cloud-hosted development environment that spins up in seconds Directly within Github. This will help you to start contributing to a project immediately from any machine, all without needing to install anything locally. If you are a developer, you should be a fan of this one. As we’ve all been adopting practices like social distancing and remote working, development teams have become more distributed. In this post, i wanted to share one of the productivity tips on how to open your code directly from the browser via codespaces.
You just need to open your repository and add "1s" after github when viewing the codebase on browser and github codespaces loads up instantly.
Here is the action below!
One thing to note here is that, this feature is not directly from the Github codespaces itself, it is enabled via the 1s which is sort of a middleware repository enabling this! However it's a great feature and worth exploring it!
Hope this enable more developers to contribute to Opensource world instantly. Cheers!
Are you are .Net developer interested in building Microservice based applications to the Cloud?. Recently i gave a talk about announcements on DotNet ecosystem and building Cloud Native applcitions with Tye and i decided to write on the same topic . Tye is an amazing project from Microsoft to ease the development, deployment with two fundamental cloud native technologies such as Docker and Kubernetes. If you have been deploying Applications in production using containers, you must be already aware of how complex steps you need to make in order to get your application running. I have worked on multiple projects where I have to run many modules as dependencies at the same time, even though I was only working on one of them. There has always been a requirement for a tool to start, deploy applications with a simple command to your desired environment without spending much time on creating docker files, configurations etc.
Tye is an experimental developer tool from the .NET team at Microsoft that makes developing, testing, and deploying microservices and distributed applications easier. It comprises a local orhestrator to assist the developers to develop microservices, deploy them to kubernetes with minimal configuration and steps.
Service discovery via configuration conventions makes Developers to expose their API with proper documentation
Add dependencies (Redis, SQL Server, etc.) without writing docker files
Run and debug locally using containers and Kubernetes
Local dashboard for metrics, logging, debugging
Automatically dockerize and deploy to Azure Kubernetes Service
What I like really like about Project Tye is that it has a very small footprint and it is so simple to get started with after spending so many years with docker and K8s. It offers the following capabilities,
This section will demonstrate how to use Tye to run multi-project application.
Step 1 : Make a new folder named dotnetconfApp
mkdir dotnetconfApp
cd dotnetconfApp
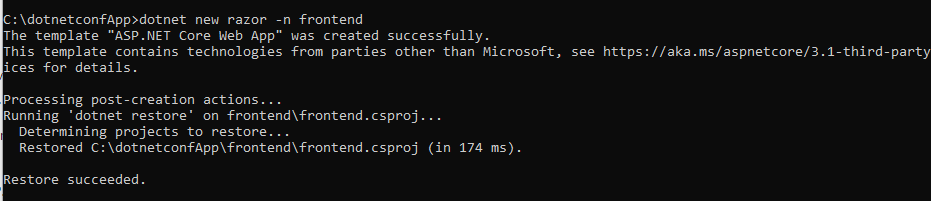
Step 2 : Create a frontend project with Razor
dotnet new razor -n frontend
Step 3 : To run the frond end project, execute the following command
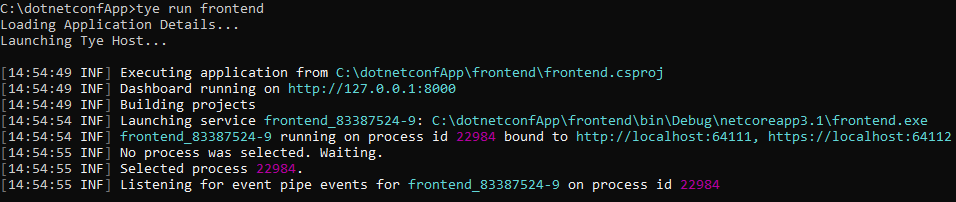
tye run frontend
As you could see above tye will do two things: start the frontend application and run a dashboard. Navigate to http://localhost:8000 to see the dashboard running.
The dashboard should show the frontend application running.
The Logs column has a link to view the streaming logs for the service.
the Bindings column has links to the listening URLs of the service.
Step 1 : Let's go ahead and add a Web API to fetch the data for the front end application. If you haven't already, stop the existing tye run command using Ctrl + C. Create a backend API that the frontend will call inside of the microservices/ folder.
dotnet new webapi -n backend
Step 2 : Create a solution file and add both projects
dotnet new sln
dotnet sln add frontend backend
You should have a solution called dotnetconfapp.sln that references the frontend and backend projects.
Step 3: Run the multiple projects with tye . Execute the following command within the solution folder,
tye run
The dashboard should show both the frontend and backend services. You can navigate to both of them through either the dashboard of the url outputted by tye run.
Make the Communication between the frontend and backend
As you see above, we have both the backend and frontend applications running, let's make them communicate. By default, tye enables service discovery by injecting environment variables with a specific naming convention.
Step 1: Open the solution folder with VSCode or Visual Studio
Step 2 : As we need to fetch and bind the data from the sample WebApi , lets add a Contract named WeatherForecast.cs to the frontend project and it should match the contract that exist in the backend project WeatherForecast.cs
using System;

namespace frontend
{
    public class WeatherForecast
    {
        public DateTime Date { get; set; }

        public int TemperatureC { get; set; }

        public int TemperatureF => 32 + (int)(TemperatureC / 0.5556);

        public string Summary { get; set; }
    }
}
Step 3: Add a file WeatherClient.cs to the frontend project with the following contents:
using System.Net.Http;
using System.Text.Json;
using System.Threading.Tasks;

 namespace frontend
 {
     public class WeatherClient
     {
         private readonly JsonSerializerOptions options = new JsonSerializerOptions()
         {
             PropertyNameCaseInsensitive = true,
             PropertyNamingPolicy = JsonNamingPolicy.CamelCase,
         };

         private readonly HttpClient client;

         public WeatherClient(HttpClient client)
         {
             this.client = client;
         }

         public async Task<WeatherForecast[]> GetWeatherAsync()
         {
             var responseMessage = await this.client.GetAsync("/weatherforecast");
             var stream = await responseMessage.Content.ReadAsStreamAsync();
             return await JsonSerializer.DeserializeAsync<WeatherForecast[]>(stream, options);
         }
     }
 }
Step 4 : Add a reference to the Microsoft.Tye.Extensions.Configuration package to the frontend project
Step 5 : Register this client in frontend by adding the following to the existing ConfigureServices method to the existing Startup.cs file:
...
public void ConfigureServices(IServiceCollection services)
{
    services.AddRazorPages();
     /** Add the following to wire the client to the backend **/
    services.AddHttpClient<WeatherClient>(client =>
    {
         client.BaseAddress = Configuration.GetServiceUri("backend");
    });
    /** End added code **/
}
...
This will connect the WeatherClient to use the correct URL for the backend service.
Step 6 : Add a Forecasts property to the Index page model under Pages\Index.cshtml.cs in the frontend project.
...
public WeatherForecast[] Forecasts { get; set; }
...
Change the OnGet method to take the WeatherClient to call the backend service and store the result in the Forecasts property:
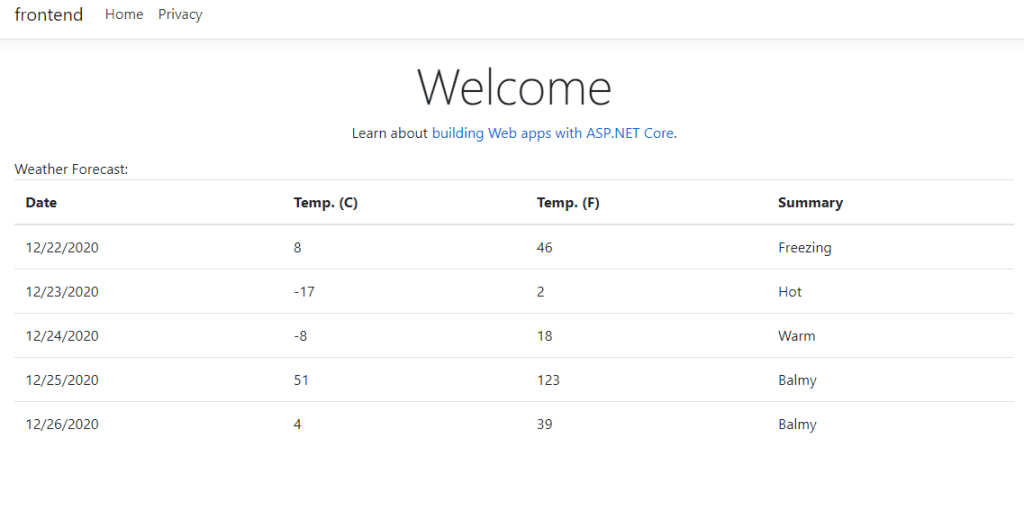
Step 8 : Run the project with tye run and the frontend service should be able to successfully call the backend service!
When you visit the frontend service you should see a table of weather data. This data was produced randomly in the backend service. Since you are seeing the data in a web UI in the frontend means that the services are able to communicate.
If you are getting any issues with the self signed scertifications, you need to run the below commands,
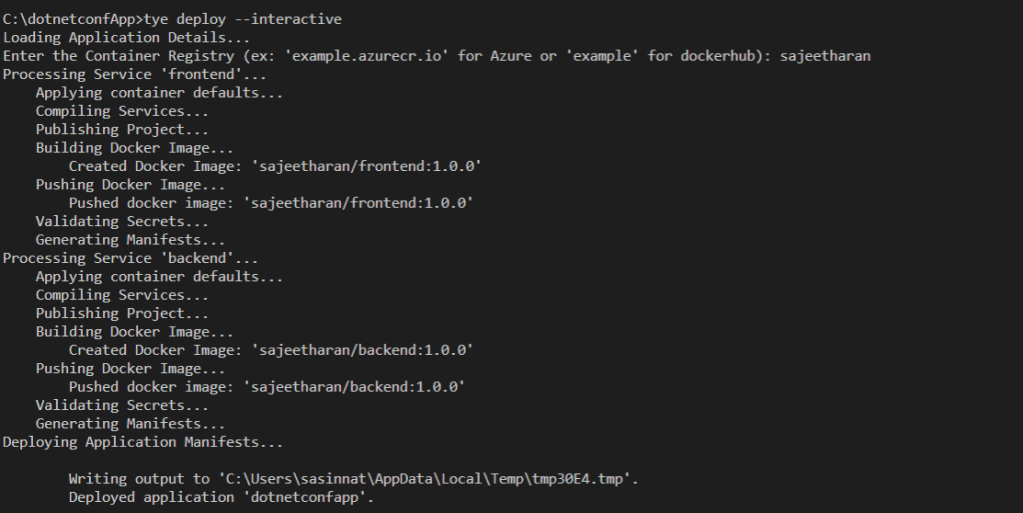
Step 4 : Now everything is ready do easy deploy the solution. Navigate to the solution folder and execute following:
tye deploy --interactive
You will be prompted to enter the Container Registry (ex: 'example.azurecr.io' for Azure or 'example' for dockerhub) where the Kubernetes service is installed.
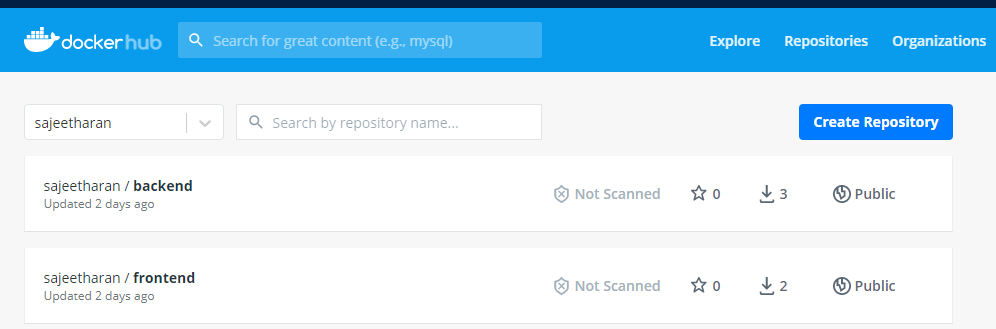
The deployment process has built the docker container and pushed repositories to my registry:
If you are using VScode with the Kubernetes extension installed, once you authenticate to Azure using Azure extension, you will be able to navigate to the cluster and click on Workloads -> Pods -> Right Click Get
You can also explore the running pods from the Azure portal or using Cloudshell as well. You'll have two services in addition to the built-in kubernetes service.
You can visit the frontend application by port forwarding to the frontend service.
kubectl port-forward svc/frontend 5000:80
Now navigate to http://localhost:5000 to view the frontend application working on Kubernetes. You should see the list of weather forecasts just like when you were running locally.
Some important Notes:
⚠️ Currently tye does not provide a way to expose pods/services created to the public internet.
⚠️ Currently tye does not automatically enable TLS within the cluster, and so communication takes place over HTTP instead of HTTPS.
In this post I explained how easy it is to get started with Project Tye and How to run a simple web application. You can certainly do the same adding an external dependency like SQL server or Redis cache without creating docker files manually. In short, Tye simplifies the multiple gestures for all the services within an application to a single command. Even though Project Tye is an experimental tool , you can watch out for more features around service discovery, diagnostics , observability, configuration and logging when it comes to building cloud native applications with Microservices. Certainly it's a great addition to the tooling what .Net ecosystem provides and hope you will consider exploring it more. Cheers!
Are you hearing the word Devspaces for the first time?. Let me put this way, Imagine a developer having to deal with a large application which has chunks of Microservices and want to get some functionality done?. There will be many risks and one of them would be dealing with right environments. As we know the best way to counter this issue within a team would be to containerize and host it on cloud. Which will let the developer to work on the particular feature and debug the container without creating the environment locally. That is what exactly Azure Dev Spaces does.
What is Devspaces?
Devspaces allows you to build, test and run code inside any Kubernetes cluster. With a DevSpace, you run everything remotely inside pods running on top of a Kubernetes cluster. Additionally, the DevSpace CLI takes care things automatically such building and pushing images for you when you make changes to your Dockerfile. If you are making a source code change, the DevSpace CLI does not require you to rebuild and redeploy.
It rather syncs your locally edited source to straight to the containers running inside Kubernetes. This makes you to edit locally but compile and run everything remotely inside Kubernetes and still use modern development features such as hot reloading. Azure Dev Spaces supports development with a minimum development machine setup. Developers can live debug on Azure Kubernetes Services (AKS) with development tools like Visual Studio, Visual Studio Code or Command Line.
With the recent announcement of Bridge To Kubernetes GA, Azure Dev Spaces will be retired on October 31, 2023. Developers should move to using Bridge to Kubernetes, a client developer tool.
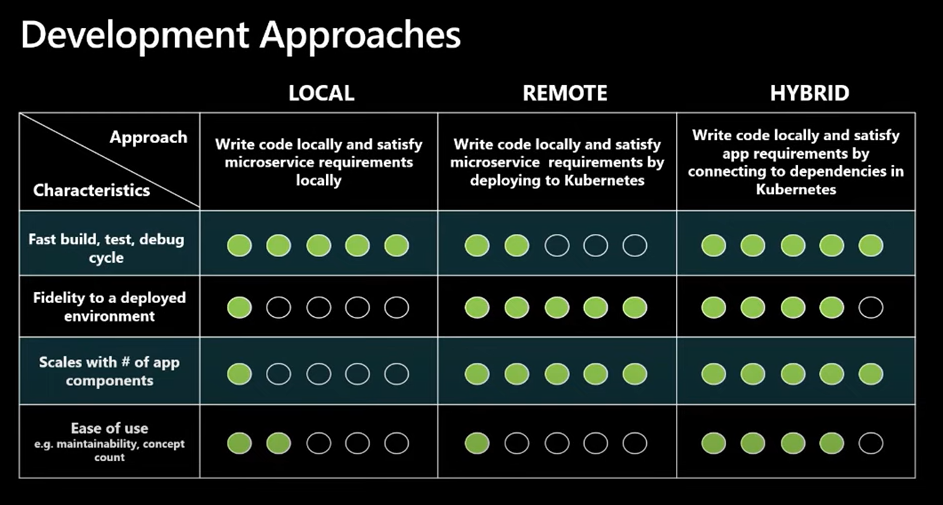
It was formerly called as Local Process with Kubernetes. Bridge to Kubernetes is an iterative development tool offered in Visual Studio and VS Code through extensions that you can pick up in the marketplace. IT allows developers to write, test and debug microservice code on their development workstations while consuming dependencies and inheriting existing configuration from a Kubernetes environment. There are lot of different tools and methods for solving these kind of challenges when you are working on a single micro-service in the context of a larger application. Those different methods and tools into three main types .There's the local, remote and hybrid approach as shown in the image below
Development Approaches
If you look at the above picture, developers are shifting from Local development methods to hybrid methods which offers the best way to deal with building applications to the cloud with containers/kuberentes. With Hybrid approach, it allows developers to write code on their development workstation, but also allow them to connect to external dependencies that are running in some remote environment. So it actually fulfilling all those external dependencies by connecting them. Let's say if you are running your application on Kubernetes on Azure, you can connect all the dependencies from your local environment and have the whole end-to-end workflow.
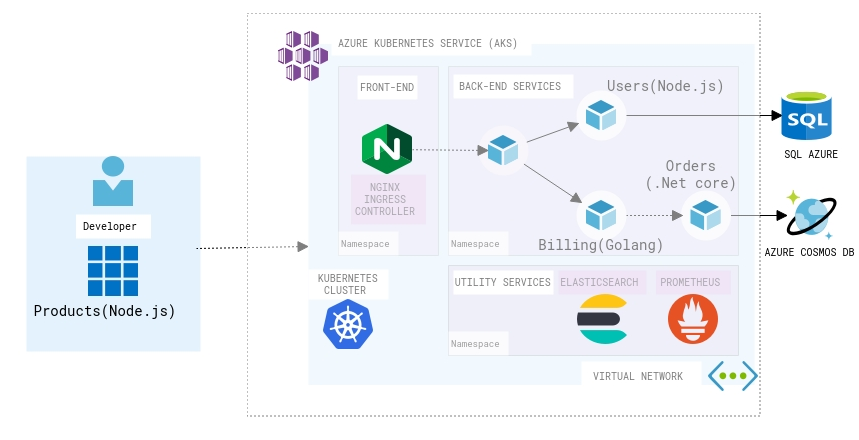
Bridge to Kubernetes Scenario
Consider the above scenario in the diagram, Assuming that i am working on a Microservice that deals with Products and the other Microservices which are developed using different stack are deployed on Kubernetes cluster on Azure. If i want to connect to any or multiple microservices and run some integration tests in my local environment Bridge to Kubernetes will help to achieve the requirement. Following are some of the Key features that Bridge to Kubernetes offers similar to Devspaces,
Accelerating and Simplifying Microservice Development
It basically eliminates the need to manually push code, configure and compile external dependencies on your development environment so that you can focus on code without worrying about other factors.
Easy DebuggingCode
It lets you to run your usual debug profile with the added kuberentes cluster configuration. It allows developers to debug code in the way they want would while taking advantage of the speed and flexibility of local debugging.
Developing and Testing End-to-End
One of the important feature is the Integration testing during development time. Select an existing service in the cluster to route to your development machine where an instance of that service is running locally. Developers can initiate request through the frontend of the application running in Kubernetes and it will route between services running in the cluster until the service you specified to redirect is called same as how you would do debugging by adding a breakpoint in your code.
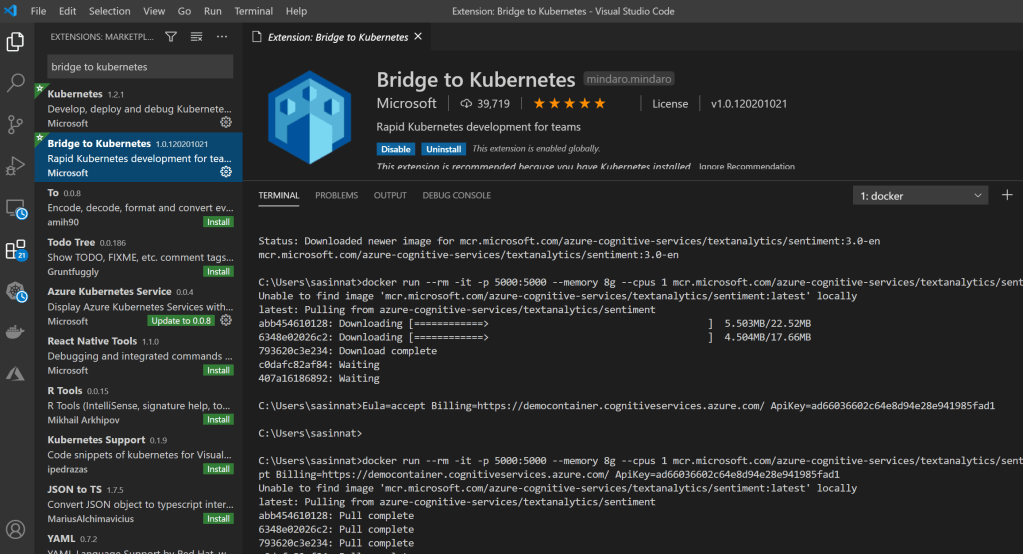
You can Start debugging your Kubernetes applications today using Bridge to Kubernetes.You need to download the extensions from the Visual Studio and VS Code marketplaces.
Bridge to Kubernetes VSCode extension
If you would like to explore more with a sample application follow the example given on Use Bridge to Kubernetes . Also kindly note the Bridge to Kubernetes collects usage data and sends it to Microsoft to help improve our products and services.
Start using Bridge to kuberentes and deploy things to production even faster than before! Cheers!