
58 posts tagged with "azure"

View All Tags

· 6 min read

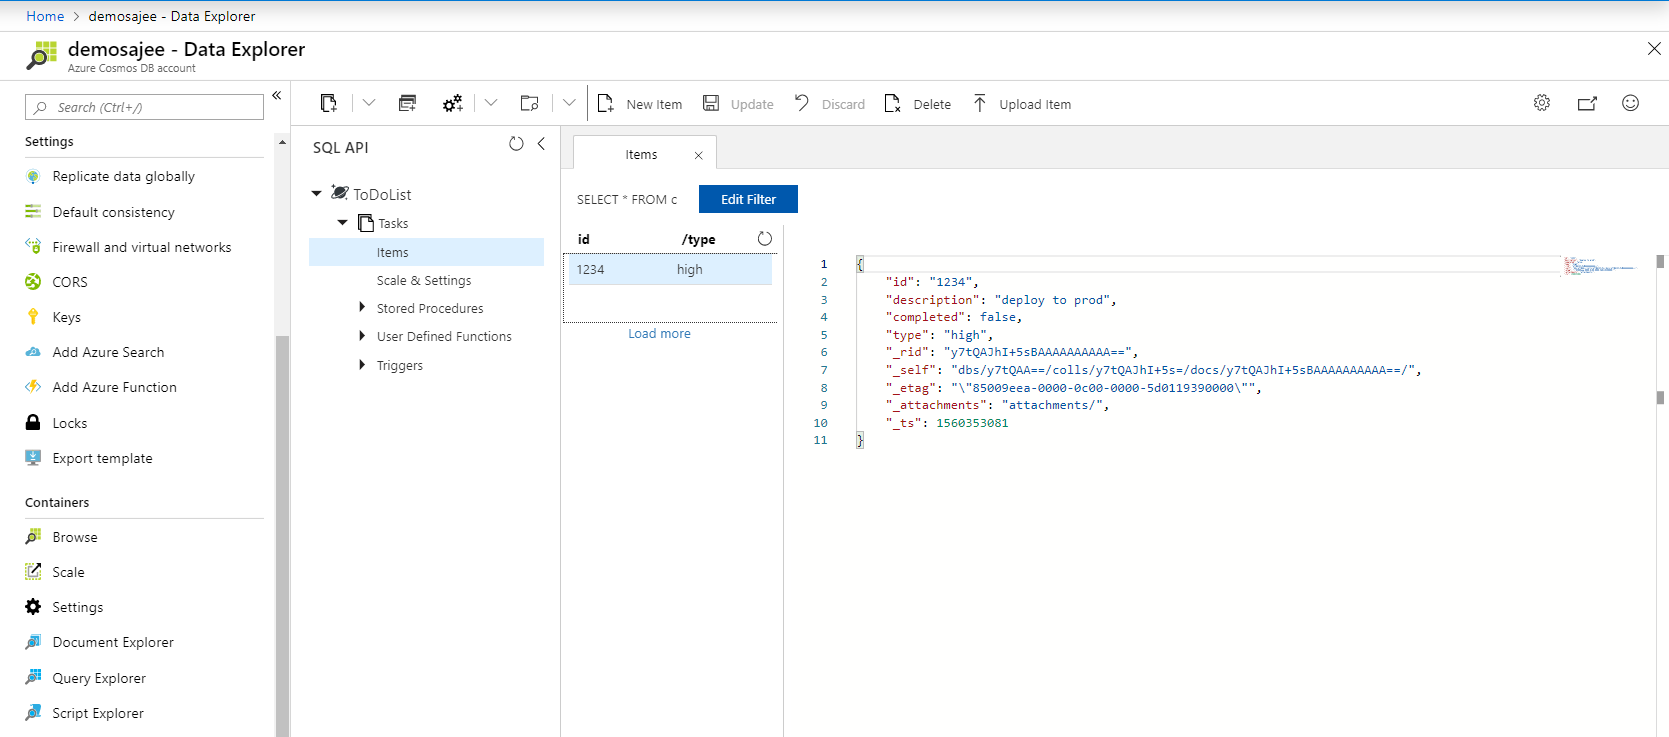
I have been working with Cosmos DB for almost 2 years and most of the time i have used SDKs to connect to Cosmos DB. In the recent times i started consuming Rest API for my hybrid application. One of the tricky part in Cosmos DB is that connecting to it and running queries with REST API. In this blog post, I want to elaborate more on the repository i have created to test the APIs in one go. Also will discuss more on how to call Azure Cosmos DB by using its REST API. I will be using the Cosmosdb account and Postman tool.

If you are very new to Cosmosdb, read my blog on how to setup Cosmos DB in local and connect via Visual Studio Code. Many of us come from the SQL background, when we want to connect to SQL Server, usually we need to have a username and password. You need to do more than that to connect and run queries in CosmosDB. But CosmosDB needs some more parameters to connect to it.

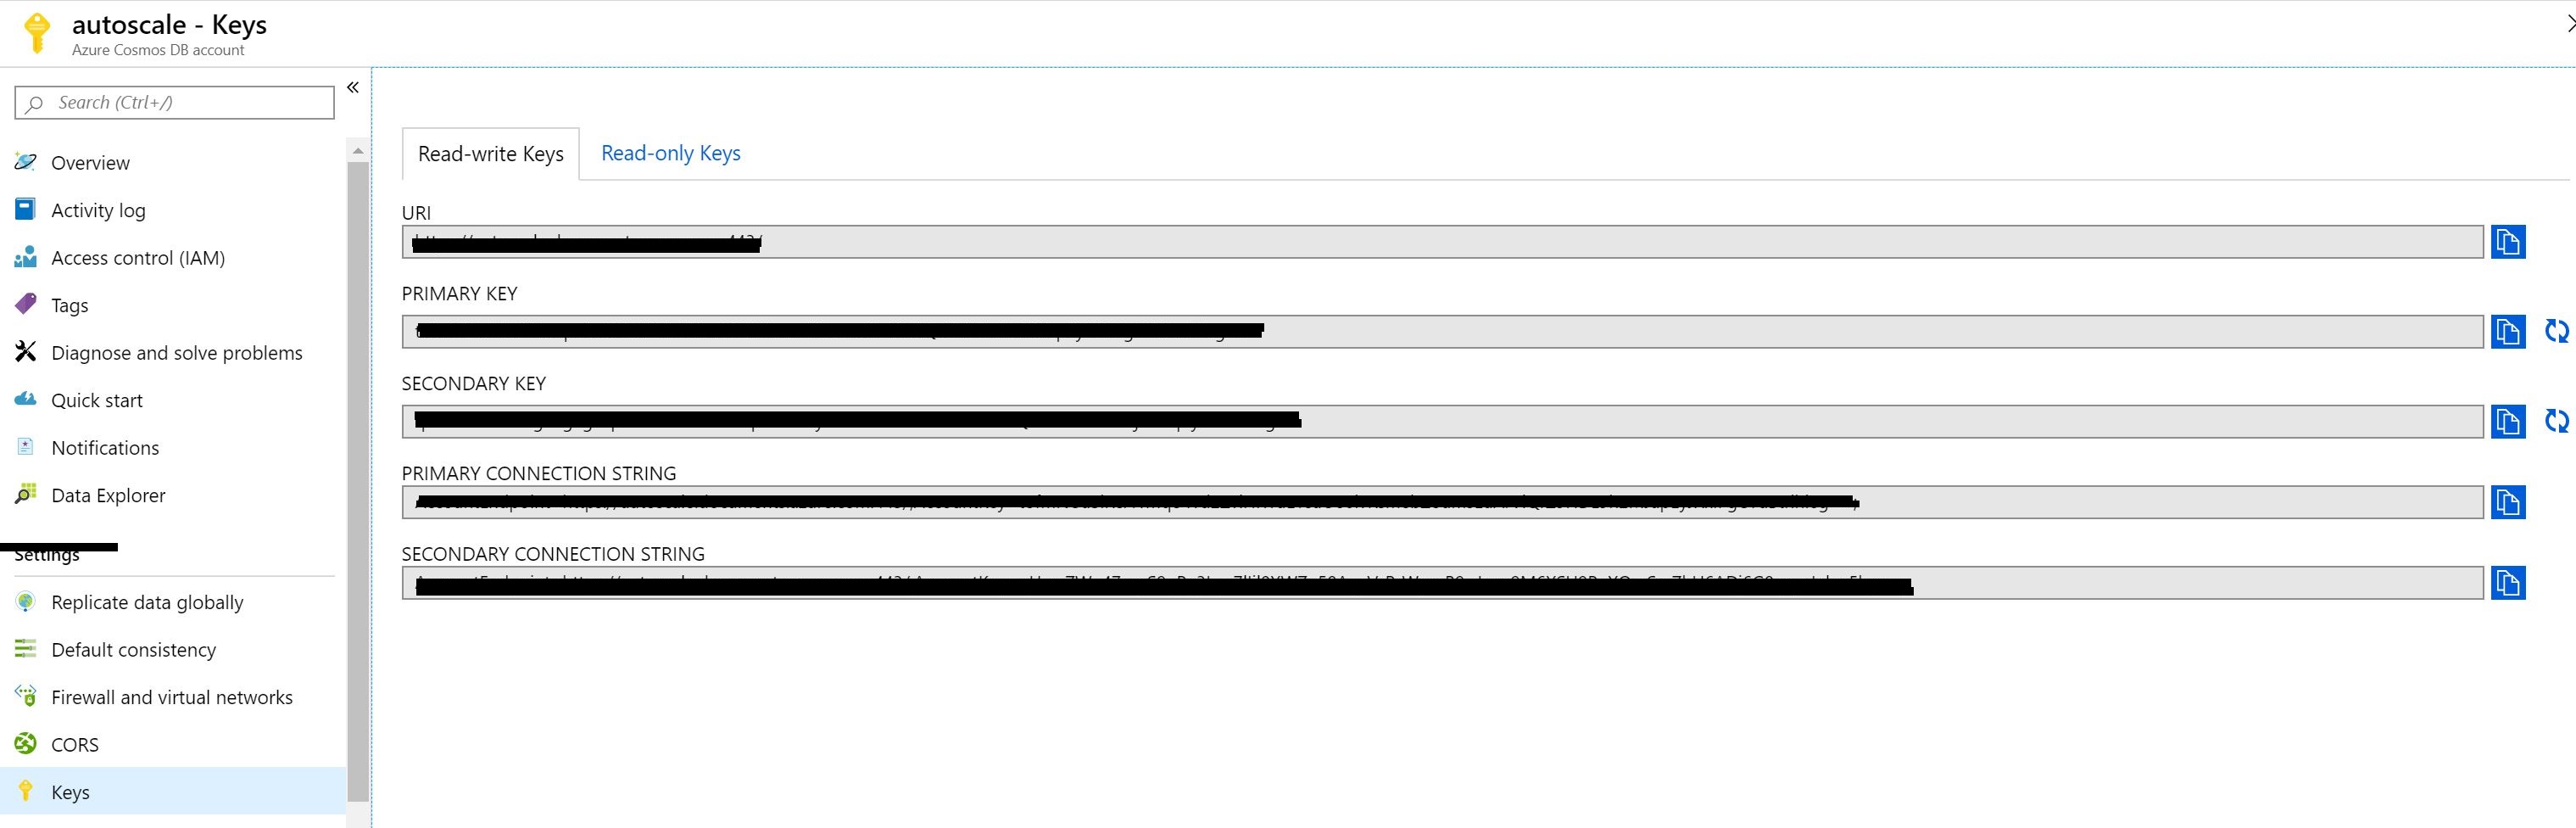
Once you create the Cosmos DB account on Azure and navigate to the keys section on the left pane. You will see two types of tabs on the Keys. There are two types of keys, one type of users having the Key can Read and Write. Other type ofusers having the key can only Read. 

Let's understand different terms used while making a connection to Cosmos DB

Master Keys are keys are created when the Cosmos DB Account is created. This key can be regenerated by clicking on refresh icon to regenerate them in the Azure portal. When you are using Cosmos DB emulator you won't be able to generate it. These keys are very sensitive ones and provide access to the administrative resources. We should be very careful when weneed to store them. Recommended way is to use Read-Only Keys as much as we can.

Resource Tokens are responsible for providing access to specific containers, documents, attachments, stored procedures, triggers, and UDFs. Each user must have a resource token. It is mandatory that every application needs to use a resource token to call Cosmos DB API.

Users are specific for Cosmos DB databases. You can attach specific permissions or roles to each user like the way we do in SQL server.

Cosmos DB API

As i mentioned earlier we have many options to access to CosmosDB. Rest API is one of these options and it is the low level access way to Cosmos DB. Most of the features supported with SDK are available and you can customize all options of CosmosDB by using REST API. To customize the calls, and pass the required authorization information, you need to use http headers.

In the following example, I am going to try to create a database in CosmosDB emulator by using the REST API. First let’s look at the required header fields for this request. These requirement applies to all other REST API calls too.

x-ms-version : As the name indicates this is the version of the REST API. You can find the available versions here. If you are confused on what to use always use the latest one.

x-ms-date : This is the date of your request. It must be formatted by Coordinated Universal Time. (ex: Sun, 30 June 2019 05:00:23 GMT)

x-ms-session-token: It is required if you want to use session consistency. For each of your new write request in Session consistency, CosmosDB assings a new SessionToken to the calls. You need to track the right session token and use it in this header property to keep usng the same session. SDK does this for you in the background, if you want to use the REST API, you need to do this manually.

Authorization: This one is the most important and tricky one. This needs to get generated for each of your call to Cosmos DB. It must be in the following format

How to Call APIs with Postman:

To call Cosmos DB directly from POSTMAN, you need to get the Cosmosdb account URL we need to use. If you are using the emulator, you can get it from the the local environment which should be like https://localhost:8081. I will be using the account created in Azure protal.

One other thing you need to setup is the environment variable as you see we are using some of the configured variables in the script, you can create a new environment variable using Postman by navigating to environments and add new environment with configured variables.
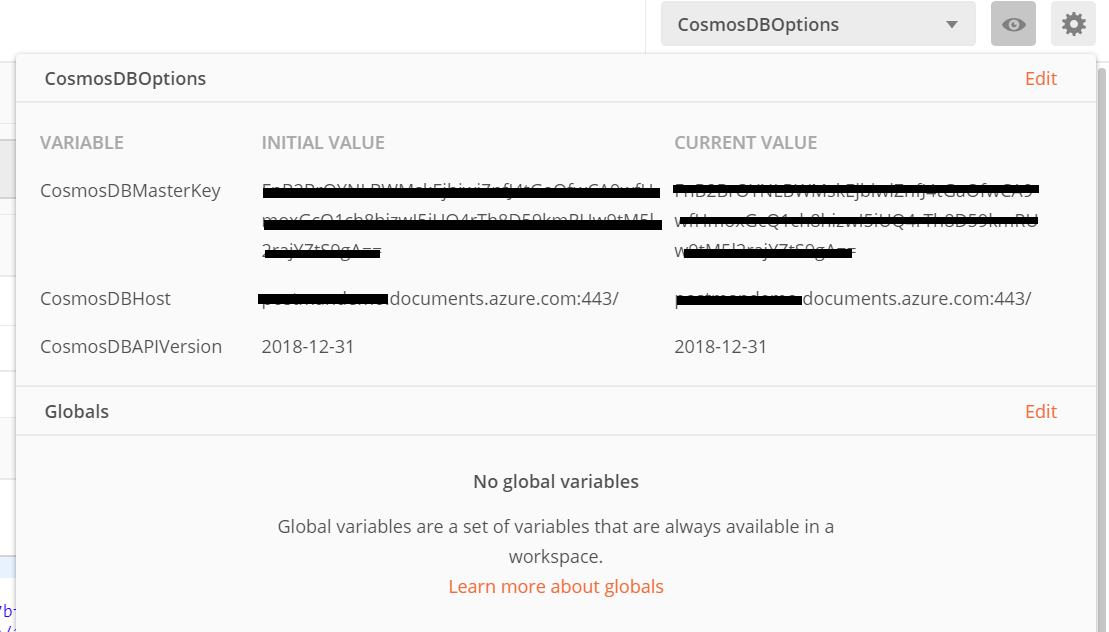
Create environments

Configured variables

we need to look at the documentation of CosmosDB Rest API. You can find all URL locations from this link. Since I am trying to list the databases inside a collection, I am going to use the following path.

https://postmandemo.documents.azure.com:443/

     Also, documentation tells us that this must be a GET Http Action. In Postman, I pick the GET and type the URL to the URL section in the following example.

As Next step, we need to create an environment in Postman to store some variables. As connecting to cosmos db needs a token we need to generate a token for CosmosDB and get the current date to fill the header named x-ms-date. I am going to use variables in Environment to store the values. To Create an environment. Click on gears icon and click on Add.

The below example shows the environment variables that we will frequently use to test Cosmos DB API.

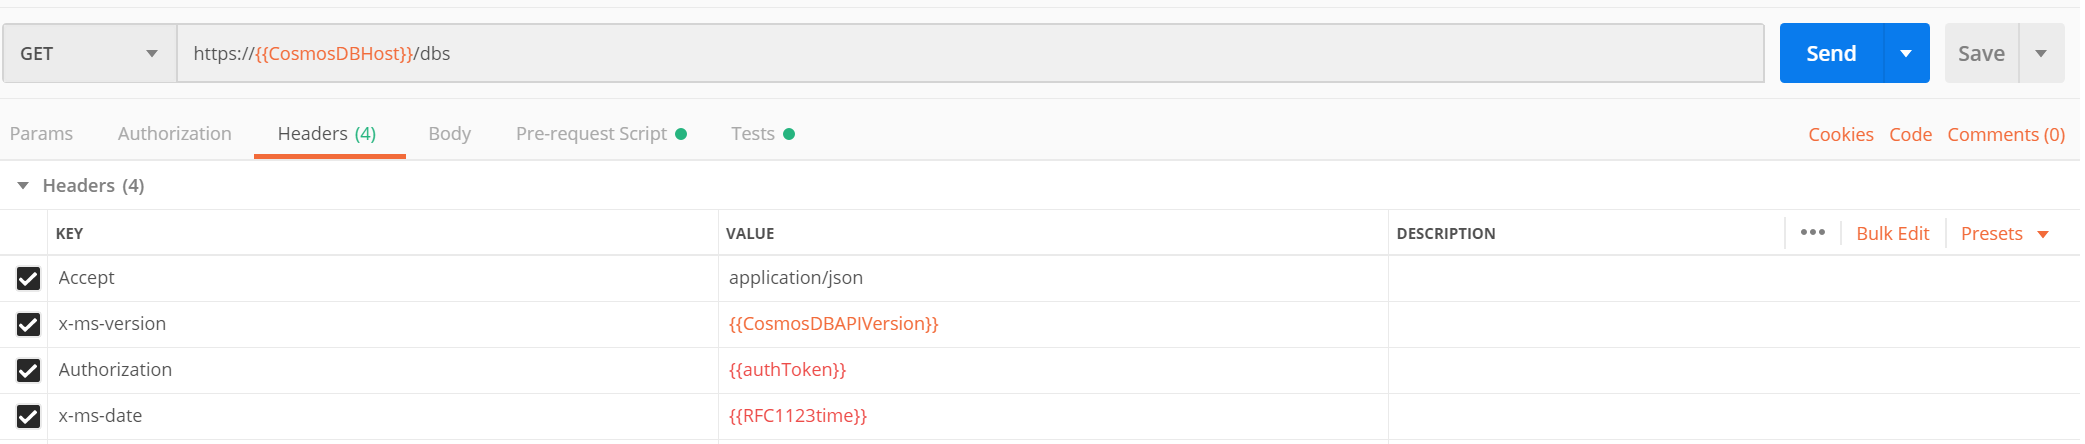
As we are requesting to get the list of databases, we are ready to add values to headers section. Click on Headers link, and add the following headers. These are the required HTTP headers for all CosmosDB REST API calls.

x-ms-version : 2019-06-30
(This is the latest version. You can find the other versions here.)

x-ms-date: {{utcDate}}
(This is the variable we defined in the Postman environment. Its value will be generated dynamically in the Pre-request Script.)

authorization : {{authToken}} (This is the other parameter we just created. We are going to generate its value in script.)

Acceptapplication/json.
(This is required since this is going to be a GET Http Action.)

Your screen should looks like this.

Next, we need to generate an authorization token and the current date in the required format.
To do this, we’ll use the Pre-request Script section in Postman. This script runs automatically before each request. In this step, we’ll generate the authToken and utcDate parameters.
Simply copy and paste the following code into the Pre-request Script tab:

https://gist.github.com/sajeetharan/c2c1fbc48bf24e3b321323b34232f5a8

We are done with all the things needed to get the list of databases. Click on the send button to see the list of databases as response.

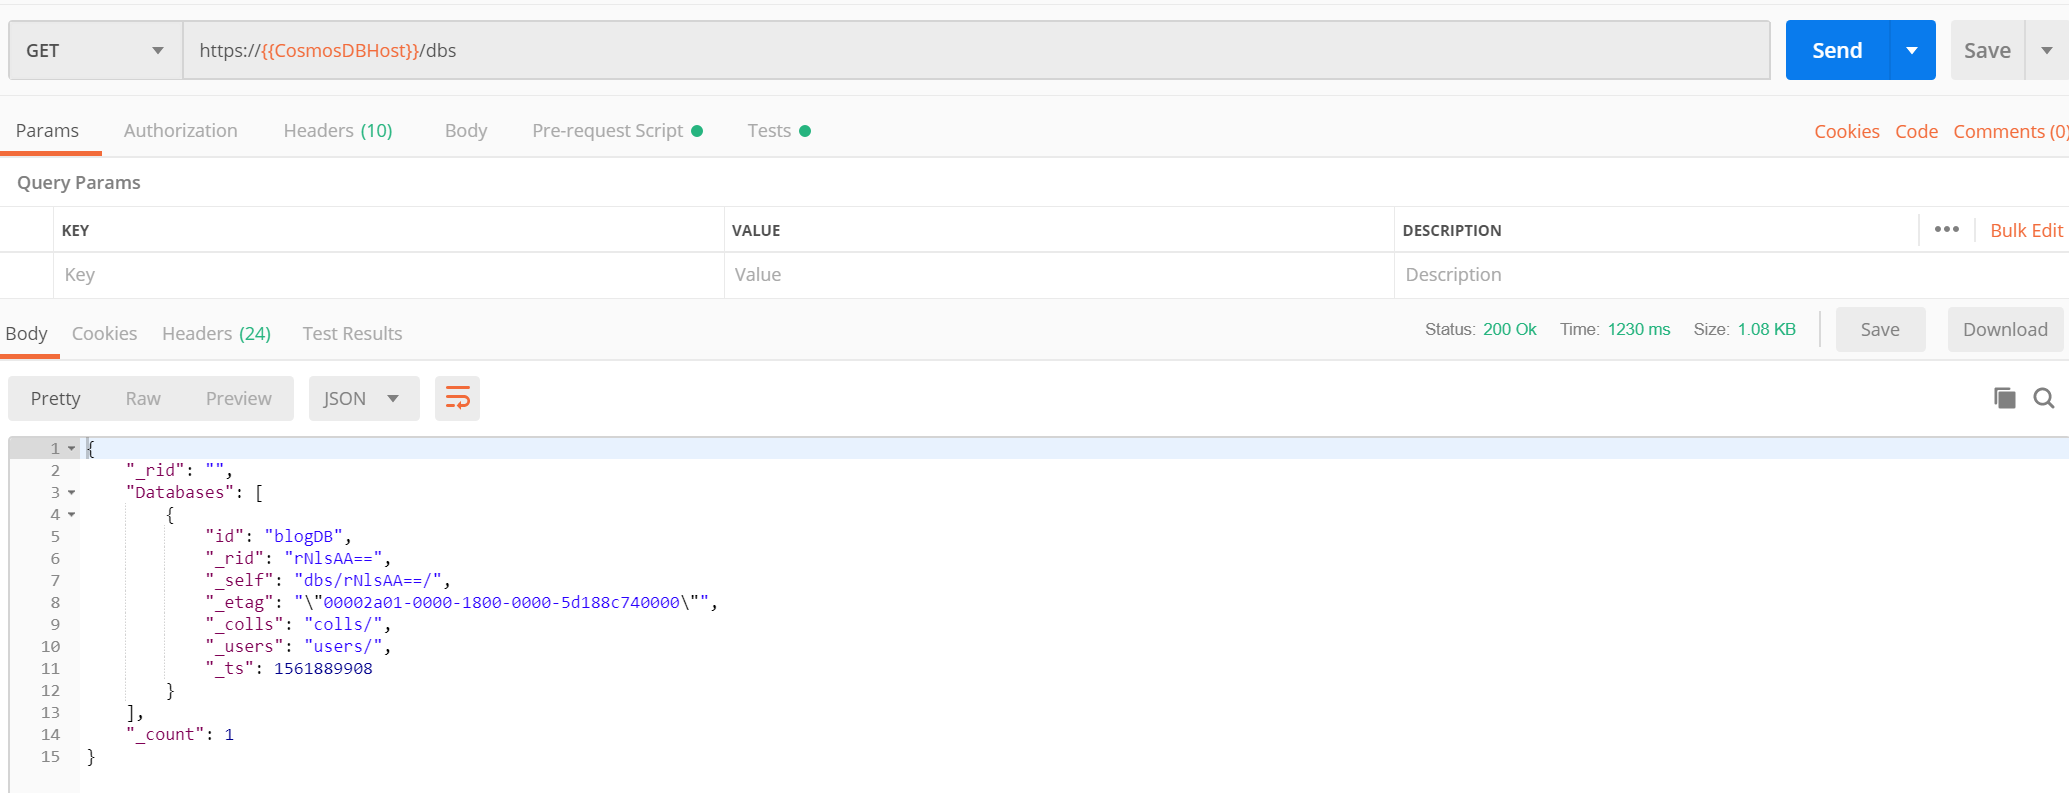
Great! Look at all that information we received back in the body of the Response.

This is the way to test Cosmos DB API with POSTMAN. You can try different APIs with the simple collection we've created here. Now it becomes easy for developers to leverage the Cosmos DB api and to play around with it.

· 2 min read

Road traffic is a very classic and burning problem in Sri Lanka and in most of the Asian countries. Personally I have to spend 2 hours on the road everyday by just stuck in the traffic and I assume the same for other people who gets stuck for many hours with no way out.

I was thinking of implementing a solution through various ways with PaaS provided by Azure, this blog focus on one of the solution with Azure by using various services such as IOT hub,Functions,Cosmosdb,Powerbi and bot framework

Overall Architecture:

Components used:

  • Azure IOT hub
  • Azure Functions
  • Azure cosmosdb
  • Power BI

How it works?

IOT sensors can be placed in heavy traffic areas to monitor traffic level along the road. Everyone can access the data using Facebook messenger bot and subscribe on specific road/area. When there is heavy traffic, push notification will be sent to subscribers allow them to avoid that area and redirected to some other road. Also a notification will be send to the traffic police to take over the control.

How to build?

The high level architecture includes 4 steps.

  • IOT sensors placed over the areas will send data to the Azure IOT hub.
  • Azure IoT Hub will be configured to trigger Azure Functions to Store data into Cosmos DB  and also send notification to Facebook messenger bot(This could be replaced with LINE,Telegram,Skype etc) subscribers.
  • Facebook messenger bot connects to Azure Functions which will acts as serverless bots over HTTPS and  Azure Functions to process message from Facebook messenger users and reply back
  • PowerBI connects to Cosmos DB and then Visualize Traffic level on map in real time and could be displayed on the control room.

I will be implementing this POC and publish the code in my github repository in the coming days. In the meantime if you have any suggestions feel free to comment below.

· 4 min read

I was at the Global Azure Bootcamp recently concluded last week, one of the participant came and asked me, "Hey what is Cosmos DB" I casually responded “Well, that’s Microsoft’s globally distributed, massively scalable, horizontally partitioned, low latency, fully indexed, multi-model NoSQL database". The immediate question came after that was whether it supports hybrid applications. In this blog I will be explaining how to leverage the features of cosmos db when you're building hybrid applications.

Ionic framework is an open source library of mobile-optimized components in JavaScript, HTML, and CSS. It provides developers with tools for building robust and optimized hybrid apps which works on Android,IOS and web.  Ionic comes with very native-styled mobile UI elements and layouts that you’d get with a native SDK on iOS or Android.

Let's see how to build Hybrid application with Ionic and Cosmosdb

PreRequisites:

You need to have npm and node installed on your machine to get started with Ionic.

Step 1: Make sure you've installed ionic in your machine with the following command,

ionic -v

Step 2: Install Ionic globally

if it's not installed, install it by using the command

npm i -g ionic

Step 3: Create a new ionic project

Ionic start is a command to create a new ionic project. You pass in the directory name to create, and the template to use. The template can be a built-in one (tabs, blank) or can point to a GitHub URL.

The aim is to create a simple ToDo application which displays lists of tasks, and user should be able to add new tasks.

Lets create a blank project with the command

 ionic start cosmosdbApp tabs

You will see a new project getting created.

Step 4: Run the ionic app

You can run the app with a simple command by navigating to the folder and then run

Ionic serve

This starts a local web server and opens your browser at the URL, showing the Ionic app in your desktop browser. Remember, ionic is just HTML, CSS and JavaScript!

It will open the application in the default browser with the default app.

If you're stuck at any point you can refer to my slides on How to get started with Ionic and follow the steps.

https://slides.com/sajeetharansinnathurai/ionicnsbm#/10

Step 5: Create the cosmosdb account on azure portal,

We need to create an cosmosdb account and use the Endpoint and SecretKey in our application. You can follow the

Blog on how to create it from the azure portal

https://sajeetharan.wordpress.com/2018/03/26/wear-out-the-features-of-azure-cosmosdb-with-aspnetcore-application/

Create a database named "ToDoList" and containeras "Items".

Once created, lets go back to the application.

Step 6: Lets add Cosmosdb SDK to the project

To consume the Cosmosdb service in the application we need to add the Azure Cosmos Javascript SDK to the project. This can be done with the command

npm i @azure/cosmos

Step 7:  You need to create an interface/model which will be used to save/retrieve the objects from the cosmosdb

https://gist.github.com/sajeetharan/a1dff67c87dce10bc2220aa0e9c550c3

Step 8: You need to add two pages home and todo page , home to display the lists of items inside the containerand todo page to add a new item. These two pages can be generated insdie the module with the command,

ionic g page home

Ionic g page todo

https://gist.github.com/sajeetharan/85229d091990d149b9c09d71f3387287

Step 9: We need to add a service to embed the logic to communicate with the cosmosdb you can create a new service inside the module as,

ionic g service cosmos

https://gist.github.com/sajeetharan/d7336abce15fa4d10ffd9d806b819462

As we need to make use of the available methods inside the @azure/cosmos You can import cosmos with the line,

import * as Cosmos from "@azure/cosmos";

Now make use of all the available functions in the SDK to add,delete,update items in the cosmosdb.

Step 8: To make application compatible with android/ios , run the following command,

Ionic cordova build ios/android

If you want to make the development faster, you could try building your ionic application with capacitor as well.

Now your hybrid application uses cosmosdb as a backend, with this demo you know how to use cosmosdb as a database for your hybrid application. I hope you should be able to create more applications in the future with cosmosdb and ionic.

You can check the demo application source code from here.

· 4 min read

Recently, I was involved in working with a customer who had their data in on prem SQL server. As they are shifting their soultion to Cloud(Azure) with Cosmosdb, the first requirement was to migrate the existing data to Cosmosdb. In this post, I will be explaining on how to do the migration and also how to do the data transformation as Cosmosdb stores the data as key value(JSON) format in the collection whereas MSSQL stores it as a row in the table.

Cosmosdb Data Migration Tool:

The migration tool provided by Cosmosdb team supports a different various data sources. To date, it can import data that you currently may have stored in SQL Server, existing JSON files, flash files of comma separated values, MongoDB, Azure Table Storage.

PreRequisities
  1. MSSQL Server , if you don't have it grab it from here.
  2. Download Cosmosdb data migration tool.
  3. Cosmosdb Account on Azure.

In this post i will show on how to import data from AdventureWorks and if you don't already know, AdventureWorks is a popular sample database for SQL Server. There are more than 40 tables in the database and we will use one of the Views to migrate to the Cosmosdb. Lets pick vStoreWithAddress. It has the columns such as Name,AddressType,AddressLine etc.As we are migrating this data  to Cosmosdb we could make use of nested values by merging address fields together. Let's get started.

 Step 1:

Connect to AdventureWorks2017 database and open the view Sales.vStoreWithAddress. 1

Step 2:

Lets assume the requirement is to migrate the data which contains the AddressType as shipping. With this step we will also do the data transformation by merging the address fields together. So the query will be like, https://gist.github.com/sajeetharan/985bd411e3e80ebb8134a16c684748ce  

Step 3:

Open Cosmosdb data migration tool. You can open it by clicking the dtui.exe inside downloaded folder  as mentioned in the prerequisites section.

Step 4:

We need to fill the source information in the tool. As we know our data source is from SQL server. Pick the source as SQL. 3

Step 5:

You need to fill the connection string for SQL server, which you can obtain easily by going to server explorer and connecting to the SQL server as follows. 5 
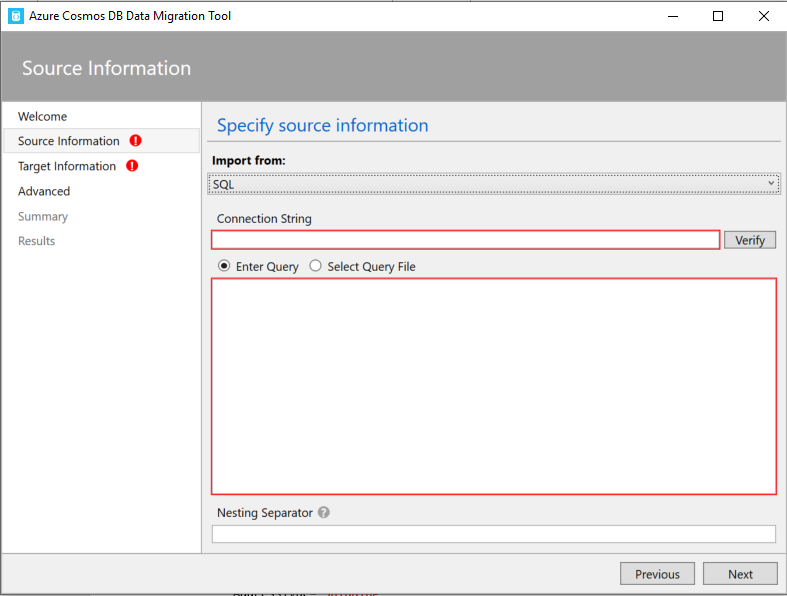
Once you enter the connection string verify if its working by clicking on verify.

Step 6:

Next step is to enter the query to select the source data, we can do this by either pasting the query or by selecting the SQL query file. 3

Step 7:

We need to give the Nesting Operator as “.” As we have used to merge the Address parts as one object. Once this is done click on next.

Step 8:

Next step is to fill the target information, as you know here our target database is Cosmosdb. I assume you have a Cosmosdb account, you can obtain your connection string by navigating to Azure portal and select Cosmosdb account.

6 
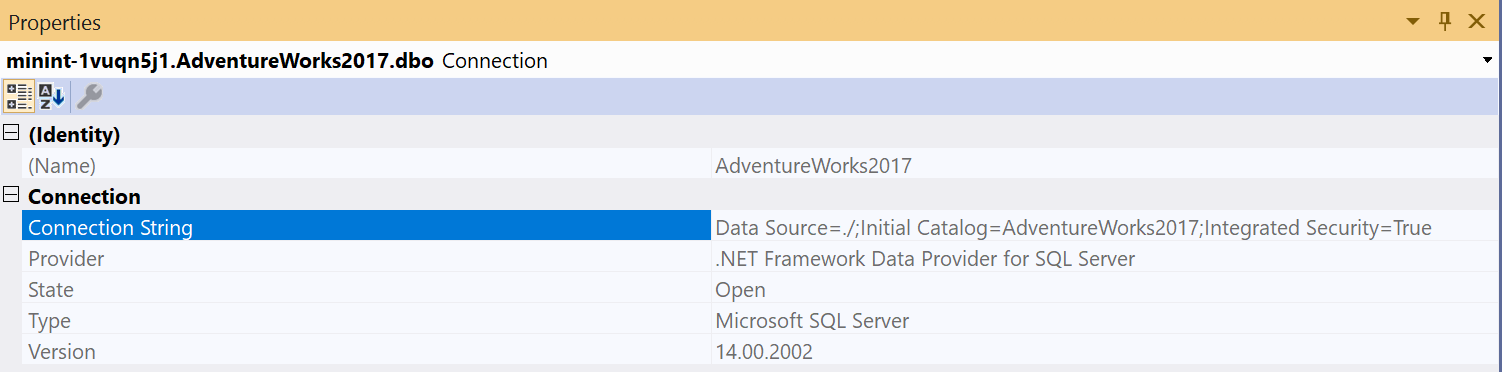
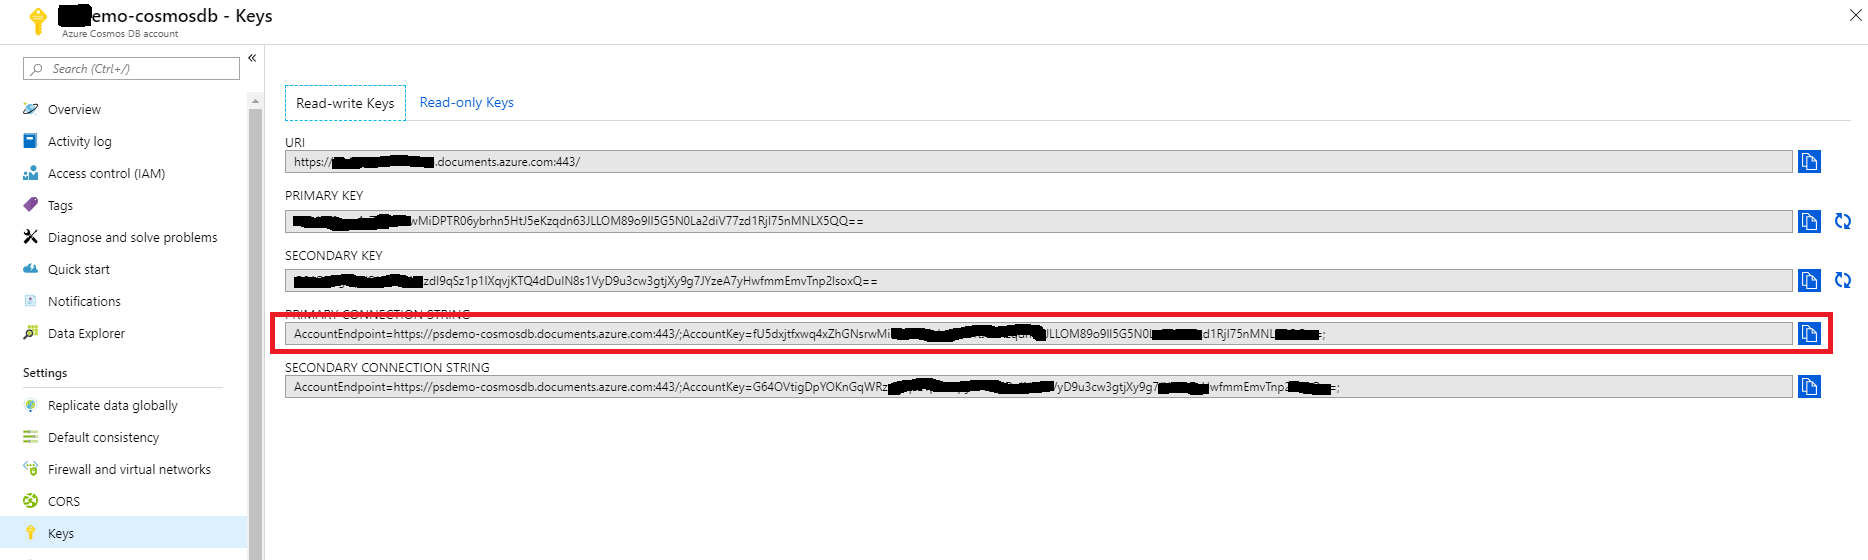
Once you copy paste the connection string, one more extra thing you need to do is to append the database with the connections string https://gist.github.com/sajeetharan/1e6e21339820b8437b1d9542e8133d51#file-sajeetharan-com\_4192016\_mssql\_cosmosdb You can verify the connection string by clicking on verify button. Also give the collection name as you prefer. It is important to define a PartitionKey in order to query the data later.Partition key is used to group multiple documents together within physical partitions. Let's partition by “/address/postalCode” which we're storing as postal code nested beneath address and for throughput, we'll just go with the default here of a thousand request units per second. One more thing we need to set the indexing policy. You'll notice this large text box here where you can set the indexing policy.I want to choose the range indexing policy which you can do here is by right clicking inside the text box and selecting from the context menu. 7 
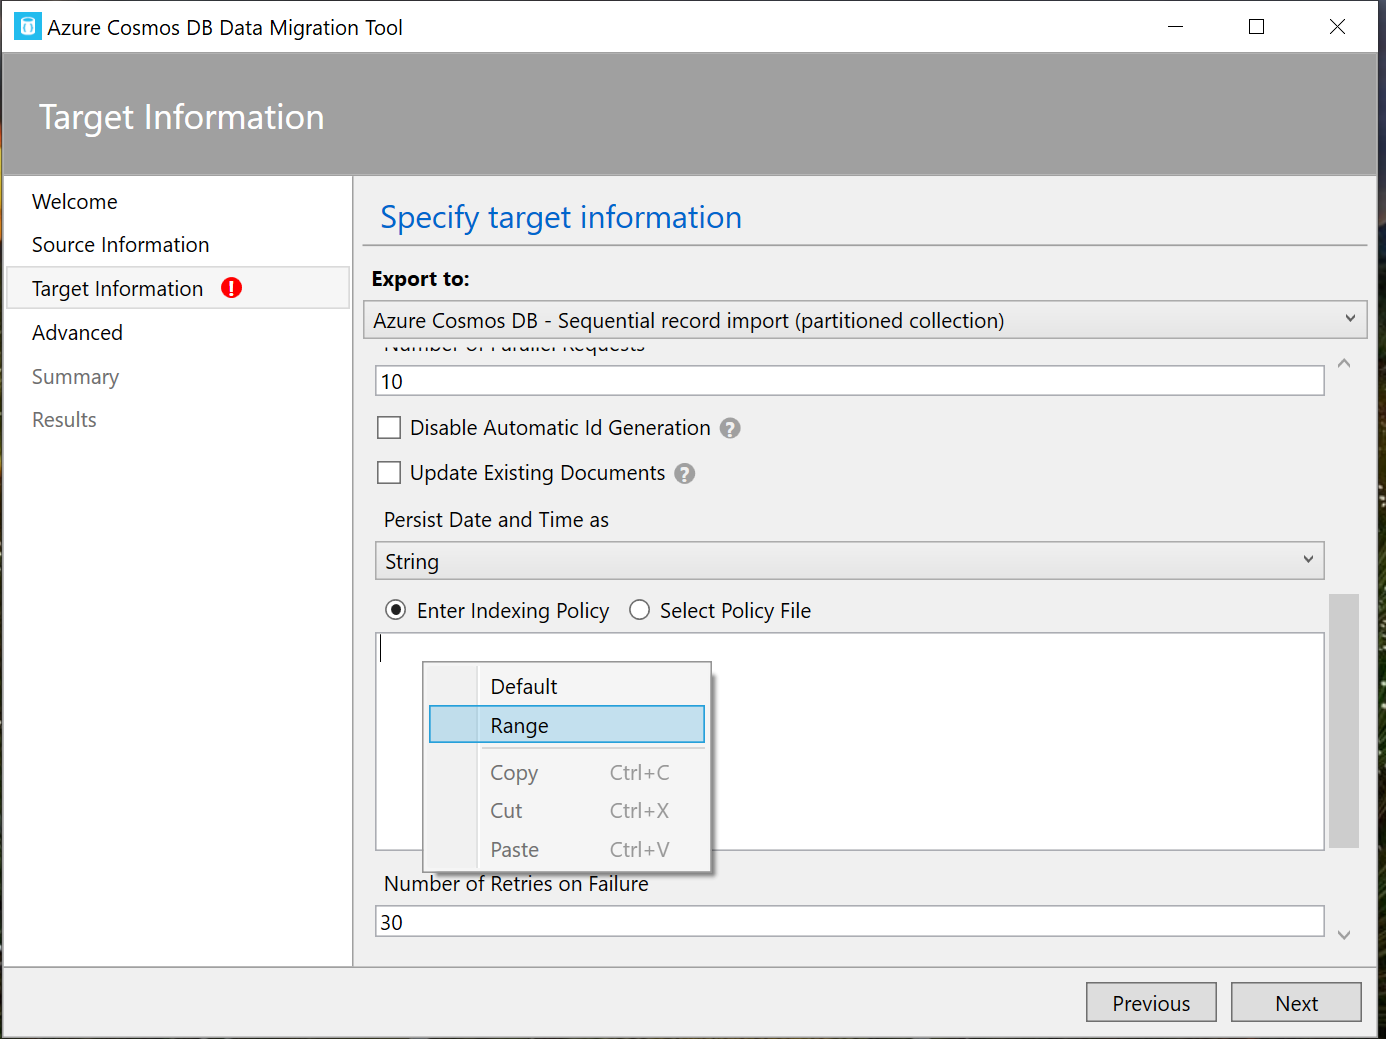
Just click Next and you will be taken to the summary page, where you can review the Migration steps at once.

Step 9:

Once you click import on the last step. You will see a successful message as all the data been transferred with the number of documents created. 8

Step 10:

You could verify the migration by running a query on the Cosmosdb data explorer as follows, 10 
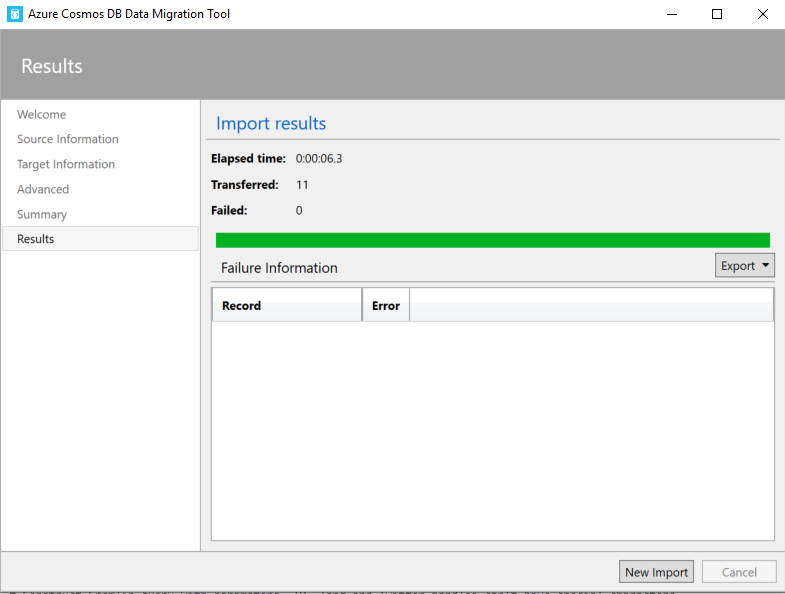
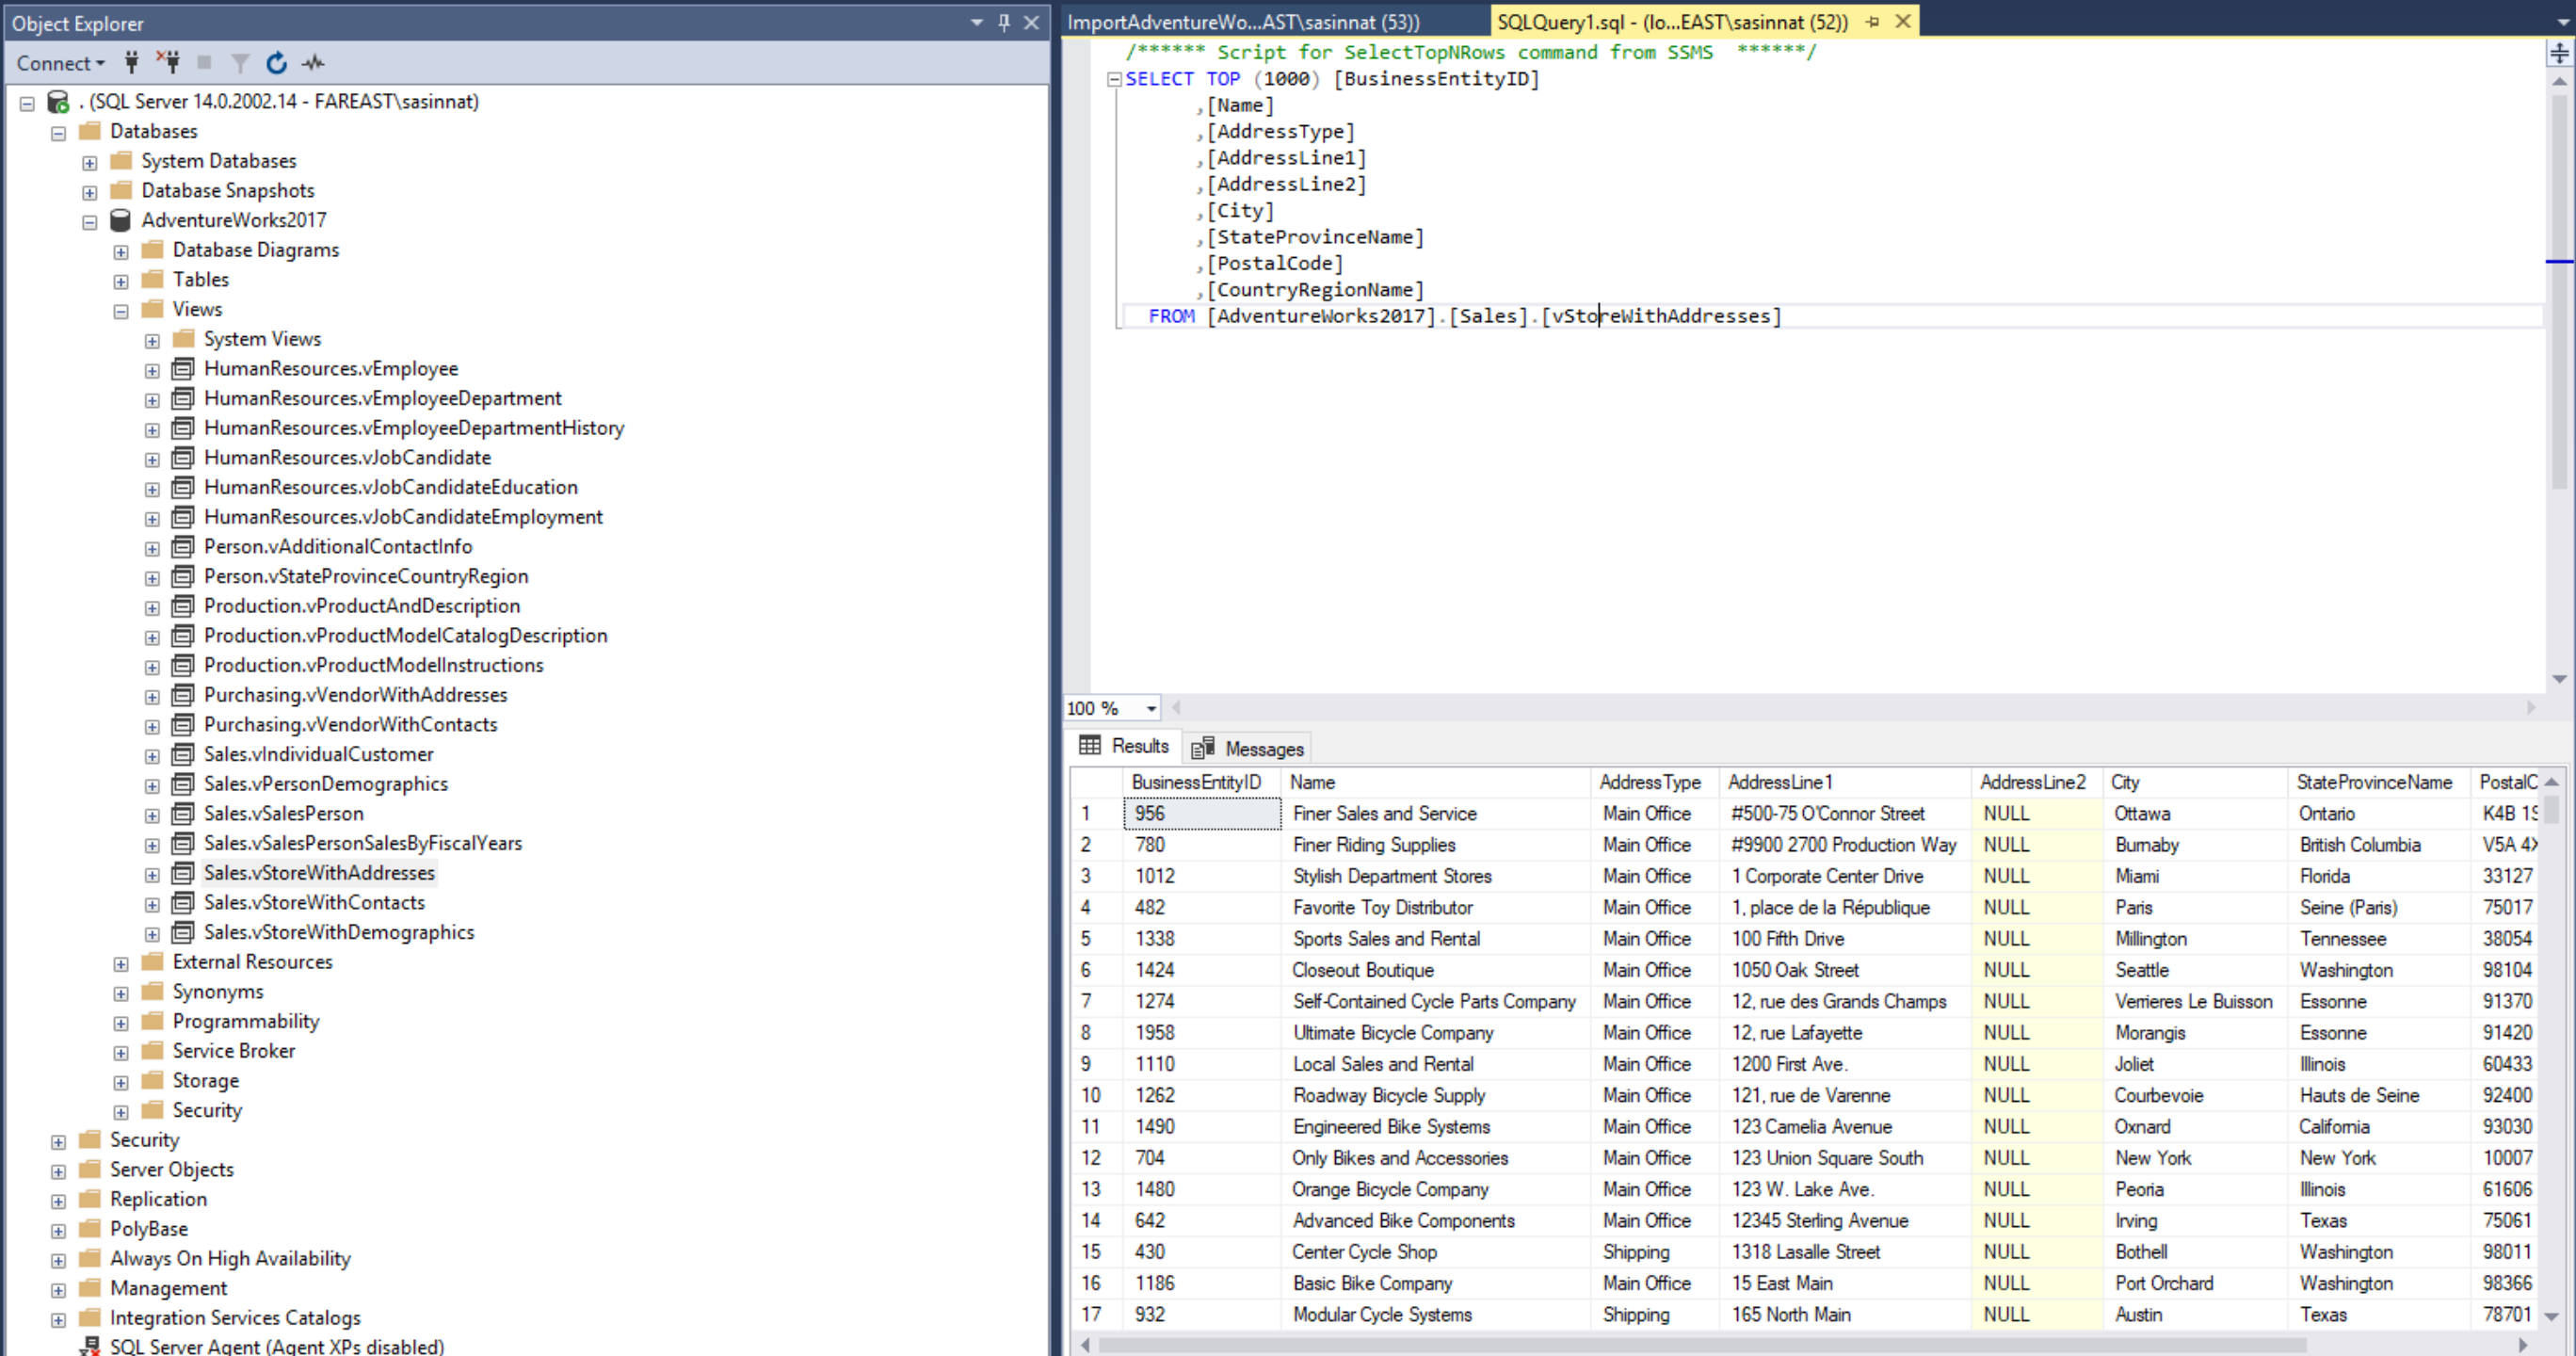
That's how you  migrate data from SQL server to Cosmosdb and it is very easy using the Cosmosdb Migration tool. For the other modes of data migration i will be writing separate blogs. Hope this blog helps if someone wants to transform data and migrate the data from MSSQL to cosmosdb. Cheers!

· 5 min read

For the past one month , I have been experimenting with one of the promising serverless framework for creating serverless functions.  With the modern applications moving to cloud with microservices this framework becomes very handy to create/manage your microservices in the form of functions.

What do we need microservices?

When I started my career as a developer most of the applications that I worked on are with three Tier architecture and most of the companies built the applications with monolithic architecture even before cloud platforms were existed. With the modern technologies everyone is decomposing the business functionalities of the application into several micro services to avoid single point of failure. Assume Uber as an application and their core functionalities such as Registration,Payment,Email notifications, Push notifications could be broken down to several microservices in order to avoid any downtime. With monolithic architecture single point of failure would cause the entire application to shut down. To understand in detail, look at the following diagram

Serverless != No server

Many of us have the common understanding of serverless as its about without a server. None can be executed/hosted without having a server. It’s just that the fack that you will have no way to actually see the server which executes your code. As a developer with serverless you do not have to worry about managing servers as it will be automatically handled. Serverless becomes handy because of the following reasons

  • Reduce time-to-market
  • Easier deployment
  • Scale automatically
  • Focus on business logic
  • Cost reduction

Serverless is used for mainly event event driven architecture where functions has an endpoint that triggers something. Say for example, Trigger a notification once the file is uploaded.

Serverless and Microservices are great couple together. You should choose serverless when your functions/services are,

  • Stateless
  • Short Job
  • Event-driven stuff, e.g. Time-based / webhook
  • Simple application with less dependencies

OpenFaaS – Serverless Functions Made Simple

There are so many frameworks out there to build applications with serverless out of them OpenFaas stands out as its not vendor locked and you can use it for both On prem as well as in any of the cloud platform. It is  very simple and need few commands to get your functions deployed anywhere. It can be exposed with Docker Swarm or Kubernetes to the outside world.

Following are the reasons if you ever want to choose OpenFaas,

  • Anything can be a function
  • Leverage existing skills in teams
  • Avoid vendor lock-in
  • Run anywhere - cloud or on-prem
  • 13,000 stars on github with large contributors

OpenFaaS Architecture

There are main two components that you should get to know before getting started with OpenFaas.

DFrkF4NXoAAJwN2.jpg

Function Watchdog

As the name indicates watchdog is responsible to convert http messages to stdin then it will be passed to functions and stdout vice versa.Any docker image could be turned to serverless by adding function watchdog

API Gateway / UI Portal

As you have heard from AWS API gateway, it does the similar job here as well. It provides an external route into your functions and collects Cloud Native metrics through Prometheus. It also scale functions according to demand by altering the service replica count in the Docker Swarm or Kubernetes API. It also provides the UI to invoke functions in your browser and create new ones as needed.

Faas-CLI

The command line interface helps you to deploy your functions or quickly create new functions from templates  in any programming language you prefer.

Setup OpenFaas on Kubernetes API

I am a fan of Microsoft Azure, I will be providing the steps to setup OpenFaas on Azure Kubernetes. I have done this at a workshop and you can find 10 steps to build a kubernetes cluster and then all steps can be done simply by hitting few kubectl and helm commands.

Step 1: Launch Azure Cloud shell with https://shell.azure.com/bash

Step 2: Create a resource group

az group create --name aksColomboRG --location eastus

Step 3: Create AKS cluster

az aks create  --resource-group aksColomboRG  --name openFaasCluster --node-vm-size Standard_A2_v2   --node-count 1 --enable-addons monitoring --generate-ssh-keys

Step 4: Connect to the cluster

az aks get-credentials --resource-group aksColomboRG --name openFaasCluster --admin -a  --overwrite-existing

Step 7: List the cluster nodes

kubectl get all -n kube-system

Kubectl is a command line interface for running commands against Kubernetes clusters.

Step 8: Install and Init Helm

helm init –upgrade

Helm fills the need to quickly and reliably provision container applications through easy install, update, and removal

Step 9: Install OpenFaas

git clone https://github.com/openfaas/faas-netes

Step 10: Create namespace OpenFaas

kubectl create ns openfaaskubectl

Step 11: Create second namespace for OpenFass Functions

kubectl create ns openfaas-fn

Step 12 : Check you have a tiller pod in ready state

kubectl -n kube-system get po

Step 13: Manually start the tiller

kubectl logs --namespace kube-system tiller-deploy-66cdfd5bc9-46sxv

When a user executes the Helm install command, a Tiller Server receives the incoming request and installs the appropriate package

Step 14: Resolve cannot list configmaps in the "kube-system"

kubectl create serviceaccount --namespace kube-system tiller

Step 16: A Helm chart for OpenFaaS is included in the cloned repository. Use this chart to deploy OpenFaaS into your AKS cluster.

helm repo add openfaas https://openfaas.github.io/faas-netes/

helm upgrade --install --namespace openfaas --set functionNamespace=openfaas-fn --set async=true --set serviceType=LoadBalancer openfaas openfaas/openfaas

Step 17: See OpenFaas live

kubectl get all -n openfaas

and you should copy the service/gateway-external url with the port and paste it in the browser. You should see OpenFaas live.

2019-02-23_13-43-40

Well, that’s all about for this post, I will write another post about how to execute functions and how to build your custom function in the coming days.

You can find the workshop slides from here. Keep watching :)