
4 posts tagged with "tools"

View All Tags

· 5 min read

Overview:

Are you hearing the word Devspaces for the first time?. Let me put this way, Imagine a developer having to deal with a large application which has chunks of Microservices and want to get some functionality done?. There will be many risks and one of them would be dealing with right environments. As we know the best way to counter this issue within a team would be to containerize and host it on cloud. Which will let the developer to work on the particular feature and debug the container without creating the environment locally. That is what exactly Azure Dev Spaces does.

What is Devspaces?

Devspaces allows you to build, test and run code inside any Kubernetes cluster. With a DevSpace, you run everything remotely inside pods running on top of a Kubernetes cluster. Additionally, the DevSpace CLI takes care things automatically such building and pushing images for you when you make changes to your Dockerfile. If you are making a source code change, the DevSpace CLI does not require you to rebuild and redeploy.

It rather syncs your locally edited source to straight to the containers running inside Kubernetes.  This makes you to edit locally but compile and run everything remotely inside Kubernetes and still use modern development features such as hot reloading. Azure Dev Spaces supports development with a minimum development machine setup. Developers can live debug on Azure Kubernetes Services (AKS) with development tools like Visual Studio, Visual Studio Code or Command Line.

With the recent announcement of Bridge To Kubernetes GA, Azure Dev Spaces will be retired on October 31, 2023. Developers should move to using Bridge to Kubernetes, a client developer tool.

What is Bridge to Kubernetes?

It was formerly called as Local Process with Kubernetes. Bridge to Kubernetes is an iterative development tool offered in Visual Studio and VS Code through extensions that you can pick up in the marketplace. IT allows developers to write, test and debug microservice code on their development workstations while consuming dependencies and inheriting existing configuration from a Kubernetes environment. There are lot of different tools and methods for solving these kind of challenges when you are working on a single micro-service in the context of a larger application. Those different methods and tools into three main types .There's the local, remote and hybrid approach as shown in the image below

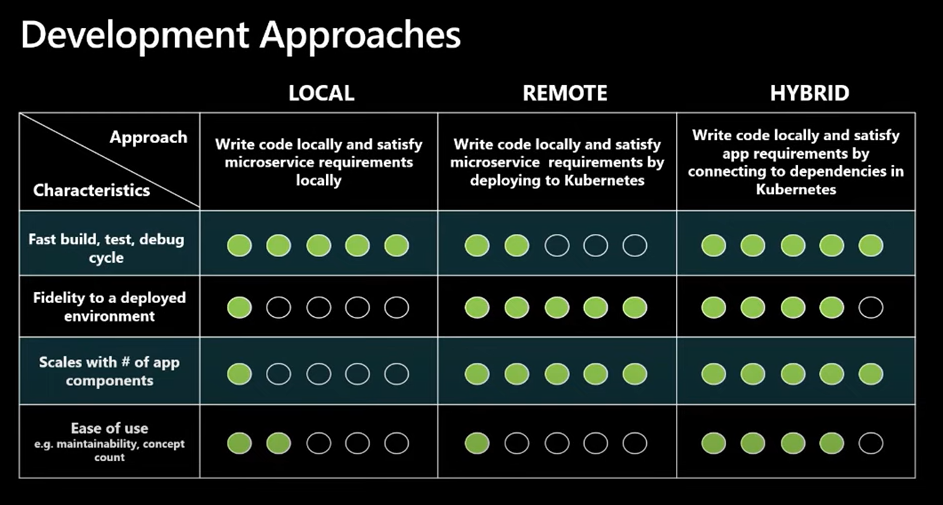
Development Approaches

If you look at the above picture, developers are shifting from Local development methods to hybrid methods which offers the best way to deal with building applications to the cloud with containers/kuberentes. With Hybrid approach, it allows developers to write code on their development workstation, but also allow them to connect to external dependencies that are running in some remote environment. So it actually fulfilling all those external dependencies by connecting them. Let's say if you are running your application on Kubernetes on Azure, you can connect all the dependencies from your local environment and have the whole end-to-end workflow.

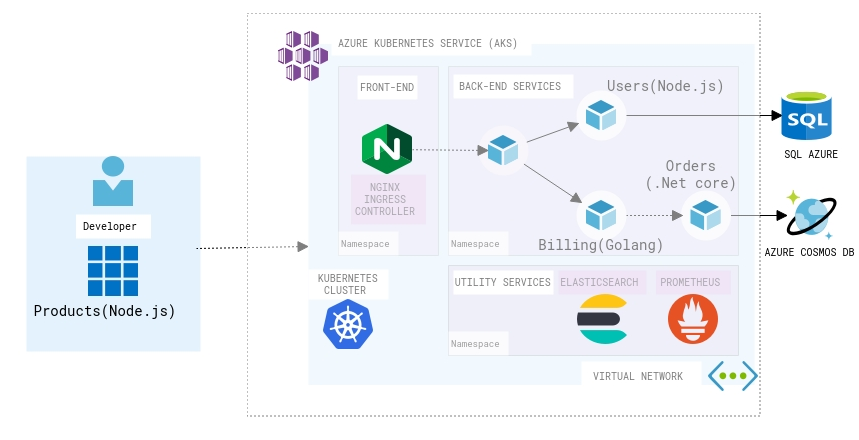
Bridge to Kubernetes Scenario

Consider the above scenario in the diagram, Assuming that i am working on a Microservice that deals with Products and the other Microservices which are developed using different stack are deployed on Kubernetes cluster on Azure. If i want to connect to any or multiple microservices and run some integration tests in my local environment Bridge to Kubernetes will help to achieve the requirement. Following are some of the Key features that Bridge to Kubernetes offers similar to Devspaces,

Accelerating and Simplifying Microservice Development

It basically eliminates the need to manually push code, configure and compile external dependencies on your development environment so that you can focus on code without worrying about other factors.

Easy Debugging Code

It lets you to run your usual debug profile with the added kuberentes cluster configuration. It allows developers to debug code in the way they want would while taking advantage of the speed and flexibility of local debugging.

Developing and Testing End-to-End

One of the important feature is the Integration testing during development time. Select an existing service in the cluster to route to your development machine where an instance of that service is running locally. Developers can initiate request through the frontend of the application running in Kubernetes and it will route between services running in the cluster until the service you specified to redirect is called same as how you would do debugging by adding a breakpoint in your code.

How to get started with Bridge to Kubernetes?

You can Start debugging your Kubernetes applications today using Bridge to Kubernetes.You need to download the extensions from the Visual Studio and VS Code marketplaces.

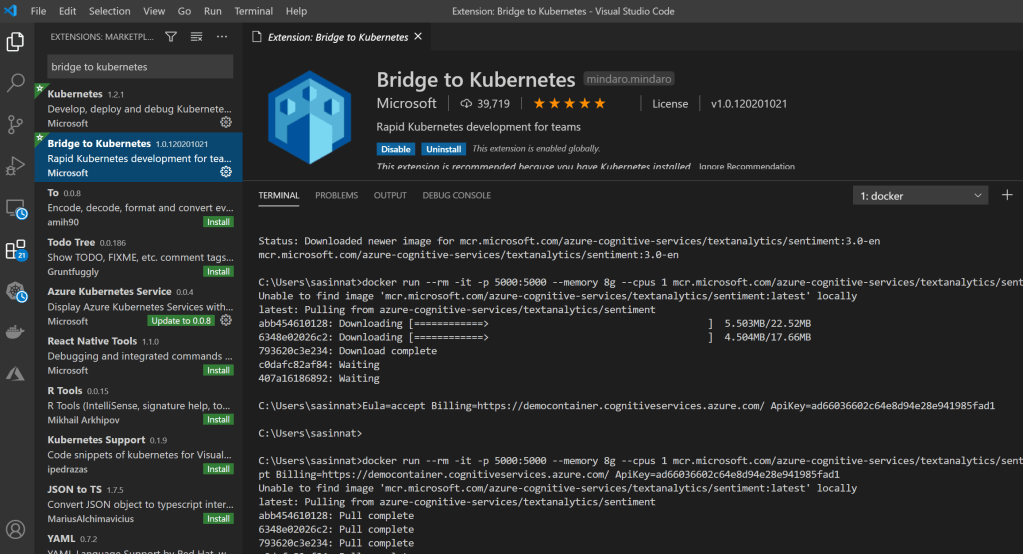
Bridge to Kubernetes VSCode extension

If you would like to explore more with a sample application follow the example given on Use Bridge to Kubernetes . Also kindly note the Bridge to Kubernetes collects usage data and sends it to Microsoft to help improve our products and services.

Start using Bridge to kuberentes and deploy things to production even faster than before! Cheers!

· 2 min read

There are few mandatory sites that every developer on azure should know. This post will contain a curated list of awesome websites which will definitely help.

Azure Checklist - This checklist is your guide to the best practices for deploying secure, scalable, and highly available infrastructure in Azure

Devops Generator - It is really a nice tool to get you a starting point for your demos on azure devops

Azure Charts - Azure heatmap where you can see the changes to Microsoft cloud services in a heat map visualisation

Cosmic notes - Learn more about Azure Cosmos DB database, one Cosmic Note at a time!

AKS Workshop - You’ll go through tasks that will help you master the basic and more advanced topics required to deploy a multi-container application to Kubernetes on Azure

Price Calulator - Pricing calculator to help you understand the pricing. This tool will make it easier to understand the pricing of the different services/products.

Azure VM pricing - Find and compare Azure Virtual machines specs and pricing on a one page.

Azure IoT Developer Kit - The Microsoft Azure MXChip IoT Developer Kit (a.k.a DevKit) can be used to develop and prototype IoT solutions leveraging Microsoft Azure services. It includes an Arduino compatible board with rich peripherals and sensors, an open-source board package and a growing projects catalog.

Severless Library - Collection of azure functions xamples. If you are looking for some ideas on how Azure functions can be leveraged or need an example for your scenario this is a great resource.

Azure speed test - Use this tool to measure the latency from your web browser to the Blob Storage Service in each of the Microsoft Azure Data Centers.

App Migration - Assess any app with an endpoint scan. Download the Migration Assistant and start your .NET and PHP app migration to Azure App Service.

The above tools/sites have helped me a lot in the journey of myself as a Azure developer. I'm sure this would help any of the developer who wants to get started on Azure.

· One min read

There are few cool speed test tools available out there which allows you to test network latencies and speed to data centers from different countries and locations.  Along with finding the closest Datacenter near your location, it tests the storage latency as well as upload and download speeds. 

Check it out from the following urls:

𝗔𝘇𝘂𝗿𝗲: http://azurespeedtest.azurewebsites.net

𝗔𝗪𝗦: https://cloudharmony.com/speedtest-for-aws

Make use of the above tools to identify which region is suitable for your solution. Hope it helps.

· 6 min read

I have been working with Cosmos DB for almost 2 years and most of the time i have used SDKs to connect to Cosmos DB. In the recent times i started consuming Rest API for my hybrid application. One of the tricky part in Cosmos DB is that connecting to it and running queries with REST API. In this blog post, I want to elaborate more on the repository i have created to test the APIs in one go. Also will discuss more on how to call Azure Cosmos DB by using its REST API. I will be using the Cosmosdb account and Postman tool.

If you are very new to Cosmosdb, read my blog on how to setup Cosmos DB in local and connect via Visual Studio Code. Many of us come from the SQL background, when we want to connect to SQL Server, usually we need to have a username and password. You need to do more than that to connect and run queries in CosmosDB. But CosmosDB needs some more parameters to connect to it.

Once you create the Cosmos DB account on Azure and navigate to the keys section on the left pane. You will see two types of tabs on the Keys. There are two types of keys, one type of users having the Key can Read and Write. Other type ofusers having the key can only Read. 

Let's understand different terms used while making a connection to Cosmos DB

Master Keys are keys are created when the Cosmos DB Account is created. This key can be regenerated by clicking on refresh icon to regenerate them in the Azure portal. When you are using Cosmos DB emulator you won't be able to generate it. These keys are very sensitive ones and provide access to the administrative resources. We should be very careful when weneed to store them. Recommended way is to use Read-Only Keys as much as we can.

Resource Tokens are responsible for providing access to specific containers, documents, attachments, stored procedures, triggers, and UDFs. Each user must have a resource token. It is mandatory that every application needs to use a resource token to call Cosmos DB API.

Users are specific for Cosmos DB databases. You can attach specific permissions or roles to each user like the way we do in SQL server.

Cosmos DB API

As i mentioned earlier we have many options to access to CosmosDB. Rest API is one of these options and it is the low level access way to Cosmos DB. Most of the features supported with SDK are available and you can customize all options of CosmosDB by using REST API. To customize the calls, and pass the required authorization information, you need to use http headers.

In the following example, I am going to try to create a database in CosmosDB emulator by using the REST API. First let’s look at the required header fields for this request. These requirement applies to all other REST API calls too.

x-ms-version : As the name indicates this is the version of the REST API. You can find the available versions here. If you are confused on what to use always use the latest one.

x-ms-date : This is the date of your request. It must be formatted by Coordinated Universal Time. (ex: Sun, 30 June 2019 05:00:23 GMT)

x-ms-session-token: It is required if you want to use session consistency. For each of your new write request in Session consistency, CosmosDB assings a new SessionToken to the calls. You need to track the right session token and use it in this header property to keep usng the same session. SDK does this for you in the background, if you want to use the REST API, you need to do this manually.

Authorization: This one is the most important and tricky one. This needs to get generated for each of your call to Cosmos DB. It must be in the following format

How to Call APIs with Postman:

To call Cosmos DB directly from POSTMAN, you need to get the Cosmosdb account URL we need to use. If you are using the emulator, you can get it from the the local environment which should be like https://localhost:8081. I will be using the account created in Azure protal.

One other thing you need to setup is the environment variable as you see we are using some of the configured variables in the script, you can create a new environment variable using Postman by navigating to environments and add new environment with configured variables.

Create environments

Configured variables

we need to look at the documentation of CosmosDB Rest API. You can find all URL locations from this link. Since I am trying to list the databases inside a collection, I am going to use the following path.

https://postmandemo.documents.azure.com:443/

     Also, documentation tells us that this must be a GET Http Action. In Postman, I pick the GET and type the URL to the URL section in the following example.

As Next step, we need to create an environment in Postman to store some variables. As connecting to cosmos db needs a token we need to generate a token for CosmosDB and get the current date to fill the header named x-ms-date. I am going to use variables in Environment to store the values. To Create an environment. Click on gears icon and click on Add.

The below example shows the environment variables that we will frequently use to test Cosmos DB API.

As we are requesting to get the list of databases, we are ready to add values to headers section. Click on Headers link, and add the following headers. These are the required HTTP headers for all CosmosDB REST API calls.

x-ms-version : 2019-06-30
(This is the latest version. You can find the other versions here.)

x-ms-date: {{utcDate}}
(This is the variable we defined in the Postman environment. Its value will be generated dynamically in the Pre-request Script.)

authorization : {{authToken}} (This is the other parameter we just created. We are going to generate its value in script.)

Acceptapplication/json.
(This is required since this is going to be a GET Http Action.)

Your screen should looks like this.

Next, we need to generate an authorization token and the current date in the required format.
To do this, we’ll use the Pre-request Script section in Postman. This script runs automatically before each request. In this step, we’ll generate the authToken and utcDate parameters.
Simply copy and paste the following code into the Pre-request Script tab:

https://gist.github.com/sajeetharan/c2c1fbc48bf24e3b321323b34232f5a8

We are done with all the things needed to get the list of databases. Click on the send button to see the list of databases as response.

Great! Look at all that information we received back in the body of the Response.

This is the way to test Cosmos DB API with POSTMAN. You can try different APIs with the simple collection we've created here. Now it becomes easy for developers to leverage the Cosmos DB api and to play around with it.