
4 posts tagged with "serverless"

View All Tags

· 4 min read

Overview

As per a survey, 57% of young individuals agreed they do not have the right connections to find a mentor and more than 50% of them couldn't find a job that they are passionate about. As a result I was exploring if there is any platform that would solve this major problem. Yes, there are some existing online apps but those don't serve the complete purpose to the extent that i expected. I decided to start a pet project to build this platform during my spare time , in this post i will be sharing the architecture of the application and how i was able to quickly spin up this application.

 Prerequisites to build and deploy

As an Azure fan, i have used Azure as the cloud platform to deploy this solution. Here are some prerequisites first:

  • An Azure account (don’t worry, deploying this app costed me almost nothing, you can use free trial)
  • node and npm (preferably the latest versions)
  • VSCode and Android Studio

As i explained in the previous posts, Cosmosdb and Azure Functions are great combo to build applications and deploy in quick time without worrying about underlying infrastructure. You can read about some of the reference architectures i have posted in the past from the below links,

Let me dive into each component in the architecture of 'MentorLab'.

How it works?

MentorLab has been made to scale up the existing students and mentors using Azure Services and Serverless Architecture to provide a cost-economic one stop solution which is dependable and truly secure. The objective is to give the students a platform which is built on a serverless architecture and can be remotely accessed irrespective of geographic location.

There are two facets of this solution

  • Mentor Side - Dashboard (Flutter)
  • Students Side - Mobile App (Flutter)

Azure Services Used 

  • Github Actions
  • Active Directory (A2D)
  • Blob Storage
  • Azure Cosmos DB
  • API Management
  • Azure Functions
  • Monitor

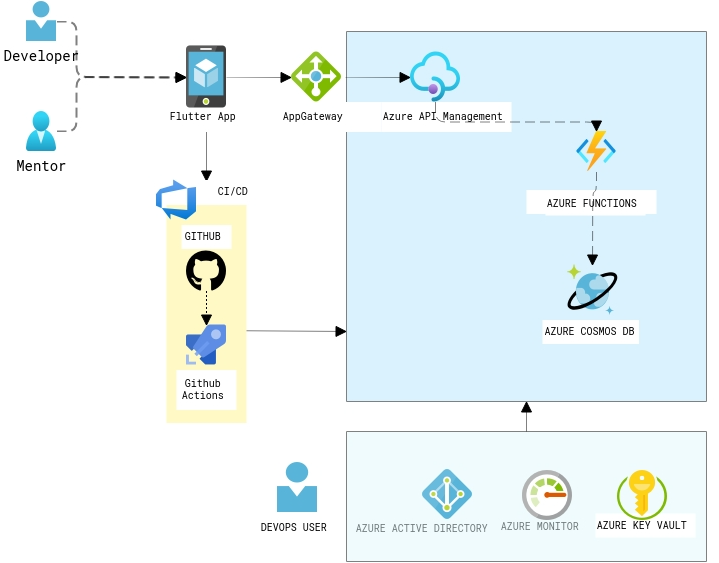
Architecture of MentorMe App

Flutter App is the front end application which is accessed by Mentor and Developer with different types of logins, All the requests from the mobile app will be router via the AppGateway. The backend APIs are built as servelress APIs with Azure functions with the support of Cosmosdb Trigger. Cosmosd's serverless feature is a great offering when building these kind of applications, as it is a cost-effective option for databases with sporadic traffic patterns and modest bursts. It eliminates the concept of provisioned throughput and instead charges you for the RUs your database operations consume. In this scenario, i have chosen Mongo API for the CRUD operations. The APIs are registered as endpoints with the Azure API management with right policies in place.

Some of the additional components you could see in the diagram are the CI/CD pipelines with Github Actions and Azure AD B2C for the authorization, Key vault for storing the connection strings,keys in a secured way. And finally application insights to generate the related metrics and for troubleshooting.

It nearly took just 3 days to build this application and going forward i am planning to add more features such as video conferencing with the help of Azure Communication and Media services . All these components just costs 36$/Month to host this application on Azure.

Hope this reference architecture helps you to kickstart your work for similar application. Feel free to add your thoughts/Questions as comments in the section below. Happy Hacking!

· 5 min read

For the past one month , I have been experimenting with one of the promising serverless framework for creating serverless functions.  With the modern applications moving to cloud with microservices this framework becomes very handy to create/manage your microservices in the form of functions.

What do we need microservices?

When I started my career as a developer most of the applications that I worked on are with three Tier architecture and most of the companies built the applications with monolithic architecture even before cloud platforms were existed. With the modern technologies everyone is decomposing the business functionalities of the application into several micro services to avoid single point of failure. Assume Uber as an application and their core functionalities such as Registration,Payment,Email notifications, Push notifications could be broken down to several microservices in order to avoid any downtime. With monolithic architecture single point of failure would cause the entire application to shut down. To understand in detail, look at the following diagram

Serverless != No server

Many of us have the common understanding of serverless as its about without a server. None can be executed/hosted without having a server. It’s just that the fack that you will have no way to actually see the server which executes your code. As a developer with serverless you do not have to worry about managing servers as it will be automatically handled. Serverless becomes handy because of the following reasons

  • Reduce time-to-market
  • Easier deployment
  • Scale automatically
  • Focus on business logic
  • Cost reduction

Serverless is used for mainly event event driven architecture where functions has an endpoint that triggers something. Say for example, Trigger a notification once the file is uploaded.

Serverless and Microservices are great couple together. You should choose serverless when your functions/services are,

  • Stateless
  • Short Job
  • Event-driven stuff, e.g. Time-based / webhook
  • Simple application with less dependencies

OpenFaaS – Serverless Functions Made Simple

There are so many frameworks out there to build applications with serverless out of them OpenFaas stands out as its not vendor locked and you can use it for both On prem as well as in any of the cloud platform. It is  very simple and need few commands to get your functions deployed anywhere. It can be exposed with Docker Swarm or Kubernetes to the outside world.

Following are the reasons if you ever want to choose OpenFaas,

  • Anything can be a function
  • Leverage existing skills in teams
  • Avoid vendor lock-in
  • Run anywhere - cloud or on-prem
  • 13,000 stars on github with large contributors

OpenFaaS Architecture

There are main two components that you should get to know before getting started with OpenFaas.

DFrkF4NXoAAJwN2.jpg

Function Watchdog

As the name indicates watchdog is responsible to convert http messages to stdin then it will be passed to functions and stdout vice versa.Any docker image could be turned to serverless by adding function watchdog

API Gateway / UI Portal

As you have heard from AWS API gateway, it does the similar job here as well. It provides an external route into your functions and collects Cloud Native metrics through Prometheus. It also scale functions according to demand by altering the service replica count in the Docker Swarm or Kubernetes API. It also provides the UI to invoke functions in your browser and create new ones as needed.

Faas-CLI

The command line interface helps you to deploy your functions or quickly create new functions from templates  in any programming language you prefer.

Setup OpenFaas on Kubernetes API

I am a fan of Microsoft Azure, I will be providing the steps to setup OpenFaas on Azure Kubernetes. I have done this at a workshop and you can find 10 steps to build a kubernetes cluster and then all steps can be done simply by hitting few kubectl and helm commands.

Step 1: Launch Azure Cloud shell with https://shell.azure.com/bash

Step 2: Create a resource group

az group create --name aksColomboRG --location eastus

Step 3: Create AKS cluster

az aks create  --resource-group aksColomboRG  --name openFaasCluster --node-vm-size Standard_A2_v2   --node-count 1 --enable-addons monitoring --generate-ssh-keys

Step 4: Connect to the cluster

az aks get-credentials --resource-group aksColomboRG --name openFaasCluster --admin -a  --overwrite-existing

Step 7: List the cluster nodes

kubectl get all -n kube-system

Kubectl is a command line interface for running commands against Kubernetes clusters.

Step 8: Install and Init Helm

helm init –upgrade

Helm fills the need to quickly and reliably provision container applications through easy install, update, and removal

Step 9: Install OpenFaas

git clone https://github.com/openfaas/faas-netes

Step 10: Create namespace OpenFaas

kubectl create ns openfaaskubectl

Step 11: Create second namespace for OpenFass Functions

kubectl create ns openfaas-fn

Step 12 : Check you have a tiller pod in ready state

kubectl -n kube-system get po

Step 13: Manually start the tiller

kubectl logs --namespace kube-system tiller-deploy-66cdfd5bc9-46sxv

When a user executes the Helm install command, a Tiller Server receives the incoming request and installs the appropriate package

Step 14: Resolve cannot list configmaps in the "kube-system"

kubectl create serviceaccount --namespace kube-system tiller

Step 16: A Helm chart for OpenFaaS is included in the cloned repository. Use this chart to deploy OpenFaaS into your AKS cluster.

helm repo add openfaas https://openfaas.github.io/faas-netes/

helm upgrade --install --namespace openfaas --set functionNamespace=openfaas-fn --set async=true --set serviceType=LoadBalancer openfaas openfaas/openfaas

Step 17: See OpenFaas live

kubectl get all -n openfaas

and you should copy the service/gateway-external url with the port and paste it in the browser. You should see OpenFaas live.

2019-02-23_13-43-40

Well, that’s all about for this post, I will write another post about how to execute functions and how to build your custom function in the coming days.

You can find the workshop slides from here. Keep watching :)

· 5 min read

For the past one month , I have been experimenting with one of the promising serverless framework for creating serverless functions.  With the modern applications moving to cloud with microservices this framework becomes very handy to create/manage your microservices in the form of functions.

What do we need microservices?

When I started my career as a developer most of the applications that I worked on are with three Tier architecture and most of the companies built the applications with monolithic architecture even before cloud platforms were existed. With the modern technologies everyone is decomposing the business functionalities of the application into several micro services to avoid single point of failure. Assume Uber as an application and their core functionalities such as Registration,Payment,Email notifications, Push notifications could be broken down to several microservices in order to avoid any downtime. With monolithic architecture single point of failure would cause the entire application to shut down. To understand in detail, look at the following diagram

Serverless != No server

Many of us have the common understanding of serverless as its about without a server. None can be executed/hosted without having a server. It’s just that the fack that you will have no way to actually see the server which executes your code. As a developer with serverless you do not have to worry about managing servers as it will be automatically handled. Serverless becomes handy because of the following reasons

  • Reduce time-to-market
  • Easier deployment
  • Scale automatically
  • Focus on business logic
  • Cost reduction

Serverless is used for mainly event event driven architecture where functions has an endpoint that triggers something. Say for example, Trigger a notification once the file is uploaded.

Serverless and Microservices are great couple together. You should choose serverless when your functions/services are,

  • Stateless
  • Short Job
  • Event-driven stuff, e.g. Time-based / webhook
  • Simple application with less dependencies

OpenFaaS – Serverless Functions Made Simple

There are so many frameworks out there to build applications with serverless out of them OpenFaas stands out as its not vendor locked and you can use it for both On prem as well as in any of the cloud platform. It is very simple and need few commands to get your functions deployed anywhere. It can be exposed with Docker Swarm or Kubernetes to the outside world.

Following are the reasons if you ever want to choose OpenFaas,

  • Anything can be a function
  • Leverage existing skills in teams
  • Avoid vendor lock-in
  • Run anywhere - cloud or on-prem
  • 13,000 stars on github with large contributors

OpenFaaS Architecture

There are main two components that you should get to know before getting started with OpenFaas.

DFrkF4NXoAAJwN2.jpg

Function Watchdog

As the name indicates watchdog is responsible to convert http messages to stdin then it will be passed to functions and stdout vice versa.Any docker image could be turned to serverless by adding function watchdog

API Gateway / UI Portal

As you have heard from AWS API gateway, it does the similar job here as well. It provides an external route into your functions and collects Cloud Native metrics through Prometheus. It also scale functions according to demand by altering the service replica count in the Docker Swarm or Kubernetes API. It also provides the UI to invoke functions in your browser and create new ones as needed.

Faas-CLI

The command line interface helps you to deploy your functions or quickly create new functions from templates  in any programming language you prefer.

Setup OpenFaas on Kubernetes API

I am a fan of Microsoft Azure, I will be providing the steps to setup OpenFaas on Azure Kubernetes. I have done this at a workshop and you can find 10 steps to build a kubernetes cluster and then all steps can be done simply by hitting few kubectl and helm commands.

Step 1: Launch Azure Cloud shell with https://shell.azure.com/bash

Step 2: Create a resource group

az group create --name aksColomboRG --location eastus

Step 3: Create AKS cluster

az aks create  --resource-group aksColomboRG  --name openFaasCluster --node-vm-size Standard_A2_v2   --node-count 1 --enable-addons monitoring --generate-ssh-keys

Step 4: Connect to the cluster

az aks get-credentials --resource-group aksColomboRG --name openFaasCluster --admin -a  --overwrite-existing

Step 7: List the cluster nodes

kubectl get all -n kube-system

Kubectl is a command line interface for running commands against Kubernetes clusters.

Step 8: Install and Init Helm

helm init –upgrade

Helm fills the need to quickly and reliably provision container applications through easy install, update, and removal

Step 9: Install OpenFaas

git clone https://github.com/openfaas/faas-netes

Step 10: Create namespace OpenFaas

kubectl create ns openfaaskubectl

Step 11: Create second namespace for OpenFass Functions

kubectl create ns openfaas-fn

Step 12 : Check you have a tiller pod in ready state

kubectl -n kube-system get po

Step 13: Manually start the tiller

kubectl logs --namespace kube-system tiller-deploy-66cdfd5bc9-46sxv

When a user executes the Helm install command, a Tiller Server receives the incoming request and installs the appropriate package

Step 14: Resolve cannot list configmaps in the "kube-system"

kubectl create serviceaccount --namespace kube-system tiller

Step 16: A Helm chart for OpenFaaS is included in the cloned repository. Use this chart to deploy OpenFaaS into your AKS cluster.

helm repo add openfaas https://openfaas.github.io/faas-netes/

helm upgrade --install --namespace openfaas --set functionNamespace=openfaas-fn --set async=true --set serviceType=LoadBalancer openfaas openfaas/openfaas

Step 17: See OpenFaas live

kubectl get all -n openfaas

and you should copy the service/gateway-external url with the port and paste it in the browser. You should see OpenFaas live.

2019-02-23_13-43-40

Well, that’s all about for this post, I will write another post about how to execute functions and how to build your custom function in the coming days.

You can find the workshop slides from here. Keep watching :)

· 5 min read

Traditional Architecture :

In a traditional Application with the normal approach, transactional use-cases usually involve persisting data in a few SQL tables or in a NOSQL database. When the changes are performed on the object the database is updated to match the new state.

The traditional approach works well in case if you do not need to know the changes that object has gone through, but in modern systems customers always comes up with a requirement to get the log of changes that particular entity has gone through. With the traditional approach, there is no way of knowing what the user had in the object before changing it, or at which point of time the contents changed. We can still solve this with the traditional way by storing the extra information about the modifications but the solution becomes more complex.

For example in traditional approach,

https://gist.github.com/sajeetharan/2d9921571c67f7038ec5a4053882b85f

Which will create an entry for each insert in the SQL database as follows,

2019-02-03_13-10-23

The current state is saved in a relational database. We load the object, change it and save  it back.

EventSourcing Architecture :

In the eventsourcing solution, we look at the problem as a sequence of events that occur and save the occurrence of events as it is. The events contains all details about what actually happened at particular point of time. These are historical information and once it is saved it should not be modified.

https://gist.github.com/sajeetharan/825ec83fd780b7670146649bf6d4a0ce

All events for a certain product are stored. Their data and sequence define the current state of the product. Event is the easiest way to remember what happened at a certain time. Event sourcing comes with an advantage of having audit trail by itself and to get full understanding of what the system is doing.

Event Sourcing Architecture with AzureCosmosdb and EventHub

To implement event sourcing in your application, Microsoft azure provides the following services to  full fledged solution and we will discuss in this blog.

Lets look at the diagram below,

NEW_LEGAL

Application 1 stores the data in the traditional database and your customer needs the changes that has been done on the product. The above architecture will easily fulfill the requirement with the event sourcing.

Components involved in the architecture as follows,

Azure EventHub

Azure Eventhub is a managed service to receive and process millions of events per second. It is intended to handle event based messaging in huge scale. This could be used in an product if you have devices application publishing events and send them to eventhub. It will create a stream of all these events which can be read by different applications in different ways. Eventhub provides interfaces such as AMQP and HTTP to make it easy to send messages to it. In Eventhub we can define consumer groups which lets us to read stream of events. We can decide on consumer group based on the number of receivers(applications)

CosmosDB

Azure Cosmos DB is a globally-distributed, multi-model database as a service build for low latency and elastic scalability.  It supports the following options to store the data and it is highly available from anywhere in the world,

  • Key-value
  • Column-family
  • Document: MONGO or SQL
  • Graph

I will be not going in detail as there are enough blogs to get started with CosmosDB. In the above architecture there will be millions of events created after each update hence we need to store them in the cosmosdb with the state of the object. This way brings a lot of benefits. First, the event store with cosmosdb becomes your canonical source of truth that describes the updates applied to your domain in an unbiased form.

Implementation:

Application 1:

Whenever user updates an object in the application1, there will be notification message sent to the EventHub with an ID (unique id for each message) that something has happened on application. We could make use of epoch timestamp with 8 digits to make sure it is a unique one. A sample payload would look like,

{"MessageId": 1547632386819}

Note:  As Eventhub can have a message of maximum size 256k it is always better to have minimum size of message.

Once the notification is sent, the state of the object is stored in the eventstore(cosmosdb).

Application 2:

Application 2 will have an EventHub receiver which runs on the background which will subscribe to the EventHub and get the latest message. Once the id is retrieved by the receiver, it can request the eventstore with the id and get all the changes prior to the id as follows,

https://gist.github.com/sajeetharan/c34965a606c8afff9d02f2a3a17522bf

which will create the documents in Cosmosdb as,

2019-02-03_16-55-58

With the above approach ensures that all changes to product are stored as sequence of events. When we look at broader picture, it also ensures that all changes to application state are stored.

This is the simple architecture diagram to implement event sourcing in your application. One of the very good pattern to implement event sourcing is by using CQRS(Command Query Responsibility Segregation).

test

Lets look at the etail implementation with the code in the upcoming blogs. Hope this will help someone out there to implement event sourcing in your application if you are using Azure platform.