Microsoft introduced App Service Static Web Apps in Preview at Build 2020 as"Azure static web apps", a service which allows web developers to build and deploy website to any environment from Github repository for free. Developers can deploy applications in minute while taking the advantage of scaling and cost savings offered by azure functions as backend. One of the frequent questions that i heard from the developers was the availability of Azure Devops support with Azure static web apps.
I have already published an article which demonstrates how to deploy to Azure Static Web Apps using GithubActions. Azure static web apps team announced the public preview of Azure Devops with Azure static web apps yesterday.
In this post you I will walk you through on how to deploy an angular application to Azure static web apps using Azure Devops.
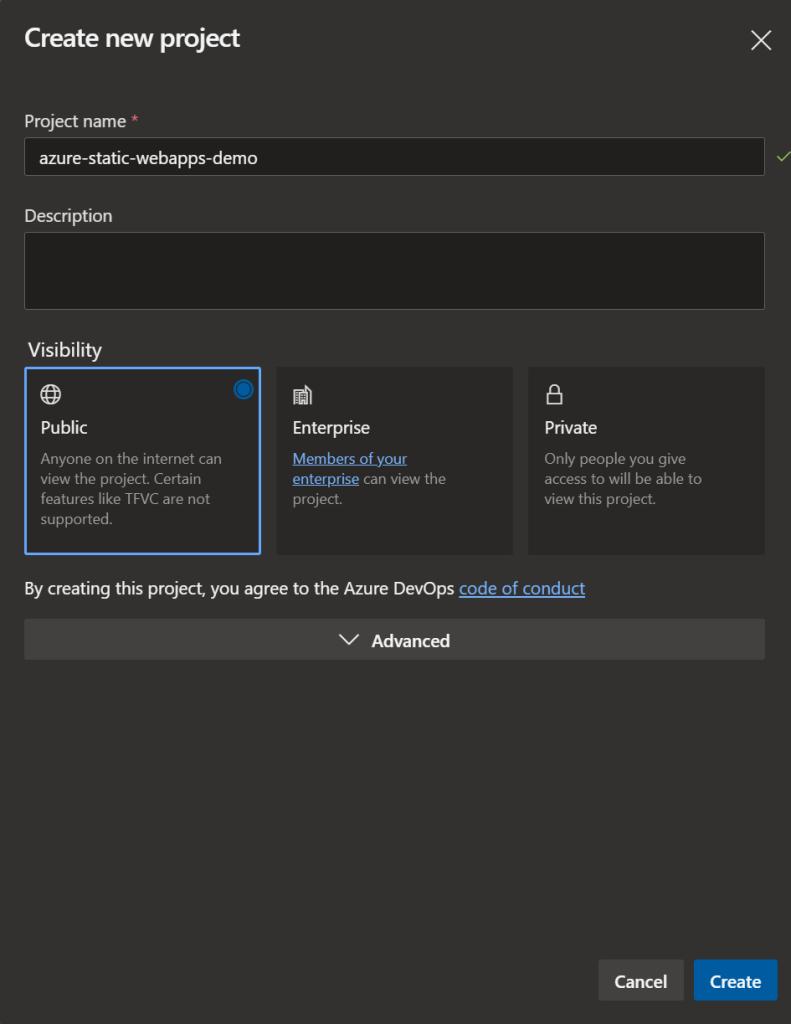
Navigate to Dev.Azure.com and create a new Devops Repository as below
Azure Devops repository
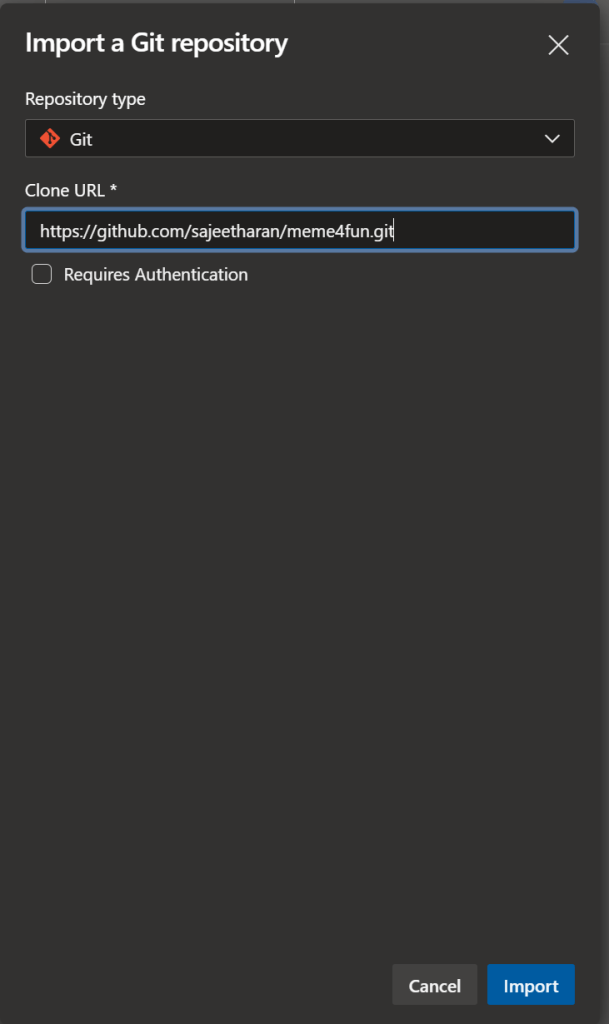
Step 2 : Import your static web application to Azure Devops repository
https://github.com/microsoft/static-web-apps-gallery-code-samplesNext step is to import the web application from any source control to your newly created Azure Devops repository. In this case i am importing the same "Meme generator" app which was made of Angular. Meme4Fun is an app to create custom programming memes from a picture and it also identifies features of people in the image which is available as part of code samples for Azure static web apps.
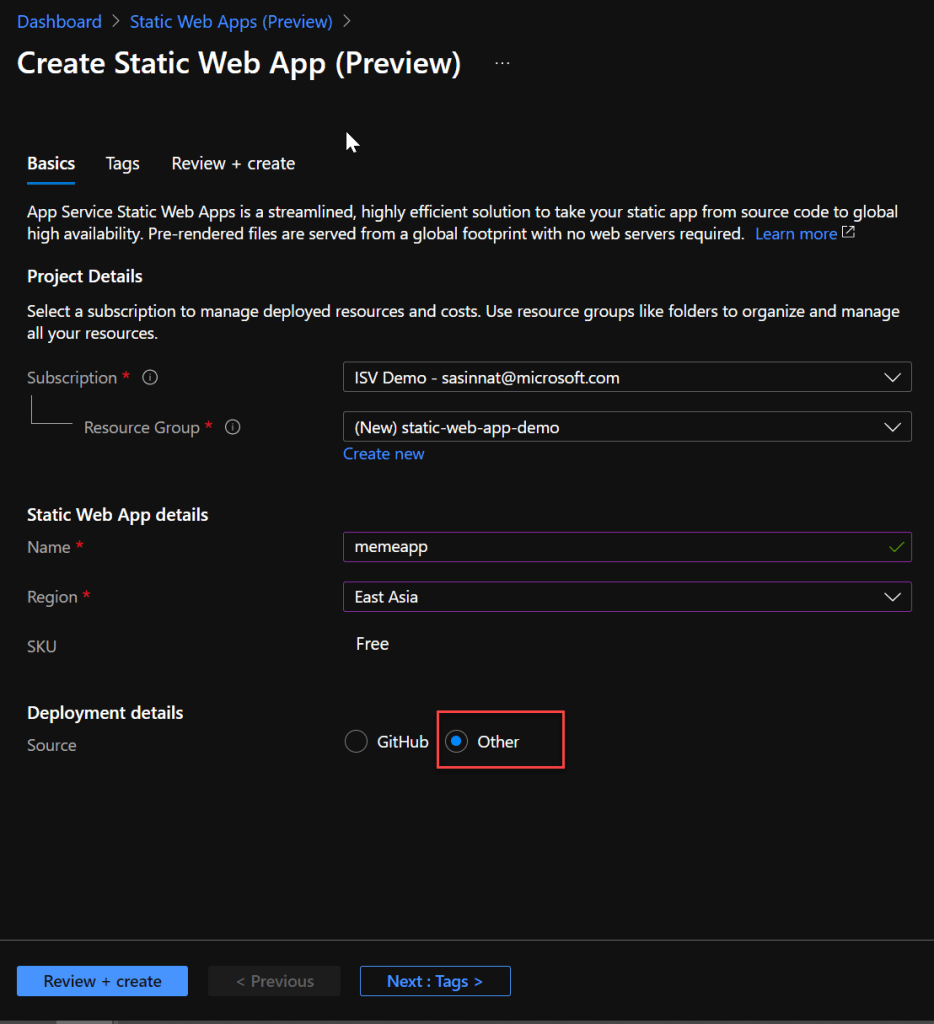
Next step is to create the static web application on azure, navigate to azure portal and create a new resource by searching for Static Web apps, and create it.
Note : Since I am going to leverage Azure Devops as the deployment method, select Other as the option.
Choose Devops as the Deployment
Once the deployment is successful, navigate to the new Static Web Apps resource and select Manage deployment token.
If you are using Azure Devops to deploy applications in the past, you will need to have the pipeline in plact to deploy to particular resource. In this case, lets create a build pipeline to deploy the angular application.
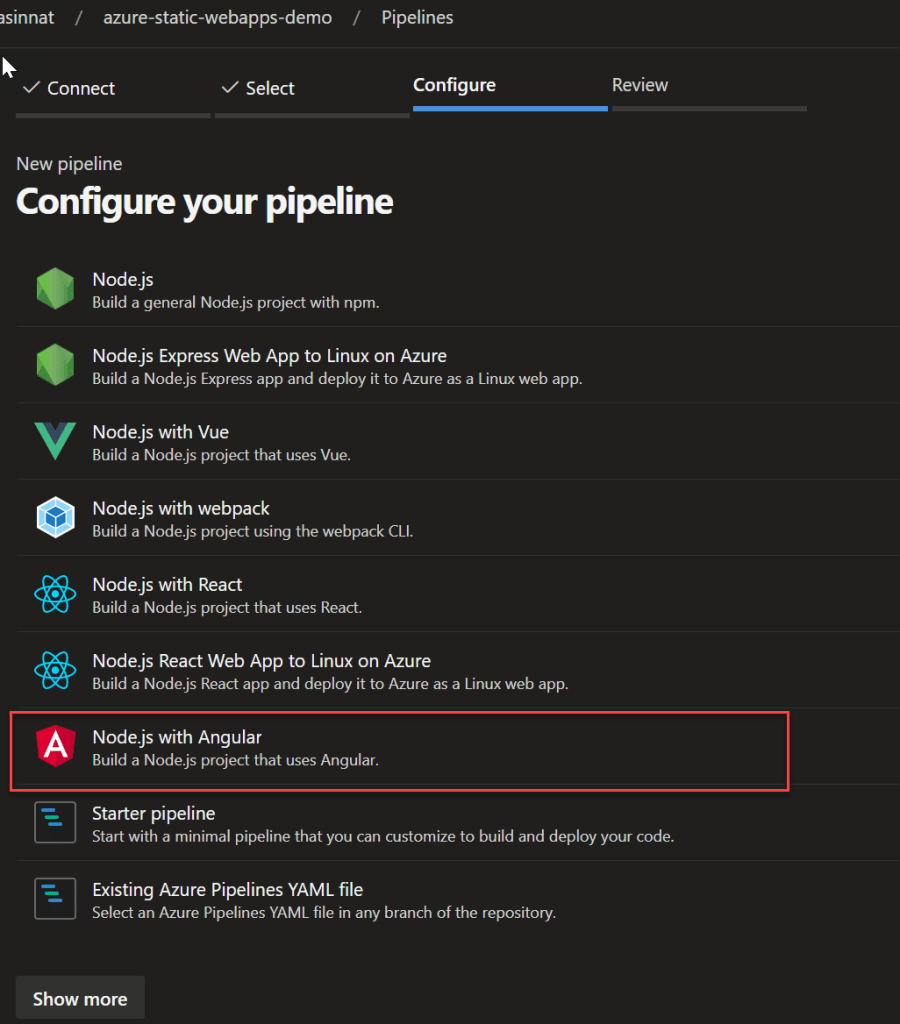
Next step is to select the template, since we are deploying an angular application, you can select the template as angular with nodejs
Angular template
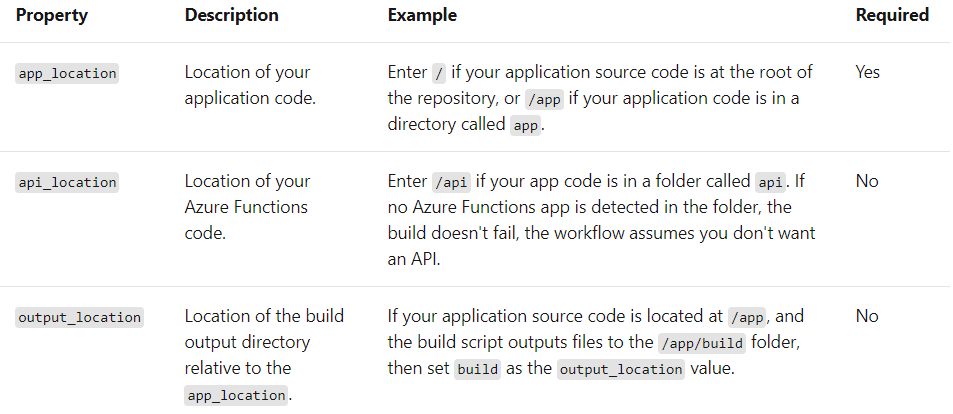
Also for static web apps it is important to include the following step in the yaml which has the app_location, api_location, and output_location , you need to pass those values if you have those details if not keep it empty.
and the final configure YAML will look similar to the below,
# Node.js with Angular
# Build a Node.js project that uses Angular.
# Add steps that analyze code, save build artifacts, deploy, and more:
# https://docs.microsoft.com/azure/devops/pipelines/languages/javascript
trigger:
- master
pool:
  vmImage: ubuntu-latest
steps:
- task: NodeTool@0
  inputs:
    versionSpec: '10.x'
  displayName: 'Install Node.js'
- script: |
    npm install -g @angular/cli
    npm install
    ng build --prod
  displayName: 'npm install and build'
- task: AzureStaticWebApp@0
  inputs:
      app_location: "/"
      api_location: "api"
      output_location: "dist/meme4fun"
  env:
      azure_static_web_apps_api_token: $(deployment_token)
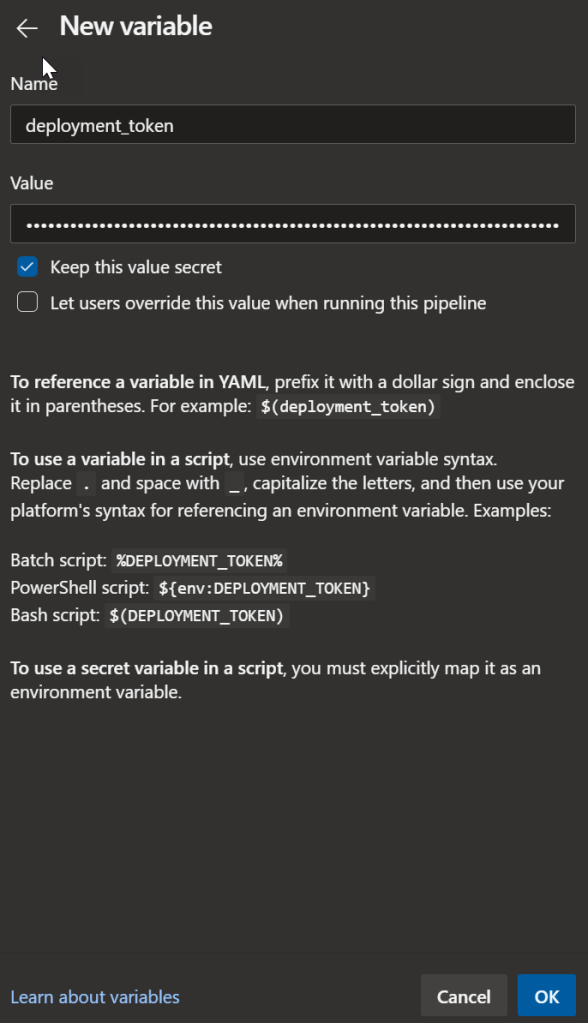
Next step is to provide the The **azure_static_web_apps_api_token** value is self managed and is manually configured. Select Variables in the pipeline and create a new variable named as "deployment_token"(matching the name in the workflow) below.
Add new Variable
Paste the deployment_token value which was copied from Azure portal
Make sure to check "Keep the value secret" and save the workflow and run.
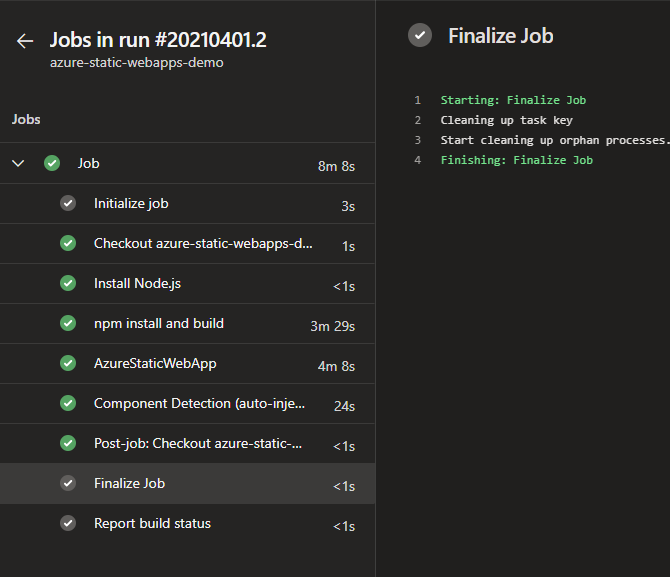
With that step Azure Devops will execute the pipeline and deploy the application to azure static web apps.
Successful deployment
Now you can access the application from the static static web app from the URL.
Static web app with azure devops deployment
If you had any trouble in executing the above steps, you can watch the same tutorial published as a video here.
It's great to see that with few steps of configuration, i was able to deploy the application with Azure Devops. If you have enabled backend support with the azure functions, it can be deployed as well. Support with Azure Devops has been one of the most requested features by developers and great to see it in live now. It's your chance to explore various application deployments with different frameworks, hope this is useful. Cheers!
As per a survey, 57% of young individuals agreed they do not have the right connections to find a mentor and more than 50% of them couldn't find a job that they are passionate about. As a result I was exploring if there is any platform that would solve this major problem. Yes, there are some existing online apps but those don't serve the complete purpose to the extent that i expected. I decided to start a pet project to build this platform during my spare time , in this post i will be sharing the architecture of the application and how i was able to quickly spin up this application.
As i explained in the previous posts, Cosmosdb and Azure Functions are great combo to build applications and deploy in quick time without worrying about underlying infrastructure. You can read about some of the reference architectures i have posted in the past from the below links,
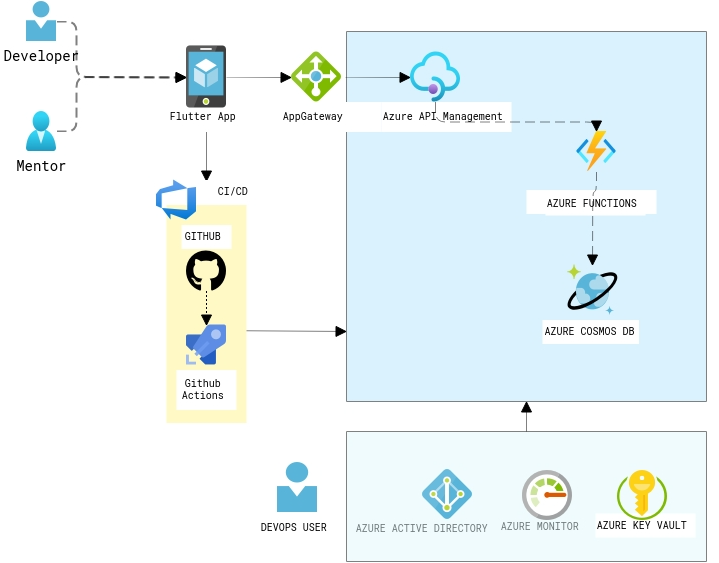
MentorLab has been made to scale up the existing students and mentors using Azure Services and Serverless Architecture to provide a cost-economic one stop solution which is dependable and truly secure. The objective is to give the students a platform which is built on a serverless architecture and can be remotely accessed irrespective of geographic location.
Flutter App is the front end application which is accessed by Mentor and Developer with different types of logins, All the requests from the mobile app will be router via the AppGateway. The backend APIs are built as servelress APIs with Azure functions with the support of Cosmosdb Trigger. Cosmosd's serverless feature is a great offering when building these kind of applications, as it is a cost-effective option for databases with sporadic traffic patterns and modest bursts. It eliminates the concept of provisioned throughput and instead charges you for the RUs your database operations consume. In this scenario, i have chosen Mongo API for the CRUD operations. The APIs are registered as endpoints with the Azure API management with right policies in place.
Some of the additional components you could see in the diagram are the CI/CD pipelines with Github Actions and Azure AD B2C for the authorization, Key vault for storing the connection strings,keys in a secured way. And finally application insights to generate the related metrics and for troubleshooting.
It nearly took just 3 days to build this application and going forward i am planning to add more features such as video conferencing with the help of Azure Communication and Media services . All these components just costs 36$/Month to host this application on Azure.
Hope this reference architecture helps you to kickstart your work for similar application. Feel free to add your thoughts/Questions as comments in the section below. Happy Hacking!
This year I've started focusing deeply on the areas around App Modernization with various cloud native offerings with different cloud vendors. One of my main focuses has been Kuberentes and how it can help organizations to design scalable applications to cater their needs. Scaling is one of the interesting concepts on Kuberentes and a very important subject to look at. This post will help you to understand the basics of the scalability aspects in Kuberentes and how you can use Event driven Applications with Kubernetes in detail.
Scaling Kubernetes
In general, Kuberentes provides two ways to scale your applications with the capabilities such as,
Cluster Scaling - It Enables users to add and remove nodes to provide more resources to run on. This is applicable to scale in an infrastructure level
Application Scaling - It can be achieved based on how your applications are running by changing the characteristics of underlying pods. Either by adding more copies or by changing the resources available to run same as how you do with services like App service on Azure.
Cluster Autoscaler : The first way of scaling can be achieved with Cluster Autoscaler. It is a tool enables automatically scaling the cluster. Most of the cloud vendors have this capability which automatically add nodes that user don't have to take care of adding more nodes. It basically add nodes when the capacity demand is there and remove nodes when they are no longer needed. I have widely used the Autoscaler with Microsoft Azure Kubernetes Service which allows you to start scaling your AKS cluster.
Event-driven applications are a key pattern for cloud-native applications. Event-driven is at the core of many growing trends, including Serverless compute like Azure Functions. There are so many scenarios where Kubernetes with Azure functions can be used in order to serve your applications with minimized cost.
Hybrid Solutions, Which needs some data to be processed on their environment
Applications with some specific requirements of Memory and GPUs
Applications which are already running on Kubernetes, so that you can leverage existing investments
Example Scenario:
Customer Scenario
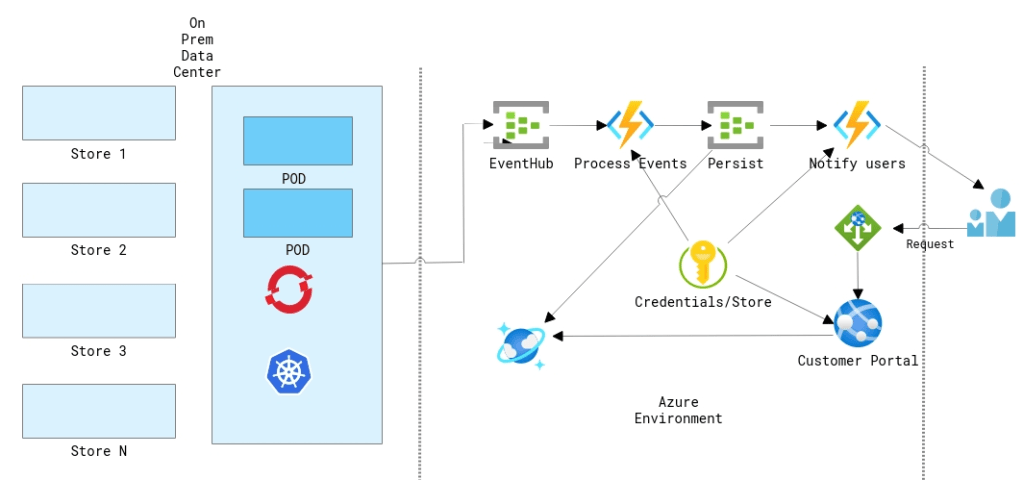
In this example, lets consider a retail customer like eBay. For a retail customers who processing millions of orders and having a hybrid environment. If the customer does a lot of processing on the data center using things like Kubernetes and at some point they push those data to the cloud using eventhub or transform their data and put in the right place etc. What if the customer is getting sudden spike on a certain day like "Black Friday" and need to make sure that the compute can scale rapidly and also wanted to make sure that the orders are processed in the correct manner.
Since Azure functions is open sourced so one of the things that azure functions team working with and talking to the community some partners like Redhat is how can they start to bring more of these experiences to that other side to where you don't want to have lock-in to a specific cloud vendor and to run these service workloads anywhere could be on other clouds. Kubernetes Event-Driven Autoscaling (KEDA) which is a Microsoft & Red Hat partnership that would make auto scaling Kubernetes workloads a lot easier. With Azure Functions, you write code which is triggered when a certain trigger occurs and they handle the scaling for you, but you have no control over it. With combining Kubernetes you have to tell it how to scale your application so it's fully up to you! On May 6th, 2019 Microsoft announced that they have partnered with Red Hat to build Kubernetes-based event-driven autoscaling (KEDA) which brings both worlds closer together.
What is Kubernetes-based event driven autoscaling (KEDA) ?
KEDA provides an autoscaling infrastructure that allows you to very easily autoscale your applications based on your criteria. Nothing to process? No problem, KEDA will scale your app back to 0 instances unless there is work to do.
How does it work?
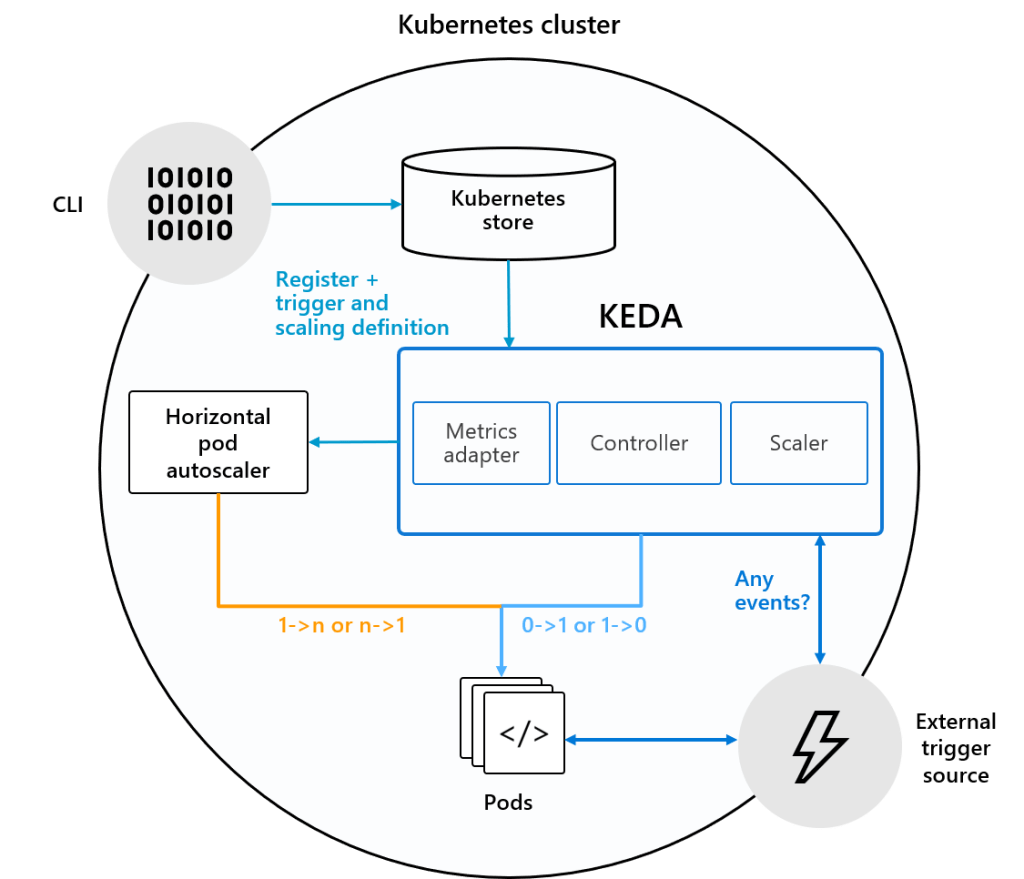
KEDA comes with a set of core components to provide the scaling infrastructure:
A Controller to coordinate all the work and watch for new ScaledObjects
A Kubernetes Custom Metric Server
A set of scalers which allow you to scale on external services
The controller is the heart of KEDA and is handling the following responsibilities :
Watching for new ScaledObjects
Ensuring that deployments where no events occur, scale back to 0 nodes. Once events occur, it makes sure that it scales from 0 to n.
How it Differs from Kubernetes ?
"Default Kubernetes Scaling is not well suited for Event Driven Applications"
By default kuberentes is not very well suited for event-driven scaling and that's because by default kuberentes can really only do resource based scaling looking at CPU and Memory.
As an application admin, you can deploy ScaledObject resources in your cluster which define the scaling rules for your application based on a given trigger.
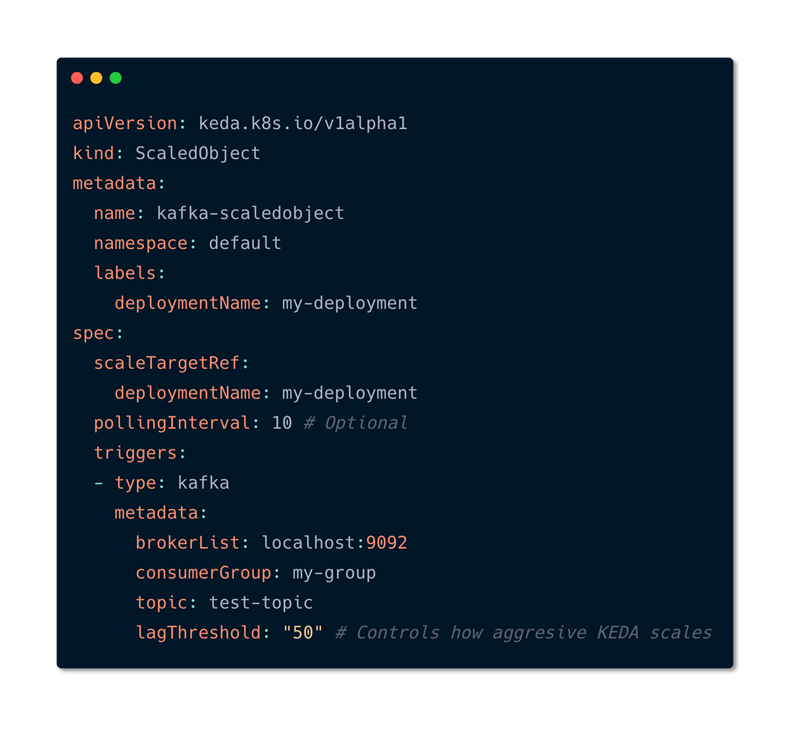
These triggers are also referred to as “Scalers”. They provide a catalog of supported sources on which you can autoscale and provide the required custom metric feeds to scale on. This allows KEDA to very easily support new scale sources by adding an individual scaler for that service. Let’s have a look at a ScaledObject that automatically scales based on Service Bus Queue depth.
Scaled Object Deployment with Kafka using KEDA
As you see in the file, All it contains is that whatever deployment that you are going to scale it goes under scaletargetreference. You can also set some metadata such as how frequently to pull for events that you can control. Metadata such as Minimums and maximums and then you can define the event source in this case it is mention as Kafka, you can also mention things like service bus etc. Once the deployment is applied on kuberentes you can see that it will identify that scaled objects. Based on the events on the eventssources it is going to identify and scale it automatically. HPA does the autoscaling.
With the production release of KEDA back in 2019, you can now safely run your azure function apps on Kubernetes and its recommended by the product group. This allows the users to build serverless applications once re-use them on other infrastructures as well. Let's see How to build an application that supports the above scenario discussed.
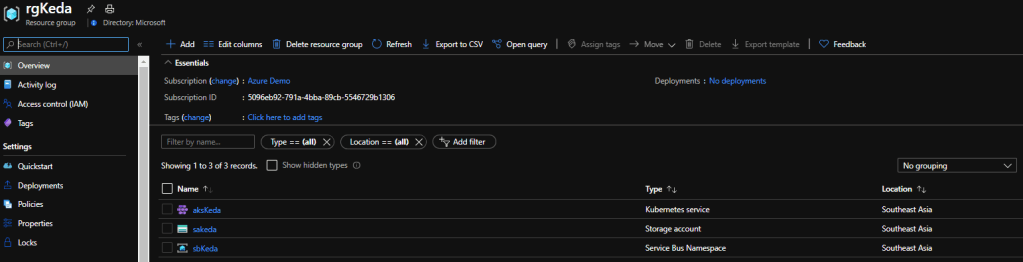
Once these resources are created you can double check it by navigating to azure portal and opening the resource group.
Resources for the Kubernetes Event Driven Autoscaling
Now we have created all the necessary resources. In the above step you can see that we have create two nodes but have not deployed anything to those nodes, but in real scenarios that nodes can contain some applications already running on Kubernetes.
Step 5 : Create Azure Function to Process the Queue Message
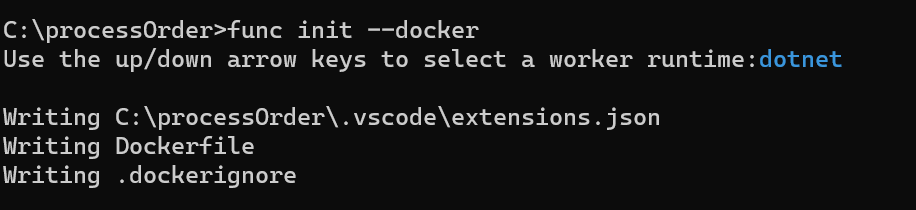
Let's create an Azure function to process these queue messages, you can navigate to the folder and create a containerized function as follows,
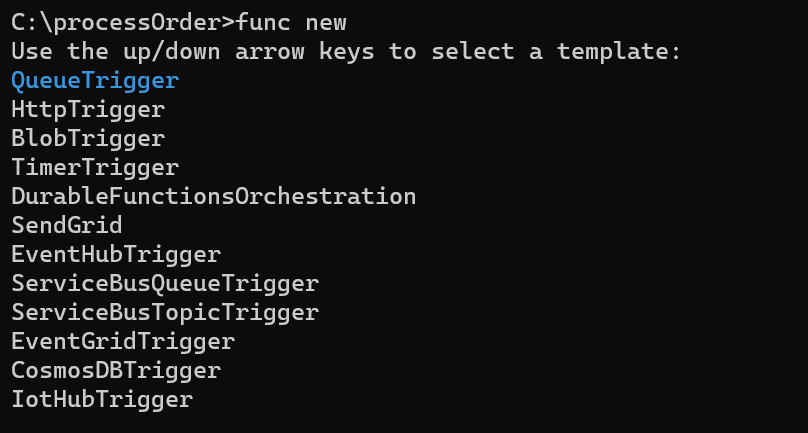
In this case we need to create a function to get triggered when there is a new message in the queue, so select the Trigger as QueueTrigger from the template,
Select Queue Trigger
and give a function name as follows,
Create Function with QueueTrigger template
Open the function in vscode and configure the storage queue connection string in the local.appsettings.json, the connection string can be obtained from the Azure portal in Storage Account "saKeda" -> Queues -> Access Keys
Step 6 : Build the function and Enable Keda on AKS cluster
As we have everything ready, let's build the function with the below command,
docker build -t processorder:v1 .
As the next step , we need to enable KEDA on the Azure Kubernetes Cluster. This is similar on any Kubernetes environment which can be achieved by below,
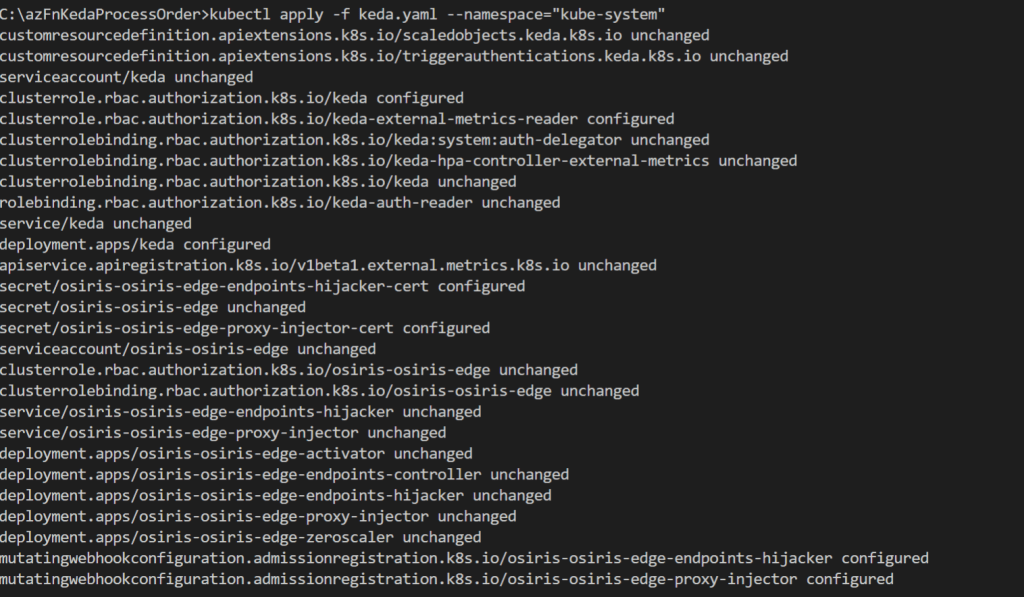
Keda.yaml is the configuration file which has all details. In our case we define that we want to use the queue trigger and what our criteria is. For our scenario we’d like to scale out if there are 5 or more messages in the orders queue with a maximum of 10 concurrent replicas which is defined via maxReplicaCount. Let's apply the yaml file on the cluster.
Make sure that you are tagging the correct registry name , here i am using my docker registry, instead you can consider using Azure Container Registry as well.
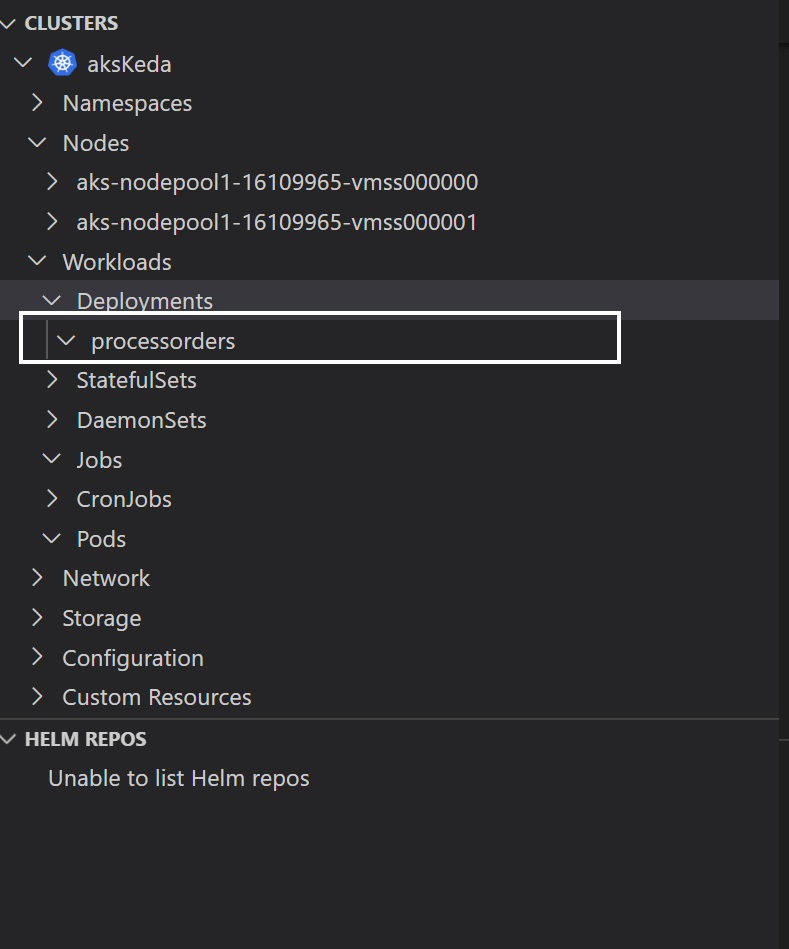
Let's view the kubernetes cluster. if you have install the kubernetes extension you can easily view the status of the cluster using vscode.
Step 8 : Publish messages to the Queue
Inorder to test the scaling of Azure function with KEDA, i created a sample console application which pushes the messages to the queue we created. And the code looks as follows,
using Microsoft.WindowsAzure.Storage;
using Microsoft.WindowsAzure.Storage.Queue;
using System;
using System.Threading;
using System.Threading.Tasks;

namespace Serverless
{
    class Program
    {
       static async Task Main(string[] args)
        {
            CloudStorageAccount storageClient = CloudStorageAccount.Parse("connection string");
            CloudQueueClient queueClient = storageClient.CreateCloudQueueClient();

            CloudQueue queue = queueClient.GetQueueReference("sqkeda");
            for (int i = 0; i < 100000000; i++)
            {
                await queue.AddMessageAsync(new CloudQueueMessage("Hello KEDA , See the magic!"));
            }

        }
    }
}
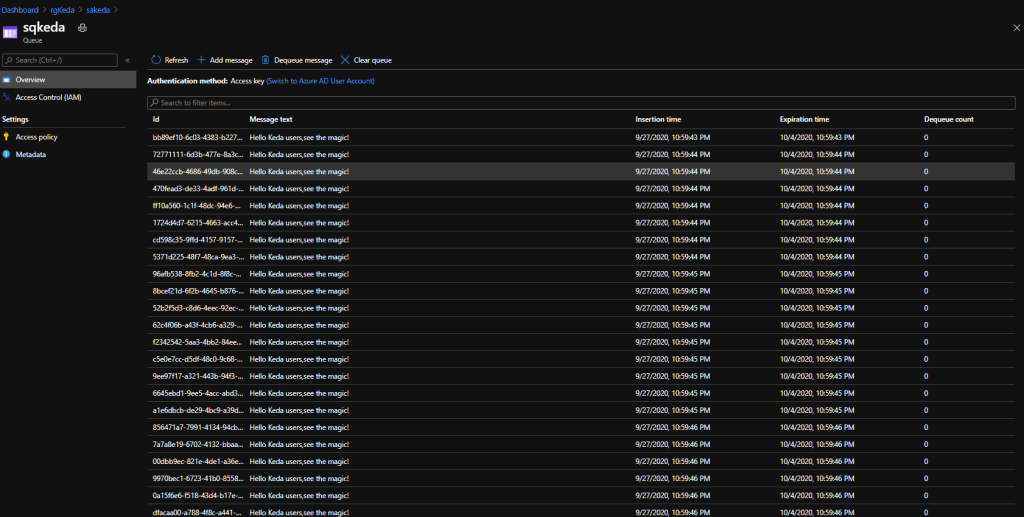
As the messages are getting inserted to the queue, the number of replicas gets increased which you can see from the image below.
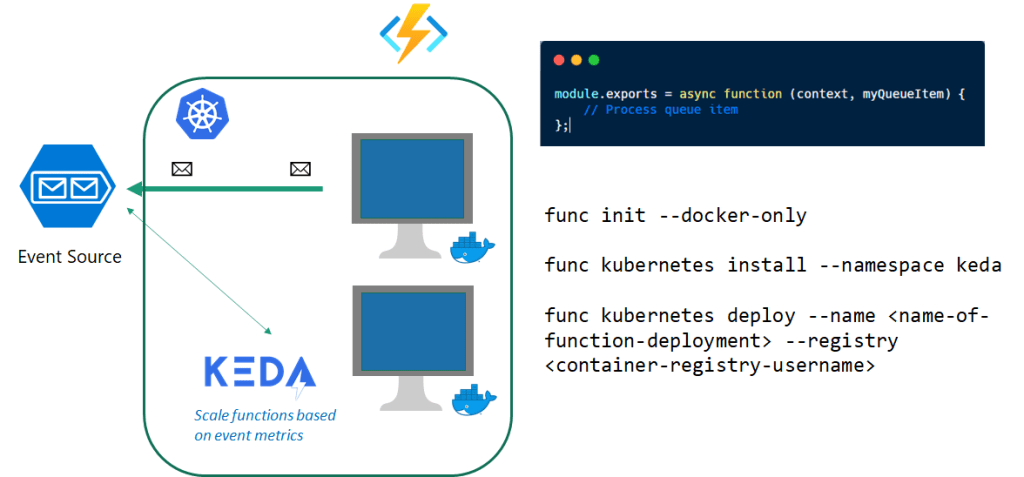
Once all the messages have been processed KEDA will scale the deployment back to 0 pod instances. Overall process is simplified in the diagram below,
We have easily deployed a .NET Core 3.1 Function on Kubernetes which was processing messages from Storage Queue. Once we’ve deployed a ScaledObject for our Kubernetes deployment it started scaling the pods out and in according to the queue depth. This makes the application very easily plug in autoscaling with existing application without making any changes!
This makes Kubernetes-based event-driven autoscaling (KEDA) a great addition to the autoscaling toolchain, certainly for Azure customers and ISVs who are building solutions. Hope this was useful in someway! Cheers!
Biometric Face Recognition is the process and ability of a bio metric machine to identify and recognize the face of an individual. It deals with either to grant access to a secured system or to find out the details of a person by matching the face with existing data in the machine’s system.
Facial recognition is full of potential and can be easily incorporated to increase the security measures of any device/object. Apart from all the excitement, this technology is still developing, the more faces are fed in the algorithm, the more accurate it becomes. Therefore, there’s no need to be afraid of facial technology as it is being used for good ethical uses and safe practices.
This post focuses on one of the solution with Azure by using various services such as Cognitive Service, Blob Storage, Event Grid, Azure Functions and Cosmosdb to build the right architecture that would solve the above mentioned use case.
The above architecture is very self explanatory, it comprises of two main components/flow.
Training Faces of Individuals
Identifying faces of Individuals
Every process is achieved in the above case using Azure function. Each operation will have separate function to achieve result. Main operations such as RegisterUser,TrainFace,TriggerTrain are simple Azure functions in the above diagram. Images are uploaded to Blob Storage using SAS token and face detection is done using cognitive service and references are stored in CosmosDB. EventGrid is used to route the events according to the invokes, for ex, to train image whenever a user uploads while registration and tag the face of the individual in the database.
I have used the above architecture with one case study and hope it will help someone out there who wants to build similar solution. Cheers!
Biometric Face Recognition is the process and ability of a bio metric machine to identify and recognize the face of an individual either to grant access to a secured system or to find out the details of a person by matching the face with existing data in the machine’s system.
Facial recognition is full of potential and can be easily incorporated to increase the security measures of any device/object. Apart from all the excitement, this technology is still developing, the more faces are fed in the algorithm, the more accurate it becomes. Therefore, there’s no need to be afraid of facial technology as it is being used for good ethical uses and safe practices.
Industries around the globe have already started to use face detection for several purposes. As a series of my ideas, continuation with Architecture for traffic problem, This post focus on one of the solution with Azure by using various services such as Cognitive Service, Blob Storage, Event Grid, Azure Functions and Cosmosdb to build the right architecture that would solve the above mentioned use case.
The above architecture is very self explanatory, it comprises of two main components/flow.
Training Faces of Individuals
Identifying faces of Individuals
Every process is achieved in the above case using Azure function. Each operation will have separate function to achieve result. Main operations such as RegisterUser,TrainFace,TriggerTrain are simple Azure functions in the above diagram. Images are uploaded to Blob Storage using SAS token and face detection is done using cognitive service and references are stored in CosmosDB. EventGrid is used to route the events according to the invokes, for ex, to train image whenever a user uploads while registration and tag the face of the individual in the database.
I have used the above architecture with one case study and hope it will help someone out there who wants to build similar solution. Cheers!
Many times you would have wanted to have one view/dashboard of all the Github issues created for your open source repositories. I have almost 150 repositories and it becomes really hard to find which are the priority ones to be fixed. In this post we will see how you can create a one dashboard/report to view all your github issues in a page using Azure Function(3.X with Typescript) and Azure CosmosDB.
You will need to have an Azure Subscription and a Github Account. If you do not have an Azure subscription you can simply create one with free trial. Free trial provides you with 12 months of free services. We will use Azure Function and CosmosDB to build this solution.
To store the related data of the GitHub issue we need to create a CosmosDB account. To Create CosmosDB account, navigate to the Azure portal and click the Create Resource. Search for Azure Cosmosdb on the market place and create the account as follows.
If you have noticed my previous blog, i have mentioned about how to create an Azure function. Here is an image of the Function App i created.
Creating Function App
Create Typescript Function:
As you see i have selected Runtime stack as Node.js which will be used to run the function written with Typescript. Open Visual Studio Code(Make sure you have already installed the VSCode with the function core tools and extension). Select Ctrl + Shif + P to create a new Function Project and select the language as Typescript.
Create Typescript Function
Select the template as Timer trigger as we need to run every 5 minutes and you need to configure the cron expression (0 */5 * * * *) as well. (You can have custom time)
Give the function name as gitIssueReport, You will see the function getting created with the necessary files.
Let's try to add the necessary dependencies to the project. We will use bluebird as a dependency to handle the requests. Also gh-issues-api library to interact with Github and get the necessary issues. You need to add the dependencies in the package.json folder under dependencies.
Once the deployment is succesfful, Navigate to Azure portal and open the function app to make sure that everything looks good. If you dont see the dependencies make sure to install the dependencies manually by navigating to the Kudu Console of the function App.
Note : Make sure to stop the Function app before you head over to Kudu.
ick on the Platform Features tab. Under Development Tools, click Advanced tools (Kudu). Kudu will open on it’s own in a new window.
Navigate to KUDU console
In the top menu of the Kudu Console, click Debug Console and select CMD
In the command prompt, we’ll want to navigate to D:\home\site\wwwroot. You can do so by using the command cd site\wwwroot and press enter on your keyboard. Once you’re in wwwroot, run the command npm i bluebird to install the package. Also do the same for gh-issues-api
As you could see in the above code, we are setting two environment variables to read the repository name and the repository owner which are needed to fetch the issues information. You can set those variable son the Azure portal as follows.
Navigate to the Overview tab for your function and click Configuration. As you can see below I've configured those values.
Just to make sure that our settings in the function.json has been reflected or not navigate to the Functions and select the Function and make sure all the binding values are correct. If not create a new binding to cosmosdb account you created as mentioned in the step Step 3 (Instead of Twilio select Cosmosdb)
Now its time to see the function app running and issues being reported. Navigate to your function app and click Run. You can see the Function Running as shown below.
If everything goes well, you can navigate to Cosmosdb Account and open the collection with the data Explorer.
Data Explorer Cosmosdb
You will see that there are many documents inserted in the collection.
Cosmosdb collection with Github repository Issues
Now you can modify this function to retrieve the issues from all of your repositories and use the data stored in the cosmosdb collection to build a dashboard to show the issues with priority. Also you can make use of this post to send a notification to someone about the issue as well.
Hope this simple function will help someone to build a dashboard out of the data collected and make them more productive.Cheers!
I have been using twitter for the past 10 years and it took nearly 5 years to get those 100 followers. I was not an active user till before 2 years. One great tip i learnt in recent times is that first thing you need to do is to get a really complete and professional profile. Most users look at profiles before following. Another best way is to increase followers on Twitter is being consistent with posting quality content. Automating your posts will help a lot with this. In this blog, i will explain how you could build a simple function and deploy it on Azure to increase your followers count and to be consistent with quality content.
Step 2 : Create a Function app with the following settings, make sure you are setting the Consumption Plan and enable Application Insights.
Step 3 : Open Visual Studio Code(Make sure you have already installed the VSCode with the function core tools and extension). Select Ctrl + Shif + P to create a new Function Project and select the language as Python
Step 4 : Select the template as Timer trigger as we need to run every 15 minutes and you need to configure the cron expression (0 */15 * * * *) as well.
Give the function name as twitter_followers,
Step 5 : You will see the project template getting created. Next step is to edit the __init__.py, thats where you are going to add the logic. We will be using Tweepy library to get the data from twitter and to follow the person who is tweeting the tweet. The methods we will use in the function as retweet and create_friendship. Here is the whole logic of the function. As you can see any tweet that has the hashtag #azure will get retweeted and you will automatically follow the user who has tweeted the tweet.
import tweepy, time, datetime, logging, os
from datetime import date
import azure.functions as func
def main(mytimer: func.TimerRequest) -> None:
    utc_timestamp = datetime.datetime.utcnow().replace(
        tzinfo=datetime.timezone.utc).isoformat()
    if mytimer.past_due:
        logging.info('The timer is past due!')
    logging.info('Python timer trigger function ran at %s', utc_timestamp)
    auth = tweepy.OAuthHandler(os.environ["TWITTER_CONSUMER_KEY"], os.environ["TWITTER_CONSUMER_SECRET"])
    auth.set_access_token(os.environ["TWITTER_ACCESS_TOKEN"], os.environ["TWITTER_ACCESS_TOKEN_SECRET"])
    api = tweepy.API(auth)
    today = str(date.today())
    while True:
        for tweet in tweepy.Cursor(api.search,q="#azure", lang="en", since=today).items(1):
            try:
                api.retweet(tweet.id)
            except:
                pass
            try:
                api.create_friendship(tweet.user.id)
            except:
                pass
Step 6: As you can see there are few environment variables which we are using in the code, we need to add those variables with the values in the local.settings.json file.
You need to get those keys from the twitter application you already created. if you dont have one, create from here.
Also you need to add the dependencies which are used in the above code inside the requirements.text file. dependencies.txt would have the following,
azure-functions
tweepy
Step 7 : Now we are done with everything, to publish the app to Azure, just press Ctrl+Shift+P and select Deploy to Funciton App
Step 8 : You can navigate to the function app on the Azure portal and make sure Application Insights is configured and as well as AppSettings are correct.
Make sure all the Environment variables are configured with the values.
Now you can start your function and navigate to Monitor section of the function app. You will see the real live telemetries from the app as follows,
All good, you can see the function running and you will see the tweets are automatically retweeted with the particular hasthage in your timeline and also you will see the number of followers increased. Happy Tweeting Folks!
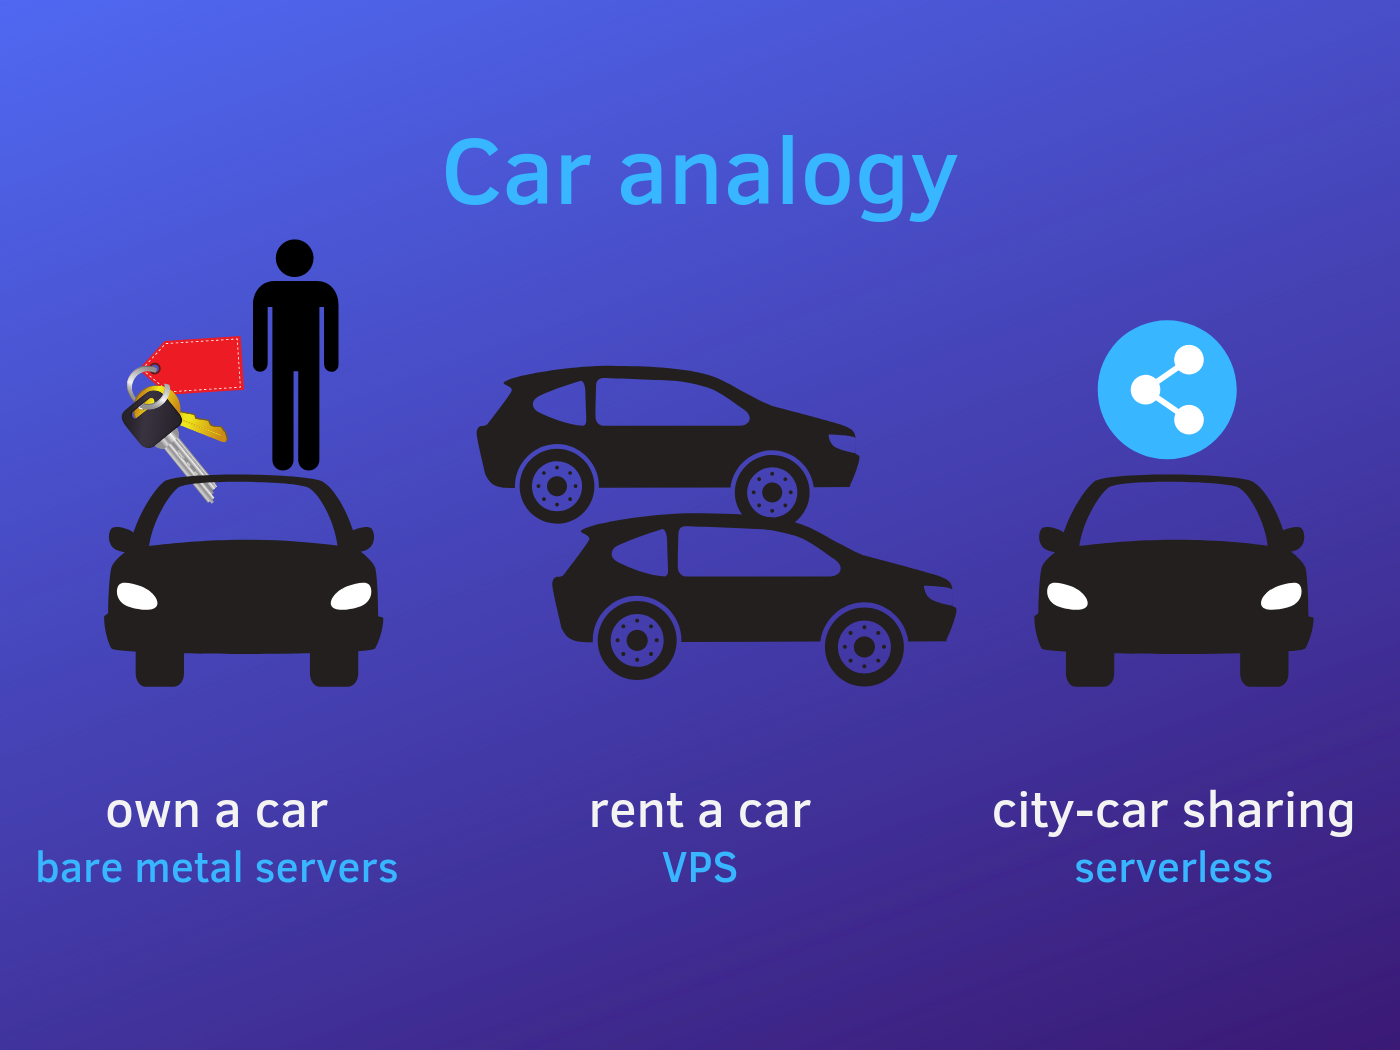
When you are involving in an architectural discussion which involves Azure's cosmosdb, a mandatory question that you get is "Is not Azure Cosmos DB very expensive?". Based on the fact that Cosmos DB is evolving very fast, there are lot of customers stepping in to use the service in their architecture. To understand one thing Cosmos DB is not priced based on the usage the pricing is based on what you reserve. One of the best serverless example we could consider here is renting out a car rather than managing and hailing it. Key point here is you pay for what you reserve, which is the capacity, which is refered in terms as Request Units (RUs). Any customer consuming the Cosmos DB serivce will be paying for the RUs as well as the space.
There have been many questions asked on forums,discussions on how to scale up/down cosmos DB Request units. Being a fan of two major services in Azure, i decided to write on how to scale Cosmos DB with Azure function.Azure Functions and Cosmosdb services are getting more closer and closer together in the recent times. One of the case study that we can consider here is whenever you are experiencing throttling(429) due to the burst of high traffic for a period of time, you will be increasing the Request Units(RUs) in the portal to handle it. Which is sort of a pain to handle it manually and the resulting cost will be very high if you've forgotten to scale it down. Let's see how to autoscale using Azure function to mitigate this issue. It involves 2 steps ,
Create an Azure function to scale throughput on a collection and publish
Connect the function to CosmosDB alert using an HTTP webhook.
The following solution will help you only to scale up , but the same function can be used to sacle it down if you pass a negative value for the CosmosDB_RU attribute.
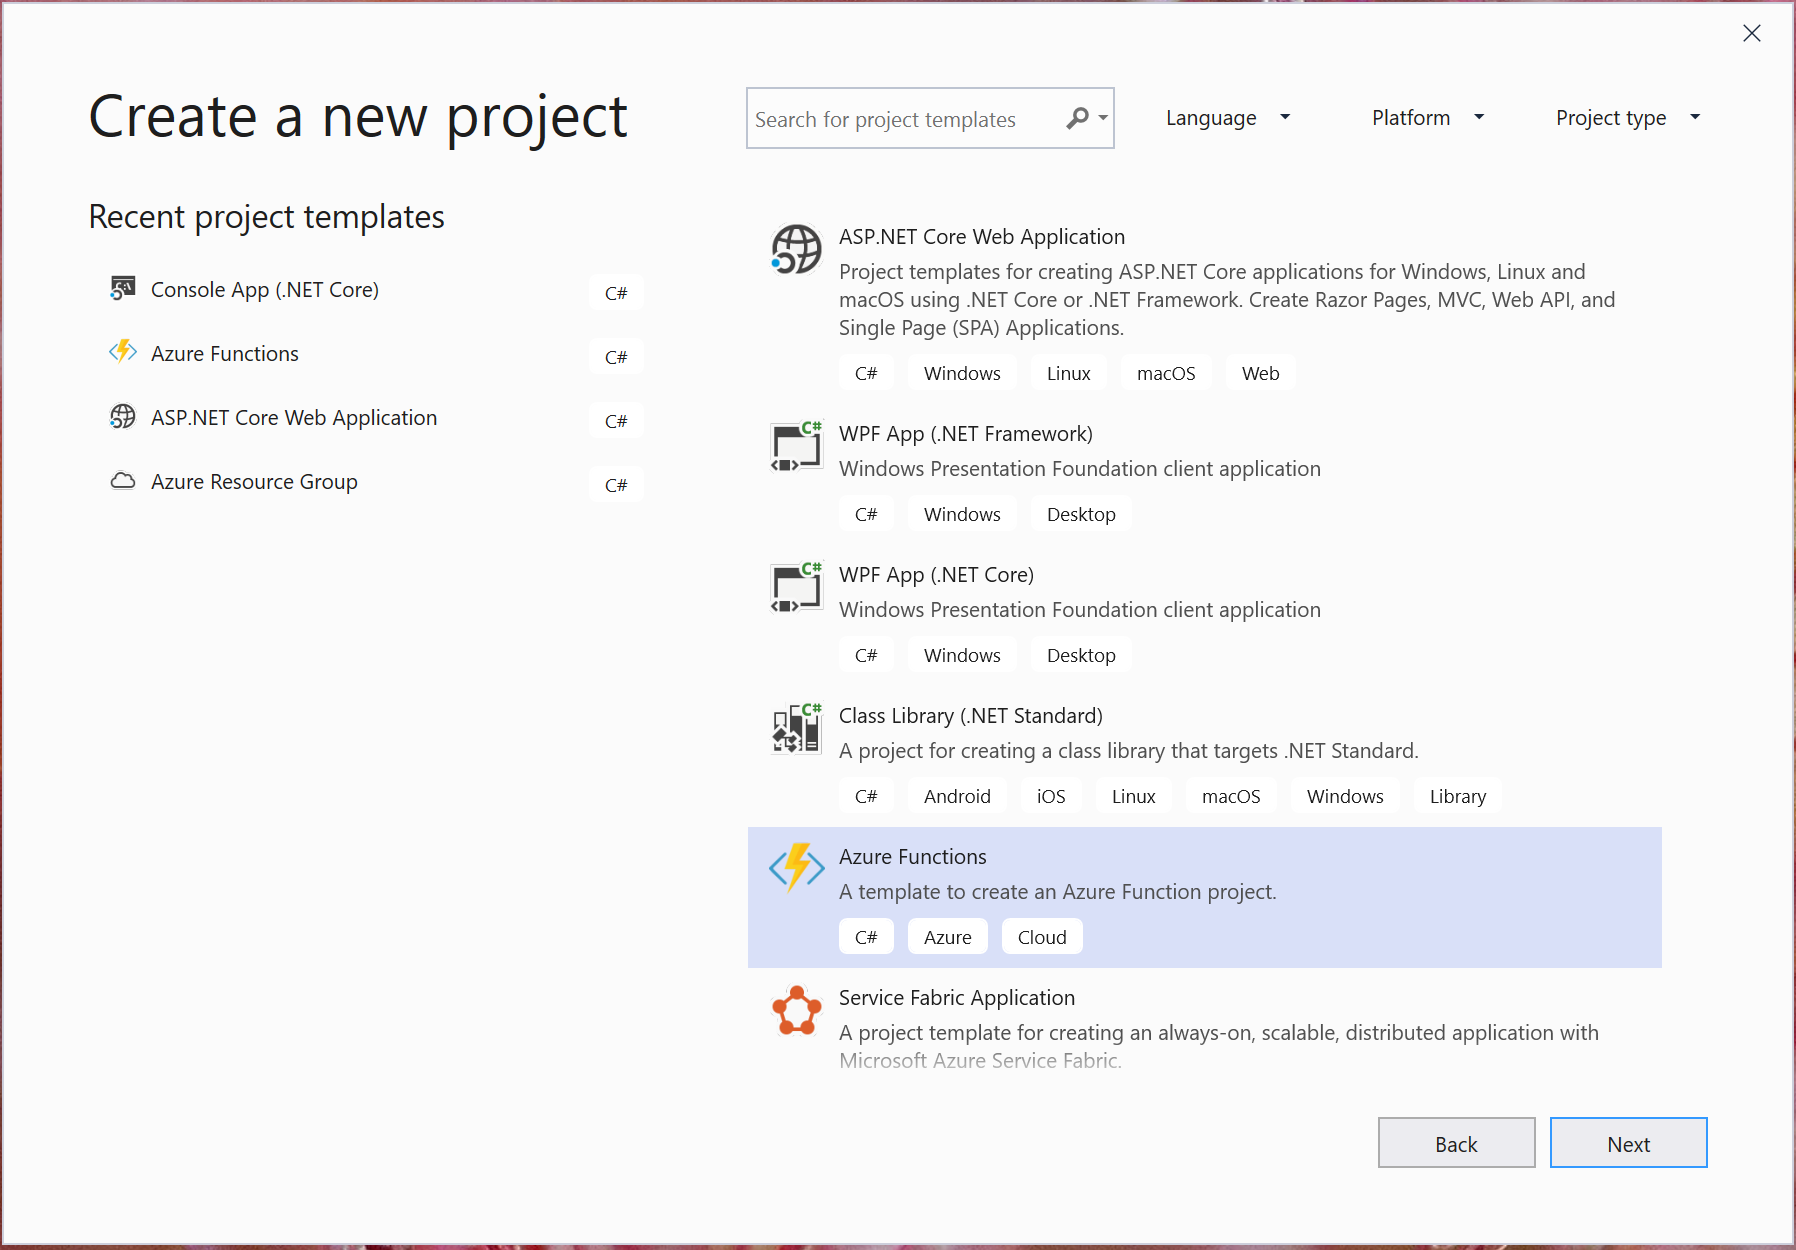
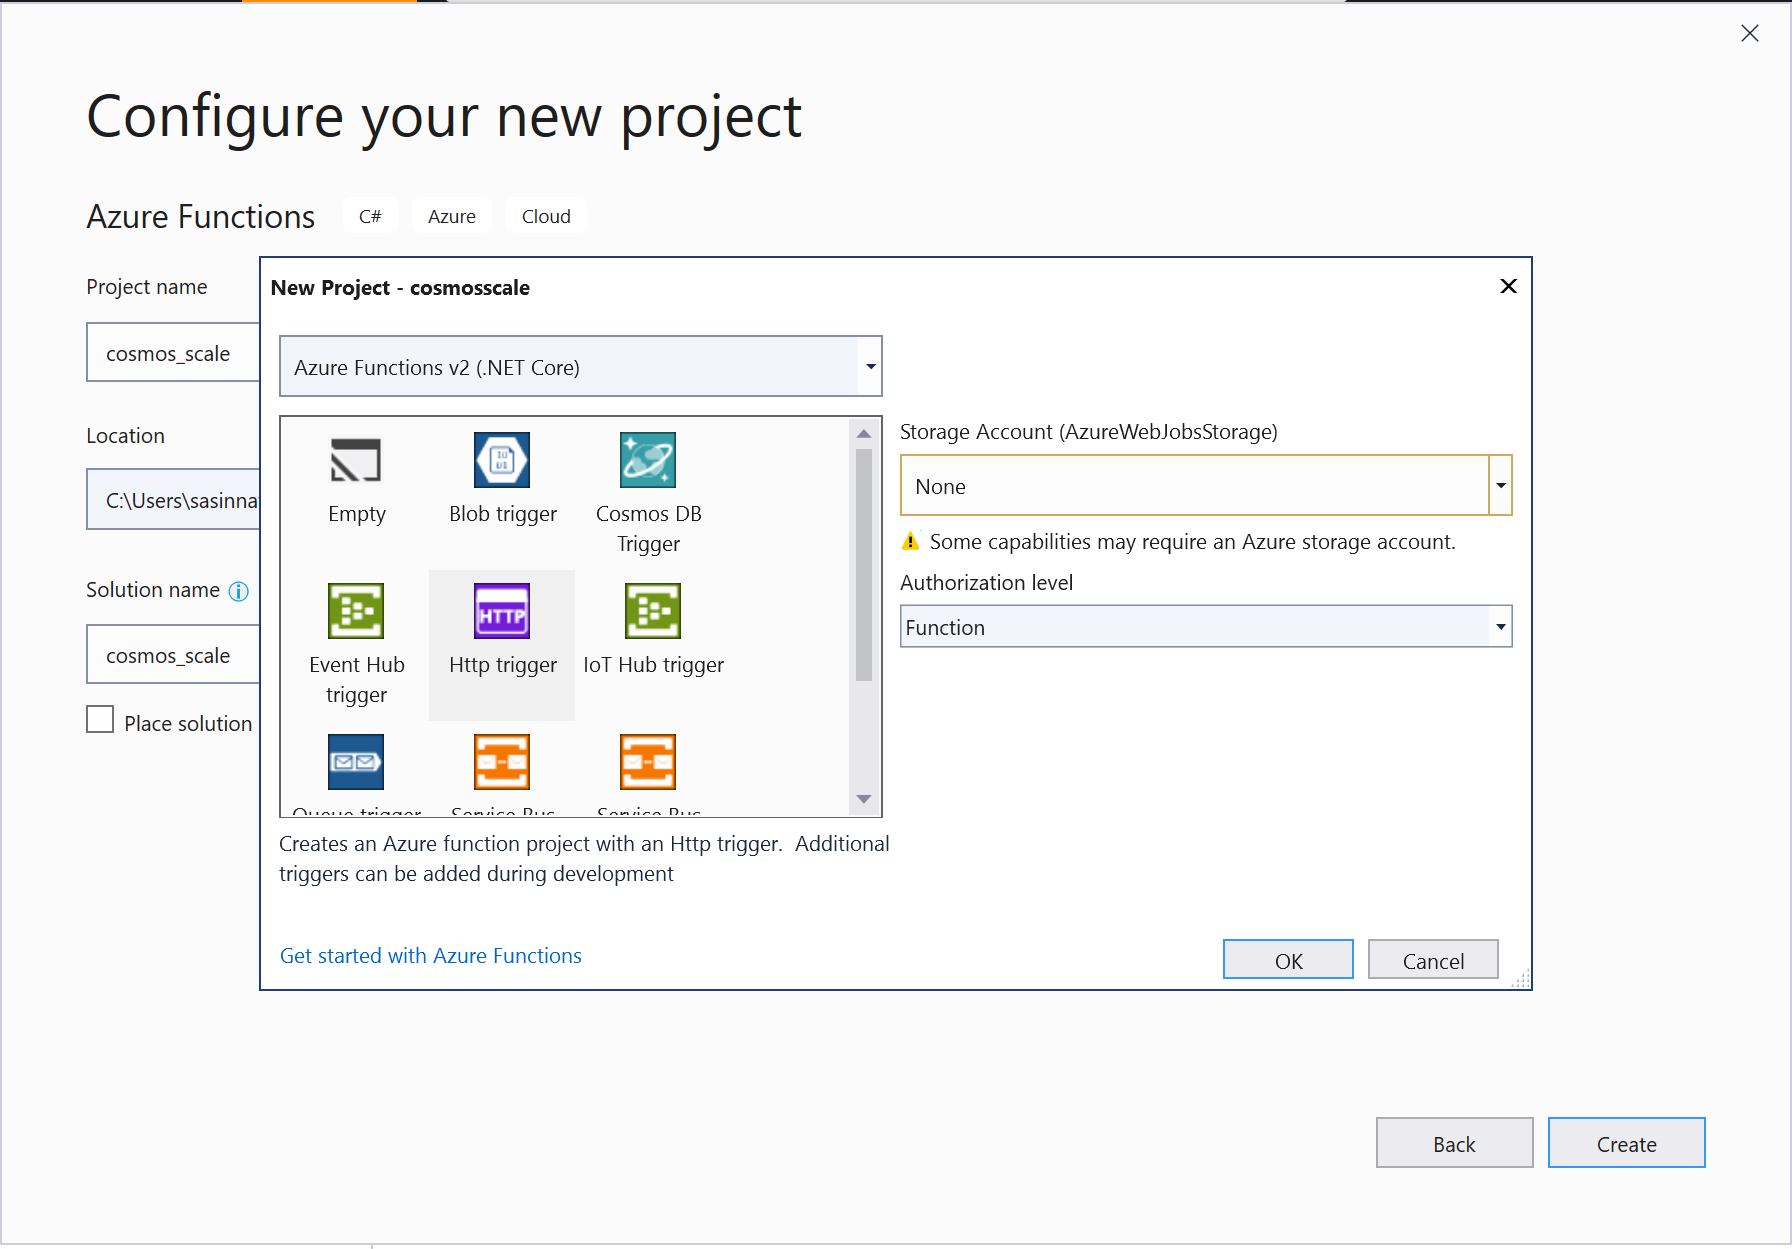
Click File->New Azure Functions from the templates available and give a name for your function and click ok. I have given the name as Cosmos_scale
I will be using Azure function 2.x , so you will be taken to a new window where select Trigger type as HttpTrigger and select Authorization level as Function and no need for Storage Account
Once the project is created, rename the default Function1.cs with your name, in this case it will be Cosmosscale.cs. Let's get into the actual implementation of the function
Step 2: Add Microsoft.Azure.Documents.Core Nuget Package to the solution
In order to communicate with the Cosmos DB account and make use of the operations let's add the Nuget package Microsoft.Azure.Documents.Core package.
Step 3:Add Microsoft.Extensions.Configuration to the solution
In order to connect to Cosmos DB we need to get the connection string and the key from the appsettings, lets add Microsoft.Extensions.Configuration. For Azure Functions v2, the ConfigurationManager is not supported and you must use the ASP.NET Core Configuration system:
Let's understand the logic here,
As a first step, lets create the Client to connect to Cosmos DB
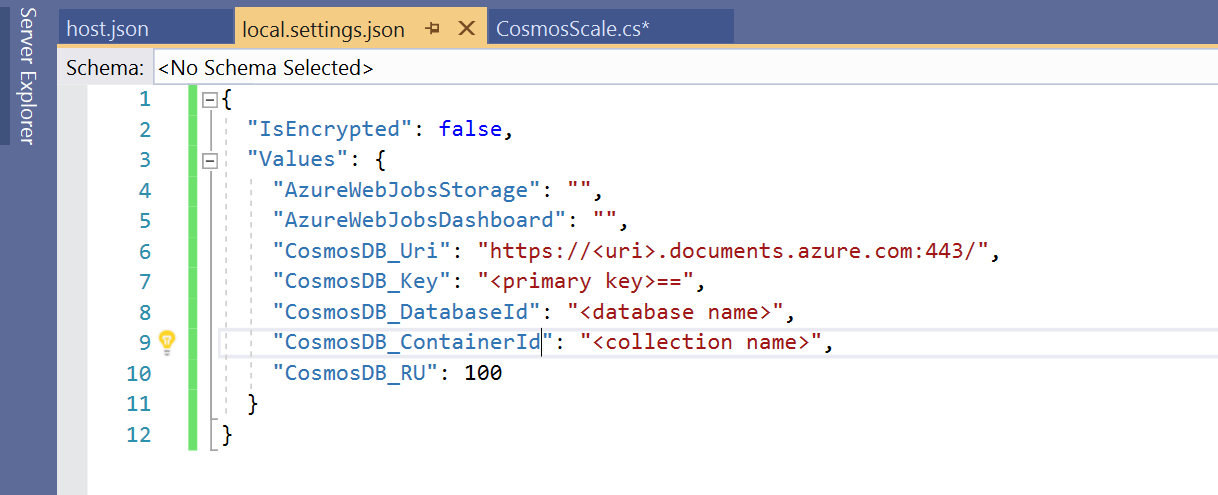
Step 4: Add the config values to local.settings.json
Now we need to add the values to "local.settings.json". These values will be used to test the function locally before deploying it to Azure.
The setting key "CosmosDB_RU" is to increase the RU by 100, and if you want to decrease you can set a negative value say "-100".
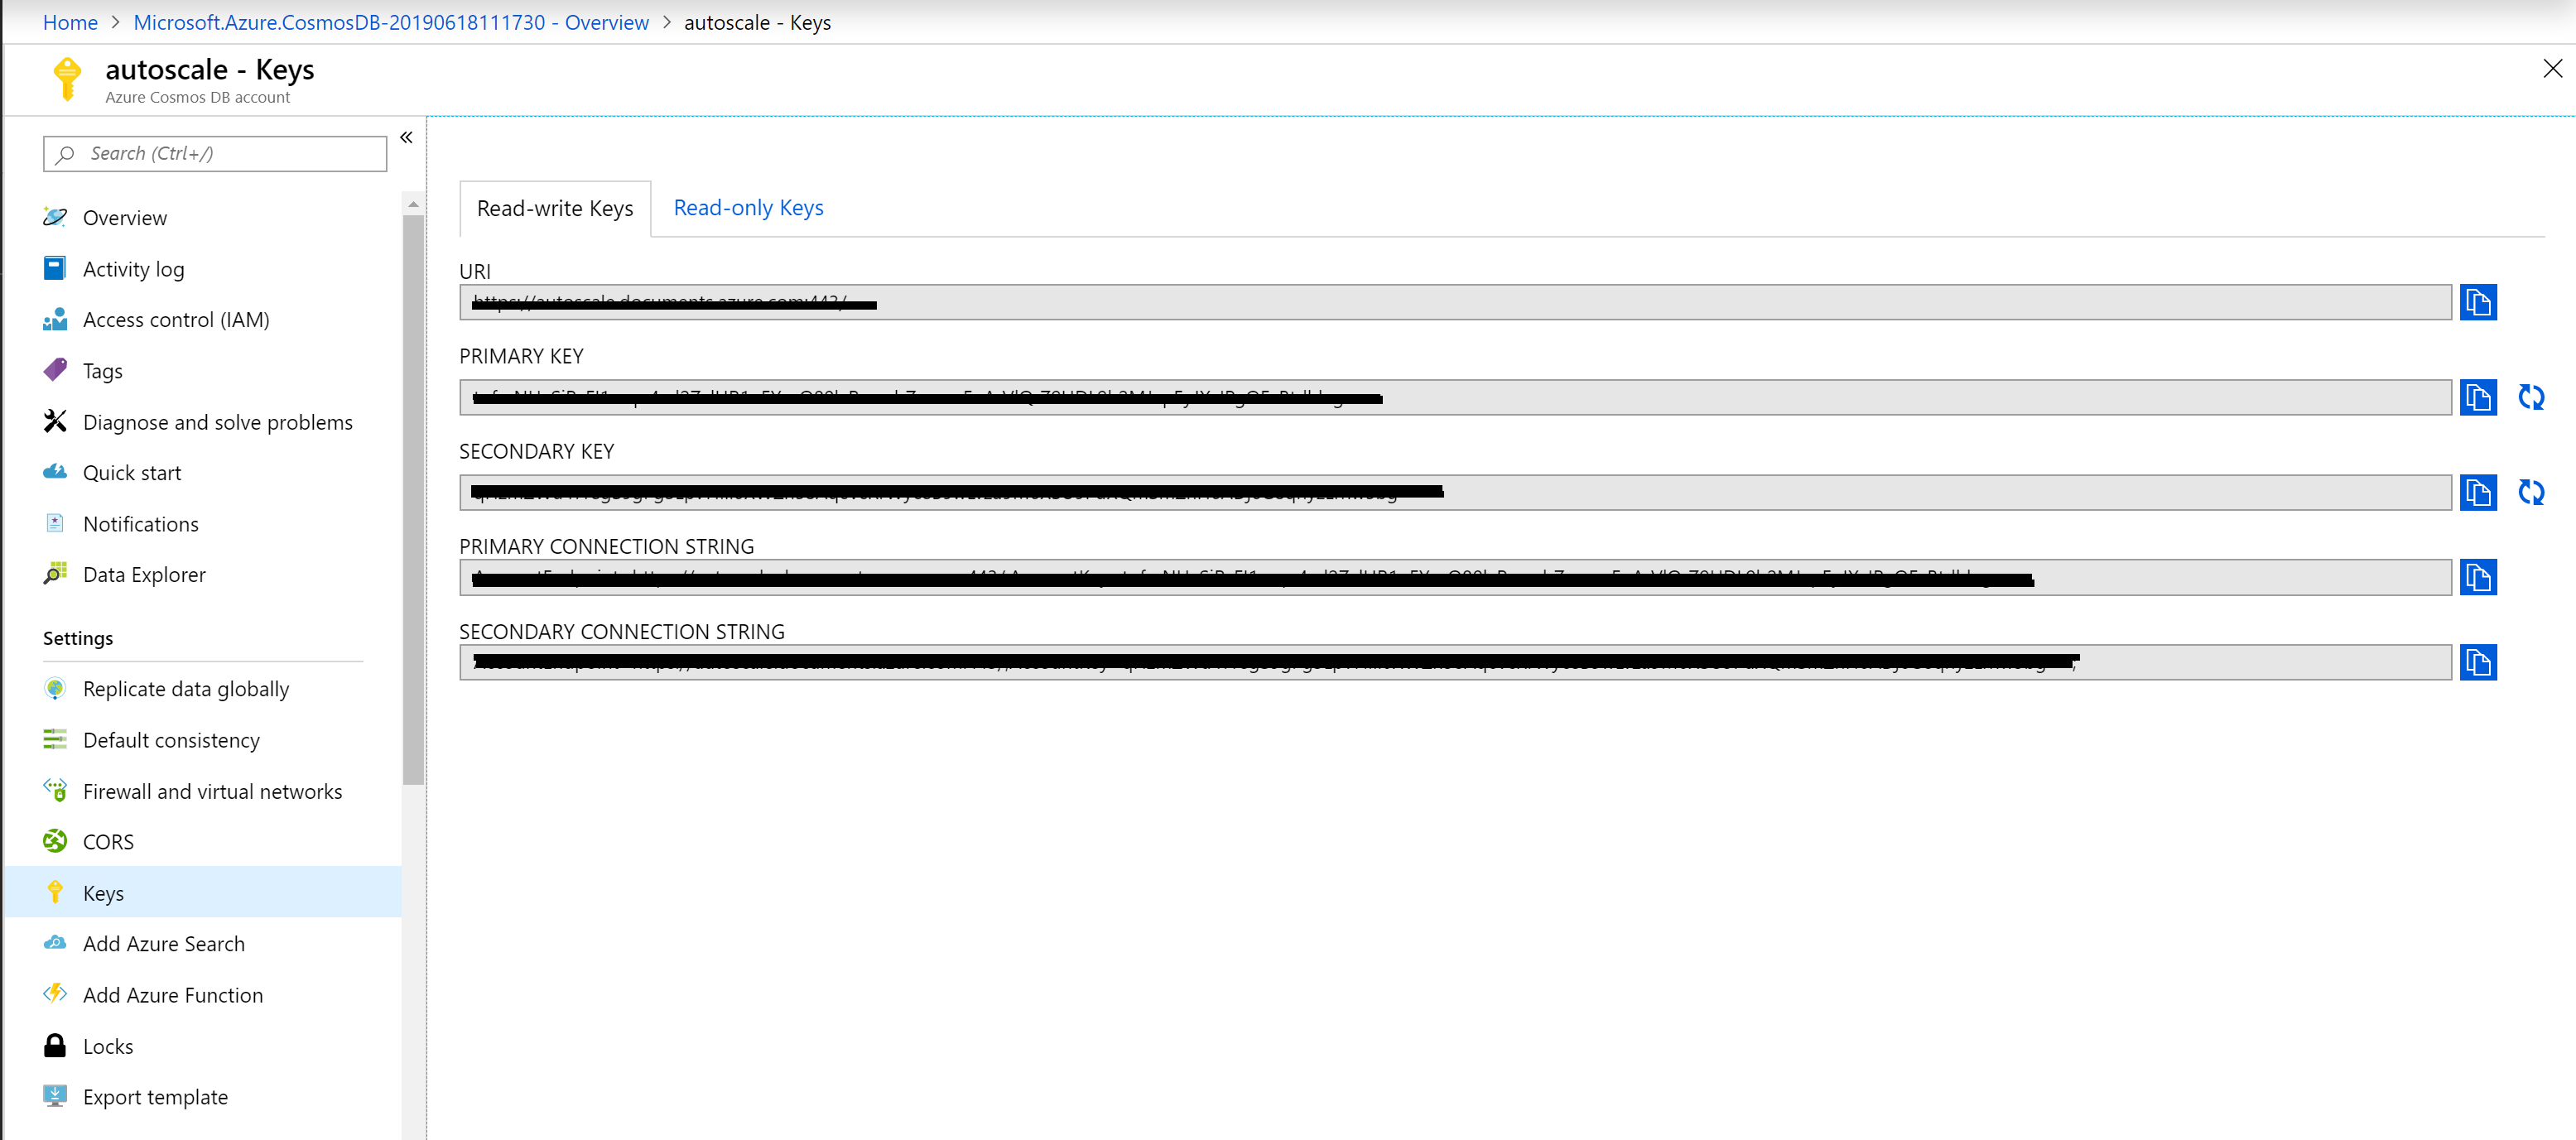
You can get these values from the portal by navigating to the Cosmos DB account.
Step 5: Check the function with Postman
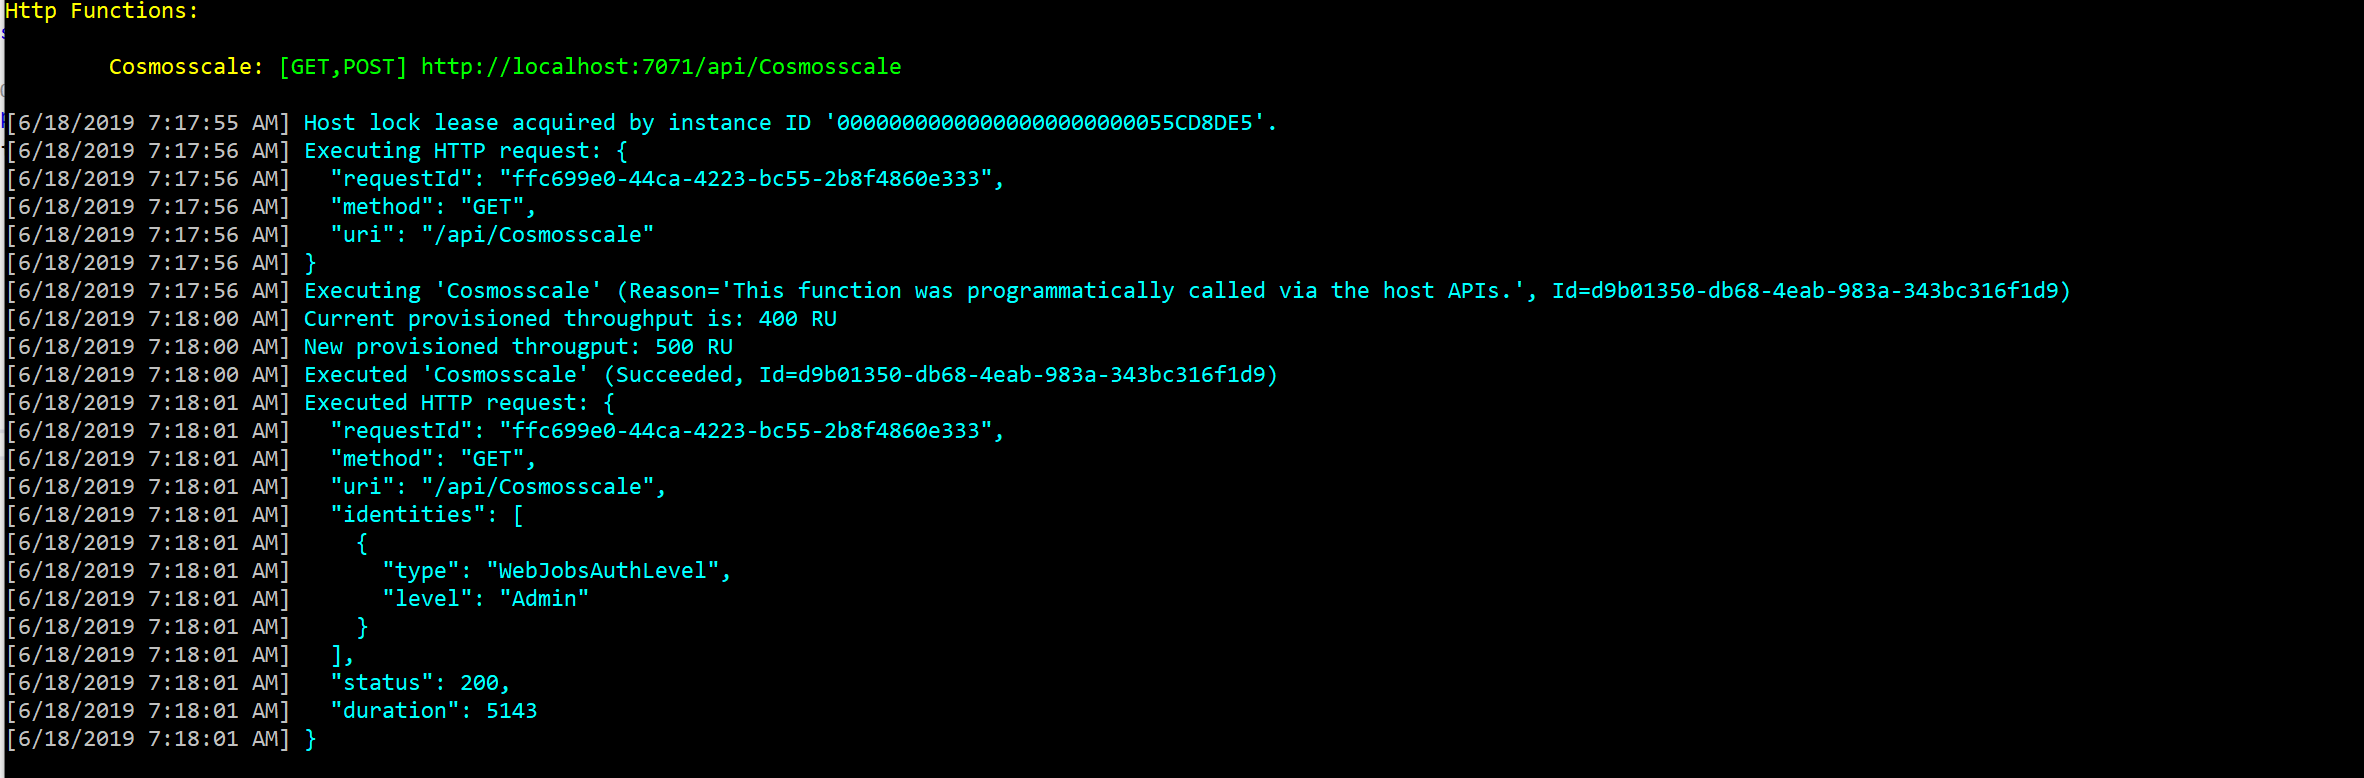
Now we have setup and created the function locally. To test the app locally, click on the run button. Using PostMan send a GET or Post request by using the url
If you have followed the steps and set up everything correctly, you will be seeing he following response in the console. LogInformation messages will specify the current and the provisioned throughput.
Now we have successfuly tested the autoscaling function in local. Let's publish the Function.
In this ste, lets deploy the function through the portal to the new function app.
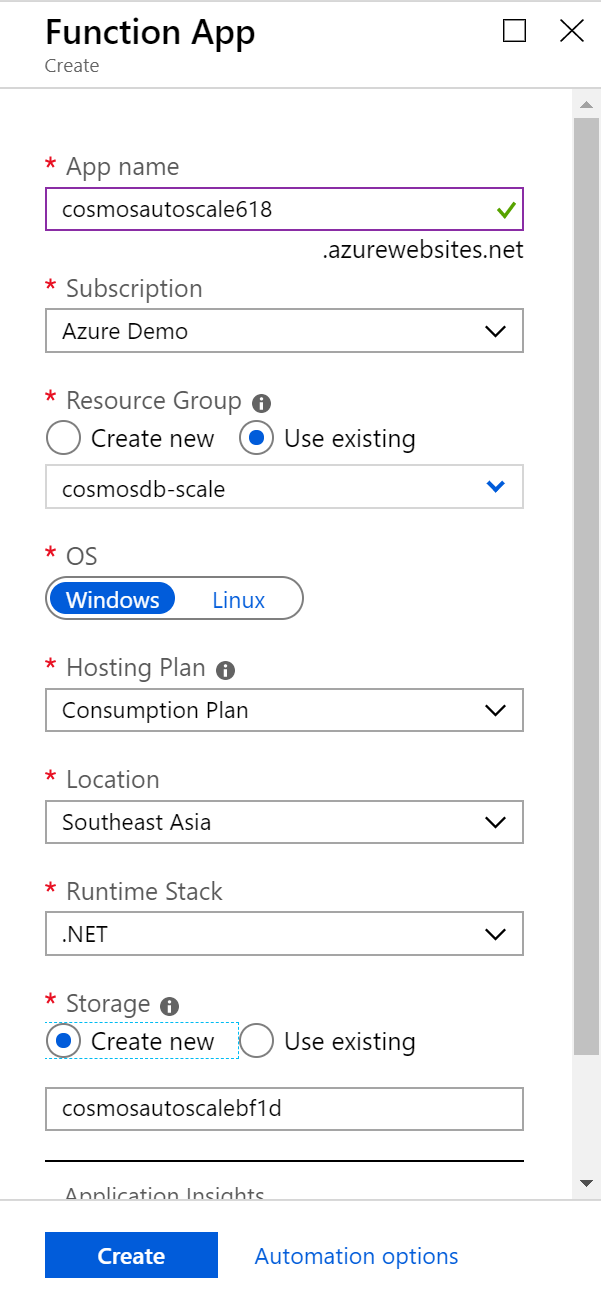
Navigate to the Azure portal and provision a Function App with the default settings.
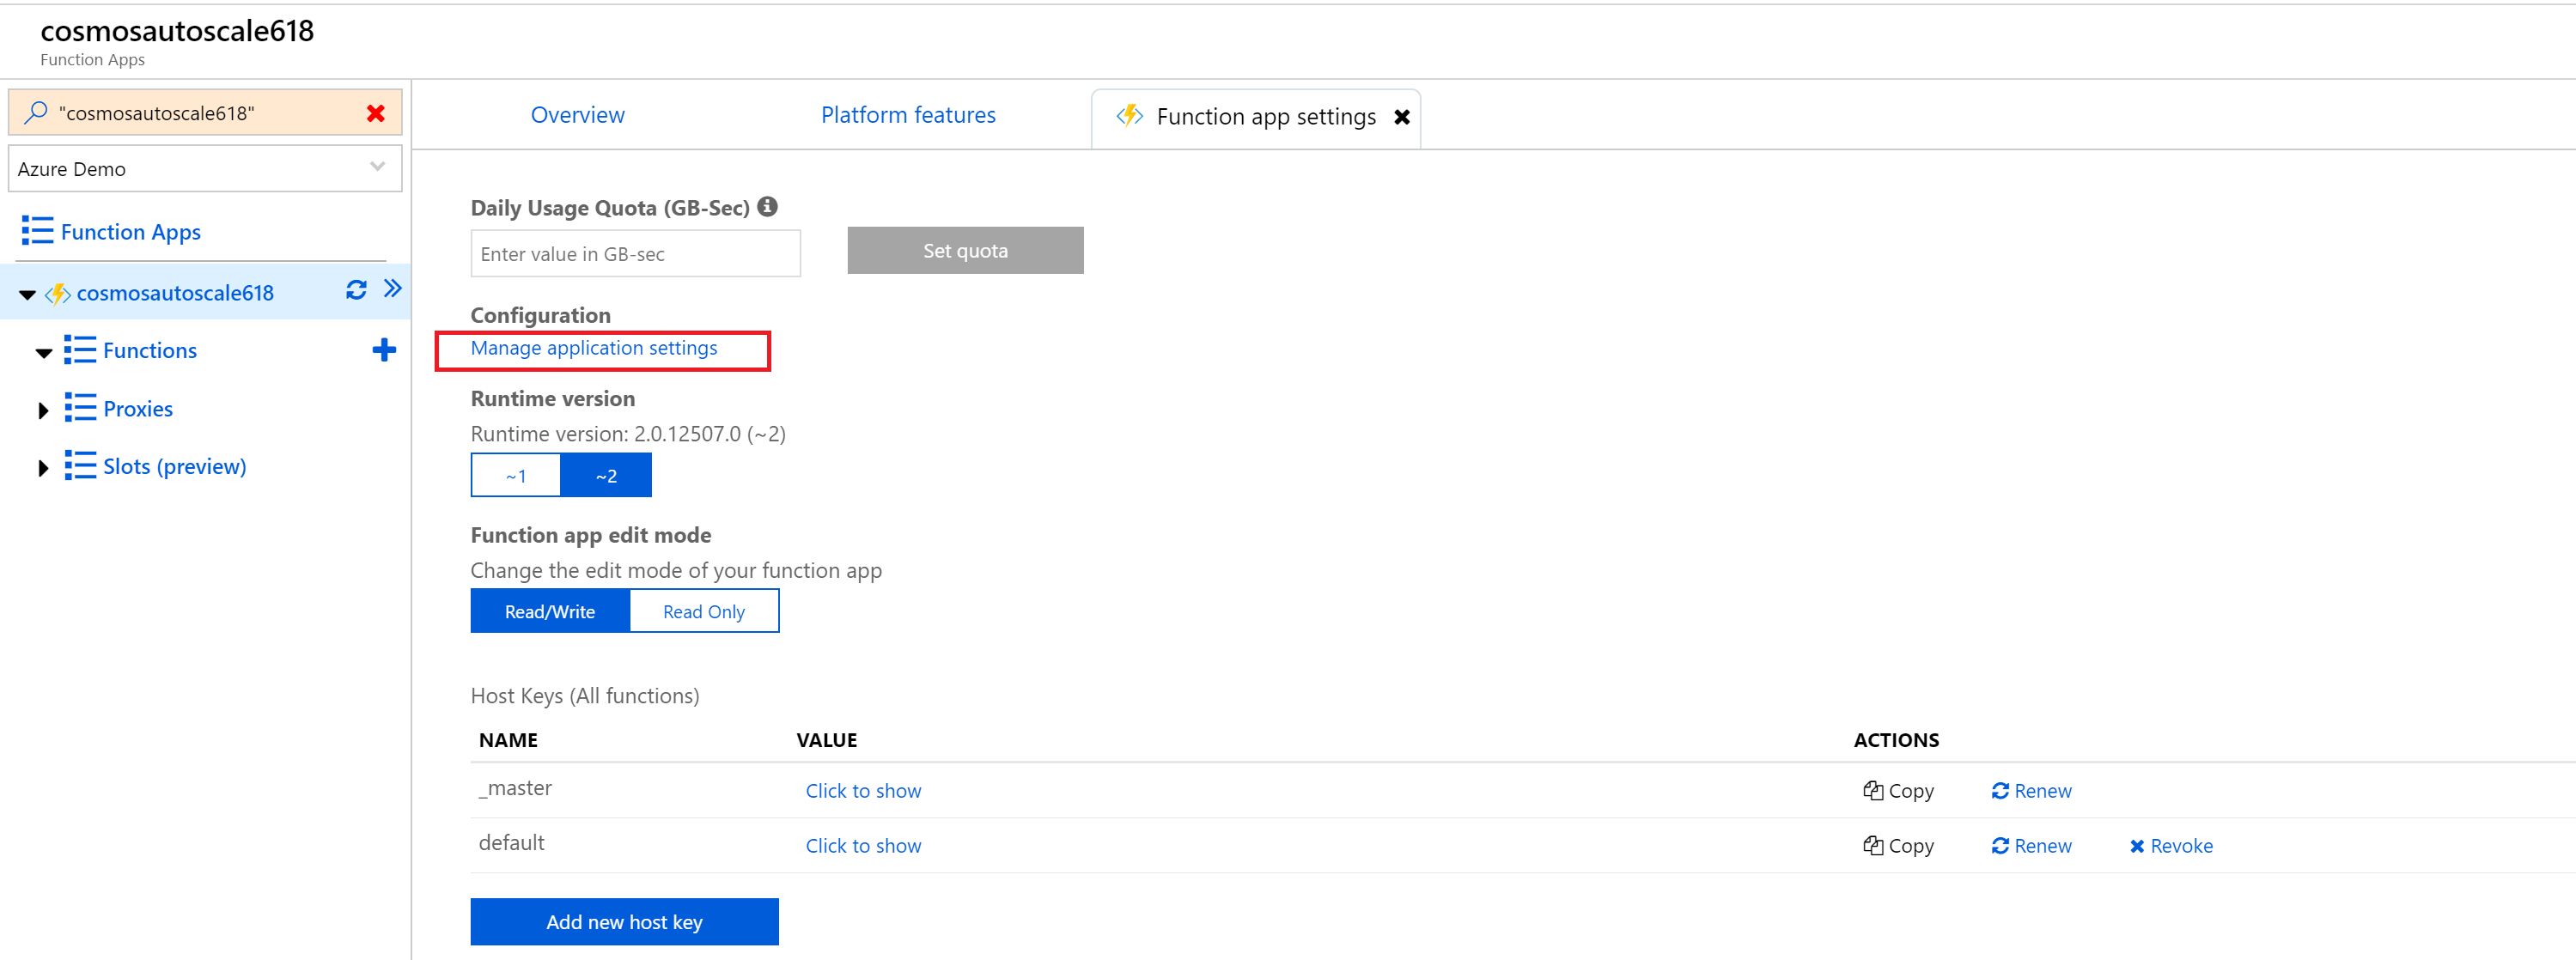
Click on “Function app settings” on your Function App’s homepage, then click on “Manage application settings”. Add the values in the table below to Application settings. The advantage of Adding values to Application settings allows the function’s manager to edit the values later.
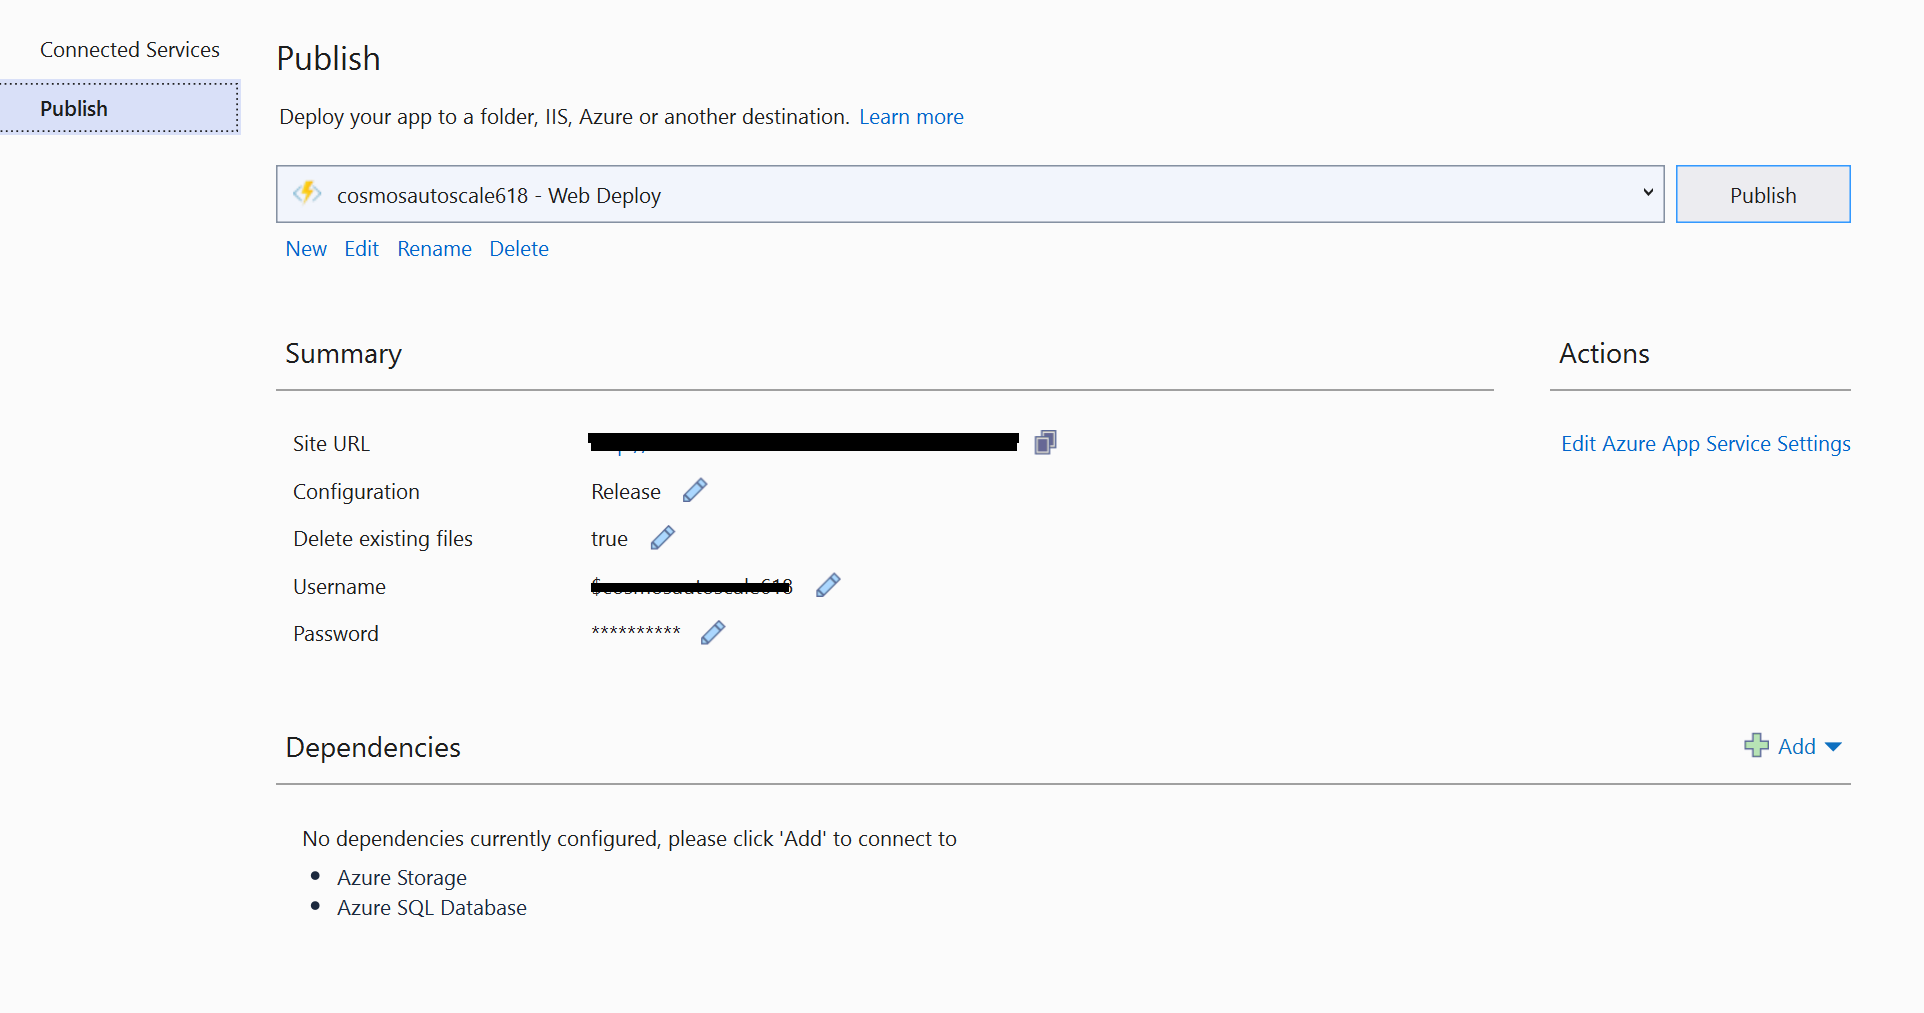
Let's publish the function app using Visual Studio.
Right click on the project file > Publish… > Select Existing > Publish > Select the Function App we provisioned in the previous step and click ok.
Now we have successfuly deployed the function to Azure. Let's do the final step
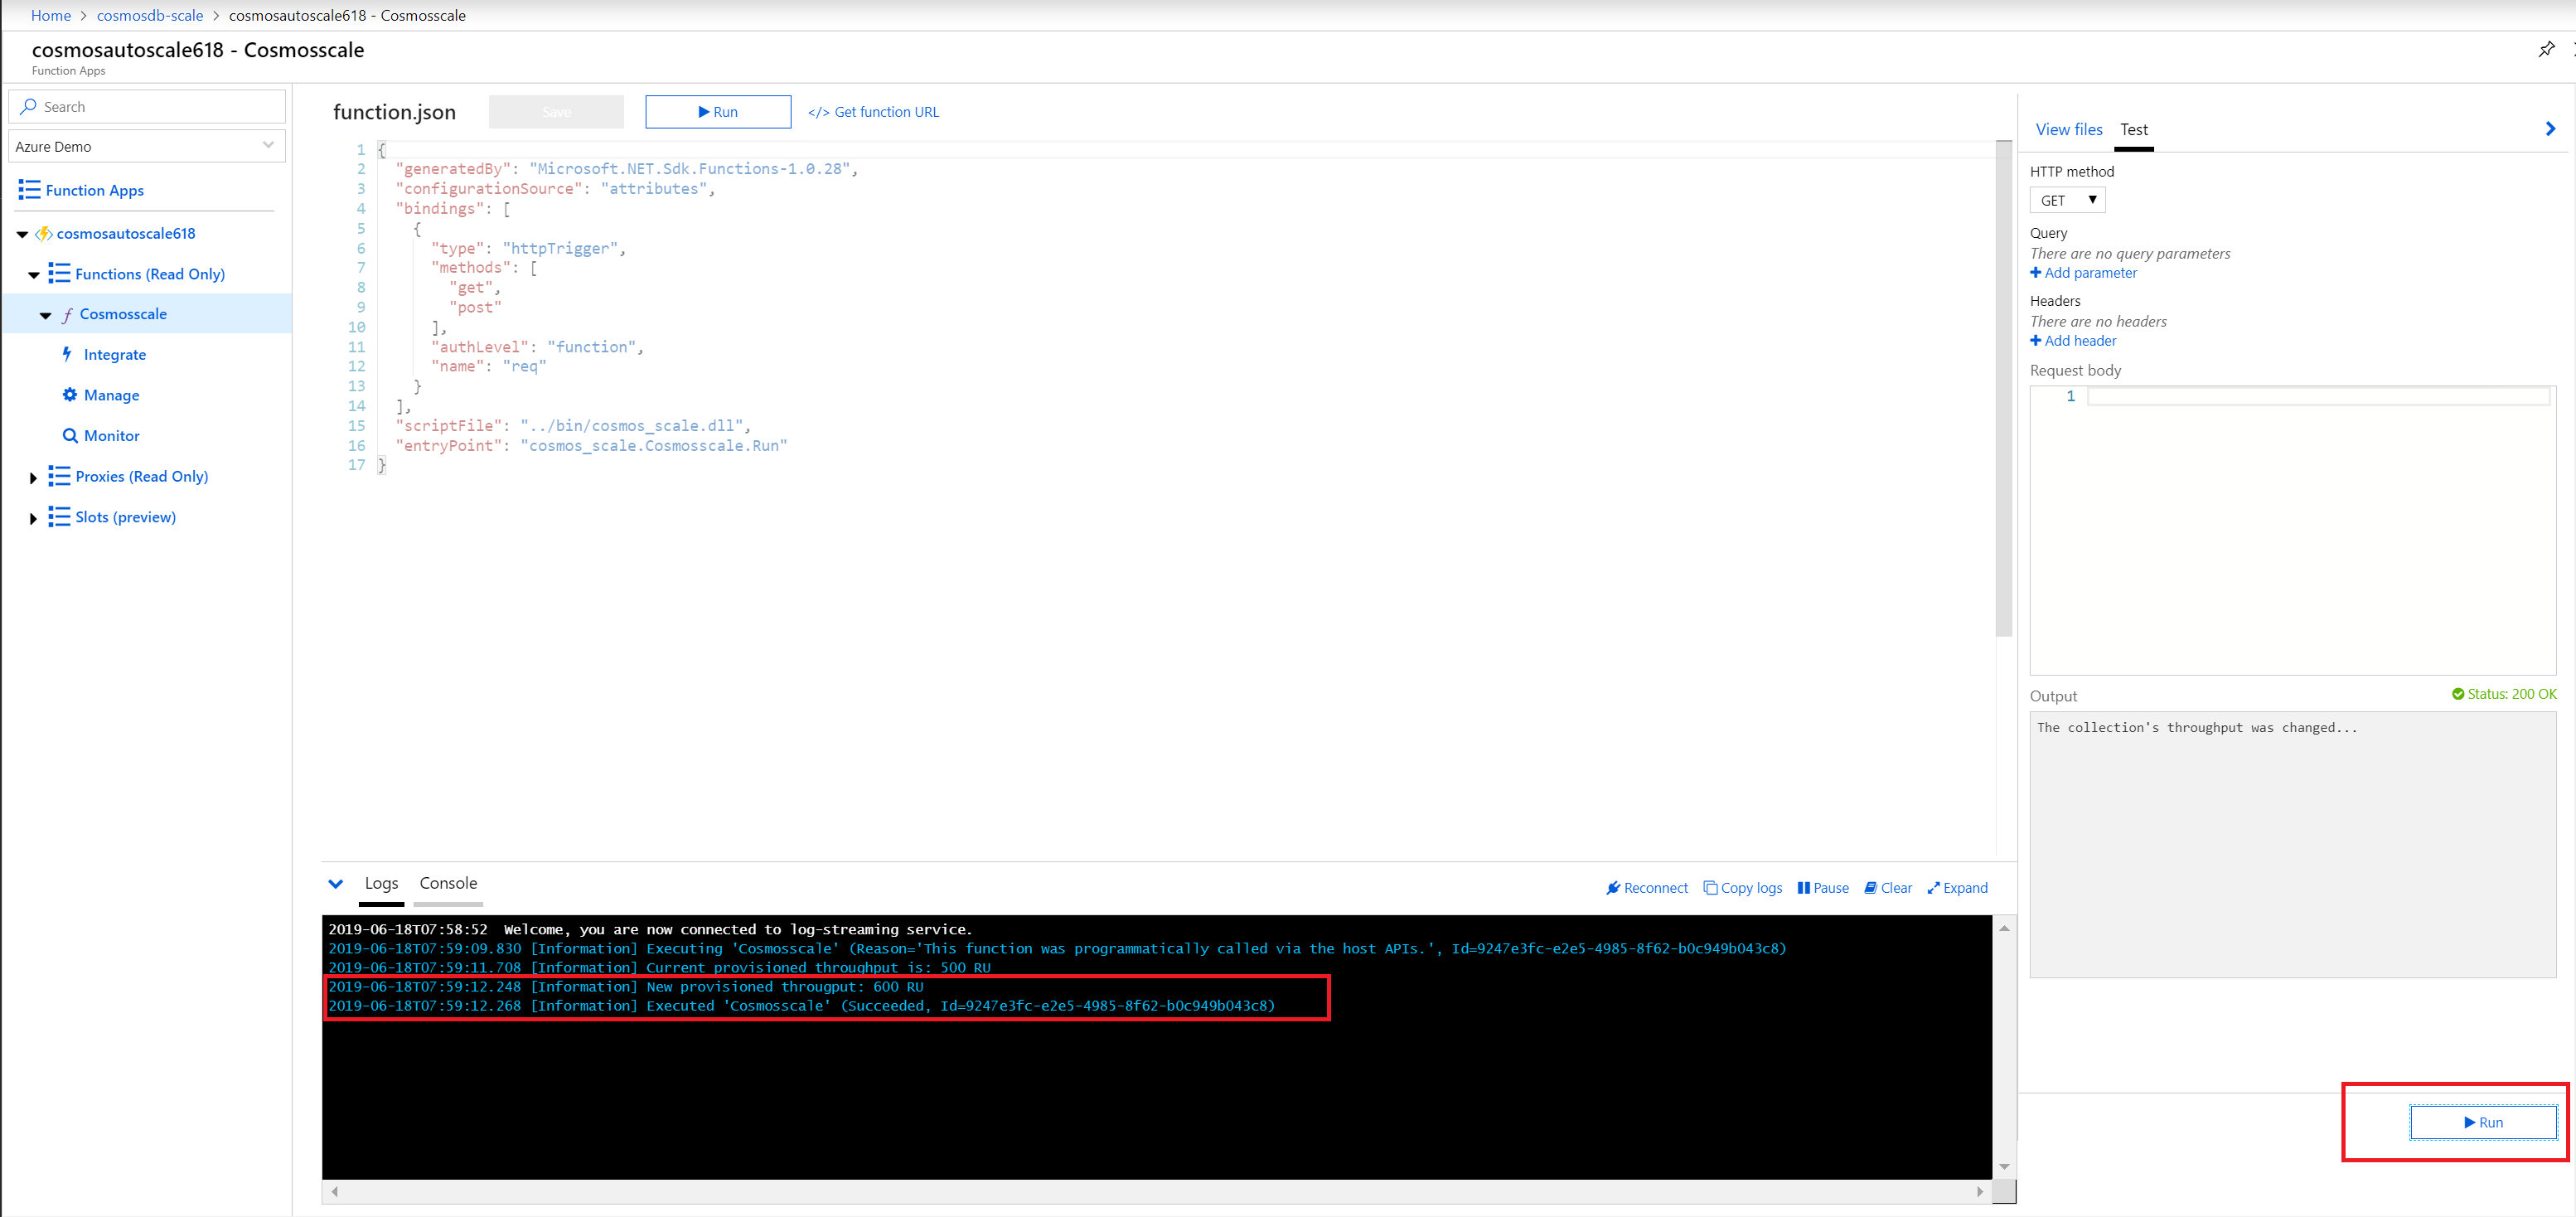
Test the function on Azure by navigating to the function, in the portal blade, and clicking run. We should see the following output if the function succeeds.
If it does not work, make sure you have entered the configuration correctly in the app settings.
As this function can be invoked periodically, you can ammend the logic to scale up/down RUs based on time/month/year etc.
Now you can use this function url as a webhook and can be called from anywhere to scale up/down automatically. Hope this will help someone out there to manage the consumption and reduce the cost.