58 posts tagged with "azure"

View All Tags

· 3 min read

Overview :

In last November 2021, Cosmos DB team has announced support for patching documents with SQL API which was the top requested features in the user voice. This is a useful and long-awaited feature among users. Prior to this announcement the only way to change the stored document was to completely replace it. Users will be able to perform Partial updates with all the Cosmos DB SDKs ( JAVA, . Net , JS ) and also Cosmos DB REST API.

Use Case:

Let's look at a scenario of a dashboard application where user need to display the System and it's features. User has decided to use Cosmos DB as a database to store the data of a System and it's features. A sample document would look as follows.

{
"ApplicationId": "App-01",
"ApplicationName": "New Cosmos Client",
"Description": "This shows the users and interactions",
"IsDraft": 0,
"IsSaved": 1,
"Features": [
{
"SystemID": 1,
"Features": [
{
"FeatureID": 4,
"FeatureName": "Patch",
"IsActive": false
},
{
"FeatureID": 35,
"FeatureName": "Feature-a-2",
"IsActive": false
},
{
"FeatureID": 36,
"FeatureName": "test-feature-a-3",
"IsActive": true
}
]
}
],
"id": "af3dfd7a-b7e9-4467-a2ca-9c6be7ad5b9f",
"_rid": "S1xQAKKOTBABAAAAAAAAAA==",
"_self": "dbs/S1xQAA==/colls/S1xQAKKOTBA=/docs/S1xQAKKOTBABAAAAAAAAAA==/",
"_etag": "\"31003582-0000-0700-0000-6213cb6b0000\"",
"_attachments": "attachments/",
"_ts": 1645464427
}

Let's look at some of the scenarios where user needs to perform patch operations.

Patch Scenario 1:  Add a new record (JSON object) under Features parent array

JSON object to Add:

{
"SystemID": 2,
"Features": [
{
"FeatureID": 1,
"FeatureName": "Reports",
"IsActive": false
}
]
}

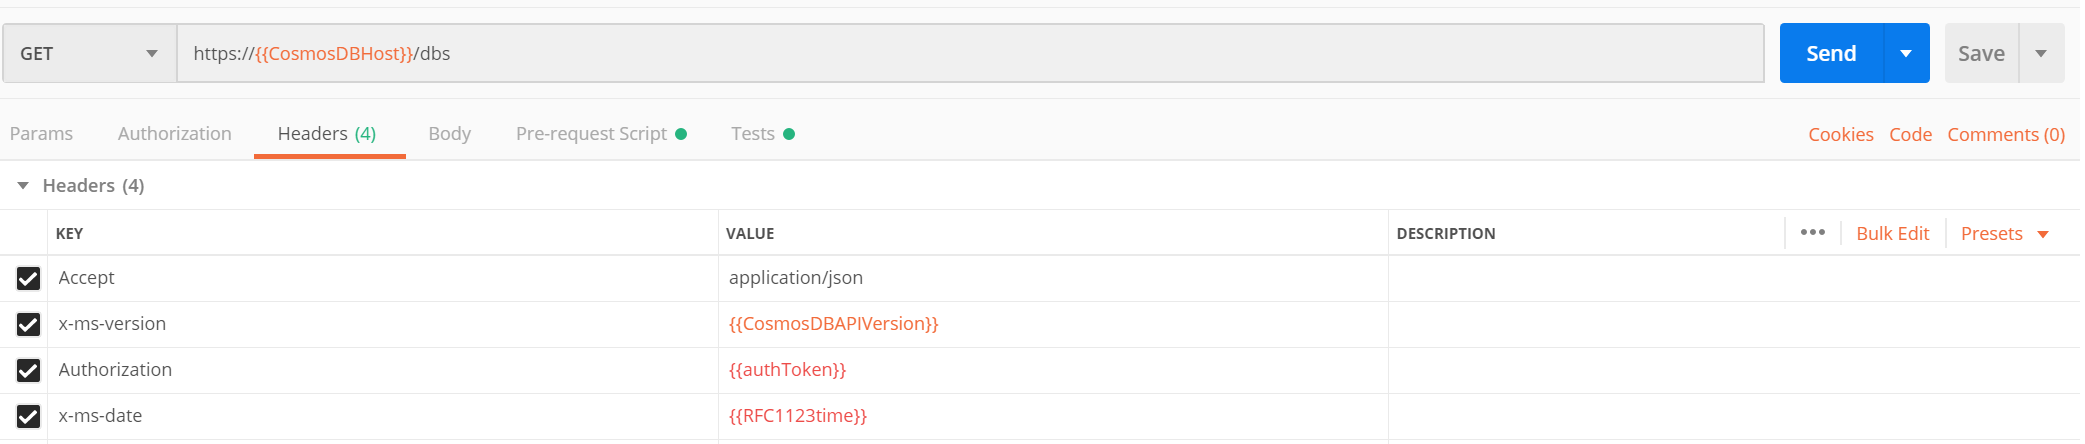
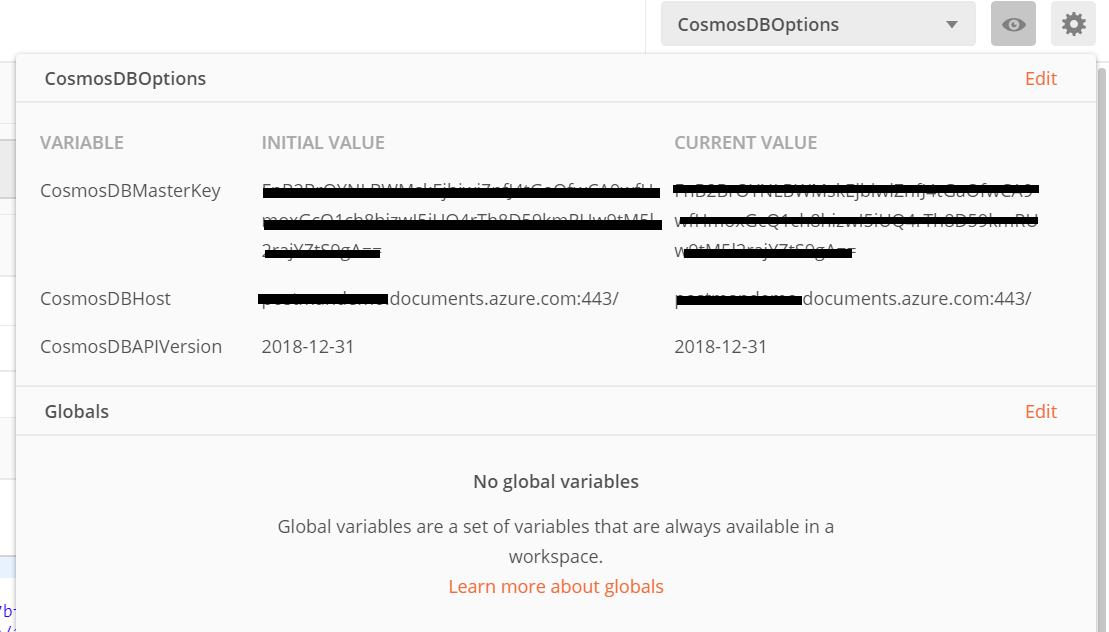
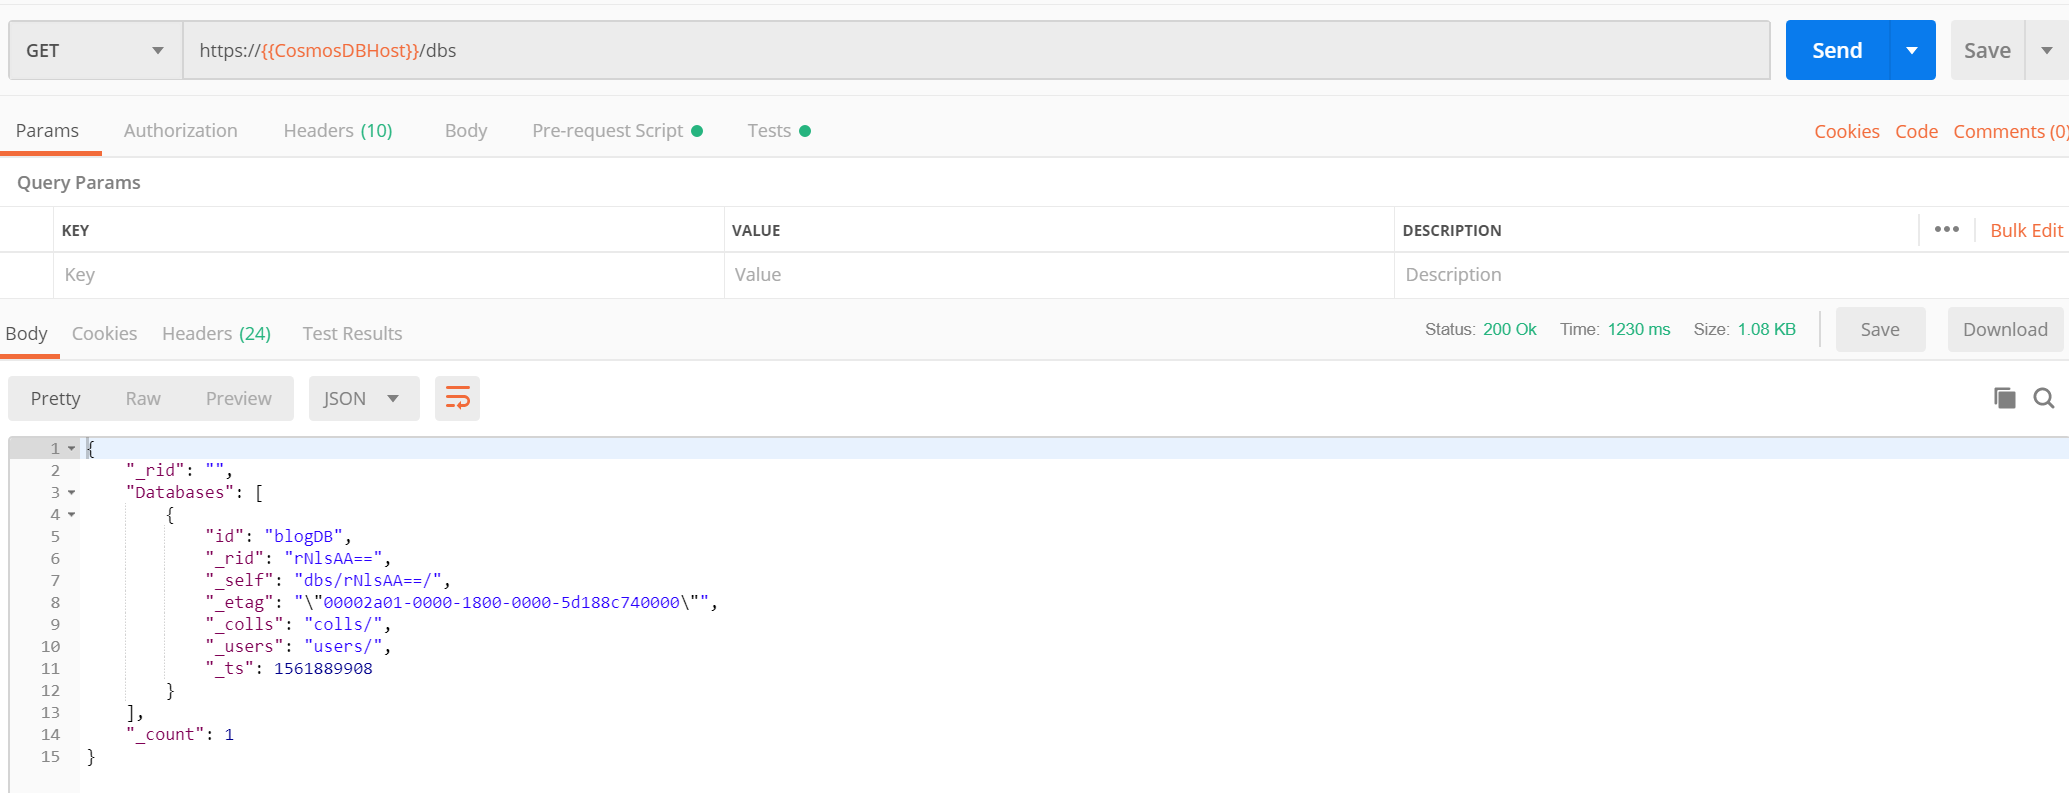
You can refer my previous blog on How to setup Rest Operations with Postman. Once you've configured the setup with the underlying database and container. Here we need to insert a new Object within the Features array, certainly we can leverage the Single Add Operation. And the sample request Body will be like,

Patch Url : [https://account/dbs/dbName/colls/Patch/docs/id of the document](https://account/dbs/dbName/colls/Patch/docs/id of the document) and the header "x-ms-documentdb-partitionkey" is set to the partition key value which is the "ApplicationId" "App-01". And we need to specify the path as "/Features/-"

Add new JSON object under Features Array

On a successful response, in the backend you will see that a new Object that is shown above will be added to the Features array.

Patch Scenario 2:  Update the Application Description in the root Object to "Testing Patch with REST API"

Patch Scenario 3:  Update only a specific Feature object in array for a given Features parent object like FeatureName . Let's assume if we need to update the Object at the 0th index and then update the First Features Object,

Patch Scenario 4 : Perform all the above operations as a single request

Since Partial document update supports up to 10 operations in a single request, all the above operations can be merged. User needs to combine all the operations as one as below,

{
"operations":[
{
"op":"replace",
"path":"/Features/0/Features/0/FeatureName",
"value":"Patch Testing"
},
{
"op":"set",
"path":"/Description",
"value":"Testing Patch with REST API"
},
{
"op":"add",
"path":"/Features/-",
"value":{
"SystemID": 2,
"Features": [
{
"FeatureID": 1,
"FeatureName": "Reports",
"IsActive": false
}
]
}
}
]
}

Hope these samples help you to perform different operations at different path using Cosmos Rest API. Cheers!

· 3 min read

Overview:

As a Developer, If you have a requirement to have list of work items which are approved to be displayed in a Grid View. You would tend to query for all approved work items and display them in the grid, one point to note is that since the amount of approved work items might grow over time, hence loading the data would get slower and slower due to having to download more items. In general, this is where pagination comes into play in front end development, which means you don't need to necessarily download all records, just download a page of records at a time. If you are using Cosmos DB as a backend, this feature is supported out of the box via the use of Continuation Token. Cosmos DB SDKs utilize a continuation strategy when managing the results returned from the queries.

Pagination with @Azure/cosmos SDK:

One of the frequent questions I have come across on forums is on How to Implement Pagination with @azure/cosmos SDK with JavaScript. With this post , I wanted to keep it simple and add a very minimal quick start on how to implementation pagination with .js SDK. You can follow the steps given in the repository.

Prerequisites:

  • Create a CosmosDB Account of type SQL API and database named 'javascript' and collection named 'products'
  • Insert the data 'ProductsData.json' to CosmosDB using the Data Migration Tool

execute.ts is the start point of the application which invokes the CallPagination method defined in the pagination.service.ts.

import dotenv from "dotenv"
import { Helper } from './helper';
import PaginationService from './pagination.service';

dotenv.config()

const cosmosDB = new Helper();
const pageMod = new PaginationService(cosmosDB);


const callPagination = async () => {
const result = await pageMod.executeSample(2, "")
console.log({
data: result.result,
dataLength: result.result.length,
hasMoreResult: result.hasMoreResults,
contToken: result.continuationToken
});
};

callPagination();

Implementation is really simple as we are passing a simple query that has more than 40 records and we set the pageLimit as 5 which is the max number of items to be returned in single call.

 public async executeSample(
pageLimit: number = 5,
contToken: string = ""
): Promise<{
result: Array<any>;
hasMoreResults: boolean;
continuationToken: string;
}> {
const sqlQuery =
`SELECT * from products where products.CategoryName = "Bikes, Road Bikes"`
console.log({ sqlQuery })

const { result, hasMoreResults, continuationToken } =
await this.cosmosHelper.queryContainerNext(
{
query: sqlQuery
},
{
maxItemCount: pageLimit,
continuationToken: contToken
},
process.env.CONTAINER_NAME
);

return {
result: result || [],
hasMoreResults: hasMoreResults || false,
continuationToken: continuationToken || "",
};
}

You can access the whole sample from this link.

Steps to Run the application

  • Clone the Repository
  • Run npm install
  • Replace the environment COSMOS_ENDPOINT,COSMOS_KEY,COSMOS_DATABASE_NAME,CONTAINER_NAME in the .env file
  • Run npm start run the application

Hope this helps someone who wants to implement Pagination with JavaScript. Cheers!

· 2 min read

Hello folks!

Azure Data Lake is a big data solution which allows organizations to ingest multiple data sets covering structured, unstructured, and semi-structured data into an infinitely scalable data lake enabling storage, processing, and analytics. It enables users to build their own customized analytical platform to fit any analytical requirements in terms of volume, speed, and quality.

Cloud Scale Analytics with Azure Data Services: Build modern data warehouses on Microsoft Azure

In the context of above, the book "Cloud Scale Analytics with Azure Data Services" book is your guide to learning all the features and capabilities of Azure data services for storing, processing, and analyzing data (structured, unstructured, and semi-structured) of any size. You will explore key techniques for ingesting and storing data and perform batch, streaming, and interactive analytics

The book also shows you how to overcome various challenges and complexities relating to productivity and scaling. Next, you will be able to develop and run massive data workloads to perform different actions. Using a cloud based big data-modern data warehouse–analytics setup, you will also be able to build secure, scalable data estates for enterprises. Finally, you will not only learn how to develop a data warehouse but also understand how to create enterprise-grade security and auditing big data programs.

By the end of this Azure book, you will have learned how to develop a powerful and efficient analytical platform to meet enterprise needs.

WIN YOUR FREE COPY

Enter your details and Click Submit to enter our monthly prize draw. Take your chance to receive one of the 10 free copies as give away.

· 8 min read

Overview :

In this blog post you will learn about the Azure Cosmos DB SQL API queries and How to get started with Cosmos DB SQL API. I recently published a video on youtube and decided to have it available in blog as well. Azure Cosmos DB is a fully managed NoSQL multi model database service provided by Azure which is highly available, globally distributed, and responds back within the minimum latency in single digit millisecond. It's becoming the preferred database for developers on Azure to build modern day applications.

You can access the slides here and repository for the queries here.

Azure supports multiple data models including documents, key-value, graph, and column-family with multi models APIs such as SQL,Mongo,Cassandra,Gremlin and Table. SQL APi is one of them and its oldest offerings on cosmos db. SQL API is also known as Core API which means that any new feature which is rolled out to cosmos db usually first available in SQL API accounts. It supports for querying the items using the Structured query language Syntax which provides a way to query JSON objects.

Also cosmos db SQL API queries can be done using any SDK we provide with Net, Java, Node and python.

Azure Cosmos DB SQL API

Azure Cosmos DB is truly schema-free. Whenever you store data, it provides automatic indexing of JSON documents without requiring explicit schema or creation of secondary indexes.

The Azure Cosmos DB database account is a unique name space that gives you access to Azure Cosmos DB.

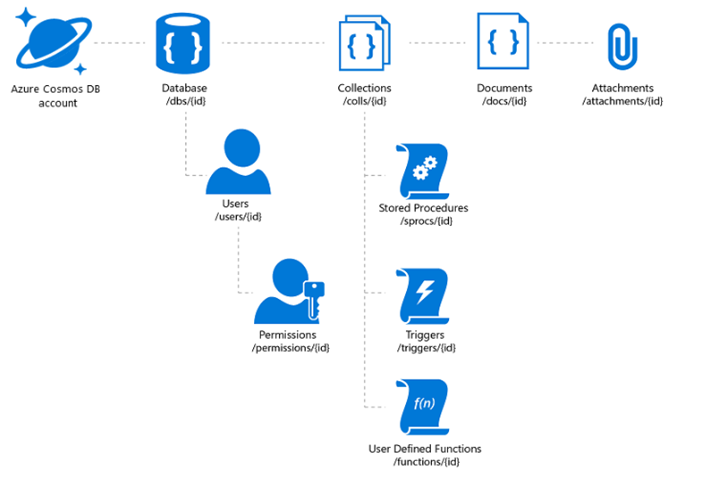
A database account consists of a set of databases, each containing multiple collections, each of which can contain stored procedures, triggers, UDFs, documents, and related attachments.

Cosmos DB SQL API Account Structure

Ways to Manage Cosmosdb Documents :

With the Cosmos DB SQL API , you can create documents using a variety of different tools :

Portal: The Data Explorer is a tool embedded within the Azure Cosmos DB blade in the Azure Portal that allows you to view, modify and add documents to your Cosmos DB API collections. Within the explorer, you can upload one or more JSON documents directly into a specific database or collection which i will be showing in a bit

SDK: Cosmos DB database service that was released prior to Azure Cosmos DB featured a variety of SDKs available across many languages

REST API : As we mentioned previously, JSON documents stored in SQL API are managed through a well-defined hierarchy of database resources. These resources are each addressable using a unique URI. Since each resource has a unique URI, many of the concepts in Restful API design applies to SQL API resources

Data Migration Tool: The open-source Cosmos DB data migration tool which allows you to import data into a SQL API collection from various sources including MongoDB, SQL Server, Table Storage, Amazon DynamoDB, HBase and other Cosmosdb collections.

Prerequisites:

For this overview demo , I will be using a dataset Tweets which contains Tweets by users across the world on certain tags says #Azure and #Cosmosdb

To replicate the demo you can use the Emulator which you can download from here Cosmosdb Emulator . Or you can create a Cosmosdb free tier account which is handy for developers.Azure Cosmos DB free tier makes it easy to get started, develop, test your applications, or even run small production workloads for free. When free tier is enabled on an account, you'll get the first 1000 RU/s and 25 GB of storage in the account for free.

In this demo let me migrate this sample dataset tweets which has 1000 recent tweets from users who actually tweeted about different technologies. I have uploaded the dataset in my github account and we will be using the same to understand different queries.

  • Create a CosmosDB Account of type SQL API and database/collection named Tweets
  • Insert the data inside the folder Tweets to CosmosDB using the Data Migration Tool

SQL API Queries :

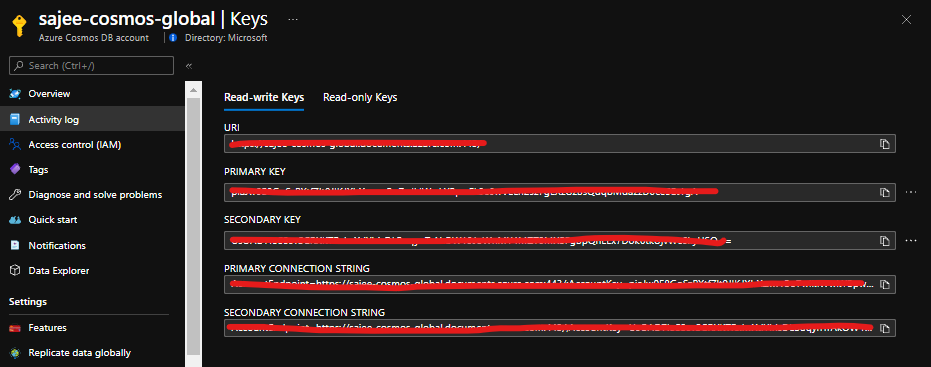
Once you created the Cosmos DB account on Azure , Navigate to Settings -> Key and copy the Endpoint and the Url for the Cosmos DB account and replace the values in the Program.cs ( This is not recommended for production use , use Keyvault instead).

Obtain Keys and Endpoint from Azure portal

  // The Azure Cosmos DB endpoint for running this sample.
private static readonly string EndpointUri = "https://sajee-cosmos-notebooks.documents.azure.com:443/";
// The primary key for the Azure Cosmos account.
private static readonly string PrimaryKey = "==";

Before dive into the queries , let me explain one of the most important thing to deal with queries in Cosmos DB. In Cosmos DB SQL API accounts, there are two ways to read data.

Point reads – Which denotes you can do a key value lookup on a single item id and a partition key. Point reads usually cost 1 RU With a latency under 10 Milli seconds.

SQL queries - SQL queries consume more Rus in general than the point reads . So if you need a single item, point reads are cheaper and faster.

As a developer we tend to execute select * from table which might cause you more RUs since you are reading the whole data across multiple partitions.

Query vs Point Read

Let's dive into some of the queries with SQL API

Query 1 : Select All

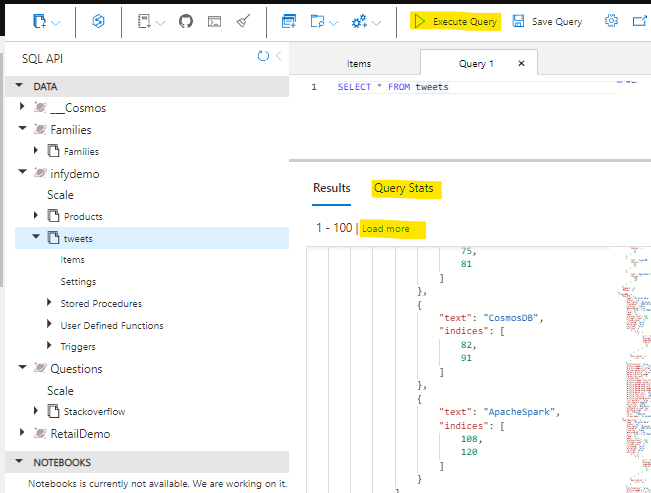
To retrieve all items from the container, in this case let's get all the tweets. Type this query into the query editor:

SELECT *
FROM tweets

...and click on Execute Query!

Cosmos DB SQL API queries

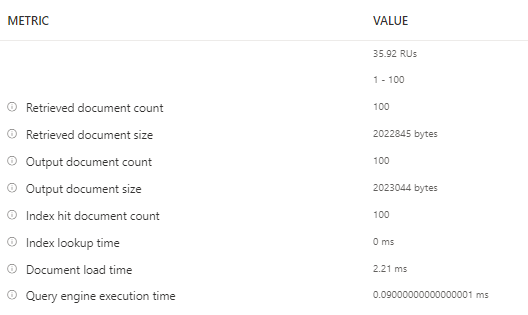
Few things to note here are, It retrieves the first 100 items from the container and if you need to retrieve the next 100, you could click on load more , under the hood it uses the pagination mechanism. Another handy thing here is that you can navigate to query stats and see more details on the query such as RUs, Document size, Execution time etc.

Query Metrics

Query 2 : Filter Path

When referring to fields you must use the alias you define in the FROM clause. We have to provide the full "path" to the properties of the objects within the container. For example, if you need to get the RetweetCount from the container for all the items.

SELECT tweets.RetweetCount
FROM tweets

Query 3 : Join

Lets see how we can find out the hashtags that have been used in all the tweets. We can use the JOIN keyword to join to our hashtags array in each tweet. We can also give it an alias and inspect its properties.

Let's see the JOIN in action. Try this query:

SELECT hashtags
FROM tweets
JOIN hashtags IN tweets.Hashtags

Now that we know how to join to our child array we can use it for filtering. Lets find all other hashtags that have been used along with the known hashtags (#Azure, #CosmosDB):

SELECT hashtags
FROM tweets
JOIN hashutcDate IN tweets.Hashtags
WHERE hashtags.text NOT IN ("CosmosDB", "Azure")

Similarly we can use OR,IN,DISTINCT,GROUPBY etc.

Query 4 : KEYWORDS (IN,OR etc)

To return the entire tweet where the indices of the hashtag is between 11 and 18 simply by selecting the tweets rather than the indices

SELECT tweets
FROM tweets
JOIN hashtags IN tweets.Hashtags
JOIN indices IN hashtags.indices
WHERE indices BETWEEN 11 AND 18

Query 5 : ORDERBY and TOP

We can also order our query so we can find the most recent tweet(s) and retrieve the top 5 tweets. (use ASC for ascending and DESC for Descending) :

SELECT TOP 5 tweets
FROM tweets
JOIN hashtags IN tweets.Hashtags
JOIN indices IN hashtags.indices
WHERE indices BETWEEN 21 AND 28
ORDER BY tweets

Query 6 : PROJECTION

We can use a feature called Projection to create an entirely new result set. We could use this to create a common structure or to make it match a structure we already have.

Try this query:

SELECT tweets.CreatedBy.Name AS Name,
tweets.FullText AS Text,
tweets.CreatedAt AS CreatedTime,
tweets.TweetDTO.metadata.iso_language_code AS LanguageCode
FROM tweets

Query 7 : USER DEFINED FUNCTION

The SQL API supports javascript User defined functions, there that you can use on this server called displayDate which removes the time parts of a UTC date string.

This is the function :

function displayDate(inputDate) {
return inputDate.split('T')[0];
}

Let's have a go at using it

SELECT tweets.CreatedAt,
udf.displayDate(tweets.CreatedAt) AS FormattedDate
FROM tweets

The SQL API also supports stored procedures written in JavaScript which enables you to perform ACID transactions over multiple records. This allows scalable and almost unlimited expandability on the functionality Azure Cosmos DB can offer.

These are some of the basic queries to get started with CosmosDB SQL API. If you want to get to know more about SQL API the following references would be useful.

Hope this post help you get started with CosmosDB SQL API! Cheers!

· 5 min read

Microsoft introduced App Service Static Web Apps in Preview at Build 2020 as"Azure static web apps", a service which allows web developers to build and deploy website to any environment from Github repository for free. Developers can deploy applications in minute while taking the advantage of scaling and cost savings offered by azure functions as backend. One of the frequent questions that i heard from the developers was the availability of Azure Devops support with Azure static web apps.

I have already published an article which demonstrates how to deploy to Azure Static Web Apps using GithubActions. Azure static web apps team announced the public preview of Azure Devops with Azure static web apps yesterday.

In this post you I will walk you through on how to deploy an angular application to Azure static web apps using Azure Devops.

PreRequisites:

Step 1 : Create a Devops repository

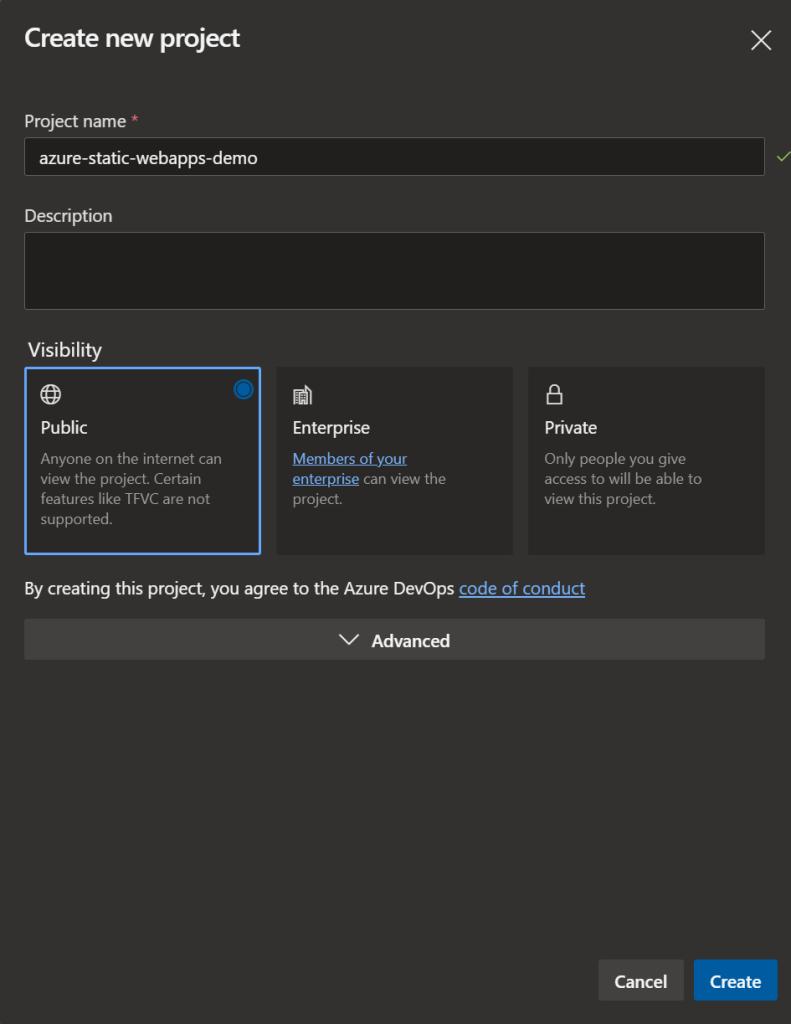
Navigate to Dev.Azure.com and create a new Devops Repository as below

Azure Devops repository

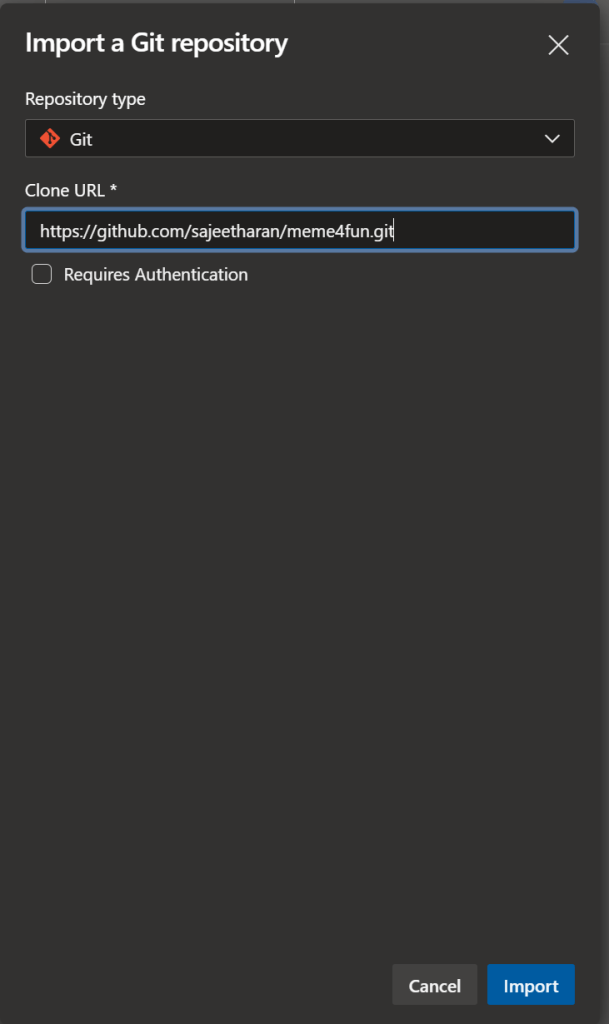
Step 2 : Import your static web application to Azure Devops repository

https://github.com/microsoft/static-web-apps-gallery-code-samplesNext step is to import the web application from any source control to your newly created Azure Devops repository. In this case i am importing the same "Meme generator" app which was made of Angular. Meme4Fun is an app to create custom programming memes from a picture and it also identifies features of people in the image which is available as part of code samples for Azure static web apps.

Import Repository to Azure Devops

Step 3 : Create a static web app on Azure

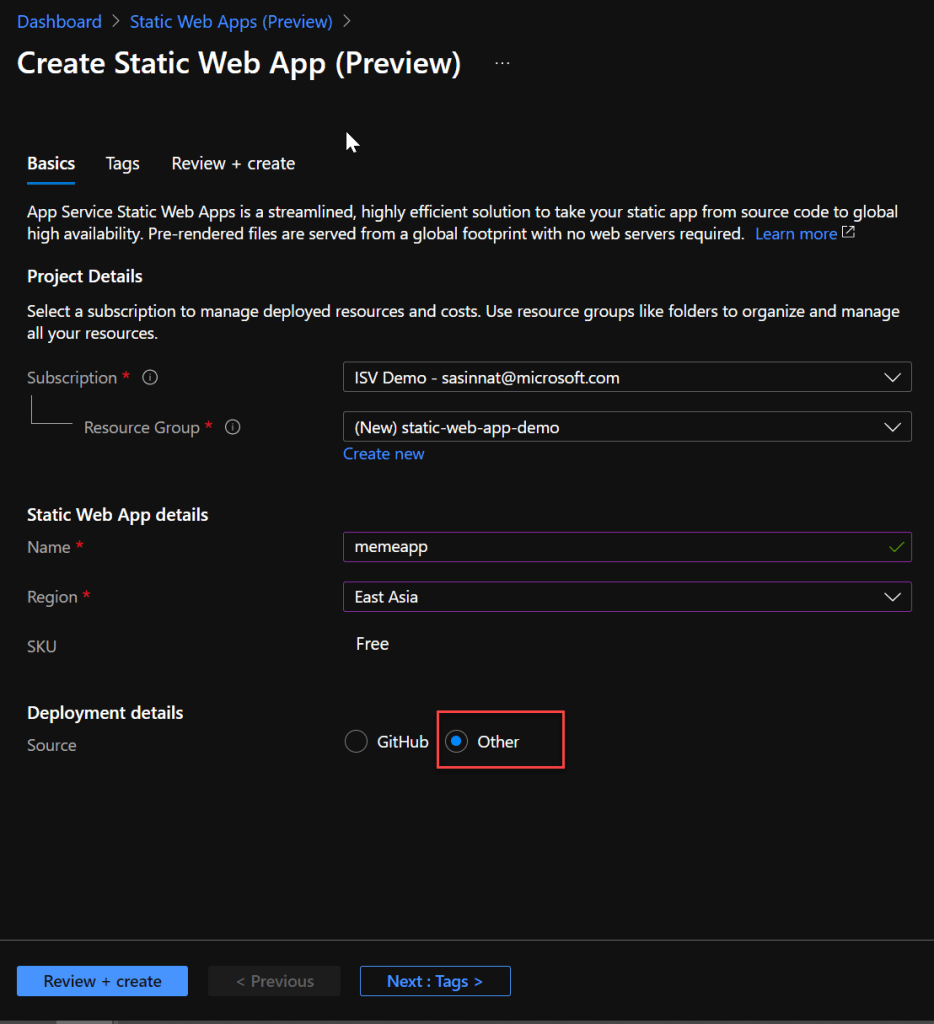
Next step is to create the static web application on azure, navigate to azure portal and create a new resource by searching for Static Web apps, and create it.

Note : Since I am going to leverage Azure Devops as the deployment method, select Other as the option.

Choose Devops as the Deployment

Once the deployment is successful, navigate to the new Static Web Apps resource and select Manage deployment token.

Manage deployment token

Step 4: Create the Pipeline task in Azure Devops

If you are using Azure Devops to deploy applications in the past, you will need to have the pipeline in plact to deploy to particular resource. In this case, lets create a build pipeline to deploy the angular application.

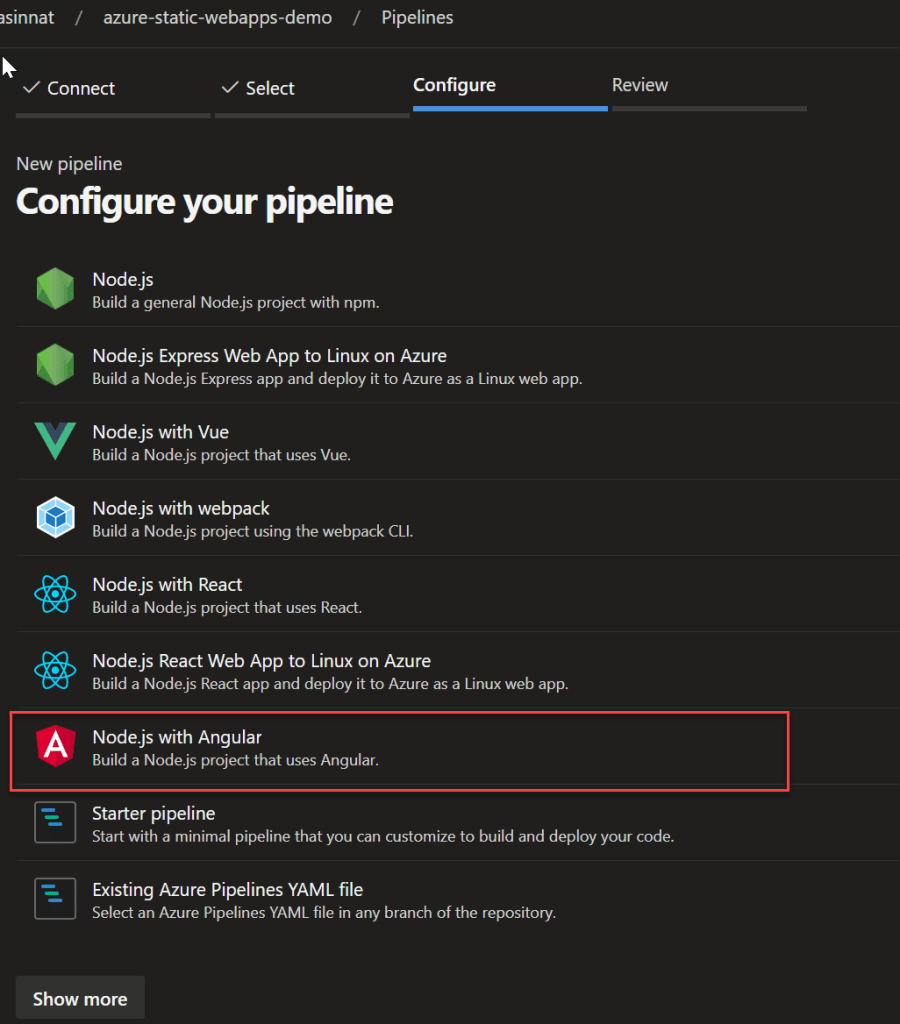
Next step is to select the template, since we are deploying an angular application, you can select the template as angular with nodejs

Angular template

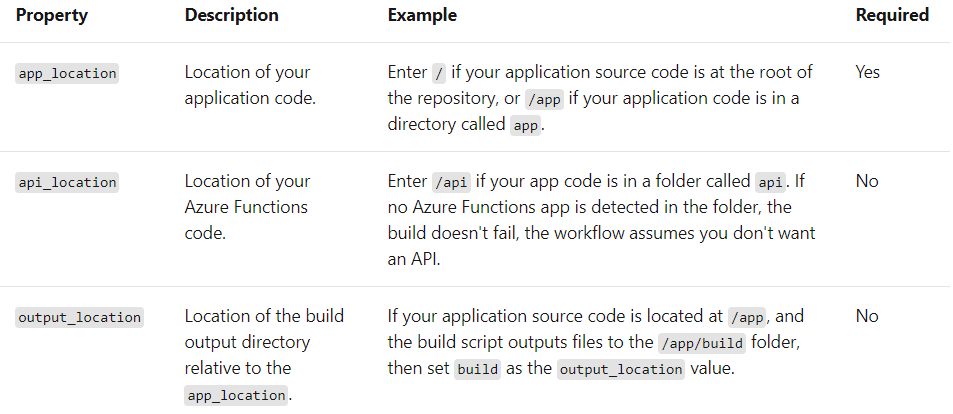
Also for static web apps it is important to include the following step in the yaml which has the app_locationapi_location, and output_location , you need to pass those values if you have those details if not keep it empty.

Different values details

and the final configure YAML will look similar to the below,

# Node.js with Angular
# Build a Node.js project that uses Angular.
# Add steps that analyze code, save build artifacts, deploy, and more:
# https://docs.microsoft.com/azure/devops/pipelines/languages/javascript
trigger:
- master
pool:
vmImage: ubuntu-latest
steps:
- task: NodeTool@0
inputs:
versionSpec: '10.x'
displayName: 'Install Node.js'
- script: |
npm install -g @angular/cli
npm install
ng build --prod
displayName: 'npm install and build'
- task: AzureStaticWebApp@0
inputs:
app_location: "/"
api_location: "api"
output_location: "dist/meme4fun"
env:
azure_static_web_apps_api_token: $(deployment_token)

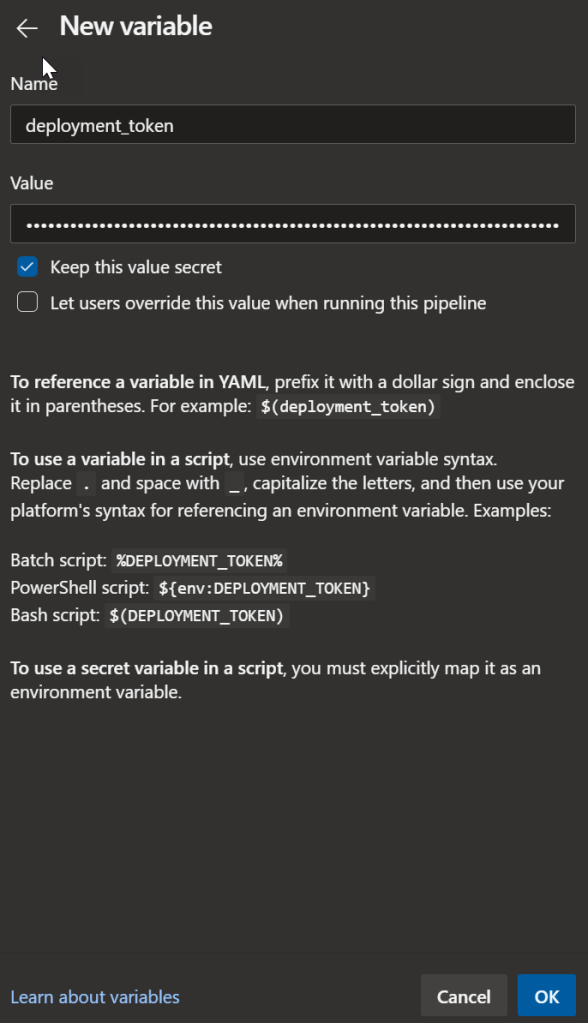
Next step is to provide the The **azure_static_web_apps_api_token** value is self managed and is manually configured. Select Variables in the pipeline and create a new variable named as "deployment_token"(matching the name in the workflow) below.

Add new Variable

Paste the deployment_token value which was copied from Azure portal

Make sure to check "Keep the value secret" and save the workflow and run.

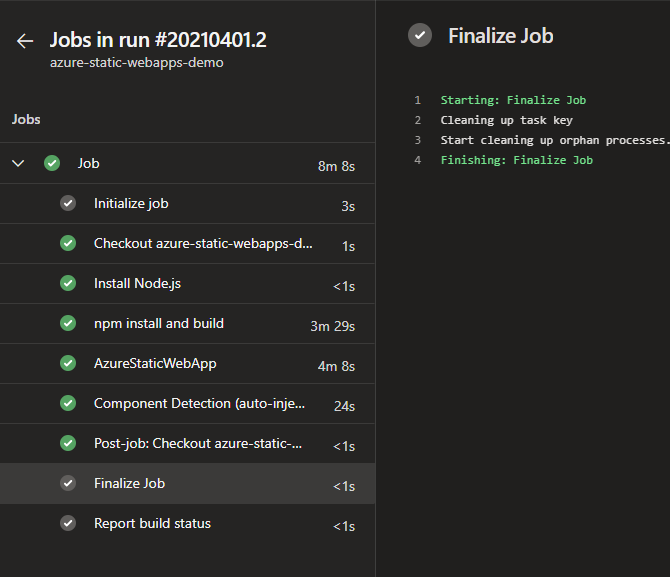
With that step Azure Devops will execute the pipeline and deploy the application to azure static web apps.

Successful deployment

Now you can access the application from the static static web app from the URL.

Static web app with azure devops deployment

If you had any trouble in executing the above steps, you can watch the same tutorial published as a video here.

It's great to see that with few steps of configuration, i was able to deploy the application with Azure Devops. If you have enabled backend support with the azure functions, it can be deployed as well. Support with Azure Devops has been one of the most requested features by developers and great to see it in live now. It's your chance to explore various application deployments with different frameworks, hope this is useful. Cheers!

· 4 min read

Overview

As per a survey, 57% of young individuals agreed they do not have the right connections to find a mentor and more than 50% of them couldn't find a job that they are passionate about. As a result I was exploring if there is any platform that would solve this major problem. Yes, there are some existing online apps but those don't serve the complete purpose to the extent that i expected. I decided to start a pet project to build this platform during my spare time , in this post i will be sharing the architecture of the application and how i was able to quickly spin up this application.

 Prerequisites to build and deploy

As an Azure fan, i have used Azure as the cloud platform to deploy this solution. Here are some prerequisites first:

  • An Azure account (don’t worry, deploying this app costed me almost nothing, you can use free trial)
  • node and npm (preferably the latest versions)
  • VSCode and Android Studio

As i explained in the previous posts, Cosmosdb and Azure Functions are great combo to build applications and deploy in quick time without worrying about underlying infrastructure. You can read about some of the reference architectures i have posted in the past from the below links,

Let me dive into each component in the architecture of 'MentorLab'.

How it works?

MentorLab has been made to scale up the existing students and mentors using Azure Services and Serverless Architecture to provide a cost-economic one stop solution which is dependable and truly secure. The objective is to give the students a platform which is built on a serverless architecture and can be remotely accessed irrespective of geographic location.

There are two facets of this solution

  • Mentor Side - Dashboard (Flutter)
  • Students Side - Mobile App (Flutter)

Azure Services Used 

  • Github Actions
  • Active Directory (A2D)
  • Blob Storage
  • Azure Cosmos DB
  • API Management
  • Azure Functions
  • Monitor

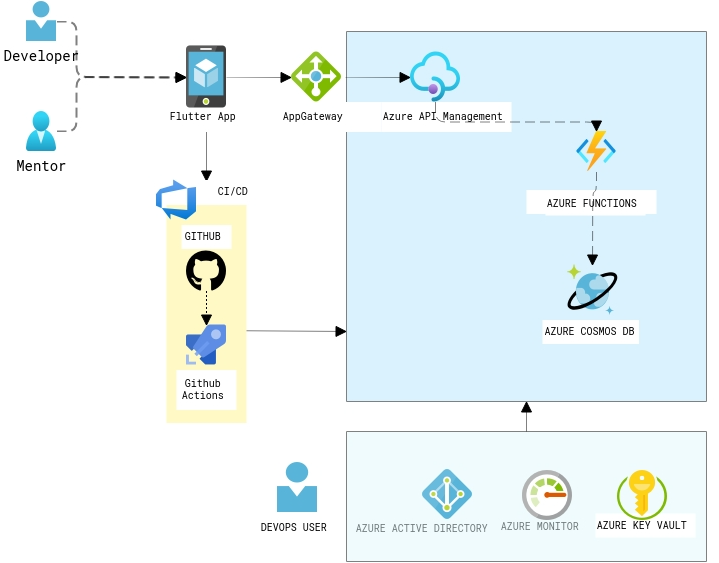
Architecture of MentorMe App

Flutter App is the front end application which is accessed by Mentor and Developer with different types of logins, All the requests from the mobile app will be router via the AppGateway. The backend APIs are built as servelress APIs with Azure functions with the support of Cosmosdb Trigger. Cosmosd's serverless feature is a great offering when building these kind of applications, as it is a cost-effective option for databases with sporadic traffic patterns and modest bursts. It eliminates the concept of provisioned throughput and instead charges you for the RUs your database operations consume. In this scenario, i have chosen Mongo API for the CRUD operations. The APIs are registered as endpoints with the Azure API management with right policies in place.

Some of the additional components you could see in the diagram are the CI/CD pipelines with Github Actions and Azure AD B2C for the authorization, Key vault for storing the connection strings,keys in a secured way. And finally application insights to generate the related metrics and for troubleshooting.

It nearly took just 3 days to build this application and going forward i am planning to add more features such as video conferencing with the help of Azure Communication and Media services . All these components just costs 36$/Month to host this application on Azure.

Hope this reference architecture helps you to kickstart your work for similar application. Feel free to add your thoughts/Questions as comments in the section below. Happy Hacking!

· 6 min read

If you are hosting your application on any environment whether it's in cloud or on-prem, an effective monitoring helps to increase the uptime by proactively notifying us of critical issues so that you resolve them before they become problems. An effective monitoring is a part of Devops process which helps you to achieve the following,

  • A proactive approach.
  • Get visibility of your infrastructure and application issues
  • React fast to an issue and mitigate quickly.
  • Increase your application availability
  • Reduce application downtime

I have been involved in lot of discussions with customers and partners on how to setup alerts in order to proactively get to know the issues and help the customers. One of the frequent questions i noticed is that about how to setup SMS alerts. In this post i wanted to cover about how to setup SMS alert on Azure at a minimal cost.

PreRequisities:

You will need to have an Azure Subscription. If you do not have an Azure subscription you can simply create one with free trial.

Services used:

  • Azure Logic Apps
  • Azure Monitor
  • Twilio API
  • Azure Virtual Machine

There is no SMS notification service readily available on Azure as of now. Even though Azure Communication Service which Integrate SMS into existing applications and workflows with Azure services Logic Apps and Event Grid is still in preview and not supported in many countries. In this case you could integrate with any of the SMS providers. In this case i will use one of the famous SMS provider which i have used in many of the projects in the past.

Step 1 : Create the Resource Group

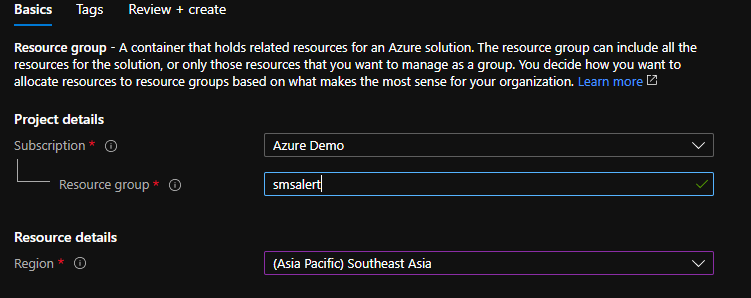
As the first step, we need to create the resource group that contains all the resources needed. In your case, you might already have an Azure environment with all the resources. Navigate to Azure Portal and create the resource group named “smsalert”

Create Resource Group

Step 2 : Create the application and deploy on Azure VM

In this case, i will be focusing on setting up alerts on a Virtual Machine, If you already have an application deployed on any compute services such as AppService or AKS you could replicate the same steps. You might not need to do this step as its about application deployment. I will use the Devops starter resource to deploy a Dotnet core application and choose VM as the compute option to deploy my application.

Search for Devops starter in the search bar and create a new ASPNet core application and choose VM as the destination to be deployed.

Deploy ASPNET core app using Devops starter

Once the application is deployed you could access the application from the url and you can login to the VM as well.

ASPNetCore app on VM via Devops starter

Now we have the application deployed on VM, assume if you want to monitor the performance and setup alert whenever it breaches certain condition, lets setup azure monitor integrated with Logic apps.

Step 2 : Create Logic app Integrated with Twilio

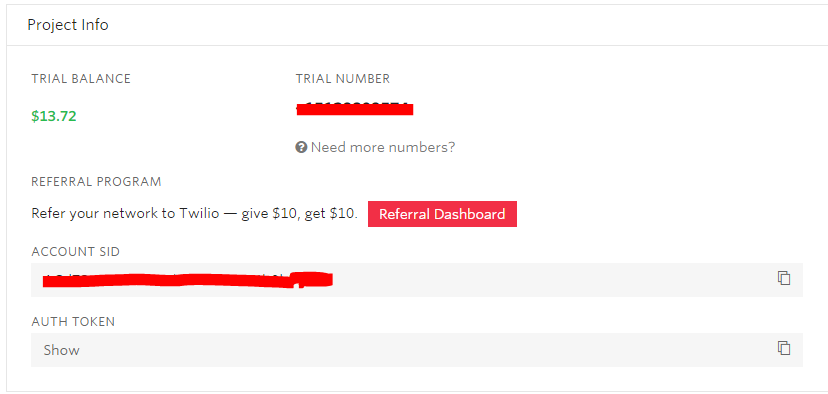
You need to setup a Twilio account inorder to send the SMS alerts, the free tier gives a worth of 15$ credits which would be enough for 4000 messages. You will also get a number to send SMSes from the account portal. If you need a custom number you can set it up with extra cost.

Twilio SMS account

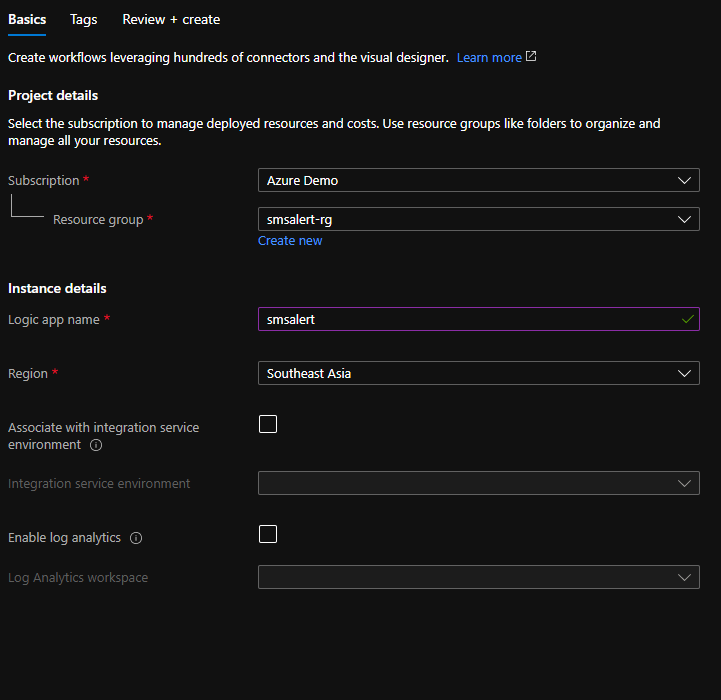
Let's create the logic app, you can search for Logic app resource on the search bar and create a Logic app with the name smsalert under the same resource group.

Logic App to send SMS alerts

Next step is to configure the steps in logic app , whenever a request is received from the azure monitor, we need to send the SMS to relevant members in the team which can be configured with 2 steps as below,

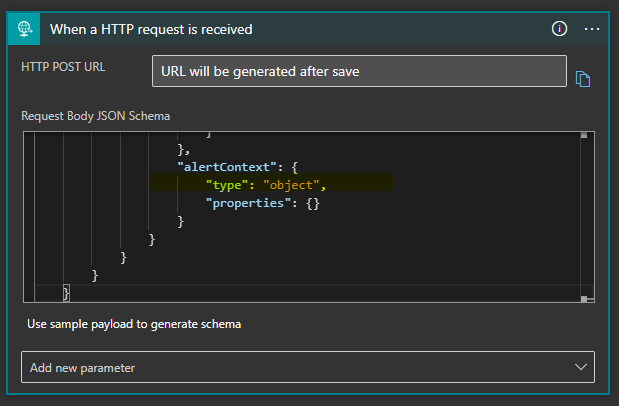
Add the first step as when an http request is received and we need to map the schema of alert inorder to get the information from the alert and to send the sms. Paste the schema object in the request body.

Next step is to add the twilio connector inorder to send the SMS when an alert is recieved. you can configure the twilio send text message step as below, you need to pass the account SID and the access token in the configuration.

You can also pass a custom text which consists of any of the parameters that recieved from the alert, say for ex. CPU percentage, time etc.

Twilio configuration

Now we are ready with the logic app integrated with Twilio, next step is to create the alert rule on the vm to send the SMS

Step 3 : Setup Alert Rule to send SMS notification.

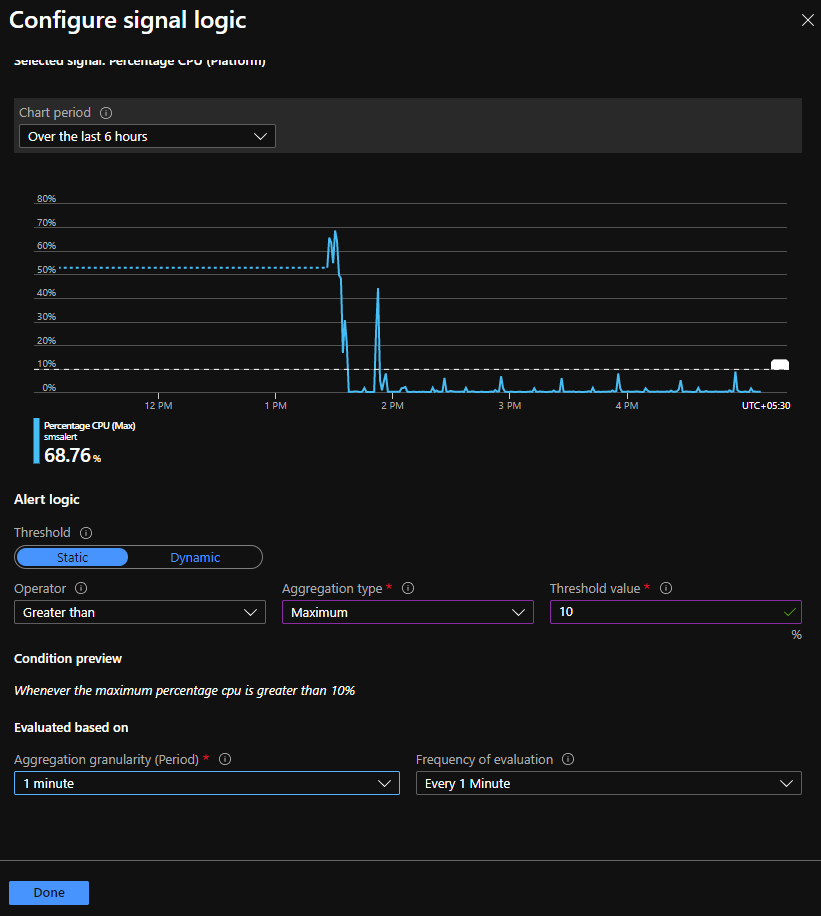
Open the VM resource , on the blade navigate to Alerts and click on new alert rule, by default you can see that the resource is selected as the VM, next step is to setup the condition when you need to fire the alert, this can be a combination of multiple configurations, you can choose it from the predefined configurations. In this case i will choose the condition as "When the percentage CPU goes above 10%".

Setup condition for Alert

Fire alert when the CPU percentage goes over 10% over a period of 1 min

We are good with the condition just for this demo purpose, but you can play around multiple conditions in combinationas you need for your environment.

Step 4: Add Action Group

In the "Add action group" section, we have to create an Action Group Name and we need to choose the Logic app as action and select the logic app which you have created in the above step,

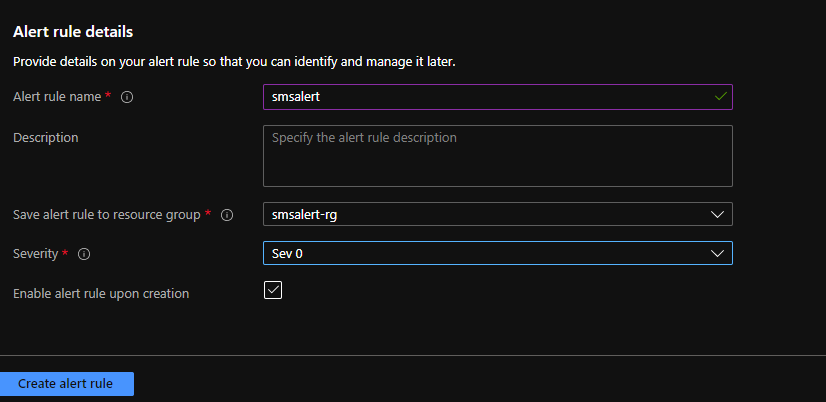
Once you are done with the action group, just pass the alert rule details and set the severity level.

We are done with all the steps needed to send the SMS alert, now whenever the CPU usage goes above 10% the configured number will get an SMS message. If you want to send the SMS to multiple members in the team, you could just use the for condition in logic app and send it to multiple members.

Step 5 : Manage Alert Rules

You can also manage the alert rules based on the severity and if the action has been taken on those alerts and recrtified from the manage alerts section.

That's all i wanted to cover in this post, one thing to note is that i have seen many customers who already have setup email notifications via the Azure monitor, but SMS is not still readily available in all countries if you've noticed.

Hope this helps to setup SMS alerts on any resource that you use as compute option to run your application. Cheers!

· 2 min read

Exactly a year ago, Github announced codespaces and gave the option to join the beta. If you are having your repository in github and need to contribute to an open source project or if you want to commit something quickly to the repository this is one of the feature that you might be interested in, It supports developers to do it on the browser on any device.

It allows developers to use a fully-featured, cloud-hosted development environment that spins up in seconds Directly within Github. This will help you to start contributing to a project immediately from any machine, all without needing to install anything locally. If you are a developer, you should be a fan of this one. As we’ve all been adopting practices like social distancing and remote working, development teams have become more distributed. In this post, i wanted to share one of the productivity tips on how to open your code directly from the browser via codespaces.

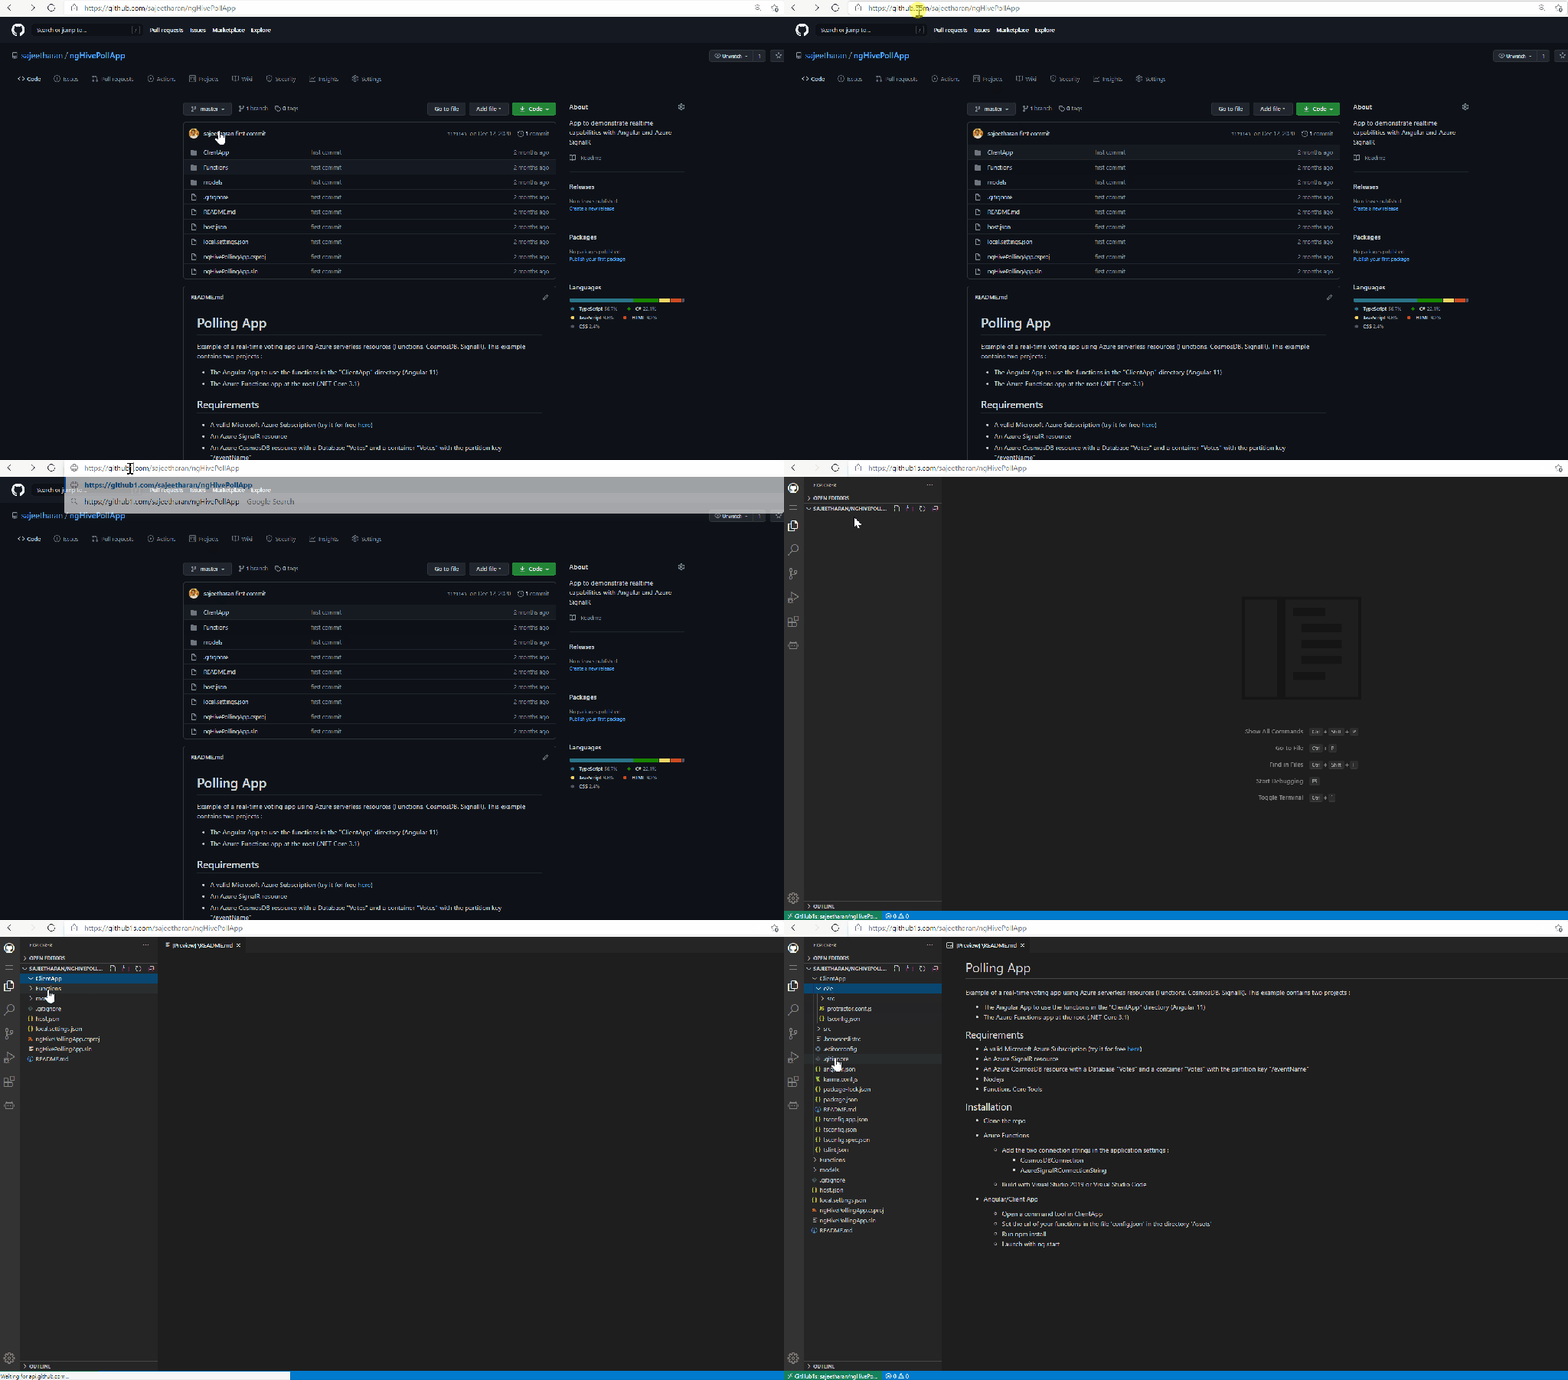
You just need to open your repository and add "1s" after github when viewing the codebase on browser and github codespaces loads up instantly.

Here is the action below!

One thing to note here is that, this feature is not directly from the Github codespaces itself, it is enabled via the 1s which is sort of a middleware repository enabling this! However it's a great feature and worth exploring it!

Hope this enable more developers to contribute to Opensource world instantly. Cheers!

· 8 min read

Overview

Are you are .Net developer interested in building Microservice based applications to the Cloud?. Recently i gave a talk about announcements on DotNet ecosystem and building Cloud Native applcitions with Tye and i decided to write on the same topic . Tye is an amazing project from Microsoft to ease the development, deployment with two fundamental cloud native technologies such as Docker and Kubernetes. If you have been deploying Applications in production using containers, you must be already aware of how complex steps you need to make in order to get your application running. I have worked on multiple projects where I have to run many modules as dependencies at the same time, even though I was only  working on one of them. There has always been a requirement for a tool to start, deploy applications with a  simple command to your desired environment without spending much time on creating docker files, configurations etc.

What is Project Tye?

Tye is an experimental developer tool from the .NET team at Microsoft that makes developing, testing, and deploying microservices and distributed applications easier. It comprises a local orhestrator to assist the developers to develop microservices, deploy them to kubernetes with minimal configuration and steps.

  • Service discovery via configuration conventions makes Developers to expose their API with proper documentation
  • Add dependencies (Redis, SQL Server, etc.) without writing docker files
  • Run and debug locally using containers and Kubernetes
  • Local dashboard for metrics, logging, debugging
  • Automatically dockerize and deploy to Azure Kubernetes Service

What I like really like about Project Tye is that it has a very small footprint and it is so simple to get started with after spending so many years with docker and K8s. It offers the following capabilities,

Getting Started

Let's see how to get started with project Tye. You need to have the following Prerequisites in order to run the following application successfully.

  • Azure Subscription (Free Trial)
  • Dotnet SDK latest
  • Visual Studio / Visual Studio Code
  • Docker/Kubernetes Extension VSCode ( Optional)

You can install Project Tye as a global .NET tool. In order to install the utility, you need to run the following command in your terminal

dotnet tool install -g Microsoft.Tye --version "0.2.0-alpha.20258.3"

To verify that Tye was installed properly you can run the following command that should output the current version installed:

> tye --version

Create a Simple Application

This section will demonstrate how to use Tye to run multi-project application.

Step 1 : Make a new folder named dotnetconfApp

mkdir dotnetconfApp
cd dotnetconfApp

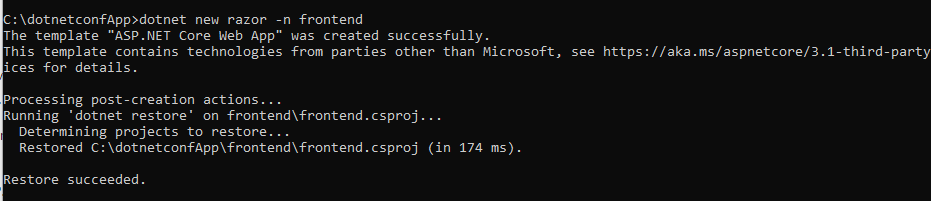
Step 2 : Create a frontend project with Razor

dotnet new razor -n frontend

Step 3 : To run the frond end project, execute the following command

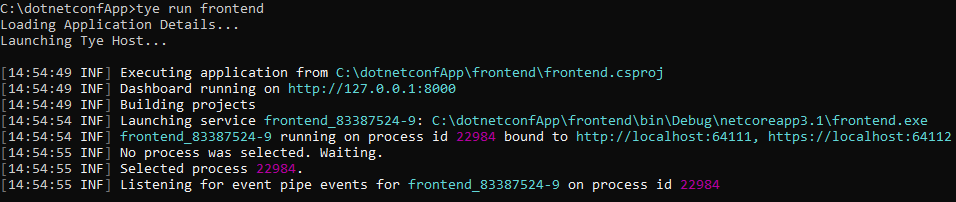
tye run frontend

As you could see above tye will do two things: start the frontend application and run a dashboard. Navigate to http://localhost:8000 to see the dashboard running.

The dashboard should show the frontend application running.

  • The Logs column has a link to view the streaming logs for the service.
  • the Bindings column has links to the listening URLs of the service.

Project Tye Dashboard

Add Multiple Projects

Step 1 : Let's go ahead and add a Web API to fetch the data for the front end application. If you haven't already, stop the existing tye run command using Ctrl + C. Create a backend API that the frontend will call inside of the microservices/ folder.

dotnet new webapi -n backend

Step 2 : Create a solution file and add both projects

dotnet new sln
dotnet sln add frontend backend

You should have a solution called dotnetconfapp.sln that references the frontend and backend projects.

Step 3: Run the multiple projects with tye . Execute the following command within the solution folder,

tye run

The dashboard should show both the frontend and backend services. You can navigate to both of them through either the dashboard of the url outputted by tye run.

Make the Communication between the frontend and backend

As you see above, we have both the backend and frontend applications running, let's make them communicate. By default, tye enables service discovery by injecting environment variables with a specific naming convention.

Step 1: Open the solution folder with VSCode or Visual Studio

Step 2 : As we need to fetch and bind the data from the sample WebApi , lets add a Contract named WeatherForecast.cs to the frontend project and it should match the contract that exist in the backend project WeatherForecast.cs

using System;

namespace frontend
{
public class WeatherForecast
{
public DateTime Date { get; set; }

public int TemperatureC { get; set; }

public int TemperatureF => 32 + (int)(TemperatureC / 0.5556);

public string Summary { get; set; }
}
}

Step 3: Add a file WeatherClient.cs to the frontend project with the following contents:

using System.Net.Http;
using System.Text.Json;
using System.Threading.Tasks;

namespace frontend
{
public class WeatherClient
{
private readonly JsonSerializerOptions options = new JsonSerializerOptions()
{
PropertyNameCaseInsensitive = true,
PropertyNamingPolicy = JsonNamingPolicy.CamelCase,
};

private readonly HttpClient client;

public WeatherClient(HttpClient client)
{
this.client = client;
}

public async Task<WeatherForecast[]> GetWeatherAsync()
{
var responseMessage = await this.client.GetAsync("/weatherforecast");
var stream = await responseMessage.Content.ReadAsStreamAsync();
return await JsonSerializer.DeserializeAsync<WeatherForecast[]>(stream, options);
}
}
}

Step 4 : Add a reference to the Microsoft.Tye.Extensions.Configuration package to the frontend project

dotnet add frontend/frontend.csproj package Microsoft.Tye.Extensions.Configuration  --version "0.4.0-*"

Step 5 : Register  this client in frontend by adding the following to the existing ConfigureServices method to the existing Startup.cs file:

...
public void ConfigureServices(IServiceCollection services)
{
services.AddRazorPages();
/** Add the following to wire the client to the backend **/
services.AddHttpClient<WeatherClient>(client =>
{
client.BaseAddress = Configuration.GetServiceUri("backend");
});
/** End added code **/
}
...

This will connect the WeatherClient to use the correct URL for the backend service.

Step 6 : Add a Forecasts property to the Index page model under Pages\Index.cshtml.cs in the frontend project.

...
public WeatherForecast[] Forecasts { get; set; }
...

Change the OnGet method to take the WeatherClient to call the backend service and store the result in the Forecasts property:

...
public async Task OnGet([FromServices]WeatherClient client)
{
Forecasts = await client.GetWeatherAsync();
}
...

Step 7 : Change the Index.cshtml razor view to render the Forecasts property in the razor page:

@page
@model IndexModel
@{
ViewData["Title"] = "Home page";
}

<div class="text-center">
<h1 class="display-4">Welcome</h1>
<p>Learn about <a href="https://docs.microsoft.com/aspnet/core">building Web apps with ASP.NET Core</a>.</p>
</div>

Weather Forecast:

<table class="table">
<thead>
<tr>
<th>Date</th>
<th>Temp. (C)</th>
<th>Temp. (F)</th>
<th>Summary</th>
</tr>
</thead>
<tbody>
@foreach (var forecast in @Model.Forecasts)
{
<tr>
<td>@forecast.Date.ToShortDateString()</td>
<td>@forecast.TemperatureC</td>
<td>@forecast.TemperatureF</td>
<td>@forecast.Summary</td>
</tr>
}
</tbody>
</table>

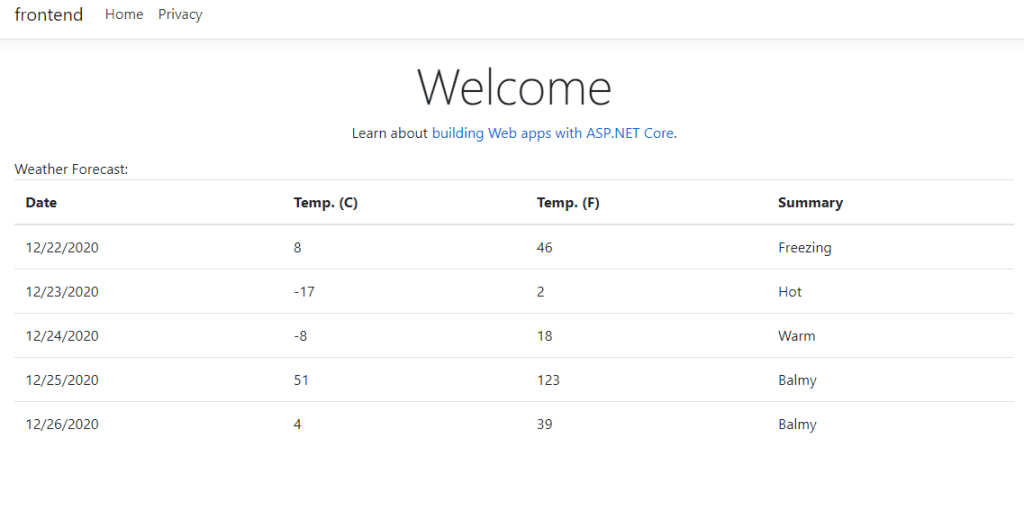
Step 8 : Run the project with tye run and the frontend service should be able to successfully call the backend service!

When you visit the frontend service you should see a table of weather data. This data was produced randomly in the backend service. Since you are seeing the data in a web UI in the frontend means that the services are able to communicate.

If you are getting any issues with the self signed scertifications, you need to run the below commands,

dotnet dev-certs https --clean
dotnet dev-certs https --trust

Let's deploy to Kubernetes

Step 1 : Provision the Kubernetes Cluster, since we will be using Azure Kubernetes Service , you can provision it by either CLI or using Azure Portal

Step 2 : Let's authenticate and get the required credentials

az aks get-credentials --resource-group dotnetconfsl-rg  --name dotnetconf

Step 3: You need to have either Docker registry or Azure container registry created where docker images of the frontend and backend will be pushed.

Step 4 : Now everything is ready do easy deploy the solution. Navigate to the solution folder and execute following:

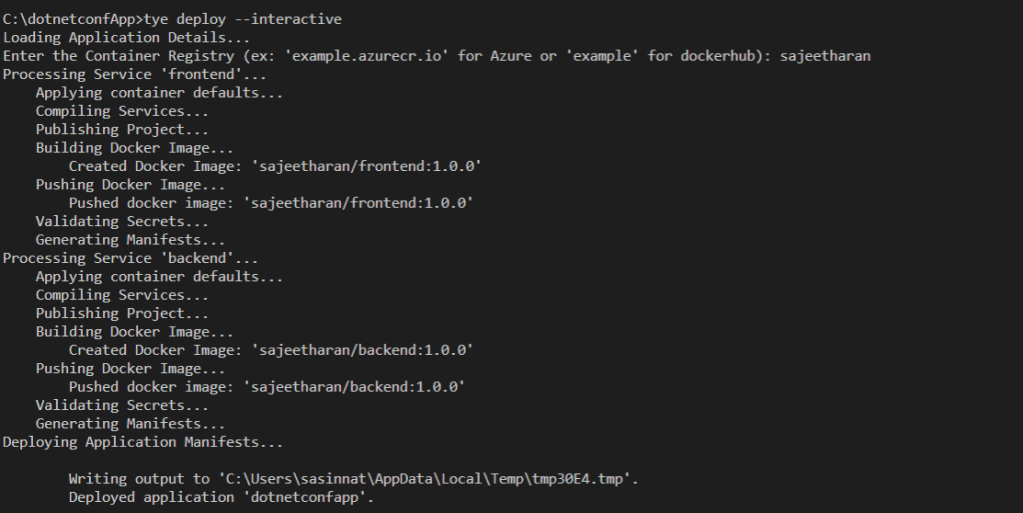
tye deploy --interactive

You will be prompted to enter the Container Registry (ex: 'example.azurecr.io' for Azure or 'example' for dockerhub) where the Kubernetes service is installed.

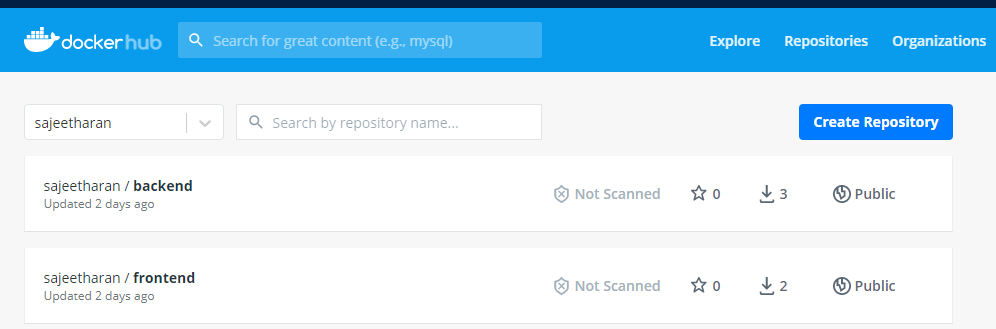
The deployment process has built the docker container and pushed repositories to my registry:

Test the application

If you are using VScode with the Kubernetes extension installed, once you authenticate to Azure using Azure extension, you will be able to navigate to the cluster and click on Workloads -> Pods -> Right Click Get

You can also explore the running pods from the Azure portal or using Cloudshell as well. You'll have two services in addition to the built-in kubernetes service.

You can visit the frontend application by port forwarding to the frontend service.

kubectl port-forward svc/frontend 5000:80

Now navigate to http://localhost:5000 to view the frontend application working on Kubernetes. You should see the list of weather forecasts just like when you were running locally.

Some important Notes:

⚠️ Currently tye does not provide a way to expose pods/services created to the public internet.

⚠️ Currently tye does not automatically enable TLS within the cluster, and so communication takes place over HTTP instead of HTTPS.

Conclusion:

In this post I explained how easy it is to get started with Project Tye and How to run a simple web application. You can certainly do the same adding an external dependency like SQL server or Redis cache without creating docker files manually. In short, Tye simplifies the multiple gestures for all the services within an application to a single command. Even though Project Tye is an experimental tool , you can watch out for more features around service discovery, diagnostics , observability, configuration and logging when it comes to building cloud native applications with Microservices. Certainly it's a great addition to the tooling what .Net ecosystem provides and hope you will consider exploring it more. Cheers!

· One min read

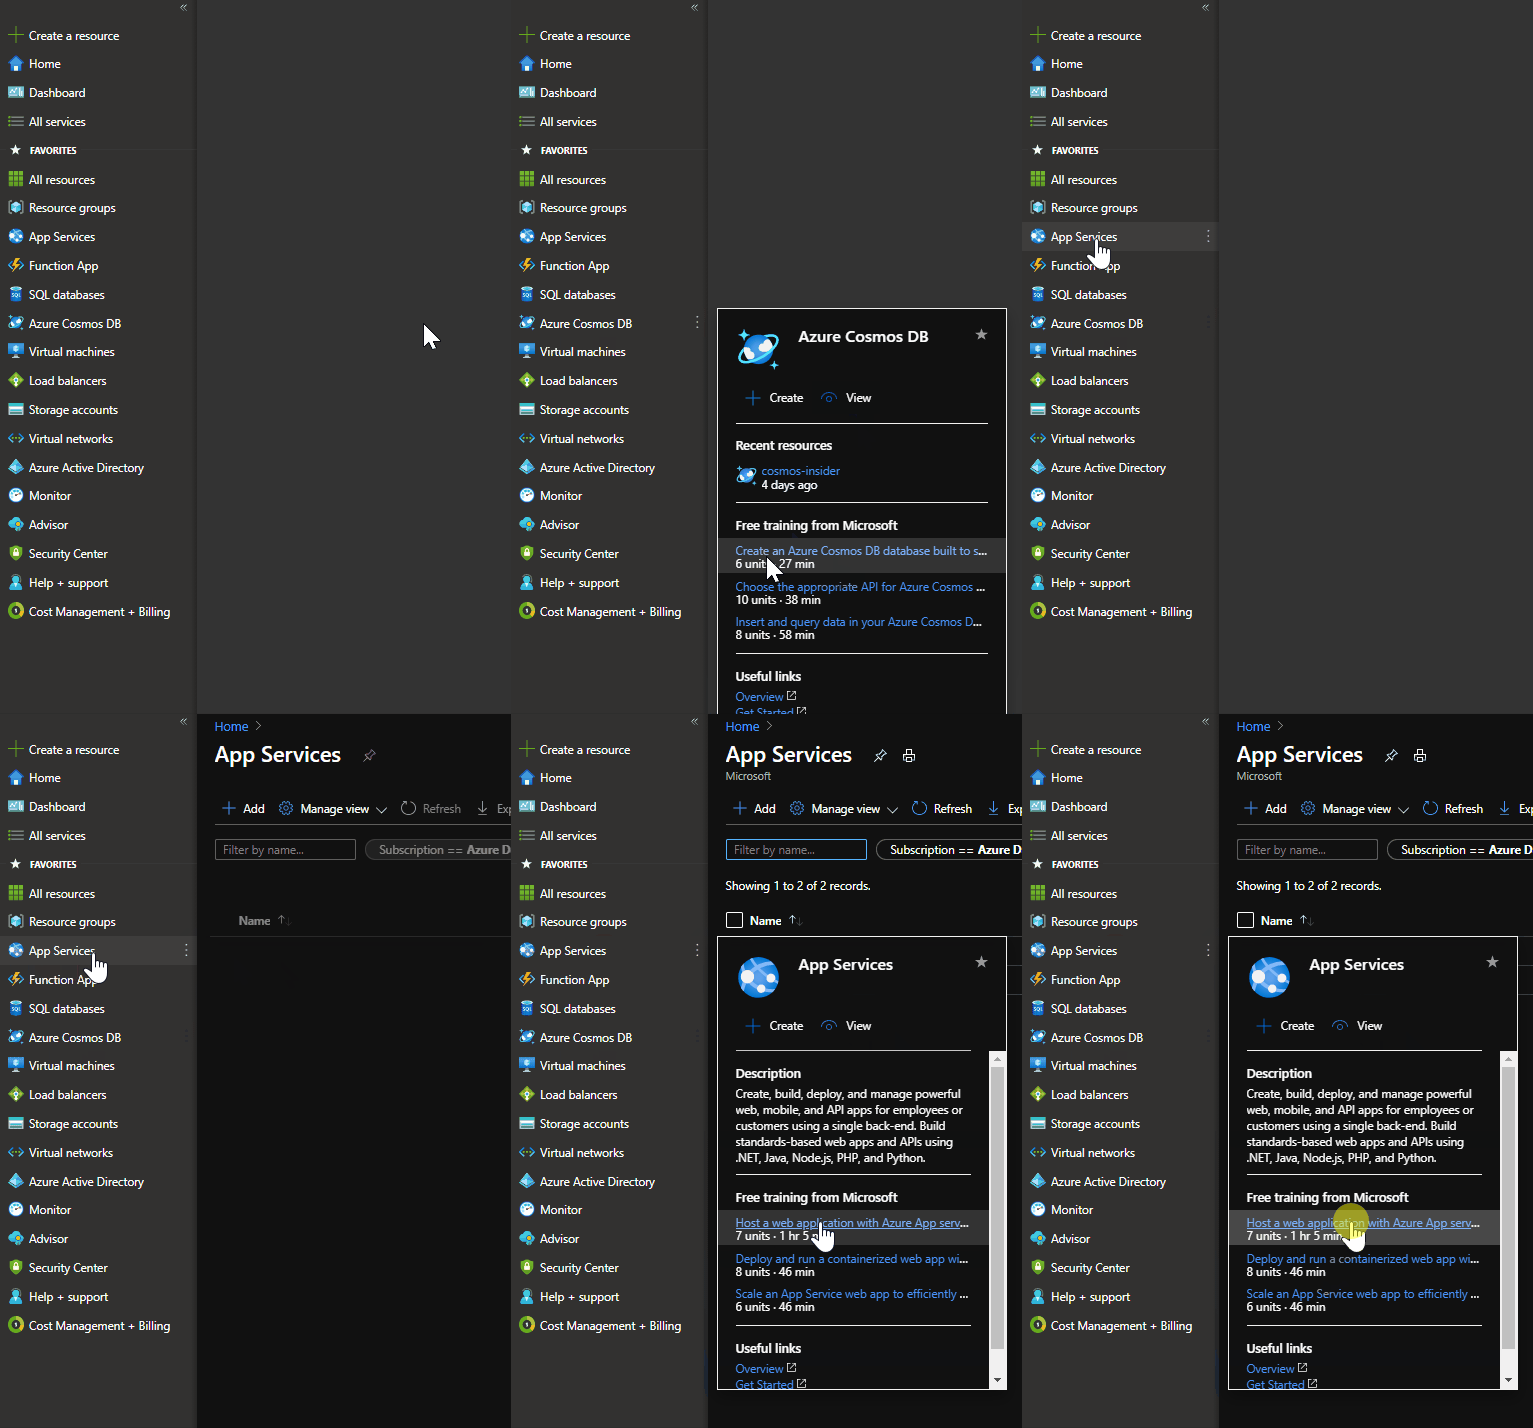
Starting as a fresher in Azure can be difficult because you don't have any previous knowledge regarding Azure and the services that it offers. If you are new to Azure and exploring on azure portal, One of the tips that I wanted to share today with azure enthusiasts is that you can access the learn Modules while you are in Azure Portal. You can navigate to the service that you want to create and navigate to the links provided next to each service, here is a view,

Hope this helps!

· 5 min read

Overview:

Are you hearing the word Devspaces for the first time?. Let me put this way, Imagine a developer having to deal with a large application which has chunks of Microservices and want to get some functionality done?. There will be many risks and one of them would be dealing with right environments. As we know the best way to counter this issue within a team would be to containerize and host it on cloud. Which will let the developer to work on the particular feature and debug the container without creating the environment locally. That is what exactly Azure Dev Spaces does.

What is Devspaces?

Devspaces allows you to build, test and run code inside any Kubernetes cluster. With a DevSpace, you run everything remotely inside pods running on top of a Kubernetes cluster. Additionally, the DevSpace CLI takes care things automatically such building and pushing images for you when you make changes to your Dockerfile. If you are making a source code change, the DevSpace CLI does not require you to rebuild and redeploy.

It rather syncs your locally edited source to straight to the containers running inside Kubernetes.  This makes you to edit locally but compile and run everything remotely inside Kubernetes and still use modern development features such as hot reloading. Azure Dev Spaces supports development with a minimum development machine setup. Developers can live debug on Azure Kubernetes Services (AKS) with development tools like Visual Studio, Visual Studio Code or Command Line.

With the recent announcement of Bridge To Kubernetes GA, Azure Dev Spaces will be retired on October 31, 2023. Developers should move to using Bridge to Kubernetes, a client developer tool.

What is Bridge to Kubernetes?

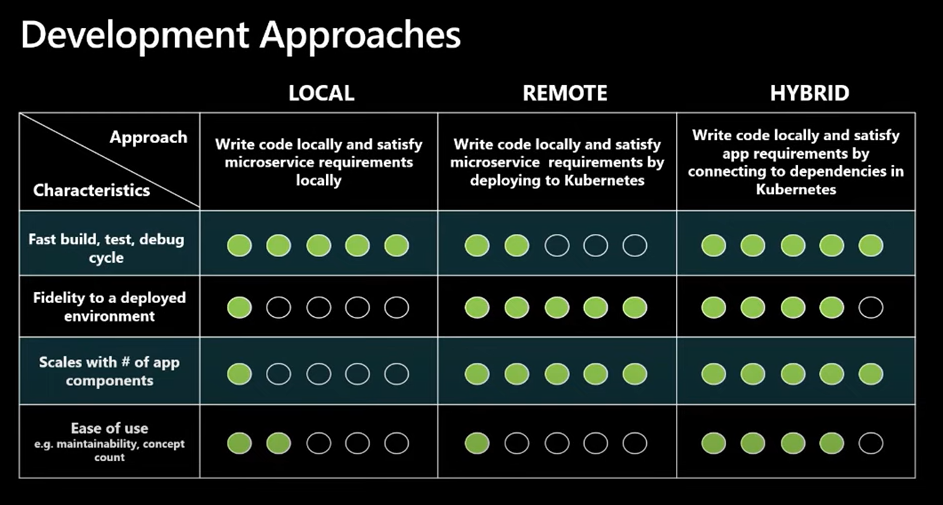
It was formerly called as Local Process with Kubernetes. Bridge to Kubernetes is an iterative development tool offered in Visual Studio and VS Code through extensions that you can pick up in the marketplace. IT allows developers to write, test and debug microservice code on their development workstations while consuming dependencies and inheriting existing configuration from a Kubernetes environment. There are lot of different tools and methods for solving these kind of challenges when you are working on a single micro-service in the context of a larger application. Those different methods and tools into three main types .There's the local, remote and hybrid approach as shown in the image below

Development Approaches

If you look at the above picture, developers are shifting from Local development methods to hybrid methods which offers the best way to deal with building applications to the cloud with containers/kuberentes. With Hybrid approach, it allows developers to write code on their development workstation, but also allow them to connect to external dependencies that are running in some remote environment. So it actually fulfilling all those external dependencies by connecting them. Let's say if you are running your application on Kubernetes on Azure, you can connect all the dependencies from your local environment and have the whole end-to-end workflow.

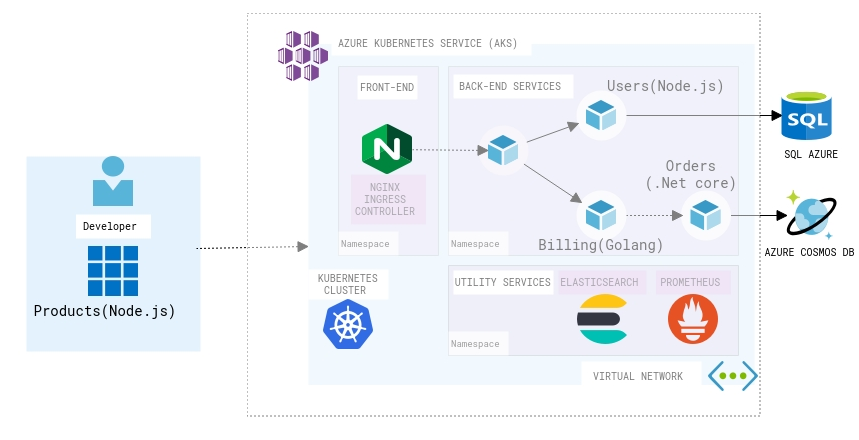
Bridge to Kubernetes Scenario

Consider the above scenario in the diagram, Assuming that i am working on a Microservice that deals with Products and the other Microservices which are developed using different stack are deployed on Kubernetes cluster on Azure. If i want to connect to any or multiple microservices and run some integration tests in my local environment Bridge to Kubernetes will help to achieve the requirement. Following are some of the Key features that Bridge to Kubernetes offers similar to Devspaces,

Accelerating and Simplifying Microservice Development

It basically eliminates the need to manually push code, configure and compile external dependencies on your development environment so that you can focus on code without worrying about other factors.

Easy Debugging Code

It lets you to run your usual debug profile with the added kuberentes cluster configuration. It allows developers to debug code in the way they want would while taking advantage of the speed and flexibility of local debugging.

Developing and Testing End-to-End

One of the important feature is the Integration testing during development time. Select an existing service in the cluster to route to your development machine where an instance of that service is running locally. Developers can initiate request through the frontend of the application running in Kubernetes and it will route between services running in the cluster until the service you specified to redirect is called same as how you would do debugging by adding a breakpoint in your code.

How to get started with Bridge to Kubernetes?

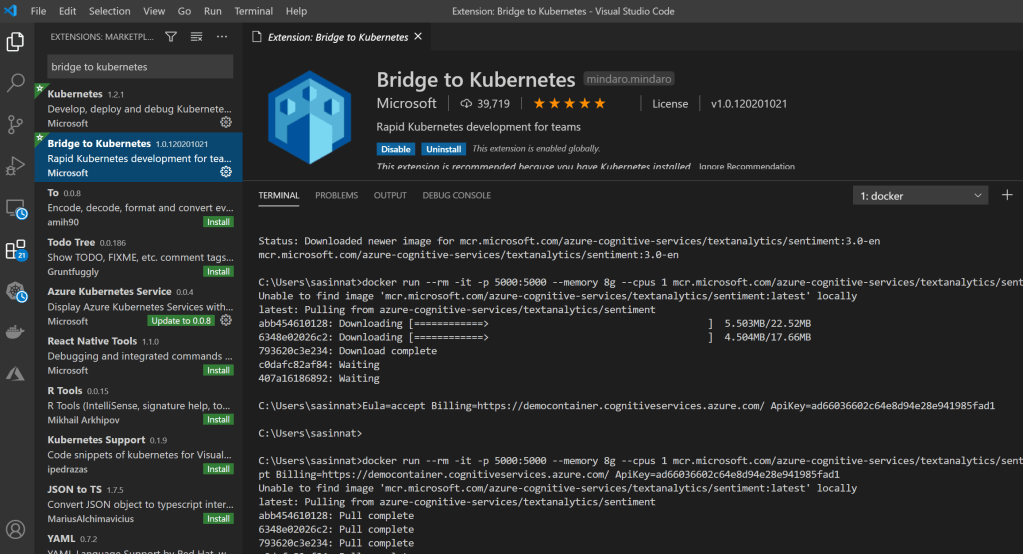
You can Start debugging your Kubernetes applications today using Bridge to Kubernetes.You need to download the extensions from the Visual Studio and VS Code marketplaces.

Bridge to Kubernetes VSCode extension

If you would like to explore more with a sample application follow the example given on Use Bridge to Kubernetes . Also kindly note the Bridge to Kubernetes collects usage data and sends it to Microsoft to help improve our products and services.

Start using Bridge to kuberentes and deploy things to production even faster than before! Cheers!

· 11 min read

Overview:

This year I've started focusing deeply on the areas around App Modernization with various cloud native offerings with different cloud vendors. One of my main focuses has been Kuberentes and how it can help organizations to design scalable applications to cater their needs. Scaling is one of the interesting concepts on Kuberentes and a very important subject to look at. This post will help you to understand the basics of the scalability aspects in Kuberentes and how you can use Event driven Applications with Kubernetes in detail.

Scaling Kubernetes

In general, Kuberentes provides two ways to scale your applications with the capabilities such as,

Cluster Scaling - It Enables users to add and remove nodes to provide more resources to run on. This is applicable to scale in an infrastructure level

Application Scaling - It can be achieved based on how your applications are running by changing the characteristics of underlying pods. Either by adding more copies or by changing the resources available to run same as how you do with services like App service on Azure.

Cluster Autoscaler : The first way of scaling can be achieved with Cluster Autoscaler. It is a tool enables automatically scaling the cluster. Most of the cloud vendors have this capability which automatically add nodes that user don't have to take care of adding more nodes. It basically add nodes when the capacity demand is there and remove nodes when they are no longer needed. I have widely used the Autoscaler with Microsoft Azure Kubernetes Service which allows you to start scaling your AKS cluster.

Event Driven Autoscaling with Kubernetes :

Necessity:

Event-driven applications are a key pattern for cloud-native applications. Event-driven is at the core of many growing trends, including Serverless compute like Azure Functions. There are so many scenarios where Kubernetes with Azure functions can be used in order to serve your applications with minimized cost.

  • Hybrid Solutions, Which needs some data to be processed on their environment
  • Applications with some specific requirements of Memory and GPUs
  • Applications which are already running on Kubernetes, so that you can leverage existing investments

Example Scenario:

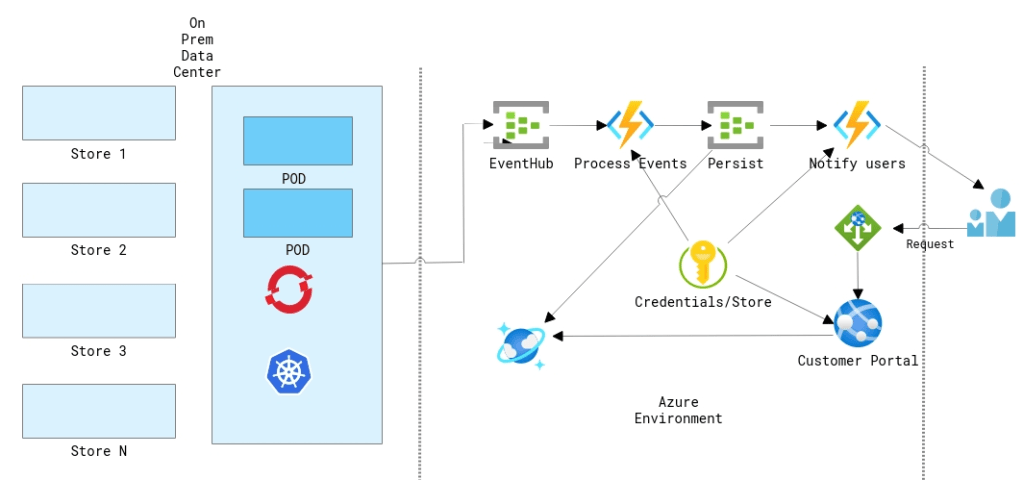
Customer Scenario

In this example, lets consider a retail customer like eBay. For a retail customers who processing millions of orders and having a hybrid environment. If the customer does a lot of processing on the data center using things like Kubernetes and at some point they push those data to the cloud using eventhub or transform their data and put in the right place etc. What if the customer is getting sudden spike on a certain day like "Black Friday" and need to make sure that the compute can scale rapidly and also wanted to make sure that the orders are processed in the correct manner.

Arrival of KEDA :

Since Azure functions is open sourced  so one of the things that azure functions team working with and talking to the community some partners like Redhat is how can they  start to bring more of these experiences to that other side to where you don't want to have lock-in to a specific cloud vendor and to run these service workloads anywhere could be on other clouds. Kubernetes Event-Driven Autoscaling (KEDA) which is a Microsoft & Red Hat partnership that would make auto scaling Kubernetes workloads a lot easier. With Azure Functions, you write code which is triggered when a certain trigger occurs and they handle the scaling for you, but you have no control over it. With combining Kubernetes you have to tell it how to scale your application so it's fully up to you! On May 6th, 2019 Microsoft announced that they have partnered with Red Hat to build Kubernetes-based event-driven autoscaling (KEDA) which brings both worlds closer together.

What is Kubernetes-based event driven autoscaling (KEDA) ?

KEDA provides an autoscaling infrastructure that allows you to very easily autoscale your applications based on your criteria. Nothing to process? No problem, KEDA will scale your app back to 0 instances unless there is work to do.

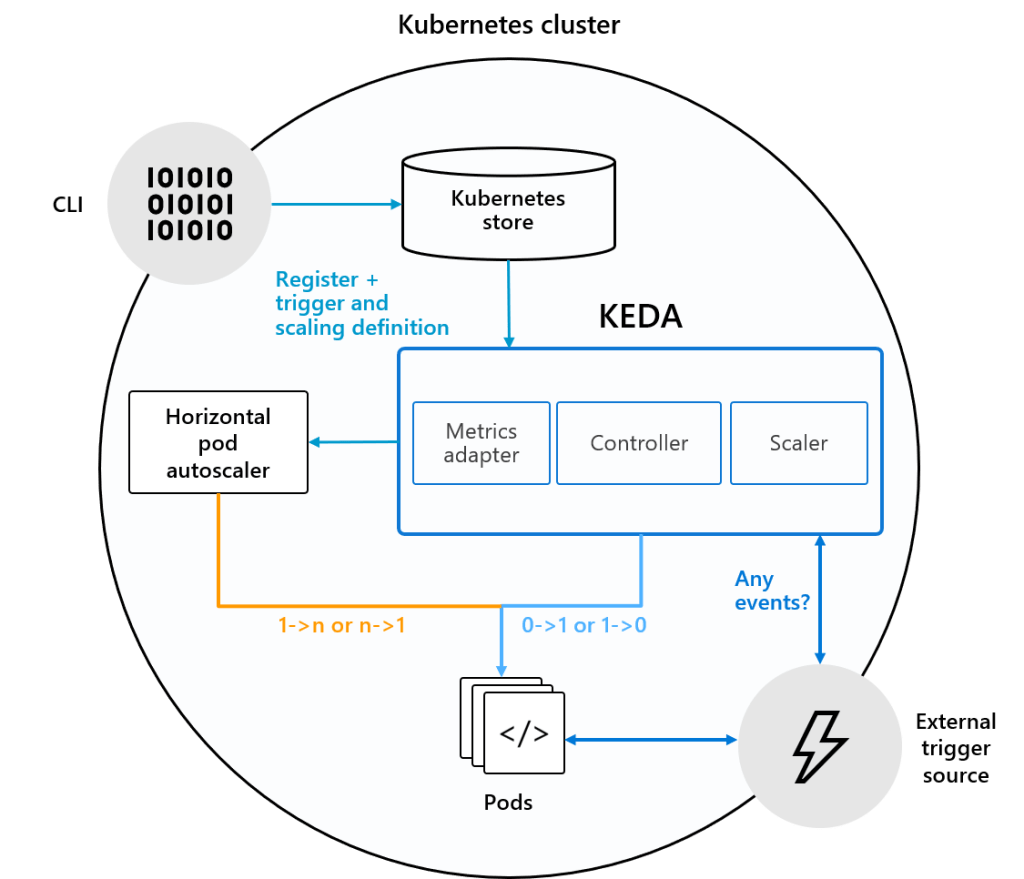
How does it work?

KEDA comes with a set of core components to provide the scaling infrastructure:

  • Controller to coordinate all the work and watch for new ScaledObjects
  • Kubernetes Custom Metric Server
  • A set of scalers which allow you to scale on external services

Kubernetes-based event-driven autoscaling (KEDA) Architecture

The controller is the heart of KEDA and is handling the following responsibilities :

  1. Watching for new ScaledObjects
  2. Ensuring that deployments where no events occur, scale back to 0 nodes. Once events occur, it makes sure that it scales from 0 to n.

How it Differs from Kubernetes ?

"Default Kubernetes Scaling is not well suited for Event Driven Applications"

By default kuberentes is not very well suited for event-driven scaling and that's because by default kuberentes can really only do resource based scaling looking at CPU and Memory.

What K8s can do?What K8s can't do?
Scheduling of containersInvoke code based on external events
Capacity managementScale based on external metrics

When do we need KEDA!

Sample Deployment :

As an application admin, you can deploy ScaledObject resources in your cluster which define the scaling rules for your application based on a given trigger.

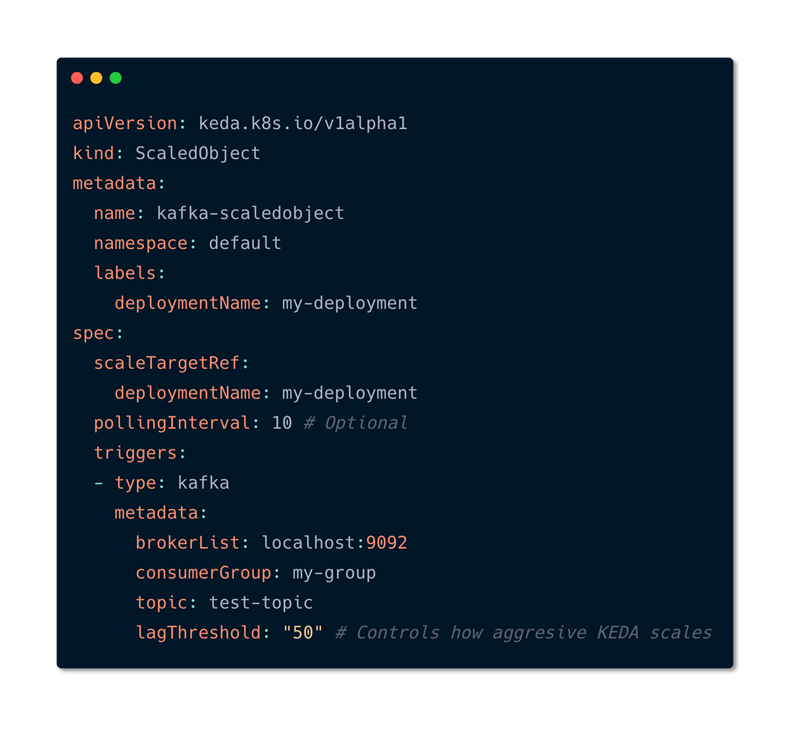
These triggers are also referred to as “Scalers”. They provide a catalog of supported sources on which you can autoscale and provide the required custom metric feeds to scale on. This allows KEDA to very easily support new scale sources by adding an individual scaler for that service. Let’s have a look at a ScaledObject that automatically scales based on Service Bus Queue depth.

Scaled Object Deployment with Kafka using KEDA

As you see in the file, All it contains is that whatever deployment that you are going to scale it goes under scaletargetreference. You can also set some metadata such as how frequently to pull for events that you can control. Metadata such as Minimums and maximums and then you can define the event source in this case it is mention as Kafka, you can also mention things like service bus etc. Once the deployment is applied on kuberentes you can see that it will identify that scaled objects. Based on the events on the eventssources it is going to identify and scale it automatically. HPA does the autoscaling.

Run Azure Functions Anywhere

With the production release of KEDA back in 2019, you can now safely run your azure function apps on Kubernetes and its recommended by the product group. This allows the users to build serverless applications once re-use them on other infrastructures as well. Let's see How to build an application that supports the above scenario discussed.

PreRequisities :

This article requires you to have the following tools & services:

  • Azure CLI
  • Azure Subscription
  • .NET Core 3.1
  • Kubernetes cluster with KEDA installed
  • Function Tools
  • Visual Studio Code
  • Docker Desktop

Step 1: Create a Resource Group

First step is to create the resource group using which all the necessary resources will be grouped together!

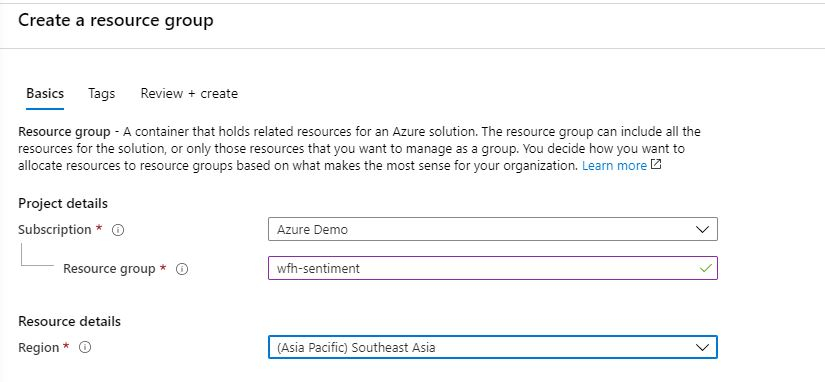
https://gist.github.com/sajeetharan/839847fe89b1b3ea90679ae7d2782d6e.jsView this gist on GitHubCreate Resource Group Named "rgKeda" in "Southeastasia" region

Step 2 : Create a Storage Account

Let's create a Storage Account to store the order messages, You can do this by the command,

https://gist.github.com/sajeetharan/fc885f9ddb7916c015ff470823f1c8f0.jsView this gist on GitHubCreate Storage Account Named "sakeda"

Step 3 : Create a Queue in Service Bus

Next step is to create the queue to store the orders under the namespace "sbqOrders"

https://gist.github.com/sajeetharan/685feca2dbc8e591a759a8da4b36c491.jsView this gist on GitHubCreate Storage Queue to store the order messages

Step 4 : Create Azure Kubernetes Service

To showcase the feature of event driven scaling with the kubernetes let's create a Kubernetes cluster on Azure with two nodes.

https://gist.github.com/sajeetharan/94812cad484f0de46490e5069e08a8c6.jsView this gist on GitHub

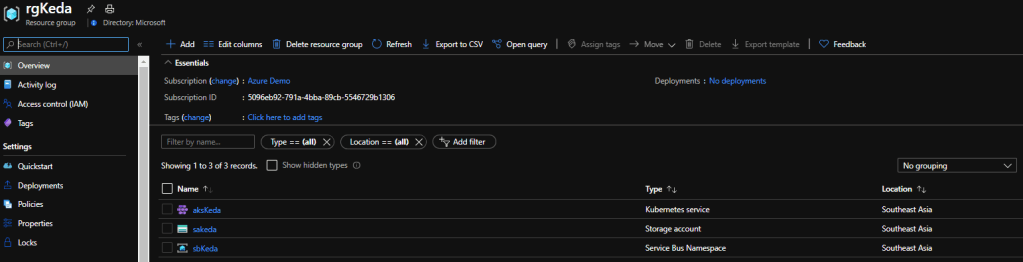
Once these resources are created you can double check it by navigating to azure portal and opening the resource group.

Resources for the Kubernetes Event Driven Autoscaling

Now we have created all the necessary resources. In the above step you can see that we have create two nodes but have not deployed anything to those nodes, but in real scenarios that nodes can contain some applications already running on Kubernetes.

Step 5 : Create Azure Function to Process the Queue Message

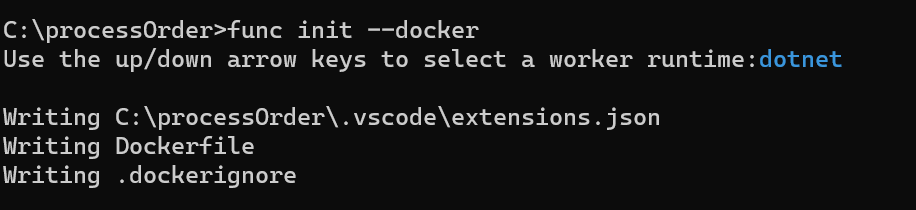
Let's create an Azure function to process these queue messages, you can navigate to the folder and create a containerized function as follows,

https://gist.github.com/sajeetharan/569c6ef142d5b64ce5a5c3fb134e920d.jsView this gist on GitHubCreate a containerized Function

Make sure to select the preferred language and the app will be created as follows,

lets create the new function as ,

https://gist.github.com/sajeetharan/d24f16c79111688f5c2167bf8947856f.jsView this gist on GitHubCreate new function

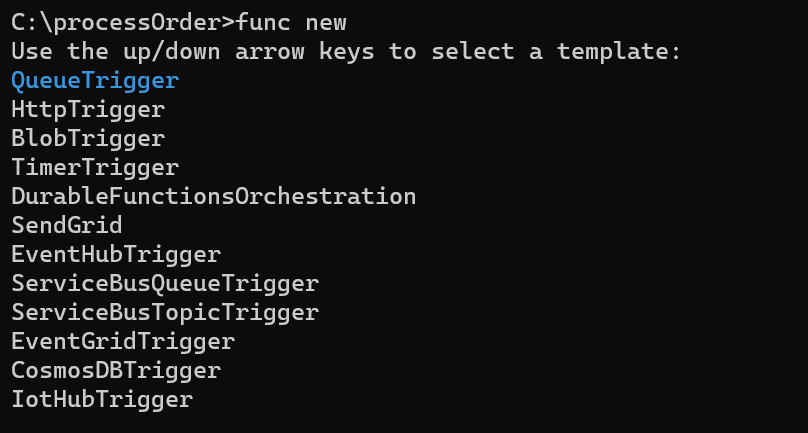
In this case we need to create a function to get triggered when there is a new message in the queue, so select the Trigger as QueueTrigger from the template,

Select Queue Trigger

and give a function name as follows,

Create Function with QueueTrigger template

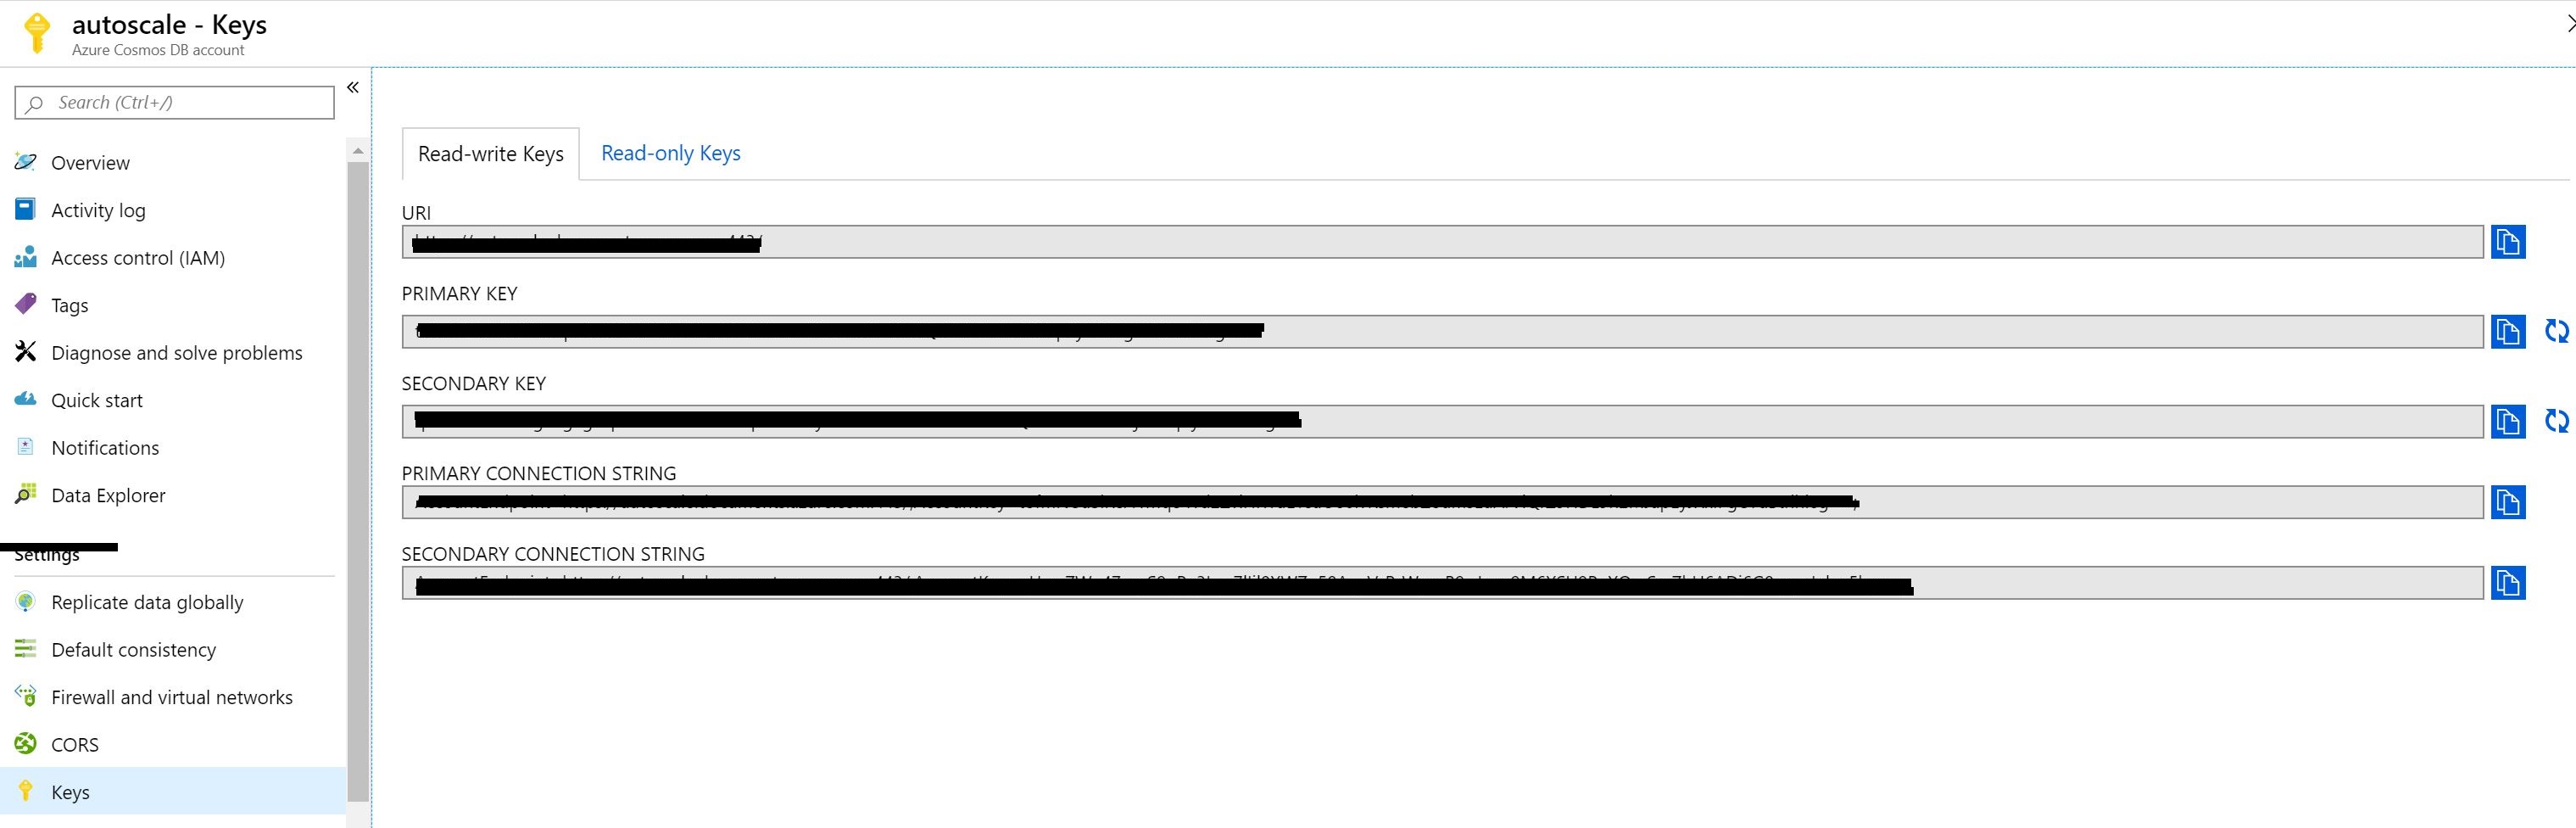
Open the function in vscode and configure the storage queue connection string in the local.appsettings.json, the connection string can be obtained from the Azure portal in Storage Account "saKeda" -> Queues -> Access Keys

{
"IsEncrypted": false,
"Values": {
"AzureWebJobsStorage": "UseDevelopmentStorage=true",
"FUNCTIONS_WORKER_RUNTIME": "dotnet",
"StorageConnection": "DefaultEndpointsProtocol=https;AccountName=sakeda;AccountKey=uPmdavPQ5DOYD3A5sJbeODP5He9OBv3sYpmlGj6fs7mQYZsk7P/ShP6Go9u+waBBean+1PJwjUEkGVnRsHf/rNg==;EndpointSuffix=core.windows.net"
}
}

Whole function code can be viewed from here.

Step 6 : Build the function and Enable Keda on AKS cluster

As we have everything ready, let's build the function with the below command,

 docker build -t processorder:v1 .

As the next step , we need to enable KEDA on the Azure Kubernetes Cluster. This is similar on any Kubernetes environment which can be achieved by below,

https://gist.github.com/sajeetharan/76b6529d6adc0235f50921d0ba6c0519.jsView this gist on GitHub

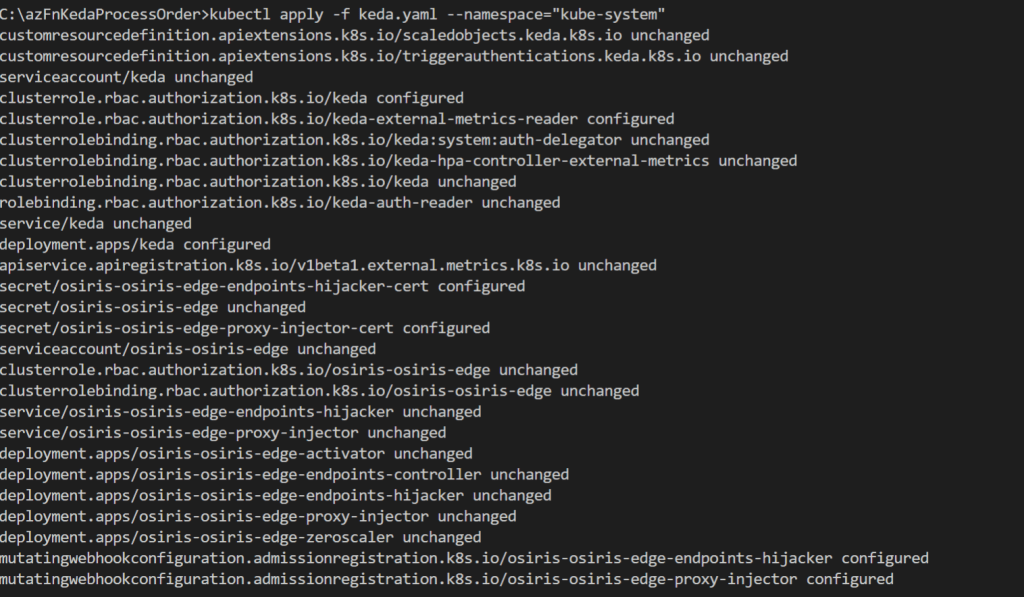
Keda.yaml is the configuration file which has all details. In our case we define that we want to use the queue trigger and what our criteria is. For our scenario we’d like to scale out if there are 5 or more messages in the orders queue with a maximum of 10 concurrent replicas which is defined via maxReplicaCount. Let's apply the yaml file on the cluster.

kubectl apply -f keda.yaml --namespace="kube-system"

Step 7 : Deploy the container as Azure function extended with AKS

Final step is to deploy the function to kubernetes environment with the following command,

https://gist.github.com/sajeetharan/fc52f2e6a686bca16acc190fee2137c0.jsView this gist on GitHub

Make sure that you are tagging the correct registry name , here i am using my docker registry, instead you can consider using Azure Container Registry as well.

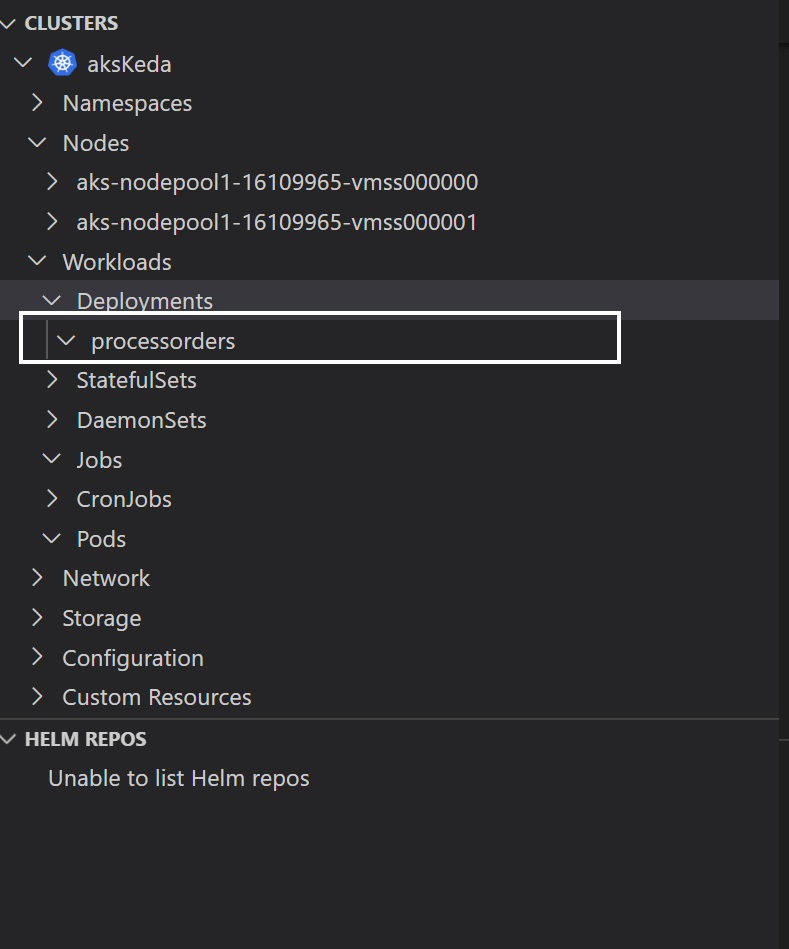
Let's view the kubernetes cluster. if you have install the kubernetes extension you can easily view the status of the cluster using vscode.

Step 8 : Publish messages to the Queue

Inorder to test the scaling of Azure function with KEDA, i created a sample console application which pushes the messages to the queue we created. And the code looks as follows,

using Microsoft.WindowsAzure.Storage;
using Microsoft.WindowsAzure.Storage.Queue;
using System;
using System.Threading;
using System.Threading.Tasks;

namespace Serverless
{
class Program
{
static async Task Main(string[] args)
{
CloudStorageAccount storageClient = CloudStorageAccount.Parse("connection string");
CloudQueueClient queueClient = storageClient.CreateCloudQueueClient();

CloudQueue queue = queueClient.GetQueueReference("sqkeda");
for (int i = 0; i < 100000000; i++)
{
await queue.AddMessageAsync(new CloudQueueMessage("Hello KEDA , See the magic!"));
}

}
}
}

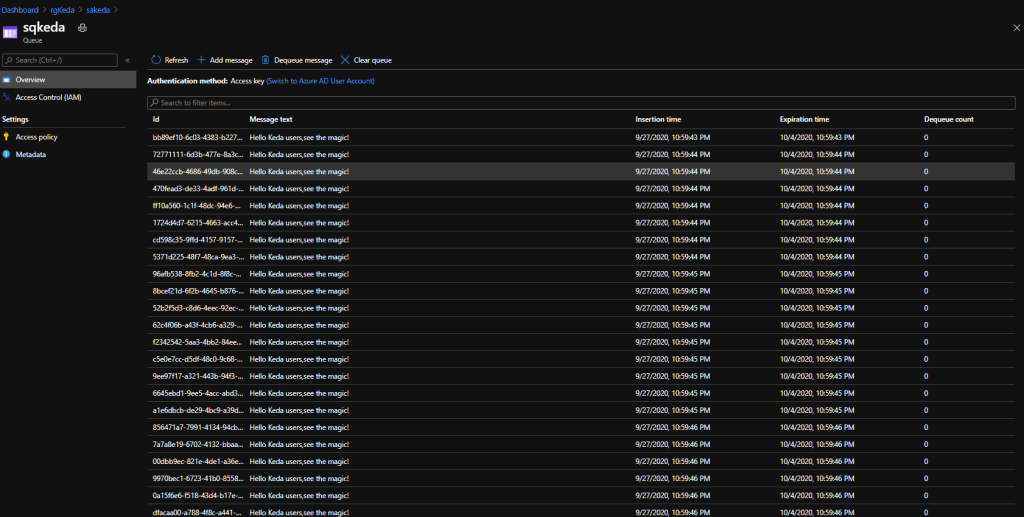
As the messages are getting inserted to the queue, the number of replicas gets increased which you can see from the image below.

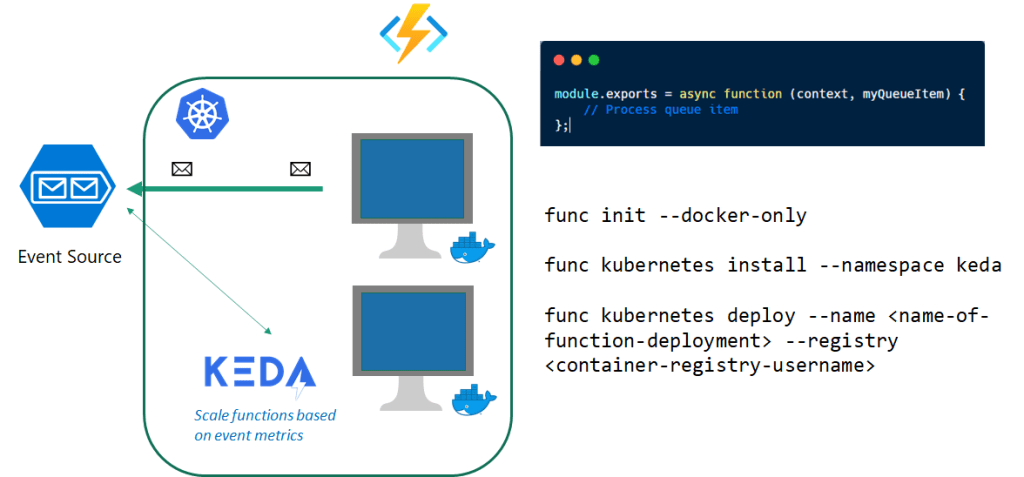
Once all the messages have been processed KEDA will scale the deployment back to 0 pod instances. Overall process is simplified in the diagram below,

Serverless eventing with Kubernetes

Conclusion :

We have easily deployed a .NET Core 3.1 Function on Kubernetes which was processing messages from Storage Queue. Once we’ve deployed a ScaledObject for our Kubernetes deployment it started scaling the pods out and in according to the queue depth. This makes the application very easily plug in autoscaling with existing application without making any changes!

This makes Kubernetes-based event-driven autoscaling (KEDA) a great addition to the autoscaling toolchain, certainly for Azure customers and ISVs who are building solutions. Hope this was useful in someway! Cheers!

· 7 min read

Overview :

Before two weeks Ryan Dahl (Founder of Node.JS) announced the first version of [Deno](https://deno.land/). As the tagline says A secure runtime for JavaScript and TypeScript. Deno is a runtime for Javascript and Typescript that is based on the V8 JavaScript engine and the Rust programming language. I have been a Node developer for 2 years in the past, if you want to get started with Deno knowing Node.js would be an added advantage. Even though Deno has arrived as a competitor for NodeJS in the industry not so quick but people are sure that it'll take over.

I was reading lot of documentations and materials to understand the difference. So, here are the advantages that i see from Deno,

  • It is Secure by default. No file, network, or environment access, unless explicitly enabled.
  • Supports TypeScript out of the box.
  • Ships only a single executable file.
  • Has built-in utilities like a dependency inspector (deno info) and a code formatter (deno fmt).
  • Deno does not use npm
  • Deno does not use package.json in its module resolution algorithm.
  • All async actions in Deno return a promise. Thus Deno provides different APIs than Node.
  • Uses "ES Modules" and does not support require().
  • Deno has a built-in test runner that you can use for testing JavaScript or TypeScript code.
  • Deno always dies on uncaught errors.

I was very excited as other developers when Deno was announced. In this post i will demonstrate how to create a simple Web API with Deno and deploy to production on Web App with Azure.

PreRequisities:

You will need to have an Azure Subscription. If you do not have an Azure subscription you can simply create one with free trial.

Install Deno :

Using Shell (macOS, Linux):

curl -fsSL https://deno.land/x/install/install.sh | sh

Using PowerShell (Windows):

iwr https://deno.land/x/install/install.ps1 -useb | iex

Using Homebrew (macOS):

brew install deno

Using Chocolatey (Windows):

choco install deno

Using Scoop (Windows):

scoop install deno

Services used:

  • Azure Web App
  • Github Actions

Step 1 : Create Deno Rest API

I will not be going through each step on how to create the REST API, however if you are familiar with creating APIs with Node , it is the same way that you need to do. You need to have the main file server.ts which will have those routes defined. (server.ts)

import { Application } from "https://deno.land/x/oak/mod.ts";
import router from "./routes.ts";
const PORT = 8001;

const app = new Application();

app.use(router.routes());
app.use(router.allowedMethods());

console.log(`Server at ${PORT}`);
await app.listen({ port: PORT });

One feature that i personally liked in DENO is that it provides developers to code with  TypeScript that addresses "design mistakes" in Node.js. In this case i am going to create an API to fetch/add/delete products and my interface would look like as below (types.ts),

export interface Product {
id: String;
name: String;
description: String;
price: Number;
status: String;
}

Similar to how you would define routes in Node, you need to define the routes for different endpoints when user want to execute fetch/add/delete operations as follows(routes.ts),

import { Router } from "https://deno.land/x/oak/mod.ts";
import { delete_product, add_product, get_product, get_products } from "./Controllers/Products.ts";

const router = new Router();

router.get("/", ctx => {
ctx.response.body = "Welcome to Deno!";
});

router.get("/get/:id", get_product);
router.post("/add", add_product);
router.get("/get_all_products", get_products);
router.get("/delete/:id", delete_product);

export default router;

The final step is to create the code for the logic of those each routes. You need to implement the methods which are defined in those routes. For example get_products would look like


import { Product } from "../Types.ts";

let products: Product[] = [
{
id: "1",
name: "Iphone XI",
description: "256GB",
price: 799,
status: "Active"
}
];

const get_products = ({response}: {response: any}) => {
response.status = 200;
response.body = products;
};

You can access the whole code from this Repository.

Run the DENO app:

Once you are good with everything, you can run the app in local and check if the endpoints are working as expected.

deno run -A server.ts

And you would see the app running in port 8001 , and you can access the endpoints as follows ,

Deno API

Step 2 : Create Azure Resources

Now we are good with the first step and you can see the app running successfully in local. As the next step let's go ahead and deploy the app to Azure. Inorder to deploy the app, you need to create a Resource Group first.

Create a ResourceGroup Named Deno-Demo

You can navigate to Azure Portal and search for Resource Group in the search bar and create a new one as defined here!

Next step is to create the Web App , as we are going to deploy this app to a Linux environment, you can set the configuration as follows,

Web App Configuration

Step 3 : Deploy to Azure with Github Actions

One of the recent inventions by Github team that was loved by all developers were Github Actions. Personally i am a big fan of Github actions and i have published few posts earlier explaining the same. To configure the Github Action to our application, first you need to push the code to your github repository.

Create a deno.yml

To deploy the app , we first need to create the workflow under the actions. you can create a new workflow by navigating to Actions tab and create new workflow

New Workflow

I am assuming that you are familiar with important terms of Github Actions, if you are new you can explore here. In this particular example i will be using one package created by Anthony Chu who is a Program Manager in Azure functions team. And my deno.yml looks like below,

# A workflow run is made up of one or more jobs that can run sequentially or in parallel
jobs:

build-and-deploy:
runs-on: ubuntu-latest
steps:

- uses: actions/checkout@v2

- uses: azure/[email protected]
with:
creds: ${{ secrets.AZURE_CREDENTIALS }}

- name: Set up Deno
uses: denolib/setup-deno@master
with:
deno-version: 1.0.2

- name: Bundle and zip Deno app
run: |
deno bundle server.ts server.bundle.js
zip app.zip server.bundle.js
- name: Deploy to Azure Web Apps
uses: anthonychu/azure-webapps-deno-deploy@master
with:
app-name: denodemo
resource-group: deno-demo
package: app.zip
script-file: server.bundle.js
deno-version: "1.0.2"

One important thing you need to verify is the resource-group and the app-name as you created on Azure.

Also you need to add secrets of your application under secrets in Github repository. You can generate a new Service Principal and obtain the secret as below,


az ad sp create-for-rbac --name "deno-demo" --role contributor --scopes /subscriptions/{SubscriptionID}/resourceGroups/deno-demo --sdk-auth

It will generate a JSON like below,

Generate Service Principal

You can copy and paste the JSON under the secret named "AZURE_CREDENTIALS" ,

Add Secret

Now we are good with everything, you can update some file on the repository and see the workflow getting triggered. You can monitor the deployment by navigating to the workflow.

Workflow Execution

Once everything is successful you can navigate to Azure portal and open the Web App endpoint to see if the app is running successfully.

WebApp with Deno API

You can see the app running successfully on Azure.

Deno Web API on azure.

Final words

I really enjoyed learning about the Deno project and created this simple app. I hope this article can be of value for anyone getting started with Deno with Azure.  I see it Deno gaining in popularity, yes. However, I do not see it replacing NodeJS and npm based on several factors. If you found this article useful, or if you have any questions please reach out me on Twitter. Cheers!

· 7 min read

Overview :

Before two weeks Ryan Dahl (Founder of Node.JS) announced the first version of [Deno](https://deno.land/). As the tagline says A secure runtime for JavaScript and TypeScript. Deno is a runtime for Javascript and Typescript that is based on the V8 JavaScript engine and the Rust programming language. I have been a Node developer for 2 years in the past, if you want to get started with Deno knowing Node.js would be an added advantage. Even though Deno has arrived as a competitor for NodeJS in the industry not so quick but people are sure that it'll take over.

I was reading lot of documentations and materials to understand the difference. So, here are the advantages that i see from Deno,

  • It is Secure by default. No file, network, or environment access, unless explicitly enabled.
  • Supports TypeScript out of the box.
  • Ships only a single executable file.
  • Has built-in utilities like a dependency inspector (deno info) and a code formatter (deno fmt).
  • Deno does not use npm
  • Deno does not use package.json in its module resolution algorithm.
  • All async actions in Deno return a promise. Thus Deno provides different APIs than Node.
  • Uses "ES Modules" and does not support require().
  • Deno has a built-in test runner that you can use for testing JavaScript or TypeScript code.
  • Deno always dies on uncaught errors.

I was very excited as other developers when Deno was announced. In this post i will demonstrate how to create a simple Web API with Deno and deploy to production on Web App with Azure.

PreRequisities:

You will need to have an Azure Subscription. If you do not have an Azure subscription you can simply create one with free trial.

Install Deno :

Using Shell (macOS, Linux):

curl -fsSL https://deno.land/x/install/install.sh | sh

Using PowerShell (Windows):

iwr https://deno.land/x/install/install.ps1 -useb | iex

Using Homebrew (macOS):

brew install deno

Using Chocolatey (Windows):

choco install deno

Using Scoop (Windows):

scoop install deno

Services used:

  • Azure Web App
  • Github Actions

Step 1 : Create Deno Rest API

I will not be going through each step on how to create the REST API, however if you are familiar with creating APIs with Node , it is the same way that you need to do. You need to have the main file server.ts which will have those routes defined. (server.ts)

import { Application } from "https://deno.land/x/oak/mod.ts";
import router from "./routes.ts";
const PORT = 8001;

const app = new Application();

app.use(router.routes());
app.use(router.allowedMethods());

console.log(`Server at ${PORT}`);
await app.listen({ port: PORT });

One feature that i personally liked in DENO is that it provides developers to code with  TypeScript that addresses "design mistakes" in Node.js. In this case i am going to create an API to fetch/add/delete products and my interface would look like as below (types.ts),

export interface Product {
id: String;
name: String;
description: String;
price: Number;
status: String;
}

Similar to how you would define routes in Node, you need to define the routes for different endpoints when user want to execute fetch/add/delete operations as follows(routes.ts),

import { Router } from "https://deno.land/x/oak/mod.ts";
import { delete_product, add_product, get_product, get_products } from "./Controllers/Products.ts";

const router = new Router();

router.get("/", ctx => {
ctx.response.body = "Welcome to Deno!";
});

router.get("/get/:id", get_product);
router.post("/add", add_product);
router.get("/get_all_products", get_products);
router.get("/delete/:id", delete_product);

export default router;

The final step is to create the code for the logic of those each routes. You need to implement the methods which are defined in those routes. For example get_products would look like


import { Product } from "../Types.ts";

let products: Product[] = [
{
id: "1",
name: "Iphone XI",
description: "256GB",
price: 799,
status: "Active"
}
];

const get_products = ({response}: {response: any}) => {
response.status = 200;
response.body = products;
};

You can access the whole code from this Repository.

Run the DENO app:

Once you are good with everything, you can run the app in local and check if the endpoints are working as expected.

deno run -A server.ts

And you would see the app running in port 8001 , and you can access the endpoints as follows ,

Deno API

Step 2 : Create Azure Resources

Now we are good with the first step and you can see the app running successfully in local. As the next step let's go ahead and deploy the app to Azure. Inorder to deploy the app, you need to create a Resource Group first.

Create a ResourceGroup Named Deno-Demo

You can navigate to Azure Portal and search for Resource Group in the search bar and create a new one as defined here!

Next step is to create the Web App , as we are going to deploy this app to a Linux environment, you can set the configuration as follows,

Web App Configuration

Step 3 : Deploy to Azure with Github Actions

One of the recent inventions by Github team that was loved by all developers were Github Actions. Personally i am a big fan of Github actions and i have published few posts earlier explaining the same. To configure the Github Action to our application, first you need to push the code to your github repository.

Create a deno.yml

To deploy the app , we first need to create the workflow under the actions. you can create a new workflow by navigating to Actions tab and create new workflow

New Workflow

I am assuming that you are familiar with important terms of Github Actions, if you are new you can explore here. In this particular example i will be using one package created by Anthony Chu who is a Program Manager in Azure functions team. And my deno.yml looks like below,

# A workflow run is made up of one or more jobs that can run sequentially or in parallel
jobs:

build-and-deploy:
runs-on: ubuntu-latest
steps:

- uses: actions/checkout@v2

- uses: azure/[email protected]
with:
creds: ${{ secrets.AZURE_CREDENTIALS }}

- name: Set up Deno
uses: denolib/setup-deno@master
with:
deno-version: 1.0.2

- name: Bundle and zip Deno app
run: |
deno bundle server.ts server.bundle.js
zip app.zip server.bundle.js
- name: Deploy to Azure Web Apps
uses: anthonychu/azure-webapps-deno-deploy@master
with:
app-name: denodemo
resource-group: deno-demo
package: app.zip
script-file: server.bundle.js
deno-version: "1.0.2"

One important thing you need to verify is the resource-group and the app-name as you created on Azure.

Also you need to add secrets of your application under secrets in Github repository. You can generate a new Service Principal and obtain the secret as below,


az ad sp create-for-rbac --name "deno-demo" --role contributor --scopes /subscriptions/{SubscriptionID}/resourceGroups/deno-demo --sdk-auth

It will generate a JSON like below,

Generate Service Principal

You can copy and paste the JSON under the secret named "AZURE_CREDENTIALS" ,

Add Secret

Now we are good with everything, you can update some file on the repository and see the workflow getting triggered. You can monitor the deployment by navigating to the workflow.

Workflow Execution

Once everything is successful you can navigate to Azure portal and open the Web App endpoint to see if the app is running successfully.

WebApp with Deno API

You can see the app running successfully on Azure.

Deno Web API on azure.

Final words

I really enjoyed learning about the Deno project and created this simple app. I hope this article can be of value for anyone getting started with Deno with Azure.  I see it Deno gaining in popularity, yes. However, I do not see it replacing NodeJS and npm based on several factors. If you found this article useful, or if you have any questions please reach out me on Twitter. Cheers!

· 4 min read

One of the highlight among the announcements made at Microsoft Build 2020 was announcement of the new Azure service in the keynote which is Azure App Static Web Apps. Azure Static Web Apps is a service that automatically builds and deploys full stack web apps to Azure from a GitHub repository. This service allow web developers to publish websites to a production environment by building apps from a GitHub repository for free. Developers can use modular and extensible patterns to deploy apps in minutes while taking advantage of the built-in scaling and cost-savings offered by serverless technologies.

It provides the killer features for developers such as:

  • Free web hosting for static content like HTML, CSS, JavaScript, and images.
  • Integrated API support provided by Azure Functions as backend APIS
  • First-party GitHub integration where repository changes trigger builds and deployments with Github Actions
  • Globally distributed static content, putting content closer to your users.
  • Free SSL certificates, which are automatically renewed.
  • Custom domains* to provide branded customizations to your app.
  • Seamless security model with a reverse-proxy when calling APIs, which requires no CORS configuration.
  • Authentication provider integrations with Azure Active Directory, Facebook, Google, GitHub, and Twitter.
  • Customizable authorization role definition and assignments.
  • Back-end routing rules enabling full control over the content and routes you serve.
  • Generated staging versions powered by pull requests enabling preview versions of your site before publishing.

How i deployed Meme-Generator App:

I was building this meme generator app for an angular session today with Azure cognitive service to detect persons in the image and also to generate a meme by adding a text as the user wanted. As soon as Azure static web apps was announced I wanted to check it out with this application on how easy it is to deploy. Experience was seamless and easy to deploy and generate a url in few seconds.

Let me explain, how i achieved this in quick time.

Step 1. Sign-in to the Azure Portal, Search for “Static Web Apps”, and click the Create button

Visit https://portal.azure.com, sign-in, and use the search box at the top to locate the Static Web Apps service (note that it’s currently in “preview”). click the Create button to get started.

Create Static Web App

In this step you’ll fill out the Static Web Apps form and sign-in to your Github account to select your repository.

  • Select your Azure subscription.
  • Create a Resource Group
  • Name your app , in my case its meme4fun
  • Select a region (as of now its not available in all regions)
  • Sign-in to Github and select your org, repo, and branch. 

Once you’re done filling out the form click the Next: Build > button.

Step 2: Define Angular App location, API, and Build Output

The next step is to define the path where my app is located in the repository, and i did not have any azure function integrated and i will keep it as empty, and the directory where my build artifacts (your bundles) are located(i.e dist/meme-4-fun). After entering that information click the Review + create button.

Defining Paths

Step 3:  Click the Create and Look for the Magic !

Once you are good with everything you can go ahead and click the create button and you will see the application successfully gets deployed and end point generated to access it public.

Deployment complete

Once the deployment is done, if you go the resource and click on overview you will see a configuration as follows,

Overview

It has the urls of the Github Actions and as well as Github source code and also the url of the application deployed. If you’d like to see the build in action on Github, click the Workflow file above.

You can access the meme generator application and create your own memes from https://lively-forest-0fd67f010.azurestaticapps.net/

Here are some great links you can visit to learn more. 

The above app is also available in the Microsoft's sample static web app Gallery.

If you're a web developer you definitely need to check out this cool service for sure. Cheers!

· 4 min read

One of the highlight among the announcements made at Microsoft Build 2020 was announcement of the new Azure service in the keynote: Azure App Static Web Apps. Azure Static Web Apps is a service that automatically builds and deploys full stack web apps to Azure from a GitHub repository. This service allow web developers to publish websites to a production environment by building apps from a GitHub repository for free. developers can use modular and extensible patterns to deploy apps in minutes while taking advantage of the built-in scaling and cost-savings offered by serverless technologies.

It provides the killer features for developers such as:

  • Free web hosting for static content like HTML, CSS, JavaScript, and images.
  • Integrated API support provided by Azure Functions as backend APIS
  • First-party GitHub integration where repository changes trigger builds and deployments with Github Actions
  • Globally distributed static content, putting content closer to your users.
  • Free SSL certificates, which are automatically renewed.
  • Custom domains* to provide branded customizations to your app.
  • Seamless security model with a reverse-proxy when calling APIs, which requires no CORS configuration.
  • Authentication provider integrations with Azure Active Directory, Facebook, Google, GitHub, and Twitter.
  • Customizable authorization role definition and assignments.
  • Back-end routing rules enabling full control over the content and routes you serve.
  • Generated staging versions powered by pull requests enabling preview versions of your site before publishing.

How i deployed Meme-Generator App:

I was building this meme generator app for an angular session today with Azure cognitive service to detect persons in the image and also to generate a meme by adding a text as the user wanted. As soon as Azure static web apps was announced I wanted to check it out with this application on how easy it is to deploy. Experience was seamless and easy to deploy and generate a url in few seconds.

Let me explain, how i achieved this in quick time.

Step 1. Sign-in to the Azure Portal, Search for “Static Web Apps”, and click the Create button

Visit https://portal.azure.com, sign-in, and use the search box at the top to locate the Static Web Apps service (note that it’s currently in “preview”). click the Create button to get started.

Create Static Web App

In this step you’ll fill out the Static Web Apps form and sign-in to your Github account to select your repository.

  • Select your Azure subscription.
  • Create a Resource Group
  • Name your app , in my case its meme4fun
  • Select a region (as of now its not available in all regions)
  • Sign-in to Github and select your org, repo, and branch. 

Once you’re done filling out the form click the Next: Build > button.

Step 2: Define Angular App location, API, and Build Output

The next step is to define the path where my app is located in the repository, and i did not have any azure function integrated and i will keep it as empty, and the directory where my build artifacts (your bundles) are located(i.e dist/meme-4-fun). After entering that information click the Review + create button.

Defining Paths

Step 3:  Click the Create and Look for the Magic !

Once you are good with everything you can go ahead and click the create button and you will see the application successfully gets deployed and end point generated to access it public.

Deployment complete

Once the deployment is done, if you go the resource and click on overview you will see a configuration as follows,

Overview

It has the urls of the Github Actions and as well as Github source code and also the url of the application deployed. If you’d like to see the build in action on Github, click the Workflow file above.

You can access the meme generator application and create your own memes from https://lively-forest-0fd67f010.azurestaticapps.net/

Here are some great links you can visit to learn more. 

The above app is also available in the Microsoft's sample static web app Gallery.

If you're a web dev you need to check out this cool service for sure. Cheers!

· 5 min read

Overview : 

Azure Service Bus is being used as one of the most reliable enterprise messaging services across different domains like health care, finance etc. Often, users do have uncertainties in handling the dead-letter messages. Before diving into the best practices, I would like to give you a quick introduction on dead-lettered messages.

Azure Service Bus Dead-letter Queue

Azure Service Bus queues and topic subscriptions provide a secondary sub-queue, called a dead-letter queue. The purpose of the dead-letter queue is to hold messages that cannot be delivered to any receiver, or messages that could not be processed. So, any message that resides in the dead-letter queue is called a dead-lettered message.

Best practices in handling Azure Service Bus dead-letter message

Most of the time we could notice that the message fails due to the following reasons;

  1. Dependent service not available
  2. Faulty message
  3. Process code issue

Dependent service not available

This could be one of the foremost and time after time reasons where the services that reply on message delivery may go down for a short period. For instance, the Redis or SQL connection issues may often happen.

Faulty Message

According to the business scenarios, you may configure the custom properties to you Azure Service Bus messages and validate with respect to the values that should contain in the custom/user defined properties.

If in case the message doesn’t have a mandatory parameter or some value is incorrect, then the message will end up in the dead-letter queue after the maxDeliveryCount is attained.

The failed delivery can also be caused by a few other reasons such as network failures, a deleted queue, a full queue, authentication failure, or a failure to deliver on time.

Here we can drill down the reasons into two ways:

  1. System level dead-lettering
  2. Application level dead-lettering

Reasons for System level dead-lettering

  • Header Size Exceeded
  • Error on processing subscription rule
  • Exceeding time to live value
  • Exceeding maxDeliveryCount
  • When Session id property is set to true (the default is false)

Reasons for Application level dead-lettering

  • Messages that cannot be properly processed due to any sort of system issue
  • Messages that hold malformed payloads
  • Messages that fail authentication when some message-level security scheme is used

In this second scenario, the best practice is to manually verify the dead-lettered messages (using Service Bus Explorer or Serverless360) to correct message data or sometimes to purge messages and clear the queue.

Message process code issue

This is a very rare case given a good number of resources in the community to fetch the flawless code. The developer should keep all the scenarios in the head and handle all the exceptions.

In the first and third scenario, the best practice is to use a flawless code that should run and reprocess the dead-lettered messages, you can find the sample code below;

internal class Program
{
private static string connectionString = ConfigurationSettings.AppSettings["GroupAssetConnection"];
private static string topicName = ConfigurationSettings.AppSettings["GroupAssetTopic"];
private static string subscriptionName = ConfigurationSettings.AppSettings["GroupAssetSubscription"];
private static string databaseEndPoint = ConfigurationSettings.AppSettings["DatabaseEndPoint"];
private static string databaseKey = ConfigurationSettings.AppSettings["DatabaseKey"];
private static string deadLetterQueuePath = "/$DeadLetterQueue";

private static void Main(string[] args)
{

try
{
ReadDLQMessages(groupAssetSyncService, log);
}
catch (Exception ex)
{
Console.WriteLine(ex.Message);
throw;
}
finally
{
documentClient.Dispose();
}
Console.WriteLine("All message read successfully from Deadletter queue");
Console.ReadLine();
}

public static void ReadDLQMessages(IGroupAssetSyncService groupSyncService, ILog log)
{
int counter = 1;
SubscriptionClient subscriptionClient = SubscriptionClient.CreateFromConnectionString(connectionString, topicName, subscriptionName + deadLetterQueuePath);
while (true)
{
BrokeredMessage bmessgage = subscriptionClient.Receive(TimeSpan.FromMilliseconds(500));
if (bmessgage != null)
{
string message = new StreamReader(bmessgage.GetBody<Stream>(), Encoding.UTF8).ReadToEnd();
syncService.UpdateDataAsync(message).GetAwaiter().GetResult();
Console.WriteLine($"{counter} message Received");
counter++;
bmessgage.Complete();
}
else
{
break;
}
}

subscriptionClient.Close();
}
}

Myths to chunk out

Does the SequenceNumber of message added by Azure Service bus keeps on increasing on each failed attempt till it reaches maxDeliveryCount?

The sequence number can be trusted as a unique identifier since it is assigned by a central and neutral authority and not by clients. It also represents the true order of arrival and is more precise than a time stamp as an order criterion, because time stamps may not have a high enough resolution at extreme message rates and may be subject to (however minimal) clock skew in situations where the broker ownership transitions between nodes.

Setting maxDeliveryCount = 1, is that best practice to deal with poison messages so that consumer never attempt twice to process message once it failed?

It is not a best practice to set the maxDeliveryCount=1. Because if some network/connection issue occurs, the built-in retry will process and clear from the queue.

If you are reading messages in batch, a complete batch will re-process if an error occurred any of message.

Conclusion

In this blog, we have seen a sneak peek of Azure dead-lettered queues and various reasons for dead-lettering of messages. Further, we discussed the best practices on handling the dead-lettered messages. Finally, we looked into the myths to chunk out while dealing with Azure Service Bus dead-lettered messages.

I hope you enjoyed reading this article. Happy Learning!

This article was contributed to my site by Nadeem Ahamed and you can read more of his articles from here.

· 7 min read

Quarantine, self isolation , social distancing for the past one month, I’m living with these words. While most of us are investing this time to learn new technologies/tools. I challenged myself to skill up myself and have deep knowledge on certain services on Azure.

Kubernetes provides a uniform way of managing containers. Its aim is to remove the complexity of deciding where applications should be scheduled to run, how to locate them, how to ensure they are running, autoscale or deploy. Azure Kubernetes is a service on Azure that help Customer achieve their business goals, by providing a layer of automation on top of their infrastructure. Going towards the technical features, Azure Kubernetes has a lot to offer, but at the end of the day, is a great platform for saving money or growing faster.

Azure Kubernetes service offers great set for microservice architectures. If your application needs to start hundreds of containers quickly or will terminate them just as quickly and to have full control of those services, AKS is a great option. There are other scenarios such as Bigdata, IOT scenarios you would consider AKS as a preferred choice. In this post i will explain how to easily setup your application running on AKS cluster in 10 minutes with CI/CD pipelines.

PreRequisities:

You will need to have an Azure Subscription. If you do not have an Azure subscription you can simply create one with free trial.

How to build & Deploy the application:

If you are a beginner with Azure Kubernetes Service, Azure Devops is the best place that you need to look in order to understand how an Application is deployed on Azure Kubernetes. The Azure DevOps Project simplifies the setup of an entire continuous integration (CI) and continuous delivery (CD) pipeline to Azure with Azure DevOps. Cool thing is that, you can start with existing code or use one of the provided sample applications. It enables you to quickly deploy that application to various Azure services such as Virtual Machines, App Service, Azure Kubernetes Services (AKS), Azure SQL Database, and Azure Service Fabric.

Lets Deploy an Node.js App to Azure Kubernetes Service :

Navigate to Azure Portal and search for Azure Devops Project in the market place/search bar.

Azure Devops Project

Let's go ahead and add a new project.

Add new Azure Devops Project

Azure Devops project enables developers to launch an app withany Azure App Service in just a few quick steps, providing everything needed to develop, deploy and monitor an app. Create a DevOps Project, and it provisions all the Azure resources and provides a Git code repository, Application Insights integration and a continuous delivery pipeline setup for deployment to Azure. The DevOps Project dashboard lets you monitor code commits, builds and deployments from a single view in the Azure portal. How cool is that ?

With the help of Azure DevOps Projects, you can build an Azure application, on an Azure service, in quick time. You also get automatic full CI/CD pipeline integration, built-in monitoring and deployment to the platform of your choice. Azure Devops Project supports almost all the latest languages out there in practice such as .Net,Java,Node.js,PHP,Python and Go.

Next step is to select the Language you want to have the application on, I will go ahead and choose Nodejs as my application language. But you could choose any language that you want to test.

Create Node.js Devops Project

Once you select the language, next step is to select the framework in which you want the application to be based on , For example, if you choose Python it could be based on Flask,Django etc. Similarly you have the flexibility to choose the framework once you decide the language. In this case i will go ahead and choose express.

Select the Framework

Next step is the critical part of the process, This is the step that defines which service you would be using to deploy the app. You can Run your application on Windows or Linux. Simply deploy to Azure Web App, Virtual Machine, Service Fabric or choose Azure Kubernetes Service for your application. Each of those option provides deployment in an elegant and fast way. In this case, we will deploy the application to Azure Kubernetes service.

Azure Kubernetes Service to Deploy

Once you are done with the above step, final step is passing the configuration details for the Kubernetes cluster on AKS as follows,

Most of the settings are self explanatory , you can change the size of underlying VMs based on your requirement. The default number of nodes for your cluster comes as 3 , if you need to make changes to your cluster and the container registry settings click on Additional Settings. Here you can configure the Kubernetes version, Node count, App Insights and resource group location. The HTTP application routing solution makes it easy to access applications that are deployed to your Azure Kubernetes Service (AKS) cluster. In this case we will disable it.

Additional Settings AKS configuration

Container registry is needed as your images needs to be pushed to them. Once you're good with all settings, click ok and done!. You will see a notification box as below.

K8s cluster, Container Registtry, CI/CD pipelines are created

Once everything is created you will be redirected to a Dashboard page as below.

Resources in page

The four stages involved are:

  1. Azure Kubernetes Cluser: Created and configured your Azure Kubernetes Cluster and application endpoint.
  2. Azure Container Registry : Created and application image is pushed to the container registry.
  3. Repository: Created a distributed Git repository and checked in sample code.
  4. CI/CD Pipeline: Seamlessly connected with the Azure Devops collaboration solution allows you to plan, test, release and monitor your solutions.
  5. Application Insights:  Created and configured your Application Insights telemetry which enables active monitoring and learning to proactively detect issues and continuously analyze and test hypotheses without code.

You can see all the resources created on Azure under the resource group

Resource Group with All resources

When you click on the Kuberentes cluster, you can see the Kubernetes related resources such as dashboard logs etc.

Kubernetes cluster resources

And if you navigate to the blade you can see the settings such as Enabling Dev spaces , Kubernetes version, Application Insights etc.

On the Azure Devops side, you will be able to see new Azure Devops project created with Dashboard, Backlog items, CI/CD pipelines etc.

Azure Devops Project with CI/CD pipelines

And when you click on the application endpoint, you would see that the application running successfully on Azure Kubernetes service.

Nodejs App on AKS

In order to verify the services and pods, you could follow the steps provided in the Azure Kubernetes dashboard configuration and when you open up the dashboard, you can see the status of each services.

Azure Kubernetes dashboard

I have spent more than 4 days in the past to configure Kubernetes to deploy my application. But Azure Devops project Simplify and speed up the DevOps process with Azure DevOps services. If you want to explore more kind of scenarios on different services on Azure its worth to explore Azure Devops Labs. I hope it makes it easier to get started with any of the deployment with Azure services. Cheers!

· 7 min read

Overview:

Due to the recent COVID outbreak and as it continues to spread throughout the world, employees are being to asked to work from home. While most of the companies are already getting adapted to this new way of working, there are mixed opinions among employees from different parts of the world. IMO , Working from home is a good option for new parents, people with disabilities and others who aren’t well served by a traditional office setup. As this was appreciated by most of my colleagues and industry friends, i wanted to see how everyone is reacting to this new way of working across the world. In this post, i will explain how i built an application in 10 minutes to solve this particular question in mind using server less computing offered by Azure.

PreRequisities:

You will need to have an Azure Subscription. If you do not have an Azure subscription you can simply create one with free trial.

Services used:

  • Azure Logic Apps
  • Azure Functions
  • Azure CosmosDB
  • Cognitive Service
  • PowerBI

Architecture:

Architecture

Architecture of the solution is very simple and it uses most of the Azure managed services that handle the infrastructure for you.Whenever a new tweet is posted Logic Apps receives and processes the tweet. Sentiment score of the tweet can be analyzed using the Cognitive service then Azure function is used here to detect the sentiment of the tweet and finally inserted as a row in the powerBI to visualize in the dashboard. You can also use SQL server/Cosmosdb to store the tweet data if you want to process it later.

How to build the application:

Step 1: Create the Resource Group

As the first step, we need to create the resource group that contains all the resources needed. Navigate to Azure Portal and create the resource group named "wfh-sentiment"

Step 2 : Create the Function App

As the next step lets create the Function App which we need to detect the sentiment of the tweet. You can create and deploy the function app using Visual Studio Code. Open Visual Studio Code(Make sure you have already installed the VSCode with the function core tools and extension). Select Ctrl + Shif + P to create a new Function Project and select the language as C# ( But you could consider using any of the language that you are familiar with)

Create new Function App

Select language as C#

Select the trigger as HttpTrigger

Give the name of the Function

Provide the name of the function

and the logic of the Function app is as follows,

using System;
using System.IO;
using System.Threading.Tasks;
using Microsoft.AspNetCore.Mvc;
using Microsoft.Azure.WebJobs;
using Microsoft.Azure.WebJobs.Extensions.Http;
using Microsoft.AspNetCore.Http;
using Microsoft.Extensions.Logging;
using System.Net.Http;
namespace WorkFromHome
{
public static class DecideSentinment
{
[FunctionName("DecideSentinment")]
public static async Task<HttpResponseMessage> Run(
[HttpTrigger(AuthorizationLevel.Anonymous, "get", "post", Route = null)] HttpRequestMessage req,
ILogger log)
{
log.LogInformation("C# HTTP trigger function processed a request.");
string Sentiment = "POSITIVE";
//Getting the score from the Cognitive Service and determining the sentiment
double score = await req.Content.ReadAsAsync<double>();
if(score < 0.3){
Sentiment = "NEGATIVE";
}
else if(score < 0.6){
Sentiment = "NEUTRAL";
}
return req.CreateResponse(System.Net.HttpStatusCode.OK,Sentiment);
}
}
}

And the source code can be found here. Then , you can deploy the function App to Azure with simple command using Ctrl+Shift+P and deploy to Function App.

Step 3: Create the Azure Cognitive Service to determine the sentiment of the tweet text

As we discussed above, lets create the cognitive service to determine the sentiment score of the tweet. Go to the same resource group and search for cognitive service and create a new service as follows,

Create Cognitive Service

Step 4: Create Cosmosdb to store the data

In my application, i have made this step optional as i don't need to save the tweet data for historical analysis. But you can definitely use cosmosdb to store the tweets to process later. As how you created the Cognitive service create a new cosmosdb account and a database to store the data as follows,

Cosmosdb to store tweets data

Step 5: Create PowerBI dataset to visualize the data

Navigate to PowerBI portal and create a new dataset to visualize the data we collected as follows,

Create new Streaming Data set in the work space

Select API in the new streaming data set option

Configure the fields as above.

Step 6: Create the Logic App and configure the Flow

This is the core part of the application as we are going to link together the above component as one flow. You can connect these flows using designer as well as using YAML code. I will be using Designer to create the flow.

As denoted above the first step we need to add the twitter connector which you can pick from the available list of connector named "when a new tweet is posted"

Connector when new tweet is posted

You need to configure the search text which you want to get the tweets , in this case i am going to use the Hashtag "#WFH" and set the interval as 30 seconds.

Look for new tweets on every 30 seconds

The second step is to pass the tweet to Azure cognitive service to analyse the sentiment of the tweet and get the score as output

Select detect sentiment as the next step

You need to provide the key and the URL which could be obtained from the cognitive service you created above.

Configure the detect sentiment of the tweet with the input as the tweet text

The third step is to pass the score obtained above to Azure function which we already deployed to determine the sentiment of the tweet, select the azure function from the connector list as follows,

Select Azure Function which will display the functions already deployed to azure

Configure score from the Cognitive service as an input to the Azure function

Next step is to stream the data set to powerBI so that it will be readily available for the visualization. Select the below connector as next step

Configure Add rows to a dataset to insert data to PowerBI

We are almost done with the configuration, as the last step you need to map the data fields from the above steps to insert into the dataset and the final configuration looks as below.

Mapping the dataset with the outputs from the previous steps

Step 7: Visualize it in PowerBI

Now we have configured all the steps required in the logic app, navigate to PowerBI and select the data set from which you want to create the report/dashboard. In this case we will select the data set which we have already created as follows,

Select the dataset

Rest is yours, you can create lot of usual charts/visualizations according to the way you need. I have created four basic metrics to see how world reacts to "work from home"

  • Indicate the total number of unique tweets
  • Distribution of sentiments using a pie chart
  • Table which displays all the data (user,location,sentiment,score and the tweet)
  • Worldmap which shows how distribution of sentiments look like

and this is how my application/dashboard look like.

Final Dashboard with RealTime Tweets

As you can see the tweets and the sentiments are being inserted to the data set and most of the sentiments are being Positive(Looks green !!!). You can replicate the same architecture for your scenarios ( Brands/ Public opinion etc).

As you see some complex scenarios/problems can be easily sorted out with the help of serverless computing and that is the power of Azure. Cheers!

For those who are interested you can view the Live dashboard.

· 3 min read

In general, any certification offers practical experience to individuals from all the aspects to be a proficient worker.Certified professionals have more beneficial and relevant networks that help them in setting career goals for themselves.Since last year I concentrated on the different Azure certifications. This year I have have a target to complete certifications on different areas too. As a start for this year, i did the certification PL-900 today and i would say it is one of the easiest exam if you have prior experience in building Mobile applications and have a general idea on how to solve business problems.

Microsoft's Power Platform

Microsoft's Power Platform is a low code platform (an environment with graphical user interfaces rather than traditional scripts and programming languages) powered by Microsoft Azure (the cloud computing platform) enabling organisations to analyse data from multiple sources, act on it through created applications and automate business processes.he Power Platform contains 3 key aspects (Power Apps, Power BI,Power Virtual Agents, and Power Automate) and integrates with 2 main ecosystems (Office 365 and Dynamics 365).

PL-900: Microsoft Power Platform Fundamentals

Last year November the new PL-900: Microsoft Power Platform Fundamentals was released in Beta mode and it's recently went into generally available.

After reading the "Skills Measured" section, I realized that a lot of what I have implemented in the past as a developer and i had some experience with PowerBI as well.

Based on the content , i was confident enough to take the exam but I wanted to make sure I was completely prepared for the exam on the topics which i am not familiar with, so did some learning on Dynamics 365 on Microsoft Learn and the Common Data Service (CDS) on Microsoft Learn as well.

Exam Materials and Tips:

You need to only spent 3-4 hours reviewing the Learning Path of Power Platform Fundamentals if you are already familiar with the topics. It's a pretty straight forward exam for which if you read the course on Microsoft Learn, you should be good to go. If you are aware of all the components of the Power Platform, you probably can give the exam as is.

Link to Exam: Here
Released: 4th November 2019 (GA 18/02/2020)
MS Learn: Modules available

I would request anyone preparing for PL-900 to have a good grasp of the following subjects:

  • Common Data Service
  • Difference between Power BI Desktop and Power BI Service
  • Power Apps Portals
  • AI Builder Models
  • Difference between Business Rules and Business Process Flows
  • How Power Platform works with Dynamics 365

It is not a hard exam if you are from the developer background, however get well prepared for this one! As always get hands on. Let’s be citizen developers together. Cheers!

· 3 min read

I've been gaming since 2003 till now.I remember those sleepless nights and how much fun i had playing PC games. I always wanted to be a game designer since my childhood days and have built lot of small games during my university days. After a very long time i invested some time and built a simple game using Python and Azure cosmosdb. I wanted to write how to build the game "Corona escape" with others in this blog post.

PreRequisities:

  • Python 3 Installed
  • VScode or Pycharm
  • Azure Subscription

Game Structure :

The coronavirus is fairly new that has taken the world by shock. It’s been two months since the outbreak started and it has shown that it isn’t as deadly as the SARS virus. This game "Corona Escape" is built using Pygame which is a library for beginners to cut their teeth on to get comfortable with learning programming and the process of game development and feel successful in making games. It's also a great rapid prototyping tool. This game is very similar to any jump game. The idea is that to escape from the virus as much as you can, user will be provided with a capsule to make the move fast and a mask to escape from the virus. I will not go in detail on the logic side of it as the source code is published here.

Corona Escape Game

Architecture below is fairly easy, its just a diagram with Cosmosdb to store the data and application insights to gather the user details (type of device,location etc). If you have plan to expand the game, you could add other components in the architecture such as azure functions etc.

Highest score is pushed to a text file and Azure cosmosdb for sharing the score across the users in the world. The related code resides in the cosmos.py which as follows,

def getLeaderBoard(self):
options = {}
options['enableCrossPartitionQuery'] = False
options['maxItemCount'] = 100
query = {'query': 'SELECT * FROM server s'}

results = self.client.QueryItems(self.container['_self'], query, options)

for result in results:
print(result['message'])


def pushData(self,username,highscore):
data = self.client.CreateItem(self.container['_self'], {
"username": str(username),
"highscore": str(highscore),
"message" : str(username) + " got " + str(highscore)
})


Make sure to create a cosmosdb account with the SQL API and pass those credentials under config.

self.config = {
'ENDPOINT': 'your endpoint',
'PRIMARYKEY': 'your cosmosdb primary key',
'DATABASE': 'your db',
'CONTAINER': 'your container'
}

How to run the Game:

  • Clone the repository from here
  • Make sure to install the dependencies using pip such as pygame
  • Run the game with the command python main.py

Hope this helps someone who want to build games using python and cosmosdb. Play the game and add your comments below. cheers!

· 5 min read

It's been almost a week since Angular 9 was released which included several new features such as new Ivy Renderer, SSR, Type checking etc. In this post, i will be going through on how to build and deploy an Angular9 application as a static website to Azure with GitHub Actions.

Prerequisites:

  • Github Account
  • Azure Account
  • VSCode

Step 1: Install latest Angular CLI

In order to create the Angular application , you need to install the latest angular cli, which could be done with the following command,

 npm install -g @angular/cli@latest

Step 2: Create new Angular9 App

Run the following command to create the Angular9 app with the default template. Let's name the application as ga-azure

ng new ga-azure

Step 3: Install the Hexa.run CLI

We will use the package by Wassim Chegham to deploy the application to Azure. Next step in your Angular project make sure to install the Hexa.run CLI as a prod dependency as you can see from the package.json of this project.

npm i -g @manekinekko/hexa

Step 4: Login to Azure account

Next step is to create the necessary resources to deploy the angular application. In this way, we will deploy our application to static website for Azure Storage which is the optimum option to host a single page application (SPA) on Azure.Hosting a SPA in pure Storage is by far the cheapest and most efficient way of running in Azure.

You can login to azure account with the command,

npm run hexa:login

which will list down the available subscriptions and you need to pick the subscription where you want to deploy the application.

Step 5: Initiate the Hexa Settings

Next step is to initiate the configuration needed for the deployment of the application. Run the Hexa CLI command as follows,

npm run hexa:init

which will ask for few inputs from the user such as the project name, storage account name and the destination folder. Eventually, you will see a new file generated as hexa.json which will look like the below,

{
"subscription": {
"name": "Azure Demo"
},
"project": {
"location": "westeurope",
"name": "ga-azure"
},
"storage": {
"location": "westeurope",
"name": "gaazure10940"
},
"hosting": {
"folder": "./gist/ga-azure"
}
}

Now you are good with all the necessary things needed to deploy the application with github action.

Step 6: Generate Service Principal

You need to use the service principal identity mechanism to do the authorization of the deployment. In order to generate the service principal using hexa, run the below command,

npm run hexa:ci

Hexa.run will automatically:

  1. create an Azure resource group (or lets you choose an existing one)
  2. create the Azure storage account
  3. configure the storage account and make it static-website ready
  4. upload the angular bundle.
  5. prints the generated URL from the Azure service.

Also it will generate the necessary credentials as a JSON and make a note of them.

{
appId: 'xx4362xx-aaxx-40xx-8bxx-xx6ea0c351xx',
displayName: 'ga-azure',
name: 'http://ga-azure',
password: 'xxce72xx-1axx-44xx-81xx-35xxb15xxa1e',
tenant: 'xxf988xx-86xx-41xx-91xx-2d7cd011dbxx'
}

Step 7 : Commit and push to the Github Repository

Once you are done with all the above steps , you can commit your changes and push to the remote repository on Github.

git remote add origin https://github.com/sajeetharan/ga-azure.git
git add -A && git commit -m "First commit"
git push origin master

Step 8 : Create Github Actions Workflow

Now it's the time to create the Actions workflow, you can create a new workflow by navigating to actions and click New Worfklow. There are few sample template workflows available , in this case we will use own workflow. So you need to click on setup workflow yourself.

Setting up own workflow GitHub Actions

Immediately you could see new workflow.yml file created where you need to add the steps and actions needed to deploy the app. Here is the workflow file look like after adding all the steps.

name: Deploy to Azure with Hexa.ru
on:
push:
branches:
- master
- release/*

jobs:
build:

runs-on: ubuntu-latest

strategy:
matrix:
node-version: [12.x]

steps:
- uses: actions/checkout@v1
- name: Use Node.js ${{ matrix.node-version }}
uses: actions/setup-node@v1
with:
node-version: ${{ matrix.node-version }}
- name: npm install
run: |
npm install
- name: npm build, and deploy
env:
AZURE_SERVICE_PRINCIPAL_ID: ${{ secrets.AZURE_SERVICE_PRINCIPAL_ID }}
AZURE_SERVICE_PRINCIPAL_PASSWORD: ${{ secrets.AZURE_SERVICE_PRINCIPAL_PASSWORD }}
AZURE_SERVICE_PRINCIPAL_TENANT: ${{ secrets.AZURE_SERVICE_PRINCIPAL_TENANT }}
run: |
npm run hexa:login
npm run build -- --prod
npm run hexa:deploy

As you could see, the steps are very much simple starting with installing the dependencies and deploying the angular application using the hexa:deploy command.

Also you need to configure the secrets in the github repository which were generated in the step 6. You can create a new secret by navigating to settings and then secrets. you need to define the below secrets which are associated with the service principal.

Github Secrets

The rest in the workflow can be easily understood as its about the environment and the trigger(whenever someone push the changes to master/release there should be a build)

Step 9 : See Github Actions in Action

Immediately when you save the workflow.yml you can see there will be a new build triggered and the steps are executed, which you can notice in the Actions tab as follows,

Deploy using hexa:run

You will be able to access the application in the url generated once the application is deployed which will look like https://gaazure10940.z6.web.core.windows.net/

That's all you need to do inorder to deploy the Angular application to Azure. If you need to include end to end testing and different tasks you could simply modify the flow and it. Github Actions definitely a future to believe in! Try this out and let me know if you have any queries! Cheers!

· 5 min read

It's been almost a week since Angular 9 was released which included several new features such as new Ivy Renderer, SSR, Type checking etc. In this post, i will be going through on how to build and deploy an Angular9 application as a static website to Azure with GitHub Actions.

Prerequisites:

  • Github Account
  • Azure Account
  • VSCode

Step 1: Install latest Angular CLI

In order to create the Angular application , you need to install the latest angular cli, which could be done with the following command,

 npm install -g @angular/cli@latest

Step 2: Create new Angular9 App

Run the following command to create the Angular9 app with the default template. Let's name the application as ga-azure

ng new ga-azure

Step 3: Install the Hexa.run CLI

We will use the package by Wassim Chegham to deploy the application to Azure. Next step in your Angular project make sure to install the Hexa.run CLI as a prod dependency as you can see from the package.json of this project.

npm i -g @manekinekko/hexa

Step 4: Login to Azure account

Next step is to create the necessary resources to deploy the angular application. In this way, we will deploy our application to static website for Azure Storage which is the optimum option to host a single page application (SPA) on Azure.Hosting a SPA in pure Storage is by far the cheapest and most efficient way of running in Azure.

You can login to azure account with the command,

npm run hexa:login

which will list down the available subscriptions and you need to pick the subscription where you want to deploy the application.

Step 5: Initiate the Hexa Settings

Next step is to initiate the configuration needed for the deployment of the application. Run the Hexa CLI command as follows,

npm run hexa:init

which will ask for few inputs from the user such as the project name, storage account name and the destination folder. Eventually, you will see a new file generated as hexa.json which will look like the below,

{
"subscription": {
"name": "Azure Demo"
},
"project": {
"location": "westeurope",
"name": "ga-azure"
},
"storage": {
"location": "westeurope",
"name": "gaazure10940"
},
"hosting": {
"folder": "./gist/ga-azure"
}
}

Now you are good with all the necessary things needed to deploy the application with github action.

Step 6: Generate Service Principal

You need to use the service principal identity mechanism to do the authorization of the deployment. In order to generate the service principal using hexa, run the below command,

npm run hexa:ci

Hexa.run will automatically:

  1. create an Azure resource group (or lets you choose an existing one)
  2. create the Azure storage account
  3. configure the storage account and make it static-website ready
  4. upload the angular bundle.
  5. prints the generated URL from the Azure service.

Also it will generate the necessary credentials as a JSON and make a note of them.

{
appId: 'xx4362xx-aaxx-40xx-8bxx-xx6ea0c351xx',
displayName: 'ga-azure',
name: 'http://ga-azure',
password: 'xxce72xx-1axx-44xx-81xx-35xxb15xxa1e',
tenant: 'xxf988xx-86xx-41xx-91xx-2d7cd011dbxx'
}

Step 7 : Commit and push to the Github Repository

Once you are done with all the above steps , you can commit your changes and push to the remote repository on Github.

git remote add origin https://github.com/sajeetharan/ga-azure.git
git add -A && git commit -m "First commit"
git push origin master

Step 8 : Create Github Actions Workflow

Now it's the time to create the Actions workflow, you can create a new workflow by navigating to actions and click New Worfklow. There are few sample template workflows available , in this case we will use own workflow. So you need to click on setup workflow yourself.

Setting up own workflow GitHub Actions

Immediately you could see new workflow.yml file created where you need to add the steps and actions needed to deploy the app. Here is the workflow file look like after adding all the steps.

name: Deploy to Azure with Hexa.ru
on:
push:
branches:
- master
- release/*

jobs:
build:

runs-on: ubuntu-latest

strategy:
matrix:
node-version: [12.x]

steps:
- uses: actions/checkout@v1
- name: Use Node.js ${{ matrix.node-version }}
uses: actions/setup-node@v1
with:
node-version: ${{ matrix.node-version }}
- name: npm install
run: |
npm install
- name: npm build, and deploy
env:
AZURE_SERVICE_PRINCIPAL_ID: ${{ secrets.AZURE_SERVICE_PRINCIPAL_ID }}
AZURE_SERVICE_PRINCIPAL_PASSWORD: ${{ secrets.AZURE_SERVICE_PRINCIPAL_PASSWORD }}
AZURE_SERVICE_PRINCIPAL_TENANT: ${{ secrets.AZURE_SERVICE_PRINCIPAL_TENANT }}
run: |
npm run hexa:login
npm run build -- --prod
npm run hexa:deploy

As you could see, the steps are very much simple starting with installing the dependencies and deploying the angular application using the hexa:deploy command.

Also you need to configure the secrets in the github repository which were generated in the step 6. You can create a new secret by navigating to settings and then secrets. you need to define the below secrets which are associated with the service principal.

Github Secrets

The rest in the workflow can be easily understood as its about the environment and the trigger(whenever someone push the changes to master/release there should be a build)

Step 9 : See Github Actions in Action

Immediately when you save the workflow.yml you can see there will be a new build triggered and the steps are executed, which you can notice in the Actions tab as follows,

Deploy using hexa:run

You will be able to access the application in the url generated once the application is deployed which will look like https://gaazure10940.z6.web.core.windows.net/

That's all you need to do inorder to deploy the Angular application to Azure. If you need to include end to end testing and different tasks you could simply modify the flow and it. Github Actions definitely a future to believe in! Try this out and let me know if you have any queries! Cheers!

· 6 min read

Microsoft's Power Platform is a low code platform which enable the organization to analyse data from multiple sources, act on it through application and automate business process. Power Platform contains 3 main aspects (Power Apps,Power BI and Microsoft Flow) and it also integrates two main ecosystems(Office 365 and Dynamics 365). In this blog we will see in detail about Power Apps which helps to quickly build apps that connects data and run on web and mobile devices.

Overview :

We wills see how to build a simple Power App to automate scaling of resources in Azure in a simple yet powerful fashion to help save you money in the cloud using multiple Microsoft tools. In this post, we will use Azure Automation run books to code Azure Power Shell scripts, MS Flow as orchestration tool and MS Power Apps as the simple interface. If you have an Azure Environment with lot of resources it becomes hassle to manage the scaling part of it if you don't have the auto scaling implemented. The following Power App will help to understand how easy it is to build the above scenario.

Prerequisites :

We will use the following Azure resources to showcase how scaling and automation can save lot of cost.

  • AppService Plan
  • Azure SQL database
  • Virtual Machines

Step 1: Create and Update Automation Account :

First we need to create the Azure Automation account. Navigate to Create Resources -> search for Automation Account on the search bar. Create a new resource as follows,

Once you have created the resource, you also need to install the required modules for this particular demo which includes
-AzureRM.Resources
-AzureRM.Profile

Installing necessary Modules

Step 2: Create Azure PowerShell RunBooks

Next step is to create the run books by going to the Runbooks blade, for this tutorial lets create 6 run books one for each resources and its purpose. We need to create PowerShell scripts for each of those types

Scale Up SQL
-Scale Up ASP
-Start VM
-Scale Down SQL
-Scale Down ASP
-Stop VM

Creating RunBook

PowerShell scripts for each of these are found in the Github repository. We need to create runbook for each of the scripts.

All the runbooks above can be scheduled and automated to run for desired length of time, particular days of the week and time frame or continuously with no expiry. For an enterprise for non-production you would want it to scale down end of business hours and at the weekend.

Once we tested with the above Powershell scripts and the runbooks, tested and published now we can move on the next step to create the Flow. Navigate to Flow and Create New App from the template.

New Flow from the template

Select the template as PowerApps Button and the first step we need to add is the automation job. When you search for automation you will see the list of jobs available. Select Create Job and pick the one you created above. If you want to all the actions in one app, you can add one by one, If not you need to create separate flows for each one.

In this one, i have created one with the ScaleUpDB job which will execute the Scale up command of the database.

Once you are done with all the steps save the flow with necessary name.

Once we create PowerApp flow buttons login to MS PowerApps with a work/school account. Navigate to Power Apps which will give a way to create a blank canvas for Mobile or tablet. Next you can then begin to customise the PowerApp with text labels, colour and buttons as below

PowerApps Name

In this case we will have a button to increase/decrease the count of instances of the sql db, my app looked like below with few labels and buttons.

AutoMateApp

Next is to link the flow to the button of the power App by navigating to the Actions -> Power Automate

Linking Button Action

Once both Scale Up/Scale down actions are linked, save the app and publish

Step 5 : Verify Automation

Inorder to verify if things are working correctly, click on scale up and scale down few times and navigate to Azure Portal and open the Automation account we created.

Navigate to the overview tab to see the requests for each job made via the power app as below.

Jobs executed.

In order to look at the history navigate to the Jobs blade

Jobs Execution

further you can build a customized app for different environments with different screens using Power App. With the help of Azure Alert, whenever you get an alert regarding the heavy usages of resources/spikes, with single click of button you will be able scale up and scale down the resources as you need.

Improvements and things to consider:

This is just a starting point to explore more on this functionality, but there are improvements you could add to make this really useful.

(i) Sometimes the azure automation action fails to start the runbook. When you are implementing flow needs to handle this condition.

(ii) Sometimes a runbook action will be successful, but the runbook execution errored. Consider using try/catch blocks in the PowerShell and output the final result as a JSON object that can be parsed and further handled by the flow.

(iii) We should update your code to use the Az modules rather than AzureRM.

Note : The user who executes the PowerApp also needs permission to execute runbooks in the Automation Account.

With this App, It becomes handy for the operations team to manage the portal without logging in. Hope it helps someone out there! Cheers.

· 6 min read

Microsoft's Power Platform is a low code platform which enable the organization to analyse data from multiple sources, act on it through application and automate business process. Power Platform contains 3 main aspects (Power Apps,Power BI and Microsoft Flow) and it also integrates two main ecosystems(Office 365 and Dynamics 365). In this blog we will see in detail about Power Apps which helps to quickly build apps that connects data and run on web and mobile devices.

Overview :

We wills see how to build a simple Power App to automate scaling of resources in Azure in a simple yet powerful fashion to help save you money in the cloud using multiple Microsoft tools. In this post, we will use Azure Automation run books to code Azure Power Shell scripts, MS Flow as orchestration tool and MS Power Apps as the simple interface. If you have an Azure Environment with lot of resources it becomes hassle to manage the scaling part of it if you don't have the auto scaling implemented. The following Power App will help to understand how easy it is to build the above scenario.

Prerequisites :

We will use the following Azure resources to showcase how scaling and automation can save lot of cost.

  • AppService Plan
  • Azure SQL database
  • Virtual Machines

Step 1: Create and Update Automation Account :

First we need to create the Azure Automation account. Navigate to Create Resources -> search for Automation Account on the search bar. Create a new resource as follows,

Once you have created the resource, you also need to install the required modules for this particular demo which includes
-AzureRM.Resources
-AzureRM.Profile

Installing necessary Modules

Step 2: Create Azure PowerShell RunBooks

Next step is to create the run books by going to the Runbooks blade, for this tutorial lets create 6 run books one for each resources and its purpose. We need to create PowerShell scripts for each of those types

Scale Up SQL
-Scale Up ASP
-Start VM
-Scale Down SQL
-Scale Down ASP
-Stop VM

Creating RunBook

PowerShell scripts for each of these are found in the Github repository. We need to create runbook for each of the scripts.

All the runbooks above can be scheduled and automated to run for desired length of time, particular days of the week and time frame or continuously with no expiry. For an enterprise for non-production you would want it to scale down end of business hours and at the weekend.

Once we tested with the above Powershell scripts and the runbooks, tested and published now we can move on the next step to create the Flow. Navigate to Flow and Create New App from the template.

New Flow from the template

Select the template as PowerApps Button and the first step we need to add is the automation job. When you search for automation you will see the list of jobs available. Select Create Job and pick the one you created above. If you want to all the actions in one app, you can add one by one, If not you need to create separate flows for each one.

In this one, i have created one with the ScaleUpDB job which will execute the Scale up command of the database.

Once you are done with all the steps save the flow with necessary name.

Once we create PowerApp flow buttons login to MS PowerApps with a work/school account. Navigate to Power Apps which will give a way to create a blank canvas for Mobile or tablet. Next you can then begin to customise the PowerApp with text labels, colour and buttons as below

PowerApps Name

In this case we will have a button to increase/decrease the count of instances of the sql db, my app looked like below with few labels and buttons.

AutoMateApp

Next is to link the flow to the button of the power App by navigating to the Actions -> Power Automate

Linking Button Action

Once both Scale Up/Scale down actions are linked, save the app and publish

Step 5 : Verify Automation

Inorder to verify if things are working correctly, click on scale up and scale down few times and navigate to Azure Portal and open the Automation account we created.

Navigate to the overview tab to see the requests for each job made via the power app as below.

Jobs executed.

In order to look at the history navigate to the Jobs blade

Jobs Execution

further you can build a customized app for different environments with different screens using Power App. With the help of Azure Alert, whenever you get an alert regarding the heavy usages of resources/spikes, with single click of button you will be able scale up and scale down the resources as you need.

Improvements and things to consider:

This is just a starting point to explore more on this functionality, but there are improvements you could add to make this really useful.

(i) Sometimes the azure automation action fails to start the runbook. When you are implementing flow needs to handle this condition.

(ii) Sometimes a runbook action will be successful, but the runbook execution errored. Consider using try/catch blocks in the PowerShell and output the final result as a JSON object that can be parsed and further handled by the flow.

(iii) We should update your code to use the Az modules rather than AzureRM.

Note : The user who executes the PowerApp also needs permission to execute runbooks in the Automation Account.

With this App, It becomes handy for the operations team to manage the portal without logging in. Hope it helps someone out there! Cheers.

· 7 min read

Many times you would have wanted to have one view/dashboard of all the Github issues created for your open source repositories. I have almost 150 repositories and it becomes really hard to find which are the priority ones to be fixed. In this post we will see how you can create a one dashboard/report to view all your github issues in a page using Azure Function(3.X with Typescript) and Azure CosmosDB.

PreRequisities:

You will need to have an Azure Subscription and a Github Account. If you do not have an Azure subscription you can simply create one with free trial. Free trial provides you with 12 months of free services. We will use Azure Function and CosmosDB to build this solution.

Step 1 : Create Resource Group

Inorder to manage deploy the function app and cosmosdb we first need to create Resource Group. You can create one named "gh-issue-report"

Step 2: Create the Azure Cosmosdb Account

To store the related data of the GitHub issue we need to create a CosmosDB account. To Create CosmosDB account, navigate to the Azure portal and click the Create Resource. Search for Azure Cosmosdb on the market place and create the account as follows.

CosmosDB Creation

Step 3:  Create the Function app

If you have noticed my previous blog, i have mentioned about how to create an Azure function. Here is an image of the Function App i created.

Creating Function App

Create Typescript Function:

As you see i have selected Runtime stack as Node.js which will be used to run the function written with Typescript.  Open Visual Studio Code(Make sure you have already installed the VSCode with the function core tools and extension). Select Ctrl + Shif + P to create a new Function Project and select the language as Typescript.

Create Typescript Function

 Select the template as Timer trigger as we need to run every 5 minutes and you need to configure the cron expression (0 */5 * * * *) as well. (You can have custom time)

Give the function name as gitIssueReport, You will see the function getting created with the necessary files.

Step 4 : Add Dependencies to the Function App

Let's try to add the necessary dependencies to the project. We will use bluebird as a dependency to handle the requests. Also gh-issues-api library to interact with Github and get the necessary issues. You need to add the dependencies in the package.json folder under dependencies.

 "dependencies": {
"@types/node": "^13.7.0",
"bluebird": "^3.4.7",
"gh-issues-api": "0.0.2"
}

You can view the whole package.json here.

Step 5: Set Output Binding

Let's set the output binding to CosmosDB to write the issues to the collection. You can set it by modifying the function.json as

{
"type": "cosmosDB",
"name": "issueReport",
"databaseName": "gh-issues",
"collectionName": "open-issues",
"createIfNotExists": true,
"connectionStringSetting": "gh-issue_DOCUMENTDB",
"direction": "out"
}

Where type cosmosDB denotes the database output binding and you can see that the database name and collection as configured.

Step 6 : Code to Retrieve the Github Repository Issues

The actual logic of the function is as follows,


import Promise = require('bluebird');

import {
GHRepository,
IssueType,
IssueState,
IssueActivity,
IssueActivityFilter,
IssueLabelFilter,
FilterCollection
} from 'gh-issues-api';

export function index(context: any, myTimer: any) {
var timeStamp = new Date().toISOString();

if(myTimer.isPastDue) {
context.log('Function trigger timer is past due!');
}

const repoName = process.env['repositoryName'];
const repoOwner = process.env['repositoryOwner'];
const labels = [
'bug',
'build issue',
'investigation required',
'help wanted',
'enhancement',
'question',
'documentation',
];

const repo = new GHRepository(repoOwner, repoName);
var report = {
name: repoName,
at: new Date().toISOString()
};

context.log('Issues for ' + repoOwner + '/' + repoName, timeStamp);
repo.loadAllIssues().then(() => {
var promises = labels.map(label => {
var filterCollection = new FilterCollection();
filterCollection.label = new IssueLabelFilter(label);
return repo.list(IssueType.All, IssueState.Open, filterCollection).then(issues => report[label] = issues.length);
});
var last7days = new Date(Date.now() - 604800000)
var staleIssuesFilter = new IssueActivityFilter(IssueActivity.Updated, last7days);
staleIssuesFilter.negated = true;
var staleFilters = new FilterCollection();
staleFilters.activity = staleIssuesFilter;
promises.push([
repo.list(IssueType.Issue, IssueState.Open).then(issues => report['total'] = issues.length),
repo.list(IssueType.PulLRequest, IssueState.Open).then(issues => report['pull_request'] = issues.length),
repo.list(IssueType.All, IssueState.Open, staleFilters).then(issues => report['stale_7days'] = issues.length)
]);

return Promise.all(promises);
}).then(() => {
var reportAsString = JSON.stringify(report);
context.log(reportAsString);
context.bindings.issueReport = reportAsString;
context.done();
});;
}

You can see that the document is set as a input to the CosmosDB with the binding named issueReport.

Step 7: Deploy the Function

Deploy the Function App. You can deploy the function app to the Azure with the keys Ctrl+Shift+P and select Deploy to the Function App

Deploy Function App

Step 8 : Verify/Install the Dependencies

Once the deployment is succesfful, Navigate to Azure portal and open the function app to make sure that everything looks good. If you dont see the dependencies make sure to install the dependencies manually by navigating to the Kudu Console of the function App.

Note : Make sure to stop the Function app before you head over to Kudu.

ick on the Platform Features tab. Under Development Tools, click Advanced tools (Kudu). Kudu will open on it’s own in a new window.

Navigate to KUDU console

In the top menu of the Kudu Console, click Debug Console and select CMD

In the command prompt, we’ll want to navigate to D:\home\site\wwwroot. You can do so by using the command cd site\wwwroot and press enter on your keyboard. Once you’re in wwwroot, run the command npm i bluebird to install the package. Also do the same for gh-issues-api

Step 8: Set Environment Variables (Repository)

As you could see in the above code, we are setting two environment variables to read the repository name and the repository owner which are needed to fetch the issues information. You can set those variable son the Azure portal as follows.

Navigate to the Overview tab for your function and click Configuration. As you can see below I've configured those values.

Function App Settings

Step 9: Verify the Output Binding

Just to make sure that our settings in the function.json has been reflected or not navigate to the Functions and select the Function and make sure all the binding values are correct. If not create a new binding to cosmosdb account you created as mentioned in the step Step 3 (Instead of Twilio select Cosmosdb)

Step 10 : Run and Test the Function

Now its time to see the function app running and issues being reported. Navigate to your function app and click Run. You can see the Function Running as shown below.

Run Function App

Step 11: Check Live App Metrics

If you see any errors you can always navigate to Monitor section of the Function app and select Live App Metrics

Live metrics of the function app

Step 12: Verify the data in cosmosdb

If everything goes well, you can navigate to Cosmosdb Account and open the collection with the data Explorer.

Data Explorer Cosmosdb

You will see that there are many documents inserted in the collection.

Cosmosdb collection with Github repository Issues

Now you can modify this function to retrieve the issues from all of your repositories and use the data stored in the cosmosdb collection to build a dashboard to show the issues with priority. Also you can make use of this post to send a notification to someone about the issue as well.

Hope this simple function will help someone to build a dashboard out of the data collected and make them more productive.Cheers!

· 5 min read

We have a wide variety of options to store data in Microsoft Azure. Nevertheless, every storage option has a unique purpose for its existence. In this blog, we will discuss ADLS (Azure Data Lake Storage) and its multi-protocol access that Microsoft introduced in the year 2019.

Introduction to ADLS (Azure Data Lake Storage)

According to the Microsoft definition, it is an enterprise-wide hyper-scale repository for big data analytics workloads and enables you to capture data of any size and ingestion speed in one single space for operational and exploratory analytics.

The main purpose of its existence is to enable analytics on the stored data (it may be of any type structured, semi-structured and unstructured data) and provide enterprise-grade capabilities like scalability, manageability, reliability, etc.

Where does it build?

ADLS is built on the top of the Azure Blob Storage. Blob Storage is one of the storage services under the suite of Storage accounts. Blob storage lets you store any type of data and it doesn’t necessarily to be a specific data type.

Does the functionality of ADLS sound like the Blob storage?

From the above paragraphs, it looks like both ADLS and Blob storage has the same functionality. Because, both the services can be used to store any type of data. But, as I said before, every service has its purpose for its existence. Let us explore, what is the difference between ADLS and Blob storage in the following.

Difference between ADLS and Blob storage

Purpose

It is optimized for analytical purposes on the data stored in the ADLS, but Blob storage is a usual way of storing file-based information in Azure where the data which will not be accessed very often also called as cold storage.

Cost

In both the storage options, we need to pay the amount for the data stored and I/O operations. In the case of ADLS, the cost is slightly higher than the Blob.

Support for Web HDFS interface

ADLS supports a standard web HDFS interface and can access the files and directories in Hadoop. Blob does not support this feature.

I/O performance

ADLS is built for running large scale systems that require massive read throughput when queried against the DB at any pace. Blob is used for store data which will be accessed infrequently.

Encryption at rest

Since ADLS GA, it supports encryption at rest. It encrypts data flowing in public networks and at rest. Blob Storage does not support encryption at rest. See more details on the comparison here.

Now, without any further delay let us dig on the Multi-protocol access for ADLS.

Multi-protocol access for ADLS

This is one of the significant announcements that Microsoft has done in the year 2019 as far as ADLS is concern. Multi-protocol access to the same data allows you to leverage existing object storage capabilities on Data Lake Storage accounts, which are hierarchical namespace-enabled storage accounts built on top of Blob storage. This allows you to put all your different types of data in the data lake so that the users can make the best use of your data as the use case evolves.

The multi-protocol concept can be achieved via Azure Blob storage API and Azure Data Lake Storage API. The convergence of both the existing services, ADLS Gen1 and blob storage, paved the path to a new term called Azure Data Lake Storage Gen 2.

Expanded feature set

With the announcement of multi-protocol access, existing blob features such as access tiers and lifecycle management policies are now unlocked for ADLS. Furthermore, it enables many of the features and ecosystem support of blob storage is now supported for your data lake storage.

This could be a great shift because your blob data can now be used for analytics. The best thing is you don’t need to update the existing applications to get access to your data stored in Data Lake Storage. Moreover, you can leverage the power of both your analytics and object storage applications to use your data most effectively.

While exploring the expanded feature sets, one of the best things I could found is that ADLS can now be integrated with Azure Event Grid.

Yes, we have one more publisher on the list for Azure Event Grid. Azure Event Grid can now be used to consume events generated from Azure Data Lake Storage Gen2 and routed to its subscribers with webhooks, Azure Event Hubs, Azure Functions, and Logic Apps as endpoints.

Modern Data Warehouse scenario

The above image depicts the use case scenario of ADLS integration with Event Grid. First off, there are a lot of data comes from different sources like Logs, Media, Files and Business apps. Those data are ending up in the ADLS via Azure Data Factory and the Event Grid which listens to the ADLS gets triggered once data reaches it. Further, the event gets routed via Event Grid and Functions to Azure Databricks. The file will be processed by the databricks job and writes the output back to Azure Data Lake Storage Gen2. Meanwhile, Azure Data Lake Storage Gen2 pushes a notification to Event Grid which triggers an Azure Function to copy data to Azure SQL Data Warehouse. Finally, the data will be served via Azure Analysis Services and PowerBI.

Wrap-up

In this blog, we have seen an introduction about the Azure Data Lake Storage and the difference between ADLS and blob storage. Further, we investigated the multi-protocol access which is one of the new entrants in ADLS. Finally, we looked into one of the extended feature sets - integration of ADLS with Azure Event Grid and its use case scenario.

I hope you enjoyed reading this article. Happy Learning!

Image Credits: Microsoft

This article was contributed to my site by Nadeem Ahamed and you can read more of his articles from here.

· 2 min read

I have come across this question about "How to deploy a web app within a sub folder on Azure" in Stackoverflow many times. Even though there is an official documentation, this question has not been addressed in general. With Virtual Directories, You could keep your web sites in separate folders and use the ‘virtual directories and applications’ settings in Azure to publish the two different projects under the same site.

However, say if you have an ASP.NET Core/Angular app to a sub-folder inside Azure Web App (App Service), and wanted to deploy on Azure inside a sub-folder. You can simply navigate to Azure portal -> Select the Web App -> Overview

  • Download the publish profile
  • Import in Visual Studio
  • Edit the web-deploy profile(Normally the publish profile will have Web Deploy as well as FTP profile)
    • Change Site Name from your-site to your-site\folder\sub-folder
    • Change the Destination URL from http://your-site.azurewebsites.net to http://your-site.azurewebsites.net/folder/sub-folder
  • Publish

You should be getting an error as follows,

System.TypeLoadException: Method ‘get_Settings’ in type ‘Microsoft.Web.LibraryManager.Build.HostInteraction’ from assembly ‘Microsoft.Web.LibraryManager.Build

You can resolve the above issue by updating the nuget package named Microsoft.Web.LibraryManager.Build in your project.

One other thing that you should be aware is that, Go to portal > demo-site App Service > Configuration > Path Mappings > Virtual applications and directories. And add the following,

Virtual PathPhysical PathType
/foldersite\wwwroot\folderFolder
/folder/sub-foldersite\wwwroot\folder\sub-folderApplication

Configuration Virtual Directory

Now publish from Visual Studio. If you only need to publish to a first level folder, i.e to your-site\folder, then all you have to do is, change the Type to Application in the Path mappings for /folder, and skip the sub-folder entry since you don’t need it. And correct the Site Name and Destination URL in the publish profile accordingly.

Hope there will be no more questions on the same. Happy Coding!

· 2 min read

I came across this question about "How to deploy a web app within a sub folder on Azure" in Stackoverflow many times. Even though there is an official documentation, this question has not been addressed in general. With Virtual Directories, You could keep your web sites in separate folders and use the ‘virtual directories and applications’ settings in Azure to publish the two different projects under the same site.

However, say if you have an ASP.NET Core/Angular app to a sub-folder inside Azure Web App (App Service), and wanted to deploy on Azure inside a sub-folder. You can simply navigate to Azure portal -> Select the Web App -> Overview

  • Download the publish profile
  • Import in Visual Studio
  • Edit the web-deploy profile(Normally the publish profile will have Web Deploy as well as FTP profile)
    • Change Site Name from your-site to your-site\folder\sub-folder
    • Change the Destination URL from http://your-site.azurewebsites.net to http://your-site.azurewebsites.net/folder/sub-folder
  • Publish

You should be getting an error as follows,

System.TypeLoadException: Method ‘get_Settings’ in type ‘Microsoft.Web.LibraryManager.Build.HostInteraction’ from assembly ‘Microsoft.Web.LibraryManager.Build

You can resolve the above issue by updating the nuget package named Microsoft.Web.LibraryManager.Build in your project.

One other thing that you should be aware is that, Go to portal > demo-site App Service > Configuration > Path Mappings > Virtual applications and directories. And add the following,

Virtual PathPhysical PathType
/foldersite\wwwroot\folderFolder
/folder/sub-foldersite\wwwroot\folder\sub-folderApplication

Configuration Virtual Directory

Now publish from Visual Studio. If you only need to publish to a first level folder, i.e to your-site\folder, then all you have to do is, change the Type to Application in the Path mappings for /folder, and skip the sub-folder entry since you don’t need it. And correct the Site Name and Destination URL in the publish profile accordingly.

Hope there will be no more questions on the same. Happy Coding!

· 8 min read

A programmer can code for days continously without a break. I have done it when I started my career as a programmer. In IT field, it gets worse if you continously work without taking 5 minutes break every 30 minutes. In this blog I will explain how you can find yourself to remind someone to get up and take that mandatory break.

PreRequisites:

Sign up Twilio

In order to yse Twilio, you need to sign up and purchase a voice enabled phone number. If you’re new user to Twilio, you can start with a free trial.

Sign up Azure:

In order to deploy your Azure function, you need to have Azure subscription. You can create a FREE Azure subscription to setup your Azure function. The free trial will provide you with 12 months of free services.

Steps to Create the Function:

Step 1 : Create the Function app

Let's start off by creating an app for our requirement. In the Azure portal, click + Create a Resource

When the Azure Marketplace  appears and in the list, click Compute. In the Featured list, click Function App (note: if Function App does not appear, then click See all).

Then you need to fill the function app settings, you can follow the image to setup your funciton,

Step 2 : Add Function

We just completed creating the function app and we need to add a function that provides the capability of alerting the user that is configured with a trigger. The trigger will start the function which sends the Twilio SMS message. We’ll be using a Timer trigger for this tutorial.

In the left menu, click Resource groups and select the resource group you created in the last step.

Click on the App Service which is highlighted. Once the page loads, click the + button next to Functions to create a new function.

Add a Function

On the next screen, you’ll need to choose a development environment. Since we’ll be creating the function in the Azure Portal, select In-Portal and Continue.

Select In Portal

Since we want to create a Timer trigger, you’ll need to select Timer and click Create.

You should now see TimerTrigger1 listed under Functions in the left menu.

Step 3 : Integrate with Twilio SMS

As the next step we need to integrate Twilio SMS with the function App we created. Under TimerTrigger1 click Integrate

Integrate Function

under Outputs, click + New Output and select Twilio SMS.

When you click on that, you will get a warning saying Extensions not installed. You’ll need to install the Mirosoft.Azure.WebJobs.Extensions.Twilio extension. You can do so by clicking Install. This process can take up to 20 minutes so just give it a moment to complete installation.

While the function extensions are getting installed, you need to update the values in the relevant fields, the values can be obtained from your Twilio dashboard as shown below,

and fill them in the environment variables after you installed the extension, you need to set the environment variables which will be used within the function.

Step 4: Set Environment variables

It's ok to hardcode the Twilio credentials in the output environment variables. However, if you are running this app in production you should always use environment variables so that you dont expose the credentials to others. As you obtained the values from the Twilio dashboard, copy and save those values,

You can create environment variables in the Azure Portal by going to the Overview tab for your function and click Configuration.

Add the environment variables one by one,

KeyValue
TWILIO_SIDACXXXXXXXXXXX
TWILIO_TOKENAuth token obtained from the Twilio dashboard
SENDER_NUMBERYour twilio number +94 77 330 XXXXX
RECIPIENT_NUMBERPhone number that recieves the message

Environment variables

You can create the first envrionment variable by clicking on the New Application Setting and repeat the same for rest of those variables as shown above,

New appsettings Configuration

Add the first setting TWILIO_SID

TWILIO_SID Environment Variable

Once you are done with each setting value click OK. When you are adding both SENDER_NUMBER and RECIPIENT_NUMBER be extra careful as it can be tricky and make sure to use the E.164 format referenced above. After all environment variables have been added click Save to save the updates that were made to the Application Settings.

Step 5 : Timer settings

Whenever you create a timer function, By default, Azure sets your function to trigger the text message every 5 minutes. You can change how frequent the timer triggers by going to the Integrate and updating the values in Timer trigger.

Goto your function and select on Integrate and then you need to update the value of the interval as you need. The Schedule field contains a sequence that using CRON expressions. For the purpose of testing the function, change the number 5 to the number 2 and click Save. You can later change the frequency after you confirm that the function works properly.

CRON Expression

If you're creating the Function App using Visual Studio code, follow this sample app to create a timer function which is more easier with Visual Studio Code.

Step 6: Modify function.json File

As we are done with all the configuration steps, now we need to update the function.json within our TimerTrigger1 function.  Go back over to the function app and click TimerTrigger1. On the far-right side of the screen, click View Files.

You will see two files:

  • function.json
  • index.js

Click function.json to open the file. Since the file is currently missing the “to”: “RECIPIENT_NUMBER”, we’ll need to add this to our file.

Now we need to add the logic to create the message and send the message using the Twilio to the relevant reciever.

Navigate to my Github repo and grab the code for this file. You’ll want to replace the existing code in the function.json file with the new code that you just copied from GitHub.

{
"bindings": [
{
"name": "myTimer",
"type": "timerTrigger",
"direction": "in",
"schedule": "0 */2 * * * *"
},
{
"type": "twilioSms",
"name": "message",
"accountSidSetting": "REPLACE_WITH_YOUR_ACCOUNT_SID",
"authTokenSetting": "REPLACE_WITH_YOUR_AUTH_TOKEN",
"from": "SENDER_NUMBER",
"to": "RECIPIENT_NUMBER",
"direction": "out"
}
]
}

Step 7 : Let's Add logic to the index.js file

When Azure creates a function, it adds default code to help setup your function. We will the code for the Twilio SMS message to this code.

In the View Files menu, click the index.js file. You’ll want to replace the existing code in the index.js file with the code below.

const twiAccountSid = process.env.TWILIO_SID;
const twiAuthToken = process.env.TWILIO_TOKEN;
const client = require('twilio')(twiAccountSid, twiAuthToken);
module.exports = async function (context, myTimer) {
var timeStamp = new Date().toISOString();
if (myTimer.IsPastDue)
{
context.log('JavaScript is running late!');
}
client.messages
.create({ from: process.env.SENDER_NUMBER,
body: "Time to have cofee and take a break for 5 minutes!",
to: process.env.RECIPIENT_NUMBER
})
.then(message => {
context.log("Message sent");
context.res = {
body: 'Text successfully sent'
};
context.log('JavaScript timer trigger done!', timeStamp);
context.done();
}).catch(err => {
context.log.error("Twilio Error: " + err.message + " -- " + err.code);
context.res = {
status: 500,
body: `Twilio Error Message: ${err.message}\nTwilio Error code: ${err.code}`
};
context.done();
});
}

Step 8 : Install the dependencies (Twilio)

As you can see the first line of the code is required to use twilio helper library. We’ll need to install the twilio-node from npm so that it’s available to our function. To do so, we’ll need to first add a new file to our function.

Add package.json file

In the View Files window, click Add. Type the file name package.json and click enter. You will see an empty content page in the middle of the screen.

Add Package.json

Add the code below to the package.json file.

{
"name": "doc247",
"version": "1.0.0",
"description": "Alert an employee with an SMS to take a break",
"main": "index.js",
"scripts": {
"test": "echo \"No tests yet...\""
},
"author": "Sajeetharan",
"dependencies": {},
"devDependencies": {
"twilio": "^3.0.0"
}
}

Now we have added Twilio as a dependency to the package.json file , as the next step we need to install it as a dependency on the environment itself. As you are aware you can install the dependencies using the deploy command as well as you can install it using the Kudu.

Note : Make sure to stop the Function app before you head over to Kudu.

Click on the Platform Features tab. Under Development Tools, click Advanced tools (Kudu). Kudu will open on it’s own in a new window.

Navigate to Kudu from the function app

In the top menu of the Kudu Console, click Debug Console and select CMD

Kudu Debug Console

In the command prompt, we’ll want to navigate to D:\home\site\wwwroot. You can do so by using the command cd site\wwwroot and press enter on your keyboard. Once you’re in wwwroot, run the command npm i twilio to install the package.

Install Dependencies Twilio

You will also notice a new node_modules folder added to the file structure. Back in the Overview tab for the function app, click Start.

node_modules Folder

Step 9 : Run and Test the Function

Back in the Overview tab for the function app, click Start. App and click TimerTrigger1. Make sure that you’re in the index.js file. Click Test next to View Files (far right-side of the screen). At the top of the index.js file, click Run

If everything was successful, the personshould receive a text message after 20 minutes with your message!

You can change the frequency for your timer by heading back to Integrate and changing the Schedule field. Be sure to read up on CRON expressions before entering a new frequency.

If you’re curious to learn more about Azure Functions, I would suggest taking this Microsoft Learn module. You can access complete source code from here. If you want to learn more on Azure visit http://azure360.info/ .Happy Coding!

· One min read

If you have been using Azure already or new to Azure, you must know that Microsoft Azure is huge and it changes very fast with new services and updates. It can be really overwhelming to see the new releases,features at the same time it is very hard to know which services to use for the given scenario of your application.

I have been working with few customers and partners and i have a method that i use to help me to pick the right compute service on azure. This helps me to narrow down the services to choose from and pick the right one for the solution. The following decision tree helps you to decide which service to pick

Azure Decision Tree

I also have implemented a visulization to depict the above picture using a tool which you can access from Azure360.

Have fun and pick the right service to build your next solution.

· 4 min read

You might have noticed my recent posts were mostly focused on how to get started and learn Azure in 2020. This post is also to help all Azure enthusiasts to get to know and download all the free ebooks by Microsoft to learn more in depth about Azure. I have added the reference to this blog in my tool Azure 360 as well. There are around 174 ebooks which can be downloadable from the Microsoft site as of now. I have listed the top 60 books which are recommended and liked,shared the most among the social mediums.

Ebooks For Achitects,Developers and Decision Makers

eBook NameDownload
Azure for ArchitectsPDF
Designing Distributed SystemsPDF
Cloud Migration EssentialsPDF
Kubernetes : Up and RunningPDF
Learning Azure Cognitive ServicesPDF
Effective DevOps—Building a DevOps Culture at ScalePDF
How to Containerize Your Go CodePDF
Build and deploy a multi-container application in Azure Container ServicePDF
Build and deploy multi-container application in Azure Service FabricPDF
Kubernetes objects on Microsoft AzurePDF
Azure Serverless Computing CookbookPDF
Create your first intelligent bot with Microsoft AIPDF
Best Practices for Migrating Windows Servers to AzurePDF
Cloud Database Migration EssentialsPDF
Getting started with Apache Spark on Azure DatabricksPDF
15 Lessons Learned: Migrating SAP to the CloudPDF
Learning Node.js Development and deploy on AzurePDF
Cloud Analytics with Microsoft AzurePDF
Grow Your ISV Business with SaaSPDF
Building Intelligent Cloud ApplicationsPDF
Manage your network more effectively with the Azure Networking CookbookPDF
Developer’s Guide to Getting Started with Microsoft Azure Database for MySQLPDF
Developer's Guide to Getting Started with Cosmos DBPDF
Quick Start Guide to Azure SentinelPDF
The Developer's Guide to AzurePDF
Kubernetes on AzurePDF
Professional Azure SQL Database AdministrationPDF
Devops with ASP.NET Core and AzurePDF
Devops for Containerized AppsPDF
Enterprise Cloud StrategyPDF
Implementing a Zero Trust approach with Azure Active Directory PDF
Microsoft Azure Trips and Tips - DataPDF
Azure AD Application Proxy – Adoption Kit – eBookPDF
Azure Active Directory B2B Collaboration – Adoption Kit – eBookPDF
AI for Retail: Learn the scenarios that are driving today's digital consumerPDF
Building IoT Solutions with Azure: A Developer’s GuidePDF
The enterprise developer’s guide to building five-star mobile appsPDF
Modernizing existing .NET appsPDF
Azure Active Directory Company Branding- Adoption Kit – eBookPDF
Azure Migration SQL Server to Azure SQL Database Managed Instance a step by step guidePDF
Azure Active Directory Connect Health- Adoption Kit – eBookPDF
Azure Active Directory Self-Service Group Management – eBookPDF
AI in Action—explore three technical case studies in one guidePDF
Azure Active Directory Identity Protection – eBookPDF
Azure Multi-Factor Authentication – eBookPDF
Azure Privileged Identity Management – eBookPDF
Azure Active Directory Single Sign-On – eBookPDF
Azure Active Directory Self-Service Password Reset – eBookPDF
Azure Active Directory User Provisioning – eBookPDF
Five Principles for Deploying and Managing Linux in The Cloud with AzurePDF
Optimizing Azure Site Recovery (ASR) WAN OptimizersDOC
Azure VM – Oracle 12c on Linux – Configuration Steps – eBookPDF
Azure Strategy and Implementation GuidePDF
Build your first intelligent app with a guide from O’ReillyPDF
Guide to migrate schema & data from Oracle to Azure SQL DBPDF
How to Set up Azure AutomationPDF
Deploy IBM DB2 pureScale on AzurePDF
Azure AD in Windows 10 cloud subscriptionsPDF
Learn Azure in a Month of LunchesPDF
Microsoft Azure Essentials Migrating SQL Server DatabasesPDF
Migrate your SAP estate to the cloud—securely and reliablyPDF
Microsoft Azure ExpressRoute GuidePDF
Making the Most of the Cloud EverywherePDF
APIs + MicroservicesPDF
Hands-On Linux Administration on AzurePDF
Designing your Hybrid Cloud Strategy: Identity and Access ManagementPDF
Overview of Azure Active DirectoryDOC
Containerize Your Apps with Docker and KubernetesPDF
Solve your big data and AI challenges with an Azure Databricks use case e-bookPDF
Azure Rapid Deployment Guide For Azure Rights ManagementPDF
Practical Microsoft Azure IaaSPDF
IoT in the Real World: Stories from ManufacturingPDF
Continuous Delivery in JavaPDF
Azure Rethinking Enterprise Storage: A Hybrid Cloud ModelPDF
Azure AD/Office 365 seamless sign-inDOC
Exam Ref AZ-900 Microsoft Azure Fundamentals (NOT eBook)PDF
Azure AD & Windows 10: Better Together for Work or SchoolDOC

If you want to access all the Ebooks,Research papers, Reports in one place you can directly go here and get it. Hope these links will be helpful and Azure be the cloud you love!

· 4 min read

You might have noticed my recent posts were mostly focused on how to get started and learn Azure in 2020. Want to become more productive with Azure?. There are around 174 ebooks which can be downloadable from the Microsoft site as of now. I have listed the top 60 books which are recommended and liked,shared the most among the social mediums.

eBooks For Architects,Developers and Decision Makers

eBook NameDownload
Azure for ArchitectsPDF
Designing Distributed SystemsPDF
Cloud Migration EssentialsPDF
Kubernetes : Up and RunningPDF
Learning Azure Cognitive ServicesPDF
Effective DevOps—Building a DevOps Culture at ScalePDF
How to Containerize Your Go CodePDF
Build and deploy a multi-container application in Azure Container ServicePDF
Build and deploy multi-container application in Azure Service FabricPDF
Kubernetes objects on Microsoft AzurePDF
Azure Serverless Computing CookbookPDF
Create your first intelligent bot with Microsoft AIPDF
Best Practices for Migrating Windows Servers to AzurePDF
Cloud Database Migration EssentialsPDF
Getting started with Apache Spark on Azure DatabricksPDF
15 Lessons Learned: Migrating SAP to the CloudPDF
Learning Node.js Development and deploy on AzurePDF
Cloud Analytics with Microsoft AzurePDF
Grow Your ISV Business with SaaSPDF
Building Intelligent Cloud ApplicationsPDF
Manage your network more effectively with the Azure Networking CookbookPDF
Developer’s Guide to Getting Started with Microsoft Azure Database for MySQLPDF
Developer's Guide to Getting Started with Cosmos DBPDF
Quick Start Guide to Azure SentinelPDF
The Developer's Guide to AzurePDF
Kubernetes on AzurePDF
Professional Azure SQL Database AdministrationPDF
Devops with ASP.NET Core and AzurePDF
Devops for Containerized AppsPDF
Enterprise Cloud StrategyPDF
Implementing a Zero Trust approach with Azure Active Directory PDF
Microsoft Azure Trips and Tips - DataPDF
Azure AD Application Proxy – Adoption Kit – eBookPDF
Azure Active Directory B2B Collaboration – Adoption Kit – eBookPDF
AI for Retail: Learn the scenarios that are driving today's digital consumerPDF
Building IoT Solutions with Azure: A Developer’s GuidePDF
The enterprise developer’s guide to building five-star mobile appsPDF
Modernizing existing .NET appsPDF
Azure Active Directory Company Branding- Adoption Kit – eBookPDF
Azure Migration SQL Server to Azure SQL Database Managed Instance a step by step guidePDF
Azure Active Directory Connect Health- Adoption Kit – eBookPDF
Azure Active Directory Self-Service Group Management – eBookPDF
AI in Action—explore three technical case studies in one guidePDF
Azure Active Directory Identity Protection – eBookPDF
Azure Multi-Factor Authentication – eBookPDF
Azure Privileged Identity Management – eBookPDF
Azure Active Directory Single Sign-On – eBookPDF
Azure Active Directory Self-Service Password Reset – eBookPDF
Azure Active Directory User Provisioning – eBookPDF
Five Principles for Deploying and Managing Linux in The Cloud with AzurePDF
Optimizing Azure Site Recovery (ASR) WAN OptimizersDOC
Azure VM – Oracle 12c on Linux – Configuration Steps – eBookPDF
Azure Strategy and Implementation GuidePDF
Build your first intelligent app with a guide from O’ReillyPDF
Guide to migrate schema & data from Oracle to Azure SQL DBPDF
How to Set up Azure AutomationPDF
Deploy IBM DB2 pureScale on AzurePDF
Azure AD in Windows 10 cloud subscriptionsPDF
Learn Azure in a Month of LunchesPDF
Microsoft Azure Essentials Migrating SQL Server DatabasesPDF
Migrate your SAP estate to the cloud—securely and reliablyPDF
Microsoft Azure ExpressRoute GuidePDF
Making the Most of the Cloud EverywherePDF
APIs + MicroservicesPDF
Hands-On Linux Administration on AzurePDF
Designing your Hybrid Cloud Strategy: Identity and Access ManagementPDF
Overview of Azure Active DirectoryDOC
Containerize Your Apps with Docker and KubernetesPDF
Solve your big data and AI challenges with an Azure Databricks use case e-bookPDF
Azure Rapid Deployment Guide For Azure Rights ManagementPDF
Practical Microsoft Azure IaaSPDF
IoT in the Real World: Stories from ManufacturingPDF
Continuous Delivery in JavaPDF
Azure Rethinking Enterprise Storage: A Hybrid Cloud ModelPDF
Azure AD/Office 365 seamless sign-inDOC
Exam Ref AZ-900 Microsoft Azure Fundamentals (NOT eBook)PDF
Azure AD & Windows 10: Better Together for Work or SchoolDOC

If you want to access all the EBooks,Research papers, Reports in one place you can directly go here and get it. Hope these links will be helpful and Azure be the cloud you love!

· 2 min read

What a way to start the new year 2020!. It just began and I am feeling as I've achieved something. It is always great when you are being recognized for your hard work and dedication. A growing list of subscribers and ever increasing traffic stats are pretty awesome! However, for the first time in my career to be ranked among the Microsoft Azure blog to follow in 2020 is truly amazing! Today, Feed spot published their list of the Top 50 Microsoft Azure Blogs to follow in 2020 and i was surprised to see my name in the spot number #27.

While i am honored to be in that list, I would recommend and it’s also important to note all the other great blogs on the list too. Take a moment to check out the list and browse through all the other great blogs on the Top 50 list as well. Congratulations everyone, the azure community wouldn’t be what it is without each of you; in addition to the countless other blogs that didn’t make the list.

"If you have knowledge, let others light their candle in it"

Thanks Feedspot and everyone for the support ! I’m sure we’ll be seeing each other next year as well.

· 2 min read

Are you an Azure or Cloud enthusiast? Got a resolution to learn #Azure in 2020?. I recently read a wonderful blog by @ThomasMaurer . Immediately i wanted to create visualization to make all the resouces in one place so that i will be easy for everyone to access. On the following days i created two resources namely,

Azure 360:

It is a simple D3 Force visualization that has all the Resources to learn Azure in a single page

Azure Mind-Map:

It is a github repository which contains all the mind-maps related to Azure resources,technologies and certifications. In general, Creating a best Azure architecture and making sure all aspects of design, development,release and maintainance can be very difficult. Microsoft Azure team have published their own set of best practices and frameworks for building cloud solutions on Azure. I have created/obtained these mindmaps from various resources built by others as well as i have modified few. Source of information used to create the illustrations are the resources of the Azure team.

Azure Solutions Architect MindMap , Open in new tab to have the zoom feature

I will be adding more features to the Azure360 as well as Mindmaps in the coming days. I hope these two resources give you a great hints of how you can start learning Azure and get certified. If you have questions feel free to reach out to me at @kokkisajee and subscribe to my blog to get more updates. Keep Azurifying!

· 9 min read

Recently, I managed to acclaim the Azure Solutions Architect badge by completing AZ-300 and AZ-301 exams.

Earning the Azure Solutions Architect Expert certification demonstrates skills and knowledge to advise stakeholders and translate business requirements into secure, scalable, and reliable solutions. Candidates have advanced experience and knowledge across various aspects of IT operations, including networking, virtualization, identity, security, business continuity, disaster recovery, data management, budgeting, and governance – managing how decisions in each area affects an overall solution.

If you are preparing for AZ-301 and AZ-300 EXAMS? Don’t know where to start? This post contains all the resources I used to study for the exam. Also, please share the post within your circles so it helps them to prepare for the exam.

AZ-301 Resources:

AZ-301 Video Content Options:

Pluralsight (Free Trial)Microsoft Azure Architect Design (AZ-301)
SkylinesAcademyhttps://courses.skylinesacademy.com/p/az-301
UdemyAZ-301 Certification: Azure Architect Design
LinkedIn Learning (Free Trial)Exam Tips: Azure Architect Design (AZ-301)

AZ-301 Practice Tests

Official Practice testhttps://docs.microsoft.com/en-us/learn/certifications/exams/az-301
Whizlabs Practice Tests5 Practice Tests for AZ-301 (275 Questions)
Udemy Practice TestsMicrosoft AZ-301 Exam Preparation Practice tests

AZ-301 E-book

Amazon IndiaAZ-301 Practice Tests
Amazon (Other countries)Exam AZ-301 Lab Guide

AZ-301 Learning Path (aka.ms/learn)

Microsoft Learnhttps://docs.microsoft.com/en-us/learn/certifications/exams/az-301

1.Determine Workload Requirements (10-15%)

Gather Information and Requirements

Gathering Information About Existing Enterprise Architecture in Microsoft Azure

Optimize Consumption Strategy

Optimizing Consumption Strategy in Microsoft Azure

Design an Auditing and Monitoring Strategy

Design Auditing for Microsoft Azure

Designing a Monitoring Strategy for a Solution in Microsoft Azure

2.Design for Identity and Security (20-25%)

Design Identity Management

Design Identity Management in Microsoft Azure

Design Authentication

Design Authentication for Microsoft Azure

Design Authorization

Design Authorization for Microsoft Azure

Design for Risk Prevention for Identity

Design for Risk Prevention in Microsoft Azure

Design a Monitoring Strategy for Identity and Security

Design a Monitoring Strategy for Identity and Security in Microsoft Azure

3.Design a Data Platform Solution (15-20%)

Design a Data Management Strategy

Design a Data Management Strategy for Microsoft Azure

Design a Data Protection Strategy

Design a Data Protection Strategy with Microsoft Azure

Design and Document Data Flows

Design and Document Data Flows with Microsoft Azure

Design a Monitoring Strategy for the Data Platform

Designing a Monitoring Strategy for the Microsoft Azure Data Platform

4.Design a Business Continuity Strategy (15-20%)

Design a Site Recovery Strategy

Designing a Site Recovery Strategy on Microsoft Azure

Design for High Availability

Designing for High Availability on Microsoft Azure

Design a Data Archiving Strategy

Designing a Data Archiving Strategy on Microsoft Azure

5.Design for Deployment, Migration, and Integration (10-15%)

Design Deployments

Designing Deployments in Microsoft Azure

Design Migrations

Designing Migrations for Microsoft Azure

Design an API Integration Strategy

Designing an API Management Strategy for Microsoft Azure

6.Design an Infrastructure Strategy (15-20%)

Design a Storage Strategy

Design a Storage Strategy for Microsoft Azure

Design a Compute Strategy

Design a Compute Strategy for Microsoft Azure

Design a Networking Strategy

Design a Networking Strategy for Microsoft Azure

Design a Monitoring Strategy for Infrastructure

Design a Monitoring Strategy for Infrastructure in Microsoft Azure

AZ-300 Resources:

AZ-300 Video Content Options

Pluralsight (Free trial)Microsoft Azure Architect Technologies (AZ-300)
LinkedIn Learning (Free trial)Exam Tips: Azure Architect Technologies (AZ-300)
UdemyAZ-300: Microsoft Azure Architect Technologies
SkylinesAcademyhttps://courses.skylinesacademy.com/p/microsoft-az-300-certification-azure-architect-technologies

AZ-300 Practice Tests & Labs

Whizlabs Practice Tests5 Practice Tests for AZ-300 (a total of 275 questions)
Udemy Practice TestsAZ-300 (Lab Scenarios + Practice Tests)

AZ-300 Exam Reference Books (PDF)

Amazon IndiaExam Ref AZ-300 Azure Architect Technologies
Amazon (Other Countries)Exam Ref AZ-300 Azure Architect Technologies
Packt.comhttps://www.packtpub.com/cloud-networking/microsoft-azure-architect-technologies-exam-guide-az-300
Exam Ref AZ-400https://kingsumo.com/g/eolt6d/win-a-copy-of-exam-ref-az-300-microsoft-azure-architect-technologies

Exam content is as followers,

Deploy and Configure Infrastructure (40-45%)

Analyze Resource Utilization and Consumption

Configure diagnostic settings on resources

Linkedin Learning: Configure Diagnostic Setting (check with a free trial)

Create a baseline for resources

LinkedIn Learning: Creating a Baseline for Resources (check with a free trial)

Create and test alerts

https://docs.microsoft.com/en-us/azure/azure-monitor/platform/alerts-metric

Analyze alerts across subscription

https://docs.microsoft.com/en-us/azure/azure-monitor/platform/alerts-managing-alert-instances

Analyze metrics across subscription

https://docs.microsoft.com/en-us/azure/azure-monitor/platform/metrics-charts

Create action groups

https://docs.microsoft.com/en-us/azure/azure-monitor/platform/action-groups

Monitor for unused resources

https://docs.bmc.com/docs/reclaiming-the-unused-and-overallocated-azure-virtual-machines-785283461.html

Monitor Cost

https://docs.microsoft.com/en-us/azure/billing/billing-getting-started

Report on Cost

https://docs.microsoft.com/en-us/azure/billing/billing-download-azure-invoice-daily-usage-date

Utilize Log Search query functions

https://docs.microsoft.com/en-us/azure/azure-monitor/log-query/search-queries

View alerts in Azure Monitor logs

https://docs.microsoft.com/en-us/azure/azure-monitor/platform/alerts-activity-log

Visualize diagnostics data using Azure Monitor Workbooks

https://docs.microsoft.com/en-us/azure/azure-monitor/app/usage-workbooks

https://github.com/microsoft/Application-Insights-Workbooks/blob/Visualizations.md

Create and Configure Storage Accounts

Configure network access to the storage account

https://docs.microsoft.com/en-us/azure/storage/common/storage-network-security

Create and configure storage account

https://docs.microsoft.com/en-us/azure/storage/common/storage-quickstart-create-account?tabs=azure-portal

https://docs.microsoft.com/en-us/azure/storage/common/storage-account-manage

Generate shared access signature

https://docs.microsoft.com/en-us/azure/storage/common/storage-dotnet-shared-access-signature-part-1

Implement Azure AD authentication for storage

https://docs.microsoft.com/en-us/azure/storage/common/storage-auth-aad-app

Install and use Azure Storage Explorer

https://docs.microsoft.com/en-us/azure/vs-azure-tools-storage-manage-with-storage-explorer

Manage access keys

https://docs.microsoft.com/en-us/azure/storage/common/storage-account-manage

Monitor activity log by using Azure Monitor logs

https://docs.microsoft.com/en-us/azure/azure-resource-manager/resource-group-audit

Implement Azure storage replication

MSDN Blog: Azure Storage Replication Implementation

Implement Azure storage account failover

https://docs.microsoft.com/en-us/azure/storage/common/storage-initiate-account-failover?tabs=azure-portal

Create and Configure a VM for Windows and Linux

Configure high availability

https://docs.microsoft.com/en-us/azure/virtual-machines/windows/tutorial-availability-sets

Configure monitoring

https://docs.microsoft.com/en-us/azure/virtual-machines/windows/tutorial-monitoring

Configure networking

https://docs.microsoft.com/en-us/azure/virtual-machines/windows/tutorial-virtual-network

Configure storage

https://docs.microsoft.com/en-us/azure/virtual-machines/windows/managed-disks-overview

Configure Virtual Machine Size

https://docs.microsoft.com/en-us/azure/virtual-machines/windows/sizes

Implement dedicated hosts

Deploy and configure scale sets

https://docs.microsoft.com/en-us/azure/virtual-machine-scale-sets/quick-create-portal

Automate Deployment of VMs

Modify Azure Resource Manager template

https://docs.microsoft.com/en-us/azure/architecture/building-blocks/extending-templates/update-resource

Configure the location of new VMs

https://docs.microsoft.com/en-us/azure/site-recovery/azure-to-azure-tutorial-migrate

Configure VHD template

https://docs.microsoft.com/en-us/azure/virtual-machines/windows/create-vm-specialized

Deploy from template

https://docs.microsoft.com/en-us/azure/virtual-machines/windows/ps-template

Save a deployment as an Azure Resource Manager template

https://docs.microsoft.com/en-us/azure/virtual-machines/windows/download-template

https://docs.microsoft.com/en-us/azure/virtual-machines/windows/ps-template

Deploy Windows and Linux VMs

https://docs.microsoft.com/en-us/azure/virtual-machines/linux/create-ssh-secured-vm-from-template

Create Connectivity Between Virtual Networks

Create and configure Vnet peering

https://docs.microsoft.com/en-us/azure/virtual-network/tutorial-connect-virtual-networks-portal

Create and configure Vnet to Vnet connections

https://docs.microsoft.com/en-us/azure/vpn-gateway/create-routebased-vpn-gateway-portal

https://docs.microsoft.com/en-us/azure/vpn-gateway/vpn-gateway-vnet-vnet-rm-ps

Implement and Manage Virtual Networking

Configure private IP addressing

https://docs.microsoft.com/en-us/azure/virtual-network/virtual-networks-static-private-ip-arm-pportal

Configure public IP addresses

https://docs.microsoft.com/en-us/azure/virtual-network/virtual-network-public-ip-address

Create and configure network routes

https://docs.microsoft.com/en-us/azure/virtual-network/tutorial-create-route-table-portal

Create and configure network interface

https://docs.microsoft.com/en-us/azure/virtual-network/virtual-network-network-interface

Create and configure subnets

https://docs.microsoft.com/en-us/azure/virtual-network/virtual-network-manage-subnet

Create and configure virtual network

https://docs.microsoft.com/en-us/azure/virtual-network/manage-virtual-network

Create and configure Network Security Groups and Application Security Groups

https://docs.microsoft.com/en-us/azure/virtual-network/tutorial-filter-network-traffic#create-a-network-security-group

https://docs.microsoft.com/en-us/azure/virtual-network/tutorial-filter-network-traffic#create-application-security-groups

Manage Azure Active Directory

Add custom domains

https://docs.microsoft.com/en-us/azure/active-directory/fundamentals/add-custom-domain

Configure Azure AD Identity Protection

https://docs.microsoft.com/en-us/azure/active-directory/identity-protection/enable

Configure Azure AD Join

https://docs.microsoft.com/en-us/azure/active-directory/devices/hybrid-azuread-join-managed-domains

Configure self-service password reset

https://docs.microsoft.com/en-us/azure/active-directory/authentication/quickstart-sspr

Implement conditional access policies

https://docs.microsoft.com/en-us/azure/active-directory/conditional-access/app-based-mfa

https://docs.microsoft.com/en-us/azure/active-directory/conditional-access/require-tou

https://docs.microsoft.com/en-us/azure/active-directory/conditional-access/app-sign-in-risk

Manage multiple directories

https://docs.microsoft.com/en-us/azure/active-directory/users-groups-roles/licensing-directory-independence

Perform an access review

https://docs.microsoft.com/en-us/azure/active-directory/governance/access-reviews-overview

Implement and Manage Hybrid Identities

Install and configure Azure AD Connect

https://docs.microsoft.com/en-us/azure/active-directory/hybrid/how-to-connect-install-express

Configure federation and single sign-on

https://docs.microsoft.com/en-us/azure/active-directory/hybrid/how-to-connect-fed-single-adfs-multitenant-federation

Configure single sign-on

https://docs.microsoft.com/en-us/azure/active-directory/manage-apps/configure-single-sign-on-portal

Manage and troubleshoot Azure AD Connect

https://docs.microsoft.com/en-us/azure/active-directory/hybrid/how-to-connect-post-installation

https://docs.microsoft.com/en-us/azure/active-directory/hybrid/tshoot-connect-connectivity

Troubleshoot password sync and writeback

https://docs.microsoft.com/en-us/azure/active-directory/hybrid/tshoot-connect-password-hash-synchronization

https://docs.microsoft.com/en-us/azure/active-directory/authentication/active-directory-passwords-troubleshoot#troubleshoot-password-writeback

Implement solutions that use virtual machines (VM)

Provision VMs

https://docs.microsoft.com/en-us/azure/virtual-machines/windows/quick-create-portal

Create Azure Resource Manager templates

https://docs.microsoft.com/en-us/azure/azure-resource-manager/template-tutorial-create-first-template?tabs=azure-powershell

https://docs.microsoft.com/en-us/azure/virtual-machines/windows/ps-template

Configure Azure Disk Encryption for VMs

https://docs.microsoft.com/en-us/azure/virtual-machines/windows/disk-encryption-portal-quickstart

Implement Azure Backup for VMs

https://docs.microsoft.com/en-us/azure/backup/backup-azure-vms-first-look-arm

Implement Workloads and Security (20-25%)

Migrate Servers to Azure

Migrate servers using Azure Migrate

https://docs.microsoft.com/en-in/azure/migrate/tutorial-migrate-hyper-v

Backup and restore data

https://docs.microsoft.com/en-us/azure/backup/quick-backup-vm-portal

https://docs.microsoft.com/en-us/azure/backup/tutorial-restore-disk

Configure Serverless Computing

Create and manage objects

https://docs.microsoft.com/en-us/azure/azure-functions/functions-create-your-first-function-visual-studio

Manage a Logic App resource

https://docs.microsoft.com/en-us/azure/logic-apps/logic-apps-overview

Manage Azure Function app settings

https://docs.microsoft.com/en-us/azure/azure-functions/functions-how-to-use-azure-function-app-settings

Manage Event Grid

https://docs.microsoft.com/en-us/azure/event-grid/overview

Manage Service Bus

https://docs.microsoft.com/en-us/azure/service-bus-messaging/service-bus-messaging-overview

Implement Application Load Balancing

Configure application gateway

https://docs.microsoft.com/en-us/azure/application-gateway/quick-create-powershell

Configure Azure Front Door service

https://docs.microsoft.com/en-us/azure/frontdoor/quickstart-create-front-door

Configure Azure Traffic Manager

https://docs.microsoft.com/en-us/azure/traffic-manager/quickstart-create-traffic-manager-profile

Integrate On premises Network with Azure Virtual Network

Create and configure Azure VPN Gateway

https://docs.microsoft.com/en-us/azure/vpn-gateway/vpn-gateway-tutorial-create-gateway-powershell

Create and configure site to site VPN

https://docs.microsoft.com/en-us/azure/vpn-gateway/vpn-gateway-howto-site-to-site-resource-manager-portal

Configure Express-Route

https://docs.microsoft.com/en-us/azure/expressroute/expressroute-howto-circuit-portal-resource-manager

Configure Virtual WAN

https://docs.microsoft.com/en-us/azure/virtual-wan/connect-virtual-network-gateway-vwan

Verify on premises connectivity

https://docs.microsoft.com/en-us/azure/vpn-gateway/vpn-gateway-verify-connection-resource-manager

Troubleshoot on premises connectivity with Azure

https://docs.microsoft.com/en-us/azure/vpn-gateway/vpn-gateway-troubleshoot-site-to-site-cannot-connect

Implement Multi factor Authentication (MFA)

Configure user accounts for MFA

https://docs.microsoft.com/en-us/azure/active-directory/authentication/howto-mfa-userstates/enable-azure-mfa-by-changing-user-state

Configure fraud alerts

https://docs.microsoft.com/en-us/azure/active-directory/authentication/howto-mfa-mfasettings/fraud-alert

Configure bypass options

https://docs.microsoft.com/en-us/azure/active-directory/authentication/howto-mfa-mfasettings/one-time-bypass

Configure trusted IPs

https://docs.microsoft.com/en-us/azure/active-directory/authentication/howto-mfa-mfasettings/trusted-ips

Configure verification methods

https://docs.microsoft.com/en-us/azure/active-directory/authentication/howto-mfa-mfasettings/verification-methods

Manage Role based Access Control (RBAC)

Create a custom role

https://docs.microsoft.com/en-us/azure/role-based-access-control/tutorial-custom-role-powershell

Configure access to Azure resources by assigning roles

https://docs.microsoft.com/en-us/azure/role-based-access-control/role-assignments-portal

Configure management access to Azure

https://docs.microsoft.com/en-us/azure/role-based-access-control/role-assignments-portal

Troubleshoot RBAC

https://docs.microsoft.com/en-us/azure/role-based-access-control/troubleshooting

Implement Azure policies

https://docs.microsoft.com/en-us/azure/governance/policy/tutorials/create-and-manage

Assign RBAC roles

https://docs.microsoft.com/en-us/azure/role-based-access-control/quickstart-assign-role-user-portal

Create and Deploy Apps (5-10%)

Create Web Apps by Using PaaS

Create an Azure App Service Web App

https://docs.microsoft.com/en-us/azure/app-service/app-service-web-get-started-dotnet

Create documentation for the API

https://www.c-sharpcorner.com/article/azure-app-service-api-configure-swashbuckle/

Create an App Service Web App for containers

https://docs.microsoft.com/en-us/azure/app-service/app-service-web-get-started-windows-container

Create an App Service background task by using WebJobs

https://docs.microsoft.com/en-us/azure/app-service/webjobs-create

Enable diagnostics logging

https://docs.microsoft.com/en-us/azure/app-service/troubleshoot-diagnostic-logs

Design and Develop Apps That Run in Containers

Configure diagnostic settings on resources

https://docs.microsoft.com/en-us/azure/container-instances/container-instances-get-logs

Create a container image by using a Docker file

https://docs.microsoft.com/en-us/azure/container-registry/container-registry-quickstart-task-cli

Create an Azure Kubernetes Service

https://docs.microsoft.com/en-us/azure/aks/kubernetes-walkthrough-portal

Publish an image to the Azure Container Registry

https://docs.microsoft.com/en-us/azure/container-registry/container-registry-get-started-docker-cli

Implement an application that runs on an Azure Container Instance

https://docs.microsoft.com/en-us/azure/container-instances/container-instances-quickstart-portal

Manage container settings by using code

https://azure.microsoft.com/en-gb/resources/samples/container-service-python-manage/

Implement Authentication and Secure Data (5-10%)

Implement Authentication

Implement authentication by using certificates, forms-based authentication, tokens, or Windows-integrated authentication

https://github.com/Azure-Samples/active-directory-dotnetcore-daemon-v2

https://docs.microsoft.com/en-us/aspnet/web-api/overview/security/forms-authentication

https://docs.microsoft.com/en-us/azure/app-service/overview-authentication-authorization

https://docs.microsoft.com/en-us/aspnet/web-api/overview/security/integrated-windows-authentication

Implement multi-factor authentication by using Azure AD

https://docs.microsoft.com/en-us/azure/active-directory/authentication/tutorial-mfa-applications

Implement OAuth2 authentication

https://docs.microsoft.com/en-us/azure/active-directory/develop/tutorial-v2-asp-webapp

Implement Managed identities for Azure resources Service Principal authentication

https://docs.microsoft.com/en-us/azure/active-directory/managed-identities-azure-resources/tutorial-windows-vm-access-arm

Implement Secure Data Solutions

Encrypt and decrypt data at rest and in transit

This block has encountered an error and cannot be previewed.

Encrypt data with Always Encrypted

https://docs.microsoft.com/en-us/azure/sql-database/sql-database-always-encrypted-azure-key-vault

Implement Azure Confidential Compute

https://azure.microsoft.com/en-in/blog/azure-confidential-computing/

Implement SSL/TLS communications

https://docs.microsoft.com/en-us/azure/storage/common/storage-security-tls

Create, read, update, and delete keys, secrets and certificates by using the KeyVault API

Keys

https://docs.microsoft.com/en-us/rest/api/keyvault/createkey/createkey

https://docs.microsoft.com/en-us/rest/api/keyvault/getkey/getkey

https://docs.microsoft.com/en-us/rest/api/keyvault/updatekey

https://docs.microsoft.com/en-us/rest/api/keyvault/deletekey

Secrets

https://docs.microsoft.com/en-us/rest/api/keyvault/setsecret/setsecret

https://docs.microsoft.com/en-us/rest/api/keyvault/getsecret/getsecret

https://docs.microsoft.com/en-us/rest/api/keyvault/updatesecret

https://docs.microsoft.com/en-us/rest/api/keyvault/deletesecret

Certificates

https://docs.microsoft.com/en-us/rest/api/keyvault/createcertificate/create

https://docs.microsoft.com/en-us/rest/api/keyvault/getcertificate/get

https://docs.microsoft.com/en-us/rest/api/keyvault/updatecertificate/update

https://docs.microsoft.com/en-us/rest/api/keyvault/deletecertificate/delete

Develop for the Cloud and for Azure Storage (15-20%)

Configure a Message-based Integration Architecture

Configure an app or service to send emails

https://docs.microsoft.com/en-us/azure/sendgrid-dotnet-how-to-send-email

Configure Event Grid

https://docs.microsoft.com/en-us/azure/storage/blobs/storage-blob-event-quickstart-powershell

Configure Azure Relay Service

https://docs.microsoft.com/en-us/azure/service-bus-relay/relay-hybrid-connections-dotnet-get-started

Create and configure a Notification Hub

https://docs.microsoft.com/en-us/azure/notification-hubs/create-notification-hub-portal

Create and configure an Event Hub

https://docs.microsoft.com/en-us/azure/event-hubs/event-hubs-create

Create and configure a Service Bus

https://docs.microsoft.com/en-us/azure/service-bus-messaging/service-bus-quickstart-portal

Configure queries across multiple products

https://docs.microsoft.com/en-us/azure/azure-monitor/log-query/cross-workspace-query

Develop for Autoscaling

Implement autoscaling rules and patterns (schedule, operational/system metrics)

https://docs.microsoft.com/en-us/azure/azure-monitor/platform/autoscale-get-started

https://docs.microsoft.com/en-us/azure/azure-monitor/platform/autoscale-common-scale-patterns

Implement code that addresses singleton application instances

Check the entire module (Writing Code to Handle Singleton Application Instances) with a free trial

Implement code that addresses transient state

https://docs.microsoft.com/en-us/azure/architecture/best-practices/retry-service-specific

Develop Solutions That Use Cosmos DB Storage

Create, read, update, and delete data by using appropriate APIs

https://docs.microsoft.com/en-us/rest/api/cosmos-db/documents

Implement partitioning schemes

https://docs.microsoft.com/en-us/azure/cosmos-db/how-to-model-partition-example

Set the appropriate consistency level for operations

https://docs.microsoft.com/en-us/azure/cosmos-db/consistency-levels-choosing

Develop Solutions That Use a Relational Database

Provision and configure relational databases

https://docs.microsoft.com/en-us/azure/sql-database/sql-database-single-database-get-started

https://docs.microsoft.com/en-us/azure/sql-database/sql-database-server-level-firewall-rule

Configure elastic pools for Azure SQL Database

https://docs.microsoft.com/en-us/azure/sql-database/sql-database-elastic-pool

Implement Azure SQL Database managed instances

https://docs.microsoft.com/en-us/azure/sql-database/sql-database-managed-instance-get-started

Create, read, update, and delete data tables by using code

https://docs.microsoft.com/en-us/azure/sql-database/sql-database-connect-query-dotnet-core

Hope the resources and the links helps you to get through the exams and make you Azure Solutions Architect. Good luck!

· 4 min read

I have been using twitter for the past 10 years and it took nearly 5 years to get those 100 followers. I was not an active user till before 2 years. One great tip i learnt in recent times is that first thing you need to do is to get a really complete and professional profile. Most users look at profiles before following. Another best way is to increase followers on Twitter is being consistent with posting quality content. Automating your posts will help a lot with this. In this blog, i will explain how you could build a simple function and deploy it on Azure to increase your followers count and to be consistent with quality content.

PreRequisites:

Step 1 : Navigate to https://portal.azure.com/ and search for Function App in the search bar.

Step 2 : Create a Function app with the following settings, make sure you are setting the Consumption Plan and enable Application Insights.

Step 3 : Open Visual Studio Code(Make sure you have already installed the VSCode with the function core tools and extension). Select Ctrl + Shif + P to create a new Function Project and select the language as Python

Step 4 : Select the template as Timer trigger as we need to run every 15 minutes and you need to configure the cron expression (0 */15 * * * *) as well.

Give the function name as twitter_followers,

Step 5 : You will see the project template getting created. Next step is to edit the __init__.py, thats where you are going to add the logic. We will be using Tweepy library to get the data from twitter and to follow the person who is tweeting the tweet. The methods we will use in the function as retweet and create_friendship. Here is the whole logic of the function. As you can see any tweet that has the hashtag #azure will get retweeted and you will automatically follow the user who has tweeted the tweet.

import tweepy, time, datetime, logging, os
from datetime import date
import azure.functions as func
def main(mytimer: func.TimerRequest) -> None:
utc_timestamp = datetime.datetime.utcnow().replace(
tzinfo=datetime.timezone.utc).isoformat()
if mytimer.past_due:
logging.info('The timer is past due!')
logging.info('Python timer trigger function ran at %s', utc_timestamp)
auth = tweepy.OAuthHandler(os.environ["TWITTER_CONSUMER_KEY"], os.environ["TWITTER_CONSUMER_SECRET"])
auth.set_access_token(os.environ["TWITTER_ACCESS_TOKEN"], os.environ["TWITTER_ACCESS_TOKEN_SECRET"])
api = tweepy.API(auth)
today = str(date.today())
while True:
for tweet in tweepy.Cursor(api.search,q="#azure", lang="en", since=today).items(1):
try:
api.retweet(tweet.id)
except:
pass
try:
api.create_friendship(tweet.user.id)
except:
pass

Step 6: As you can see there are few environment variables which we are using in the code, we need to add those variables with the values in the local.settings.json file.

{  "IsEncrypted": false, 
"Values": {
"TWITTER_CONSUMER_KEY": "",
"TWITTER_CONSUMER_SECRET": "",
"TWITTER_ACCESS_TOKEN": "",
"TWITTER_ACCESS_TOKEN_SECRET": "",
"FUNCTIONS_WORKER_RUNTIME": "python",
"AzureWebJobsStorage": "UseDevelopmentStorage=true"
}
}

You need to get those keys from the twitter application you already created. if you dont have one, create from here.

Also you need to add the dependencies which are used in the above code inside the requirements.text file. dependencies.txt would have the following,

azure-functions
tweepy

Step 7 : Now we are done with everything, to publish the app to Azure, just press Ctrl+Shift+P and select Deploy to Funciton App

Step 8 : You can navigate to the function app on the Azure portal and make sure Application Insights is configured and as well as AppSettings are correct.

Make sure all the Environment variables are configured with the values.

Now you can start your function and navigate to Monitor section of the function app. You will see the real live telemetries from the app as follows,

All good, you can see the function running and you will see the tweets are automatically retweeted with the particular hasthage in your timeline and also you will see the number of followers increased. Happy Tweeting Folks!

You can get the sourcecode from here.

· 4 min read

Technology is moving very fast and it’s hard to keep up, but you always gotta find a way to keep updated! Especially in the cloud's world it is mandatory to keep your knowledge updated everyday. Every social media is a great place to know about what’s happening around,new innovations and stuff. As there are many services/features been announced every day on Azure, This blog helps you to unleash the power of AzureCharts which is a great resource that help to track Azure updates. AzureCharts is a set of auto-rebuilt charts to keep you updated on Azure changes, news, stats. Public updates, RSS channels and web pages are used as data sources.

Before few weeks I saw a tweet from mark russinovich who is the CTO of Azure definitely somebody that you should follow if you want to learn about Azure.

As you see, he mentioned in the tweet if you want to see exactly what updates were making to Azure services check out this cool site that lets you see all of them as your charts. This site was developed by one of cloud solution architects Alexey Polkovnikov. Azure charts is not a Microsoft service or product, this is just a personal project of him and quite honestly I think this is awesome. He has delivered a great way to consolidate everything going on in all of the different update points of Azure which cover things like RSS feeds the azure updates page news statistic other public updates so this is just an awesome place to come and see exactly what's going on.

HeatMap View:

It pulls the update from portal and other locations in order to give us many things including a heat map view. Now you have one place to come where you can see everything across all major pillars and services in Azure.This is just absolutely amazing so this heat map view specifically digs into the hottest areas of azure update items.You'll find those across the top and they are the most highlighted in color and we have many different ways that we can look at and slice this data up. You can also look at this in terms of regions and data centers which features are being deprecated in this retirement section,things security compliance open source and other azure services and individual feature updates.

Addition to that you can look at this based on a specific measure role. For example, if I am an Azure developer then I would care about what's going on with the SDKs and specific features that are here.

SLA

It is very difficult to keep track the SLA of each and every service on Azure. This feature becomes very handly, if we click on this tile it takes us over to the SLA page and you can see the SLA details a and then you can read up about that and the different service levels.

Regions

Region look up is a pretty cool feature this is where we can take aparticular geography and again compare it to another region but a little more. specifically, if you want to look at features that are GA in the United States geography regions or what is GA in preview GA preview and future you will just select GA and hit search regions and of all of these services.

Fun

Last but not the least, Quize helps you to validate the knowledge on different services with bit of gamification as there are different multiple choice questions.

Thanks Alexey for putting this together and this should be a shout out for everybody to go explore this tool and give your feedback. Definitely this would help in some way.

· 3 min read

This week I participated my first ever OpenHack on DevOps organized by Microsoft in Singapore. It was a three day event from 26th-29th November 2019. The hackathon was focused on Azure DevOps and Azure Kubernetes services. There were participants from all over the world gathered at one place.

There were over 90+ Participants comprised of internal employees as well as customers. Participants were divided into 6 members per team with one coach. The content was set as 8 challenges. Coach from each team was some Cloud Solution Architect from Microsoft who was helping and guiding the team during the challenges with some hints to solve it. One of the cool thing of the hack was that each team could apply their own solutions in unique ways. We as a team were supposed to find our way out to solve the challenges. There was no one way, we were free to take our decisions and paths as deemed fit. If you are wondering about the agenda and what happened in the hack, here you go.

My Team RockStars - Announced as Happiest team among all

What I really liked about the openhack was that each team member was really able to understand what's the challenge and was able to get the team's support whenever they're stuck. Before we start each challenge, one member from the team was assigned as a Scrum Master and he has to drive the entire team to complete the challgne. In each challenge, one has to elloborate the feature of whatever the tools/technologies that we would use in the challenge. There was whiteboarding session included in each challenge before we get in to try to solve the challenge. It was a hands-on rather than attending any tech talk about a specific topic. The tasks were set, challenges were well organized, the environment was prepared, code was almost prepared (with some changes) so that we can focus on learning how we can use Azure DevOps as a tool to ensure zero down-time for production ready application. Kubernetes was chosen as an orchestration framework. Azure monitor was used as the Monitoring service.

Microsoft OpenHack is a developer focused event where a wide variety of participants (Open) learn through hands-on experimentation (Hack) using challenges based on real world customer engagements designed to mimic the developer journey.

For every challenge the links to documentation and resources were provided to understand relevant topics and areas at hand. Besides the actual work, it was a great opportunity to network and discuss broader topics with fellow team members and other participants. It was not just about solving challenges, but each one was appreciating others work whenever we accompolished something. we were given with some cool swags including stickers,notebook wireless charger and Azure Devops badge.

There was not a real winner(team) out of this openhack, all the teams who participated thoroughly enjoyed and it was about sharing and solving real issues.Overall, I think it was a great learning experience for all the participants with great focus on getting things done. I will definitely keep an eye on such events in the future and try to join as a Devops coach for the upcoming events. More than the hackathon it was not just about technology but about teamwork. If you want to have the same experience try to join any of the OpenHacks from here.

· 2 min read

One of the cool feature that Microsoft teams provide is that you can load any website as a tab on particular channel. One handy thing i noticed is that if you want to access azure cloud shell in teams you can just add it as a separate tab and manage the resources without navigating to the browser. With simple step you can access your azure portal as a tab in your teams.

Step 1 : Goto your channel on teams and click on + (Add tab)

it will open up a window.

Step 2 : Just type website in the search tab and you should be able to add a new website as a tab.

Step 3: Just add http://shell.azure.com as a website tab and thats it. Now you should be able to execute all the commands without opening up a shell.

You can do the same with most of the frequently accessed websites if you want to demonstrate something while you are on teams. I have done with Stackoverflow and it's really helfpul while github can be added as a separate tab from the available list.

Try it out today, eventhough it is not helpful as the page refreshes when you move to another tab and come back, but really a good feature to have as a developer. Here is a small gif demonstrating how effectively you can navigate between those tabs.

Microsoft teams is getting better with much features day by day!

· 6 min read

The first ever Github Universe viewing party in SriLanka took place on last Thursday organized by the Github Campus Experts in the country. It was an event to share all the exciting news and updates on Github and it was a great success. I decided to write this blog based on the session i presented on “Github Actions”. It’s amazing to see the new features announced by the Github over the span of last 12 months out of which Github actions was the latest one and it was made generally available on  few days ago (November 13, 2019) to build CI/CD pipelines from GitHub itself. I was excited about this announcement and tested it with two of my projects and I have to say I’m impressed.

As a example, in this post I will explain about how to build a “Emotion detection app” with angular and deploy it on one of the public cloud(Azure) with Github Actions. Below is the simple architecture diagram to get an understanding on how I am going to leverage Github action to deploy my Angular application to the Cloud. Here is the simple architecture of the application that i have demonstrated.

PreRequisities:

Step 1 : Create the Resource group On Azure :

As the first step, we need to create the AppService on Azure to Deploy the Angular application.Navigate to https://portal.azure.com/ and you will be directed to the home page on the portal. Let’s create a resource group to group the resources we create.

Step 2: Create the App service to deploy the Angular app.

As the second step, create an app service to deploy the Angular application

Step 3: Create the Cognitive Service

Create Cognitive service to integrate the emotion detection part. We will use detect api to detect the attributes in a picture.

If you want to store the data , you can create a new cosmosdb to store the results which i have not included here.

Step 4: Code the Angular App

You need to create the component to upload a file and pass the file to the cognitive service to detect the attributes and use ngFor on the template to display the results.

Get the keys of the cognitive service and the url from the portal as follow

You can access the whole code from here. Make sure to replace the Ocp-Apim-Subscription-Key and the url according to the endpoint you created above.

makeRequest() {
let data, contentType;
if (typeof this.image === 'string' && !this.image.startsWith('data')) {
data = { url: this.image };
contentType = 'application/json';
} else {
data = this.fileToUpload;
contentType = 'application/octet-stream';
}

const httpOptions = {
headers: new HttpHeaders({
'Content-Type': contentType,
'Ocp-Apim-Subscription-Key': 'eb491c17bd874d2f9d410eedde346366'
})
};

this.http
.post(
'https://eastus.api.cognitive.microsoft.com/face/v1.0/detect?returnFaceId=true&returnFaceLandmarks=false&returnFaceAttributes=emotion',
data,
httpOptions
)
.subscribe(body => {
if (body && body[0]) {
console.log(body);
this.output = body;
this.thing = body[0].faceAttributes.emotion;
this.result = this.getTop();
this.noFace = false;
} else {
this.noFace = true;
}
});
}

Step 5: Push the Code to Github

You can push the code to your own repository on GitHub and let’s create the build and deploy pipeline via the GitHub actions. Navigate to your repository and click on Actions

Step 6: Create Github Action with Workflow

Create a new workflow by clicking on the new workflow. You will get to see different templates by default to build the pipeline according to the application language as below

In this case, I will create my own workflow by clicking on the setup workflow for yourself. Name the workflow as angular.yaml. You can see a new file being generated under your repository as github_action_angular/.github/workflows/azure.yml

name: Deploy to Azure
on:
push:
branches:
- master
env:
AZURE_WEBAPP_NAME: github-actions-spa
AZURE_WEBAPP_PACKAGE_PATH: './dist/angulargithubaction'
NODE_VERSION: '10.x'

jobs:
build-and-deploy:
runs-on: ubuntu-latest
steps:
- name: Checkout
uses: actions/checkout@master
- name: Use Node.js ${{ env.NODE_VERSION }}
uses: actions/setup-node@v1
with:
node-version: ${{ env.NODE_VERSION }}
- name: Install dependencies
run: npm install
- name: Build
run: npm run build -- --prod
- name: 'Deploy to Azure WebApp'
uses: azure/webapps-deploy@v1
with:
app-name: ${{ env.AZURE_WEBAPP_NAME }}
publish-profile: ${{ secrets.AZURE_WEBAPP_PUBLISH_PROFILE }}
package: ${{ env.AZURE_WEBAPP_PACKAGE_PATH }}

The workflow is really simple. As you see it includes a name and few actions starting with when you need to do the build and deploy. Buildon: push indicates that whenever there is a new commit the code needs to be built again. Also you have to define NodeJS version and will run our build on ubuntu server. And you have a few regular steps that we usually do with building angular application if we are familiar with Angular apps development.

Also as an option you  run that configuration only for branches other than master. For master branch we have separate configuration (with deployment to Azure). So it is flexible to maintain different workflows to different branches/environments. Is not that cool?

Step 7: Configure the Pipeline,Secrets

As the next step you need to create in GitHub Secrets page new secrets. It’s important to save the secret name whenever you need to deploy to production/development using secrets is one of the best practice. You can get the the keys from the publish profile of the app service.

Create new secret as above with the values got from profile.

  We have to configure the values in angular.yaml as follows:

  • app-name — application name in Azure
  • publish-profie — name of the secret from GitHub
  • package — path to directory which we would like to deploy (in above example: ./dist/yourSPAApp.

And that’s it. Really clear and simple! You can just check if the deployment has been successful or not by navigating to the Kudu.

And you can see the application working successfully on Azure. As the next step you can include unit tests to run when you do the build. Using the Angular CLI and Github Actions, it has become very easy to create and test frontend Web apps. Check out the fulling working demo repo below as well as the current build status for the demo!.

Start using Github Action and deploy your app within few seconds. You can use Github actions to deploy any application to any cloud as i've explained above.

You can access the Session Slides from here and the repository from here.

· One min read

One of the interesting queries that i got from my colleague is that how to get rid of the metadata properties when retrieving documents from Cosmosdb. It seemed like a very reasonable expectation to have the option with the document "GET" API call to be able to retrieve exactly what he created using the document "POST" API call, without these Cosmosdb Metadata properties mixed in:

"_rid":"ehszALxRRgACAAAAAAAAAA==", "_ts":1408340640, "_self":"dbs\/ehszAA==\/colls\/ehszALxRRgAALxRRgACAAAAAAAAAA==\/", "_etag":"00002500-0000-0000-0000-53f192a00000", "_attachments":"attachments\/"

As of now there is no direct way to omit these properties when you are querying the documents. However, cosmosdb team is aware of this feature request, understand the reasons for it, and are considering it for a future release.

For those who are wondering how to omit these system generated properties, you can simply handle this with a User Defined Function.

function stripMeta(doc) {
var metaProps = ["_rid", "_ts", "_self", "_etag", "_attachments"];
var newDoc = {};
for(var prop in doc) {
if (metaProps.indexOf(prop) == -1) {
newDoc[prop] = doc[prop];
}
}

return newDoc;
}

And you can retrieve your documents with whatever queries as follows,

select value udf.stripMeta(c) from c

Hope this helps someone out there.

· 5 min read

One of the frequent questions i get from partners is on how to set Timezone for an application running on Azure app service. It is too easy to change the timezone for an app service hosted in windows OS , but the same settings do not apply for an app service hosted in Linux or Web App running using a container.

How to configure for App Service on Windows:

If your app service plan runs on Windows, As a quick fix, in the configuration, just add a setting named “WEBSITE_TIME_ZONE” with the value you want:

Timezone configuration on Web App

How to configure for AppService on Linux:

If your App Service Plan is Linux, you need to do it differently. You need to set TZ variable in Application settings.

Say if you want to set your timezone to Asia/Kolkata. you need to set the TZ variable value as

Timezone configuration on Linux Web App

Timezone Values:

The supported timezone values are listed here.

Value="Morocco Standard Time" For (GMT) Casablanca
Value="GMT Standard Time" For (GMT) Greenwich Mean Time : Dublin, Edinburgh, Lisbon, London
Value="Greenwich Standard Time" For (GMT) Monrovia, Reykjavik
Value="W. Europe Standard Time" For (GMT+01:00) Amsterdam, Berlin, Bern, Rome, Stockholm, Vienna
Value="Central Europe Standard Time" For (GMT+01:00) Belgrade, Bratislava, Budapest, Ljubljana, Prague
Value="Romance Standard Time" For (GMT+01:00) Brussels, Copenhagen, Madrid, Paris
Value="Central European Standard Time" For (GMT+01:00) Sarajevo, Skopje, Warsaw, Zagreb
Value="W. Central Africa Standard Time" For (GMT+01:00) West Central Africa
Value="Jordan Standard Time" For (GMT+02:00) Amman
Value="GTB Standard Time" For (GMT+02:00) Athens, Bucharest, Istanbul
Value="Middle East Standard Time" For (GMT+02:00) Beirut
Value="Egypt Standard Time" For (GMT+02:00) Cairo
Value="South Africa Standard Time" For (GMT+02:00) Harare, Pretoria
Value="FLE Standard Time" For (GMT+02:00) Helsinki, Kyiv, Riga, Sofia, Tallinn, Vilnius
Value="Israel Standard Time" For (GMT+02:00) Jerusalem
Value="E. Europe Standard Time" For (GMT+02:00) Minsk
Value="Namibia Standard Time" For (GMT+02:00) Windhoek
Value="Arabic Standard Time" For (GMT+03:00) Baghdad
Value="Arab Standard Time" For (GMT+03:00) Kuwait, Riyadh
Value="Russian Standard Time" For (GMT+03:00) Moscow, St. Petersburg, Volgograd
Value="E. Africa Standard Time" For (GMT+03:00) Nairobi
Value="Georgian Standard Time" For (GMT+03:00) Tbilisi
Value="Iran Standard Time" For (GMT+03:30) Tehran
Value="Arabian Standard Time" For (GMT+04:00) Abu Dhabi, Muscat
Value="Azerbaijan Standard Time" For (GMT+04:00) Baku
Value="Mauritius Standard Time" For (GMT+04:00) Port Louis
Value="Caucasus Standard Time" For (GMT+04:00) Yerevan
Value="Afghanistan Standard Time" For (GMT+04:30) Kabul
Value="Ekaterinburg Standard Time" For (GMT+05:00) Ekaterinburg
Value="Pakistan Standard Time" For (GMT+05:00) Islamabad, Karachi
Value="West Asia Standard Time" For (GMT+05:00) Tashkent
Value="India Standard Time" For (GMT+05:30) Chennai, Kolkata, Mumbai, New Delhi
Value="Sri Lanka Standard Time" For (GMT+05:30) Sri Jayawardenepura
Value="Nepal Standard Time" For (GMT+05:45) Kathmandu
Value="N. Central Asia Standard Time" For (GMT+06:00) Almaty, Novosibirsk
Value="Central Asia Standard Time" For (GMT+06:00) Astana, Dhaka
Value="Myanmar Standard Time" For (GMT+06:30) Yangon (Rangoon)
Value="SE Asia Standard Time" For (GMT+07:00) Bangkok, Hanoi, Jakarta
Value="North Asia Standard Time" For (GMT+07:00) Krasnoyarsk
Value="China Standard Time" For (GMT+08:00) Beijing, Chongqing, Hong Kong, Urumqi
Value="North Asia East Standard Time" For (GMT+08:00) Irkutsk, Ulaan Bataar
Value="Singapore Standard Time" For (GMT+08:00) Kuala Lumpur, Singapore
Value="W. Australia Standard Time" For (GMT+08:00) Perth
Value="Taipei Standard Time" For (GMT+08:00) Taipei
Value="Tokyo Standard Time" For (GMT+09:00) Osaka, Sapporo, Tokyo
Value="Korea Standard Time" For (GMT+09:00) Seoul
Value="Yakutsk Standard Time" For (GMT+09:00) Yakutsk
Value="Cen. Australia Standard Time" For (GMT+09:30) Adelaide
Value="AUS Central Standard Time" For (GMT+09:30) Darwin
Value="E. Australia Standard Time" For (GMT+10:00) Brisbane
Value="AUS Eastern Standard Time" For (GMT+10:00) Canberra, Melbourne, Sydney
Value="West Pacific Standard Time" For (GMT+10:00) Guam, Port Moresby
Value="Tasmania Standard Time" For (GMT+10:00) Hobart
Value="Vladivostok Standard Time" For (GMT+10:00) Vladivostok
Value="Central Pacific Standard Time" For (GMT+11:00) Magadan, Solomon Is., New Caledonia
Value="New Zealand Standard Time" For (GMT+12:00) Auckland, Wellington
Value="Fiji Standard Time" For (GMT+12:00) Fiji, Kamchatka, Marshall Is.
Value="Tonga Standard Time" For (GMT+13:00) Nuku'alofa
Value="Azores Standard Time" For (GMT-01:00) Azores
Value="Cape Verde Standard Time" For (GMT-01:00) Cape Verde Is.
Value="Mid-Atlantic Standard Time" For (GMT-02:00) Mid-Atlantic
Value="E. South America Standard Time" For (GMT-03:00) Brasilia
Value="Argentina Standard Time" For (GMT-03:00) Buenos Aires
Value="SA Eastern Standard Time" For (GMT-03:00) Georgetown
Value="Greenland Standard Time" For (GMT-03:00) Greenland
Value="Montevideo Standard Time" For (GMT-03:00) Montevideo
Value="Newfoundland Standard Time" For (GMT-03:30) Newfoundland
Value="Atlantic Standard Time" For (GMT-04:00) Atlantic Time (Canada)
Value="SA Western Standard Time" For (GMT-04:00) La Paz
Value="Central Brazilian Standard Time" For (GMT-04:00) Manaus
Value="Pacific SA Standard Time" For (GMT-04:00) Santiago
Value="Venezuela Standard Time" For (GMT-04:30) Caracas
Value="SA Pacific Standard Time" For (GMT-05:00) Bogota, Lima, Quito, Rio Branco
Value="Eastern Standard Time" For (GMT-05:00) Eastern Time (US & Canada)
Value="US Eastern Standard Time" For (GMT-05:00) Indiana (East)
Value="Central America Standard Time" For (GMT-06:00) Central America
Value="Central Standard Time" For (GMT-06:00) Central Time (US & Canada)
Value="Central Standard Time (Mexico)" For (GMT-06:00) Guadalajara, Mexico City,Monterrey
Value="Canada Central Standard Time" For (GMT-06:00) Saskatchewan
Value="US Mountain Standard Time" For (GMT-07:00) Arizona
Value="Mountain Standard Time (Mexico)" For (GMT-07:00) Chihuahua, La Paz, Mazatlan
Value="Mountain Standard Time" For (GMT-07:00) Mountain Time (US & Canada)
Value="Pacific Standard Time" For (GMT-08:00) Pacific Time (US & Canada)
Value="Pacific Standard Time (Mexico)" For (GMT-08:00) Tijuana, Baja California
Value="Alaskan Standard Time" For (GMT-09:00) Alaska
Value="Hawaiian Standard Time" For (GMT-10:00) Hawaii
Value="Samoa Standard Time" For (GMT-11:00) Midway Island, Samoa
Value="Dateline Standard Time" For (GMT-12:00) International Date Line West

To verify that whether offset is updated or not navigate to Console and execute time command

Also, note that TZ codes are different from the Windows codes. Here's the reference database:

https://en.wikipedia.org/wiki/List_of_tz_database_time_zones

I hope it helps someone out there.

· 2 min read

There are few mandatory sites that every developer on azure should know. This post will contain a curated list of awesome websites which will definitely help.

Azure Checklist - This checklist is your guide to the best practices for deploying secure, scalable, and highly available infrastructure in Azure

Devops Generator - It is really a nice tool to get you a starting point for your demos on azure devops

Azure Charts - Azure heatmap where you can see the changes to Microsoft cloud services in a heat map visualisation

Cosmic notes - Learn more about Azure Cosmos DB database, one Cosmic Note at a time!

AKS Workshop - You’ll go through tasks that will help you master the basic and more advanced topics required to deploy a multi-container application to Kubernetes on Azure

Price Calulator - Pricing calculator to help you understand the pricing. This tool will make it easier to understand the pricing of the different services/products.

Azure VM pricing - Find and compare Azure Virtual machines specs and pricing on a one page.

Azure IoT Developer Kit - The Microsoft Azure MXChip IoT Developer Kit (a.k.a DevKit) can be used to develop and prototype IoT solutions leveraging Microsoft Azure services. It includes an Arduino compatible board with rich peripherals and sensors, an open-source board package and a growing projects catalog.

Severless Library - Collection of azure functions xamples. If you are looking for some ideas on how Azure functions can be leveraged or need an example for your scenario this is a great resource.

Azure speed test - Use this tool to measure the latency from your web browser to the Blob Storage Service in each of the Microsoft Azure Data Centers.

App Migration - Assess any app with an endpoint scan. Download the Migration Assistant and start your .NET and PHP app migration to Azure App Service.

The above tools/sites have helped me a lot in the journey of myself as a Azure developer. I'm sure this would help any of the developer who wants to get started on Azure.

· One min read

There are few cool speed test tools available out there which allows you to test network latencies and speed to data centers from different countries and locations.  Along with finding the closest Datacenter near your location, it tests the storage latency as well as upload and download speeds. 

Check it out from the following urls:

𝗔𝘇𝘂𝗿𝗲: http://azurespeedtest.azurewebsites.net

𝗔𝗪𝗦: https://cloudharmony.com/speedtest-for-aws

Make use of the above tools to identify which region is suitable for your solution. Hope it helps.

· 6 min read

I have been working with Cosmos DB for almost 2 years and most of the time i have used SDKs to connect to Cosmos DB. In the recent times i started consuming Rest API for my hybrid application. One of the tricky part in Cosmos DB is that connecting to it and running queries with REST API. In this blog post, I want to elaborate more on the repository i have created to test the APIs in one go. Also will discuss more on how to call Azure Cosmos DB by using its REST API. I will be using the Cosmosdb account and Postman tool.

If you are very new to Cosmosdb, read my blog on how to setup Cosmos DB in local and connect via Visual Studio Code. Many of us come from the SQL background, when we want to connect to SQL Server, usually we need to have a username and password. You need to do more than that to connect and run queries in CosmosDB. But CosmosDB needs some more parameters to connect to it.

Once you create the Cosmos DB account on Azure and navigate to the keys section on the left pane. You will see two types of tabs on the Keys. There are two types of keys, one type of users having the Key can Read and Write. Other type ofusers having the key can only Read. 

Let's understand different terms used while making a connection to Cosmos DB

Master Keys are keys are created when the Cosmos DB Account is created. This key can be regenerated by clicking on refresh icon to regenerate them in the Azure portal. When you are using Cosmos DB emulator you won't be able to generate it. These keys are very sensitive ones and provide access to the administrative resources. We should be very careful when weneed to store them. Recommended way is to use Read-Only Keys as much as we can.

Resource Tokens are responsible for providing access to specific containers, documents, attachments, stored procedures, triggers, and UDFs. Each user must have a resource token. It is mandatory that every application needs to use a resource token to call Cosmos DB API.

Users are specific for Cosmos DB databases. You can attach specific permissions or roles to each user like the way we do in SQL server.

Cosmos DB API

As i mentioned earlier we have many options to access to CosmosDB. Rest API is one of these options and it is the low level access way to Cosmos DB. Most of the features supported with SDK are available and you can customize all options of CosmosDB by using REST API. To customize the calls, and pass the required authorization information, you need to use http headers.

In the following example, I am going to try to create a database in CosmosDB emulator by using the REST API. First let’s look at the required header fields for this request. These requirement applies to all other REST API calls too.

x-ms-version : As the name indicates this is the version of the REST API. You can find the available versions here. If you are confused on what to use always use the latest one.

x-ms-date : This is the date of your request. It must be formatted by Coordinated Universal Time. (ex: Sun, 30 June 2019 05:00:23 GMT)

x-ms-session-token: It is required if you want to use session consistency. For each of your new write request in Session consistency, CosmosDB assings a new SessionToken to the calls. You need to track the right session token and use it in this header property to keep usng the same session. SDK does this for you in the background, if you want to use the REST API, you need to do this manually.

Authorization: This one is the most important and tricky one. This needs to get generated for each of your call to Cosmos DB. It must be in the following format

How to Call APIs with Postman:

To call Cosmos DB directly from POSTMAN, you need to get the Cosmosdb account URL we need to use. If you are using the emulator, you can get it from the the local environment which should be like https://localhost:8081. I will be using the account created in Azure protal.

One other thing you need to setup is the environment variable as you see we are using some of the configured variables in the script, you can create a new environment variable using Postman by navigating to environments and add new environment with configured variables.

Create environments

Configured variables

we need to look at the documentation of CosmosDB Rest API. You can find all URL locations from this link. Since I am trying to list the databases inside a collection, I am going to use the following path.

https://postmandemo.documents.azure.com:443/

     Also, documentation tells us that this must be a GET Http Action. In Postman, I pick the GET and type the URL to the URL section in the following example.

As Next step, we need to create an environment in Postman to store some variables. As connecting to cosmos db needs a token we need to generate a token for CosmosDB and get the current date to fill the header named x-ms-date. I am going to use variables in Environment to store the values. To Create an environment. Click on gears icon and click on Add.

The below example shows the environment variables that we will frequently use to test Cosmos DB API.

As we are requesting to get the list of databases, we are ready to add values to headers section. Click on Headers link, and add the following headers. These are the required HTTP headers for all CosmosDB REST API calls.

x-ms-version : 2019-06-30
(This is the latest version. You can find the other versions here.)

x-ms-date: {{utcDate}}
(This is the variable we defined in the Postman environment. Its value will be generated dynamically in the Pre-request Script.)

authorization : {{authToken}} (This is the other parameter we just created. We are going to generate its value in script.)

Acceptapplication/json.
(This is required since this is going to be a GET Http Action.)

Your screen should looks like this.

Next, we need to generate an authorization token and the current date in the required format.
To do this, we’ll use the Pre-request Script section in Postman. This script runs automatically before each request. In this step, we’ll generate the authToken and utcDate parameters.
Simply copy and paste the following code into the Pre-request Script tab:

https://gist.github.com/sajeetharan/c2c1fbc48bf24e3b321323b34232f5a8

We are done with all the things needed to get the list of databases. Click on the send button to see the list of databases as response.

Great! Look at all that information we received back in the body of the Response.

This is the way to test Cosmos DB API with POSTMAN. You can try different APIs with the simple collection we've created here. Now it becomes easy for developers to leverage the Cosmos DB api and to play around with it.

· 2 min read

Road traffic is a very classic and burning problem in Sri Lanka and in most of the Asian countries. Personally I have to spend 2 hours on the road everyday by just stuck in the traffic and I assume the same for other people who gets stuck for many hours with no way out.

I was thinking of implementing a solution through various ways with PaaS provided by Azure, this blog focus on one of the solution with Azure by using various services such as IOT hub,Functions,Cosmosdb,Powerbi and bot framework

Overall Architecture:

Components used:

  • Azure IOT hub
  • Azure Functions
  • Azure cosmosdb
  • Power BI

How it works?

IOT sensors can be placed in heavy traffic areas to monitor traffic level along the road. Everyone can access the data using Facebook messenger bot and subscribe on specific road/area. When there is heavy traffic, push notification will be sent to subscribers allow them to avoid that area and redirected to some other road. Also a notification will be send to the traffic police to take over the control.

How to build?

The high level architecture includes 4 steps.

  • IOT sensors placed over the areas will send data to the Azure IOT hub.
  • Azure IoT Hub will be configured to trigger Azure Functions to Store data into Cosmos DB  and also send notification to Facebook messenger bot(This could be replaced with LINE,Telegram,Skype etc) subscribers.
  • Facebook messenger bot connects to Azure Functions which will acts as serverless bots over HTTPS and  Azure Functions to process message from Facebook messenger users and reply back
  • PowerBI connects to Cosmos DB and then Visualize Traffic level on map in real time and could be displayed on the control room.

I will be implementing this POC and publish the code in my github repository in the coming days. In the meantime if you have any suggestions feel free to comment below.

· 4 min read

I was at the Global Azure Bootcamp recently concluded last week, one of the participant came and asked me, "Hey what is Cosmos DB" I casually responded “Well, that’s Microsoft’s globally distributed, massively scalable, horizontally partitioned, low latency, fully indexed, multi-model NoSQL database". The immediate question came after that was whether it supports hybrid applications. In this blog I will be explaining how to leverage the features of cosmos db when you're building hybrid applications.

Ionic framework is an open source library of mobile-optimized components in JavaScript, HTML, and CSS. It provides developers with tools for building robust and optimized hybrid apps which works on Android,IOS and web.  Ionic comes with very native-styled mobile UI elements and layouts that you’d get with a native SDK on iOS or Android.

Let's see how to build Hybrid application with Ionic and Cosmosdb

PreRequisites:

You need to have npm and node installed on your machine to get started with Ionic.

Step 1: Make sure you've installed ionic in your machine with the following command,

ionic -v

Step 2: Install Ionic globally

if it's not installed, install it by using the command

npm i -g ionic

Step 3: Create a new ionic project

Ionic start is a command to create a new ionic project. You pass in the directory name to create, and the template to use. The template can be a built-in one (tabs, blank) or can point to a GitHub URL.

The aim is to create a simple ToDo application which displays lists of tasks, and user should be able to add new tasks.

Lets create a blank project with the command

 ionic start cosmosdbApp tabs

You will see a new project getting created.

Step 4: Run the ionic app

You can run the app with a simple command by navigating to the folder and then run

Ionic serve

This starts a local web server and opens your browser at the URL, showing the Ionic app in your desktop browser. Remember, ionic is just HTML, CSS and JavaScript!

It will open the application in the default browser with the default app.

If you're stuck at any point you can refer to my slides on How to get started with Ionic and follow the steps.

https://slides.com/sajeetharansinnathurai/ionicnsbm#/10

Step 5: Create the cosmosdb account on azure portal,

We need to create an cosmosdb account and use the Endpoint and SecretKey in our application. You can follow the

Blog on how to create it from the azure portal

https://sajeetharan.wordpress.com/2018/03/26/wear-out-the-features-of-azure-cosmosdb-with-aspnetcore-application/

Create a database named "ToDoList" and containeras "Items".

Once created, lets go back to the application.

Step 6: Lets add Cosmosdb SDK to the project

To consume the Cosmosdb service in the application we need to add the Azure Cosmos Javascript SDK to the project. This can be done with the command

npm i @azure/cosmos

Step 7:  You need to create an interface/model which will be used to save/retrieve the objects from the cosmosdb

https://gist.github.com/sajeetharan/a1dff67c87dce10bc2220aa0e9c550c3

Step 8: You need to add two pages home and todo page , home to display the lists of items inside the containerand todo page to add a new item. These two pages can be generated insdie the module with the command,

ionic g page home

Ionic g page todo

https://gist.github.com/sajeetharan/85229d091990d149b9c09d71f3387287

Step 9: We need to add a service to embed the logic to communicate with the cosmosdb you can create a new service inside the module as,

ionic g service cosmos

https://gist.github.com/sajeetharan/d7336abce15fa4d10ffd9d806b819462

As we need to make use of the available methods inside the @azure/cosmos You can import cosmos with the line,

import * as Cosmos from "@azure/cosmos";

Now make use of all the available functions in the SDK to add,delete,update items in the cosmosdb.

Step 8: To make application compatible with android/ios , run the following command,

Ionic cordova build ios/android

If you want to make the development faster, you could try building your ionic application with capacitor as well.

Now your hybrid application uses cosmosdb as a backend, with this demo you know how to use cosmosdb as a database for your hybrid application. I hope you should be able to create more applications in the future with cosmosdb and ionic.

You can check the demo application source code from here.

· 4 min read

Recently, I was involved in working with a customer who had their data in on prem SQL server. As they are shifting their soultion to Cloud(Azure) with Cosmosdb, the first requirement was to migrate the existing data to Cosmosdb. In this post, I will be explaining on how to do the migration and also how to do the data transformation as Cosmosdb stores the data as key value(JSON) format in the collection whereas MSSQL stores it as a row in the table.

Cosmosdb Data Migration Tool:

The migration tool provided by Cosmosdb team supports a different various data sources. To date, it can import data that you currently may have stored in SQL Server, existing JSON files, flash files of comma separated values, MongoDB, Azure Table Storage.

PreRequisities
  1. MSSQL Server , if you don't have it grab it from here.
  2. Download Cosmosdb data migration tool.
  3. Cosmosdb Account on Azure.

In this post i will show on how to import data from AdventureWorks and if you don't already know, AdventureWorks is a popular sample database for SQL Server. There are more than 40 tables in the database and we will use one of the Views to migrate to the Cosmosdb. Lets pick vStoreWithAddress. It has the columns such as Name,AddressType,AddressLine etc.As we are migrating this data  to Cosmosdb we could make use of nested values by merging address fields together. Let's get started.

 Step 1:

Connect to AdventureWorks2017 database and open the view Sales.vStoreWithAddress. 1

Step 2:

Lets assume the requirement is to migrate the data which contains the AddressType as shipping. With this step we will also do the data transformation by merging the address fields together. So the query will be like, https://gist.github.com/sajeetharan/985bd411e3e80ebb8134a16c684748ce  

Step 3:

Open Cosmosdb data migration tool. You can open it by clicking the dtui.exe inside downloaded folder  as mentioned in the prerequisites section.

Step 4:

We need to fill the source information in the tool. As we know our data source is from SQL server. Pick the source as SQL. 3

Step 5:

You need to fill the connection string for SQL server, which you can obtain easily by going to server explorer and connecting to the SQL server as follows. 5 Once you enter the connection string verify if its working by clicking on verify.
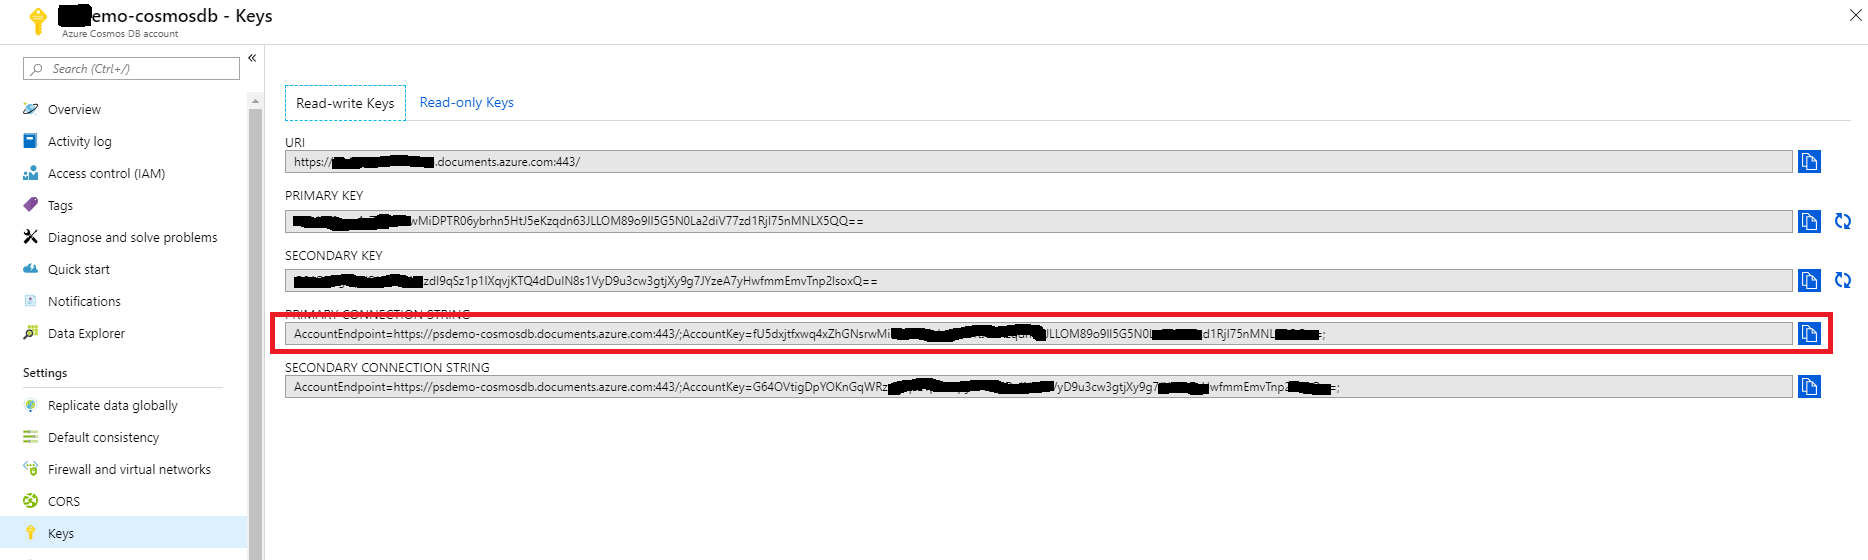
Step 6:

Next step is to enter the query to select the source data, we can do this by either pasting the query or by selecting the SQL query file. 3

Step 7:

We need to give the Nesting Operator as “.” As we have used to merge the Address parts as one object. Once this is done click on next.

Step 8:

Next step is to fill the target information, as you know here our target database is Cosmosdb. I assume you have a Cosmosdb account, you can obtain your connection string by navigating to Azure portal and select Cosmosdb account.

6 Once you copy paste the connection string, one more extra thing you need to do is to append the database with the connections string https://gist.github.com/sajeetharan/1e6e21339820b8437b1d9542e8133d51#file-sajeetharan-com\_4192016\_mssql\_cosmosdb You can verify the connection string by clicking on verify button. Also give the collection name as you prefer. It is important to define a PartitionKey in order to query the data later.Partition key is used to group multiple documents together within physical partitions. Let's partition by “/address/postalCode” which we're storing as postal code nested beneath address and for throughput, we'll just go with the default here of a thousand request units per second. One more thing we need to set the indexing policy. You'll notice this large text box here where you can set the indexing policy.I want to choose the range indexing policy which you can do here is by right clicking inside the text box and selecting from the context menu. 7 Just click Next and you will be taken to the summary page, where you can review the Migration steps at once.
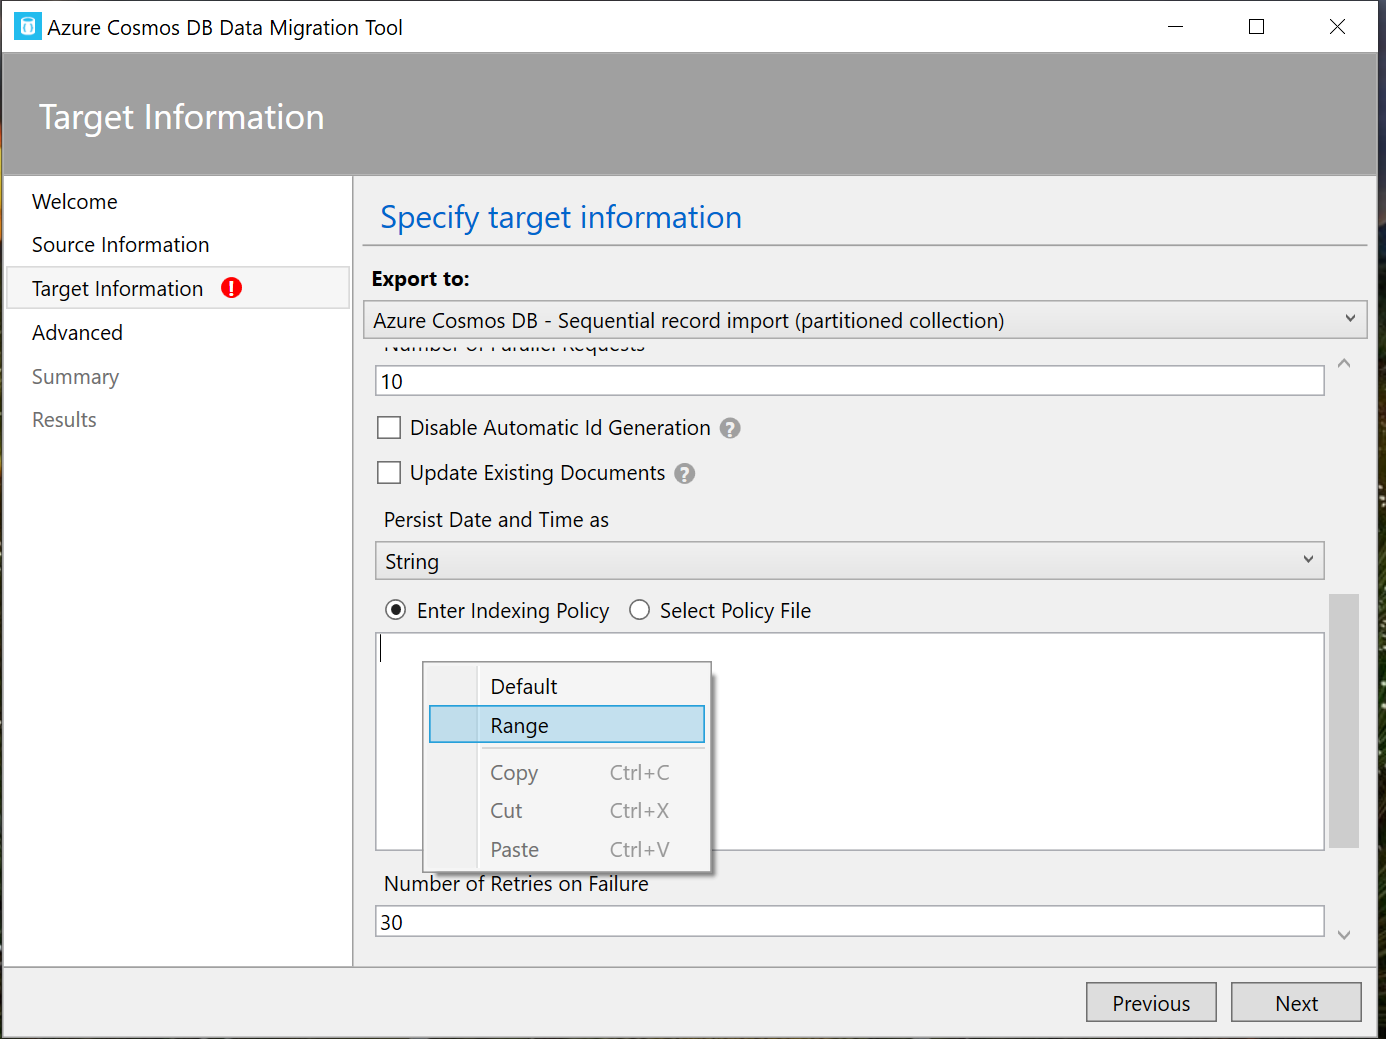
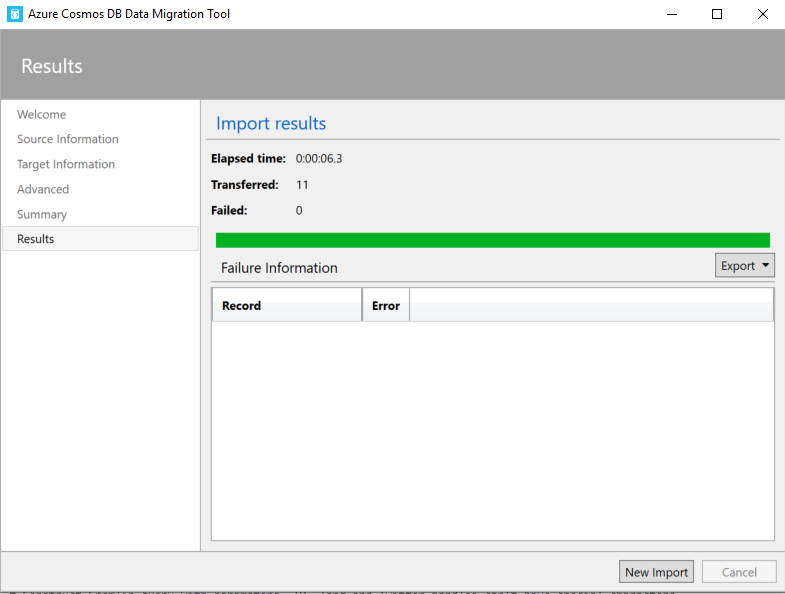
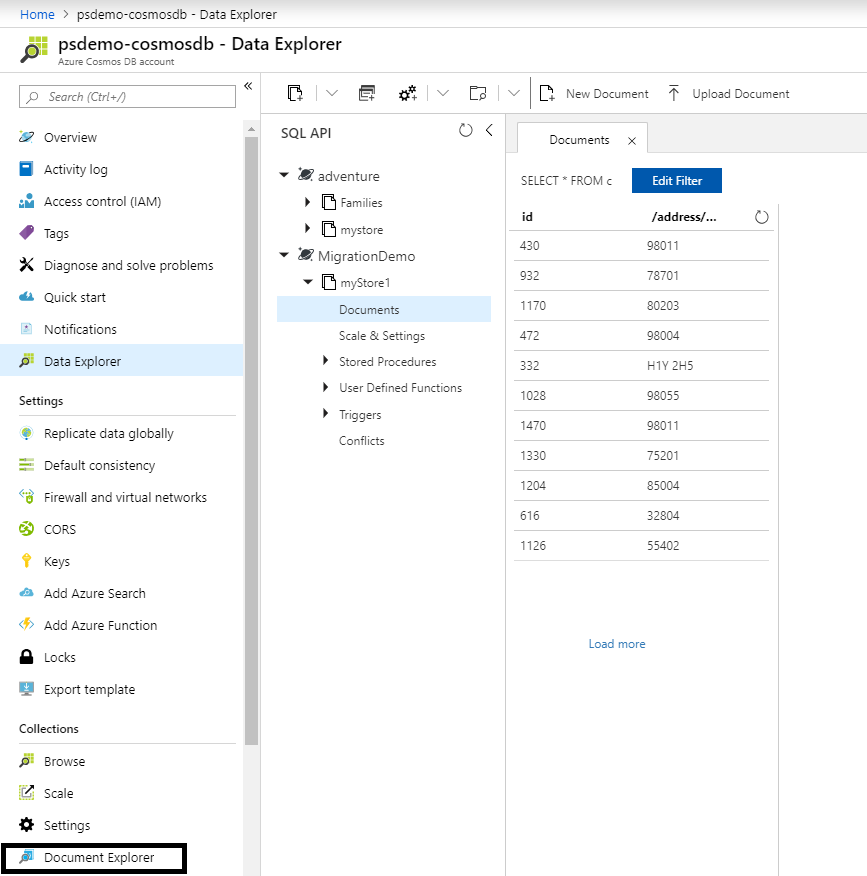
Step 9:

Once you click import on the last step. You will see a successful message as all the data been transferred with the number of documents created. 8

Step 10:

You could verify the migration by running a query on the Cosmosdb data explorer as follows, 10 That's how you  migrate data from SQL server to Cosmosdb and it is very easy using the Cosmosdb Migration tool. For the other modes of data migration i will be writing separate blogs. Hope this blog helps if someone wants to transform data and migrate the data from MSSQL to cosmosdb. Cheers!
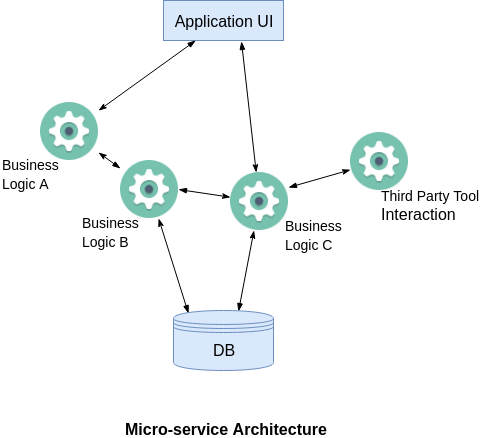
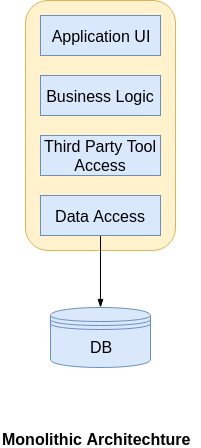
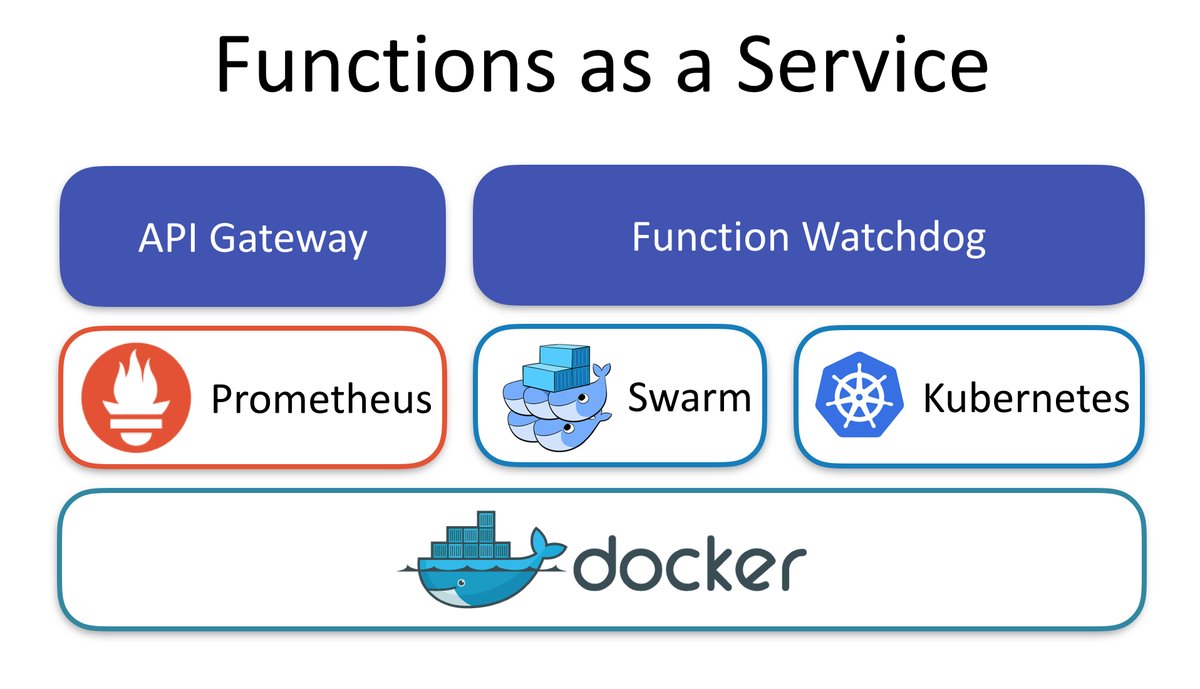
· 5 min read

For the past one month , I have been experimenting with one of the promising serverless framework for creating serverless functions.  With the modern applications moving to cloud with microservices this framework becomes very handy to create/manage your microservices in the form of functions.

What do we need microservices?

When I started my career as a developer most of the applications that I worked on are with three Tier architecture and most of the companies built the applications with monolithic architecture even before cloud platforms were existed. With the modern technologies everyone is decomposing the business functionalities of the application into several micro services to avoid single point of failure. Assume Uber as an application and their core functionalities such as Registration,Payment,Email notifications, Push notifications could be broken down to several microservices in order to avoid any downtime. With monolithic architecture single point of failure would cause the entire application to shut down. To understand in detail, look at the following diagram

Serverless != No server

Many of us have the common understanding of serverless as its about without a server. None can be executed/hosted without having a server. It’s just that the fack that you will have no way to actually see the server which executes your code. As a developer with serverless you do not have to worry about managing servers as it will be automatically handled. Serverless becomes handy because of the following reasons

  • Reduce time-to-market
  • Easier deployment
  • Scale automatically
  • Focus on business logic
  • Cost reduction

Serverless is used for mainly event event driven architecture where functions has an endpoint that triggers something. Say for example, Trigger a notification once the file is uploaded.

Serverless and Microservices are great couple together. You should choose serverless when your functions/services are,

  • Stateless
  • Short Job
  • Event-driven stuff, e.g. Time-based / webhook
  • Simple application with less dependencies

OpenFaaS – Serverless Functions Made Simple

There are so many frameworks out there to build applications with serverless out of them OpenFaas stands out as its not vendor locked and you can use it for both On prem as well as in any of the cloud platform. It is  very simple and need few commands to get your functions deployed anywhere. It can be exposed with Docker Swarm or Kubernetes to the outside world.

Following are the reasons if you ever want to choose OpenFaas,

  • Anything can be a function
  • Leverage existing skills in teams
  • Avoid vendor lock-in
  • Run anywhere - cloud or on-prem
  • 13,000 stars on github with large contributors

OpenFaaS Architecture

There are main two components that you should get to know before getting started with OpenFaas.

DFrkF4NXoAAJwN2.jpg

Function Watchdog

As the name indicates watchdog is responsible to convert http messages to stdin then it will be passed to functions and stdout vice versa.Any docker image could be turned to serverless by adding function watchdog

API Gateway / UI Portal

As you have heard from AWS API gateway, it does the similar job here as well. It provides an external route into your functions and collects Cloud Native metrics through Prometheus. It also scale functions according to demand by altering the service replica count in the Docker Swarm or Kubernetes API. It also provides the UI to invoke functions in your browser and create new ones as needed.

Faas-CLI

The command line interface helps you to deploy your functions or quickly create new functions from templates  in any programming language you prefer.

Setup OpenFaas on Kubernetes API

I am a fan of Microsoft Azure, I will be providing the steps to setup OpenFaas on Azure Kubernetes. I have done this at a workshop and you can find 10 steps to build a kubernetes cluster and then all steps can be done simply by hitting few kubectl and helm commands.

Step 1: Launch Azure Cloud shell with https://shell.azure.com/bash

Step 2: Create a resource group

az group create --name aksColomboRG --location eastus

Step 3: Create AKS cluster

az aks create  --resource-group aksColomboRG  --name openFaasCluster --node-vm-size Standard_A2_v2   --node-count 1 --enable-addons monitoring --generate-ssh-keys

Step 4: Connect to the cluster

az aks get-credentials --resource-group aksColomboRG --name openFaasCluster --admin -a  --overwrite-existing

Step 7: List the cluster nodes

kubectl get all -n kube-system

Kubectl is a command line interface for running commands against Kubernetes clusters.

Step 8: Install and Init Helm

helm init –upgrade

Helm fills the need to quickly and reliably provision container applications through easy install, update, and removal

Step 9: Install OpenFaas

git clone https://github.com/openfaas/faas-netes

Step 10: Create namespace OpenFaas

kubectl create ns openfaaskubectl

Step 11: Create second namespace for OpenFass Functions

kubectl create ns openfaas-fn

Step 12 : Check you have a tiller pod in ready state

kubectl -n kube-system get po

Step 13: Manually start the tiller

kubectl logs --namespace kube-system tiller-deploy-66cdfd5bc9-46sxv

When a user executes the Helm install command, a Tiller Server receives the incoming request and installs the appropriate package

Step 14: Resolve cannot list configmaps in the "kube-system"

kubectl create serviceaccount --namespace kube-system tiller

Step 16: A Helm chart for OpenFaaS is included in the cloned repository. Use this chart to deploy OpenFaaS into your AKS cluster.

helm repo add openfaas https://openfaas.github.io/faas-netes/

helm upgrade --install --namespace openfaas --set functionNamespace=openfaas-fn --set async=true --set serviceType=LoadBalancer openfaas openfaas/openfaas

Step 17: See OpenFaas live

kubectl get all -n openfaas

and you should copy the service/gateway-external url with the port and paste it in the browser. You should see OpenFaas live.

2019-02-23_13-43-40

Well, that’s all about for this post, I will write another post about how to execute functions and how to build your custom function in the coming days.

You can find the workshop slides from here. Keep watching :)

· 5 min read

For the past one month , I have been experimenting with one of the promising serverless framework for creating serverless functions.  With the modern applications moving to cloud with microservices this framework becomes very handy to create/manage your microservices in the form of functions.

What do we need microservices?

When I started my career as a developer most of the applications that I worked on are with three Tier architecture and most of the companies built the applications with monolithic architecture even before cloud platforms were existed. With the modern technologies everyone is decomposing the business functionalities of the application into several micro services to avoid single point of failure. Assume Uber as an application and their core functionalities such as Registration,Payment,Email notifications, Push notifications could be broken down to several microservices in order to avoid any downtime. With monolithic architecture single point of failure would cause the entire application to shut down. To understand in detail, look at the following diagram

Serverless != No server

Many of us have the common understanding of serverless as its about without a server. None can be executed/hosted without having a server. It’s just that the fack that you will have no way to actually see the server which executes your code. As a developer with serverless you do not have to worry about managing servers as it will be automatically handled. Serverless becomes handy because of the following reasons

  • Reduce time-to-market
  • Easier deployment
  • Scale automatically
  • Focus on business logic
  • Cost reduction

Serverless is used for mainly event event driven architecture where functions has an endpoint that triggers something. Say for example, Trigger a notification once the file is uploaded.

Serverless and Microservices are great couple together. You should choose serverless when your functions/services are,

  • Stateless
  • Short Job
  • Event-driven stuff, e.g. Time-based / webhook
  • Simple application with less dependencies

OpenFaaS – Serverless Functions Made Simple

There are so many frameworks out there to build applications with serverless out of them OpenFaas stands out as its not vendor locked and you can use it for both On prem as well as in any of the cloud platform. It is very simple and need few commands to get your functions deployed anywhere. It can be exposed with Docker Swarm or Kubernetes to the outside world.

Following are the reasons if you ever want to choose OpenFaas,

  • Anything can be a function
  • Leverage existing skills in teams
  • Avoid vendor lock-in
  • Run anywhere - cloud or on-prem
  • 13,000 stars on github with large contributors

OpenFaaS Architecture

There are main two components that you should get to know before getting started with OpenFaas.

DFrkF4NXoAAJwN2.jpg

Function Watchdog

As the name indicates watchdog is responsible to convert http messages to stdin then it will be passed to functions and stdout vice versa.Any docker image could be turned to serverless by adding function watchdog

API Gateway / UI Portal

As you have heard from AWS API gateway, it does the similar job here as well. It provides an external route into your functions and collects Cloud Native metrics through Prometheus. It also scale functions according to demand by altering the service replica count in the Docker Swarm or Kubernetes API. It also provides the UI to invoke functions in your browser and create new ones as needed.

Faas-CLI

The command line interface helps you to deploy your functions or quickly create new functions from templates  in any programming language you prefer.

Setup OpenFaas on Kubernetes API

I am a fan of Microsoft Azure, I will be providing the steps to setup OpenFaas on Azure Kubernetes. I have done this at a workshop and you can find 10 steps to build a kubernetes cluster and then all steps can be done simply by hitting few kubectl and helm commands.

Step 1: Launch Azure Cloud shell with https://shell.azure.com/bash

Step 2: Create a resource group

az group create --name aksColomboRG --location eastus

Step 3: Create AKS cluster

az aks create  --resource-group aksColomboRG  --name openFaasCluster --node-vm-size Standard_A2_v2   --node-count 1 --enable-addons monitoring --generate-ssh-keys

Step 4: Connect to the cluster

az aks get-credentials --resource-group aksColomboRG --name openFaasCluster --admin -a  --overwrite-existing

Step 7: List the cluster nodes

kubectl get all -n kube-system

Kubectl is a command line interface for running commands against Kubernetes clusters.

Step 8: Install and Init Helm

helm init –upgrade

Helm fills the need to quickly and reliably provision container applications through easy install, update, and removal

Step 9: Install OpenFaas

git clone https://github.com/openfaas/faas-netes

Step 10: Create namespace OpenFaas

kubectl create ns openfaaskubectl

Step 11: Create second namespace for OpenFass Functions

kubectl create ns openfaas-fn

Step 12 : Check you have a tiller pod in ready state

kubectl -n kube-system get po

Step 13: Manually start the tiller

kubectl logs --namespace kube-system tiller-deploy-66cdfd5bc9-46sxv

When a user executes the Helm install command, a Tiller Server receives the incoming request and installs the appropriate package

Step 14: Resolve cannot list configmaps in the "kube-system"

kubectl create serviceaccount --namespace kube-system tiller

Step 16: A Helm chart for OpenFaaS is included in the cloned repository. Use this chart to deploy OpenFaaS into your AKS cluster.

helm repo add openfaas https://openfaas.github.io/faas-netes/

helm upgrade --install --namespace openfaas --set functionNamespace=openfaas-fn --set async=true --set serviceType=LoadBalancer openfaas openfaas/openfaas

Step 17: See OpenFaas live

kubectl get all -n openfaas

and you should copy the service/gateway-external url with the port and paste it in the browser. You should see OpenFaas live.

2019-02-23_13-43-40

Well, that’s all about for this post, I will write another post about how to execute functions and how to build your custom function in the coming days.

You can find the workshop slides from here. Keep watching :)

· 2 min read

I have been working with couple of applications built with CosmosDB and one of the things that surprised me was one cannot clear all documents in a collection from the Azure web portal or using the Storage Explorer. As I was struggling to do this while doing some tests on the application I decided to write a blog on the solution I used. There are two ways to achieve the same

  • Using a stored procedure
  • Using Cosmosdb SDK

Using Cosmosdb SDK:

I came up with a script in Node which can be done with any of the programming languages such as C#,Python supported by the SDK

Let’s go through the steps:

Step 1:

Open VScode and Create a file named cosmosdb_helper.js

Step 2:

Let’s install the necessary packages needed.

Install documentdb javascript sdk with the following command,

npm i documentdb

and you will see the output as follows

2019-02-04_21-36-10

Let’s install require to handle the dependencies with the following command,

npm i require

and you will see the output as follows,

2019-02-04_21-36-31

Step 3: 

Let's do some coding. You will be able to understand the following code with the comments added on each line,

https://gist.github.com/sajeetharan/8efe2c9424dfc89d1f58b34627858944

Suppose if you have partitionKey created with your collection, you need to pass queryoptions with the partitionKey in selectAll as well as deletDocument as follows,

https://gist.github.com/sajeetharan/d5302257d3b5e54a33e5601b215decf1

Step 4:

Let’s run the script and see the output,

You can run the helper script as follows,

if you want to list all documents in the collection,

node cosmosdb_helper.js selectAll

which will list the output of all documents in the collection.

If you want to delete all documents within a collection, you can run the script as,

node cosmosdb_helper.js deletAll

which will remove all documents in the collection.

Using a stored procedure:

As mentioned above, 2nd way is to use the stored procecure given by Microsoft employee as mentioned here.

Hope the helper script will help someout out there in order to delete all documents in a collection. You can get the whole code from Cosmosd_Helper

· 5 min read

Traditional Architecture :

In a traditional Application with the normal approach, transactional use-cases usually involve persisting data in a few SQL tables or in a NOSQL database. When the changes are performed on the object the database is updated to match the new state.

The traditional approach works well in case if you do not need to know the changes that object has gone through, but in modern systems customers always comes up with a requirement to get the log of changes that particular entity has gone through. With the traditional approach, there is no way of knowing what the user had in the object before changing it, or at which point of time the contents changed. We can still solve this with the traditional way by storing the extra information about the modifications but the solution becomes more complex.

For example in traditional approach,

https://gist.github.com/sajeetharan/2d9921571c67f7038ec5a4053882b85f

Which will create an entry for each insert in the SQL database as follows,

2019-02-03_13-10-23

The current state is saved in a relational database. We load the object, change it and save  it back.

EventSourcing Architecture :

In the eventsourcing solution, we look at the problem as a sequence of events that occur and save the occurrence of events as it is. The events contains all details about what actually happened at particular point of time. These are historical information and once it is saved it should not be modified.

https://gist.github.com/sajeetharan/825ec83fd780b7670146649bf6d4a0ce

All events for a certain product are stored. Their data and sequence define the current state of the product. Event is the easiest way to remember what happened at a certain time. Event sourcing comes with an advantage of having audit trail by itself and to get full understanding of what the system is doing.

Event Sourcing Architecture with AzureCosmosdb and EventHub

To implement event sourcing in your application, Microsoft azure provides the following services to  full fledged solution and we will discuss in this blog.

Lets look at the diagram below,

NEW_LEGAL

Application 1 stores the data in the traditional database and your customer needs the changes that has been done on the product. The above architecture will easily fulfill the requirement with the event sourcing.

Components involved in the architecture as follows,

Azure EventHub

Azure Eventhub is a managed service to receive and process millions of events per second. It is intended to handle event based messaging in huge scale. This could be used in an product if you have devices application publishing events and send them to eventhub. It will create a stream of all these events which can be read by different applications in different ways. Eventhub provides interfaces such as AMQP and HTTP to make it easy to send messages to it. In Eventhub we can define consumer groups which lets us to read stream of events. We can decide on consumer group based on the number of receivers(applications)

CosmosDB

Azure Cosmos DB is a globally-distributed, multi-model database as a service build for low latency and elastic scalability.  It supports the following options to store the data and it is highly available from anywhere in the world,

  • Key-value
  • Column-family
  • Document: MONGO or SQL
  • Graph

I will be not going in detail as there are enough blogs to get started with CosmosDB. In the above architecture there will be millions of events created after each update hence we need to store them in the cosmosdb with the state of the object. This way brings a lot of benefits. First, the event store with cosmosdb becomes your canonical source of truth that describes the updates applied to your domain in an unbiased form.

Implementation:

Application 1:

Whenever user updates an object in the application1, there will be notification message sent to the EventHub with an ID (unique id for each message) that something has happened on application. We could make use of epoch timestamp with 8 digits to make sure it is a unique one. A sample payload would look like,

{"MessageId": 1547632386819}

Note:  As Eventhub can have a message of maximum size 256k it is always better to have minimum size of message.

Once the notification is sent, the state of the object is stored in the eventstore(cosmosdb).

Application 2:

Application 2 will have an EventHub receiver which runs on the background which will subscribe to the EventHub and get the latest message. Once the id is retrieved by the receiver, it can request the eventstore with the id and get all the changes prior to the id as follows,

https://gist.github.com/sajeetharan/c34965a606c8afff9d02f2a3a17522bf

which will create the documents in Cosmosdb as,

2019-02-03_16-55-58

With the above approach ensures that all changes to product are stored as sequence of events. When we look at broader picture, it also ensures that all changes to application state are stored.

This is the simple architecture diagram to implement event sourcing in your application. One of the very good pattern to implement event sourcing is by using CQRS(Command Query Responsibility Segregation).

test

Lets look at the etail implementation with the code in the upcoming blogs. Hope this will help someone out there to implement event sourcing in your application if you are using Azure platform.

· 4 min read

This is time for another blog on cosmosdb explaining how to stream tweets from twitter using hashtags and store them in cosmosdb in real time. You should be able to setup and run this demo within 15 minutes.

PRE REQUISITIES:

I have the following in my local environment , hope you guys have already have😊, if not start setting up.

  • Windows 10 OS
  • Python 2.7
  • Visual Studio Code or PyCharm (Any editor)
  • Azure subscription

let’s get started.

Step 1: Install Python

Hope you have already installed Python in your system , if not download and install from here. Once you install run the following command and see if its properly installed.

Step 2: Install Tweepy and PyDocumentDB

Install the following libraries needed.

Tweepy:

Tweepy is a python package which is easy to use for accessing the twitter api. The API class provides access to the entire twitter RESTful API methods. Each method can accept various parameters and return responses. Install it with the following command,

Pip install tweepy  

If you get an error 'pip' is not recognized as an internal or external command. You should set the path as follows,

C:\>set PATH=C:\Python27\Scripts

Now you should be able to install it without any issue,

Pydocumentdb:

As mentioned above we will be storing the tweets in Azure’s cosmosdb , In order to do that we need the python package for cosmosdb which is pydocumentdb. Install it with the following command.

Pip install pydocumentdb

Now we have everything needed. Lets dive into coding.

Step 3 : Creating Listener to invoke the cosmosdb client

Create a listener named CosmosDBListener with the following methods

__init__ Initializes the client to make sure the connection is available.

On_data will load the data retrieved from the stream and write to the Cosmosdb.

On_error will throw if there is any network/key issues on console.

 
from config import *
import json
from tweepy.streaming import StreamListener

class CosmosDBListener(StreamListener):

def __init__(self, client, collLink):
self.client = client
self.collLink = collLink

def on_data(self, data):
try:
dictData = json.loads(data)
dictData["id"] = str(dictData["id"])
self.client.CreateDocument(self.collLink, dictData)
return True
except BaseException as e:
print("Error on data: %s" % str(e))
return True

def on_error(self, status):
print(status)
return True

Step 4: Stream data from Twitter to CosmosDB

Lets create the real code to connect to twitter and get the related tweets for several hashtags. We will need to authenticate with tweepy to get the twets, so pass the consumer secret and access secret to the api as follows.

    auth = OAuthHandler(consumer_key, consumer_secret)
auth.set_access_token(access_token, access_secret)
api = tweepy.API(auth)

Set the connection policy for cosmosdb and create a client as follows,

    connectionPolicy = documents.ConnectionPolicy()
connectionPolicy.EnableEndpointDiscovery
connectionPolicy.PreferredLocations = preferredLocations

Next step is to read the tweets as follows , we are using .filter method to get tweets related to particular hashtags.

client = document_client.DocumentClient(host, {'masterKey': masterKey}, connectionPolicy)
dbLink = 'dbs/' + databaseId
collLink = dbLink + '/colls/' + collectionId

twitter_stream = Stream(auth, CosmosDBListener(client, collLink))
twitter_stream.filter(track=['#CosmosDB', '#Microsoft', '#MVP', '#BigData', '#DataScience', '#Mongo', '#Graph'], async=True)

Step 5: Creating Configuration File

Create the config file with the following values,

# Enter CosmosDB config details below.
masterKey = ' '
host = ' '

#Enter your database, collection and preferredLocations here.
databaseId = 'tweepyDemo'
collectionId = 'tweets'
preferredLocations = ''

# Enter twitter OAuth keys here.
consumer_key = ''
consumer_secret = ''
access_token = ''
access_secret = ''

You need to have CosmosDB account on azure to get the master key and host values, if you are stuck , read my previous blog on How to setup cosmosdb account

You also need to register the script as a new application at twitter developer portal. After choosing a name and application for your app, you will be provided with a  consumer key , Consumer secret, access token and access token secret - which need to be filled into  the above config.py to provide the app programmatic access to Twitter.

Step 6: Run the script

That’s it folks now if you goto command prompt and run the following command,

py cosmosdbdriver.py

You should see the tweets coming into your cosmosdb collection as follows.

Tweets you need are now in your CosmosDB and use them for further analysis as you need. Hope it helps someone out there. If you are stuck at any point, look at the complete code from here.

· 8 min read

Azure CosmosDB (Azure Cosmos DB – Globally Distributed Database Service (formerly DocumentDB) | Microsoft Azure) is a super set of the service once known as “Azure Document Db”. In short: “Azure CosmosDB ” = “Azure Document Db” + new data types + new APIs.

You can try CosmosDB  for free on Azure or you can setup the CosmosDB on your local environment by following my previous blog. I am becoming a fan of .NET Core with all the features and it is getting better day by day . In this blog post i just wanted to take that initial steps of how to work with CosmosDB from .NET Core Client context. After reading this blog, you should be able to do the following with CosmosDB programmatically,

  • Create Database
  • Create Collection
  • Create Documents
  • Query a Document
  • Delete Database

Pre-Requisities Needed:

I have the following in my local environment , hope you guys have already have😊, if not start setting up.

  • Windows 10 OS
  • Azure CosmosDB Emulator
  • Visual Studio Code editor with C# plugin
  • .NET Core 2.0

Ok folks, lets get started.

Step 1: Create .Net Core Console Application :  As other tutorials, to make it simple I will be creating a dotnetcore console app to work with CosmosDB . With Net Core , we now  have a CLI. Lets create the new app with the following steps. (I’ve mentioned in the previous blog)

  1. Open command prompt or poweshell (Administrator Mode)
  2. Navigate to your folder where you need to create the app
  3. Execute the following command
dotnet new console -n CosmosCoreClient -o CosmosCoreClient

here -n denotes the name of the application, and -o tells the CLI to create a folder with that name and create the application inside the folder

Open the newly created project in Visual Studio Code. Execute the following command

Code.

Here is a screenshot of how it should look on your end:

I am using C# 7.1 feature to create a async Main method in my console app. For that, we will need to make a small change in our project file a little. Open CosmosDBClient.csproj file to edit. Add the following XML node to PropertyGroup node.

<LangVersion>latest</LangVersion>

After changes, your csproj file should look like below:

Lets move to the core part of integrating CosmosDB with .netCore application and start building the features.

Step 2: Add CosmosDB Nuget Package

If you have followed the above steps, we have successfully created the application, next is to add reference to CosmosDB nuget package to get the client libraries. Advantage of these packages/libraries are, they make it easy to work with Cosmosdb.

  1. Open a command prompt and navigate to root of your project.
  2. Execute the following command
dotnet add package Microsoft.Azure.DocumentDB.Core

You might wonder the namespace has DocumentDB in it. In fact DocumetDB is where the whole journey started and hence the name sticks in Cosmos world too. If you now look at the project file a new reference for DocumentDB would have been added. Here is the screenshot of my project file.

Step 3: Creating Model for CosmosDB

Lets build the database. If you are new to CosmosDB you should know that CosmosDB has a query playground here https://www.documentdb.com/sql/demo. It is a sandboxed environment with couple of databases and you can try around with different queries you can write against the database. For this post, lets create the database named Course locally.

Since we our application is to deal with the Courses we need 4 Models here.

  1. Course
  2. Session
  3. Teacher
  4. Student

Here are the Models of the above 4.

Course.cs

using Microsoft.Azure.Documents;
using Newtonsoft.Json;
using System;
using System.Collections.Generic;
public class Course : Document
{
[JsonProperty(PropertyName = "CourseId")]
public Guid CourseId { get; set; }

[JsonProperty(PropertyName = "Name")]
public string Name
{
get
{
return GetPropertyValue<string>("Name");
}
set
{
SetPropertyValue("Name", value);
}
}

[JsonProperty(PropertyName = "Sessions")]
public List<Session> Sessions { get; set; }

[JsonProperty(PropertyName = "Teacher")]
public Teacher Teacher { get; set; }

[JsonProperty(PropertyName = "Students")]
public List<Student> Students { get; set; }
}

Session.cs

using System;

public class Session
{
public Guid SessionId { get; set; }

public string Name { get; set; }

public int MaterialsCount { get; set; }
}

Teacher.cs

using System;

public class Teacher
{
public Guid TeacherId { get; set; }

public string FullName { get; set; }

public int Age { get; set; }
}

Student.cs

using System;

public class Student
{
public Guid StudentId { get; set; }
public string FullName { get; set; }

}

Lets create the Client as the next step.

Step 4: Creating the Client

Next step you will need to instantiate the CosmosDb client before we do anything with the database. In order to connect to the local instance of the cosmosDb, we need to configure 2 things,

  1. URL of the CosmosDb instane
  2. Authentication key needed to authenticate.

As stated above, When you start the CosmosDb  local emulator, the db instance is available at https://localhost:8081. The authkey for local emulator is a static key and you can find it here in this article(https://docs.microsoft.com/en-us/azure/cosmos-db/local-emulator#authenticating-requests). This key works only with the local emulator and wont work with your Azure instance, you can find the key if you are using azure instance from the portal as mentioned in the answer. Here is the code snippet to instantiate the client:

        static string endpointUri = "https://localhost:8081";
static string authKey = "C2y6yDjf5/R+ob0N8A7Cgv30VRDJIWEHLM+4QDU5DE2nQ9nDuVTqobD4b8mGGyPMbIZnqyMsEcaGQy67XIw/Jw==";
string dbName = "CourseDB";
string collectionName = "Courses";
static void Main(string[] args)
{
Console.WriteLine("Press any key to run");
Console.ReadLine();

Run();

Console.ReadLine();

}
private static async void Run()
{
DocumentClient documentClient = new DocumentClient(new Uri(endpointUri),
authKey);
}

When the method Run is exectued the Client is instantiated with the local CosmosDB emulator.

Step 5: Lets start building the features

Next step is to build the features as listed above. Lets add the methods inside the Async method.

Creating Database:

To create a new database programmatically, we make use of CreateDatabaseAsync() or CreateDatabaseIfNotExistsAsync(). When creating the database we pass the database name. Here is the code snippet:

private static async Task<Database> CreateDatabase(DocumentClient documentClient)
{
Database database = documentClient.CreateDatabaseQuery().Where(c => c.Id == "courseDatabase").AsEnumerable().FirstOrDefault();
if (database == null)
{
database = await documentClient.CreateDatabaseAsync(new Database()
{
Id = "courseDatabase"
});
}
return database;
}

When you refresh the URL of local CosmosDB emulator, You should see the database created in your local db emulator as follows,

Creating Collection:

Once the database is created, we can then create a collection. We make use of CreateDocumentCollectionAsync() or CreateDocumentCollectionIfNotExistsAsync().

We will need to provide what is known as the database link (basically the URI at which the db can be reached) and the collection name to the create method. Here is the code snippet.

private static async Task<DocumentCollection> CreateDocumentCollection(DocumentClient documentClient, Database database)

{
DocumentCollection documentCollection = documentClient.CreateDocumentCollectionQuery(database.CollectionsLink).Where(c => c.Id == "courseDocumentCollection").AsEnumerable().FirstOrDefault();

if (documentCollection == null)
{
documentCollection = await documentClient.CreateDocumentCollectionAsync(database.SelfLink, new DocumentCollection()
{
Id = "courseDocumentCollection"
});
}

return documentCollection;
}

Now you should the the Collection for Course is created as follows,

Creating Document :  After creating the database and collection, we can now create the documents. We make use of CreateDocumentAsync() for this purpose. We will need to pass the URI of the collection under which we want to create the document and the document data itself. In this example we make use of the Course data mode i showed earlier and pass it to the create method. Here is the code snippet:

private static async Task CreateCourse(DocumentClient documentClient, DocumentCollection documentCollection)
{
Course course = new Course()
{
CourseId = Guid.NewGuid(),
Name = "En",
Teacher = new Teacher()
{
TeacherId = Guid.NewGuid(),
FullName = "Scott Hanselman",
Age = 44
},
Students = new List<Student>()
{
new Student(){
FullName = "Trump",
StudentId = Guid.NewGuid()
}
},
Sessions = new List<Session>(){
new Session(){
SessionId = Guid.NewGuid(),
Name = "CosmosDB",
MaterialsCount = 10
},
new Session(){
SessionId = Guid.NewGuid(),
Name = "Ch1",
MaterialsCount = 3
}
}
};
Document document = await documentClient.CreateDocumentAsync(documentCollection.DocumentsLink, course);
}

You should see the document inserted in localdb Emulator as follows.

Querying Document:

Now that we have created a document, we can see how to query it. We can make use of CreateDocumentQuery() method for this purpose. We will need to pass the collection link on which we need to query. We can then build the query as a LINQ expression and the client library does the rest. This is the best part of the client library. It has the ability to translate your LINQ expression to cosmos REST URIs without me having to crack my head in constructing those URIs. Here is the code snippet:

private Course QueryCourse(Guid guid, String dbName, DocumentClient documentClient, string collectionName)
{
Course selectedCourse = documentClient.CreateDocumentQuery<Course>(
UriFactory.CreateDocumentCollectionUri(dbName, collectionName))
.Where(v => v.Name == "CosmosDB")
.AsEnumerable()
.FirstOrDefault();
return selectedCourse;
}

Note that you will need to import System.Linq for the LINQ expression to work.

Deleting Database:

Finally, we can make use of DeleteDatabaseAsync() method to delete the database programmatically. We will need to provide the database link to the delete method. We can use the UriFactory.CreateDatabaseUri() helper method to create the database link. Here is the code snippet:

await documentClient.DeleteDatabaseAsync(UriFactory.CreateDatabaseUri(dbName));

Well, those are the main features that Azure CosmosDB client provides and if you are stuck with any of the steps above , you can check out the repository i have added with the samples.

Happy Coding! Lets spread Azure's CosmosDB to the world.

· 4 min read

Recently I started experimenting with Azure's CosmosDB and developed few applications using the same. To start with it this blog will help all the Azure/CosmosDB developers out there to easily setup with visual studio code. I will be sharing how to connect to Azure CosmosDB without using the portal in local machine.

To start with it, You should have visual studio code installed on your machine. If not download it from here.

We need to setup an extension with visual studio code as a initial step. Azure CosmosDB extension for visual studio code gives developers set of cool commands to work with CosmosDB. With the help of Azure CosmosDB extension developers can easily do the actions which could be done on the azure portal such as Create,delete,modify databases,Collections,views and documents. Also the hierarchical representation will provide a better way to understand the structure of database.

Step 1:

To start with, you must install the Azure CosmosDB from the market place. So, search for Azure Cosmos DB extension in the market place and click on install

Go to View - > Extensions or press Ctrl + Shift + X

Once the extension is installed, you can find Azure CosmosDB in explore section of visual studio code.

Step 2:

To explore the different types of commands with Azure Cosmos DB, open show all command palate and search for Cosmos. It will list down a different set of commands that you can play with,

Go to View - > Extensions or press Ctrl + Shift + P              

Step 3:

Now the extension is installed successfully. Lets see how to connect to Azure CosmosDB  in local machine. Move back to Azure CosmosDB extension section in the explorer panel. Sign in to Azure account to view the CosmosDB accounts inside the visual studio code alternatively you can select “Attach Database Account”

Select the specific Database Account API, in this case it is DocumentDB and enter the connection string copied from the portal

To get the connection string from the Azure Portal, navigate to the respective CosmosDB  Resource, and from the left side panel Settings –> Keys -> Connection String Copy the Primary Connection String.

Now you can see the database displayed with the account provided in the azure CosmosDB explorer pane.

That’s it Now you can Add, Modify Database, collection, and documents within Visual Studio Code. Play around with all the commands and features of the extension.

Step 4: Installing Azure Cosmos DB Emulator

Azure Cosmos DB Emulator provides a local environment that emulates the Azure CosmosDB service for your development. With the Azure Cosmos DB Emulator, you can develop and test your application locally, without creating an Azure subscription and without internet connection. With the extension we installed already you can connect with Local Emulator as well.

Download Azure CosmosDB emulator:

You can download emulator from Microsoft Download Center.

  1. Extract setup and run emulator exe.
  2. Once you completed the setup, type Azure Cosmos DB Emulator in Start menu.

Start the local Azure CosmosDB Emulator, and make sure it’s running.

Verify the access by exploring the local emulator on this address.

https://localhost:8081/_explorer/index.html and you should see a screen as follows.

Step 5:

Once you verify your Azure Cosmos DB Emulator is running, you can go back to Visual Studio Code and try to attach the emulator by selecting Connected with Azure Cosmos DB Emulator option

After 1 or 2 minutes, you can find your local Cosmos DB data also mapped in Visual Studio Code.

As a developer I found this extension is very powerful and if you are developing Azure based solution with Visual Studio code, you must start exploring this.

Start building application with cosmosdb today 😊 Cheers!

· 2 min read

In this blog i will start with an introduction to .NET Core CLI tools with an example of how to create a web API using the CLI tools provided with .NET Core. At the end we will set up a solution grouping an API project and a test project. Let's dive into the steps,

Step 1 :  Installing the tools

Need to install .NET Core and Visual Studio Code that are supported on Mac, Unix and Windows. You can read more on how it works on multi-platform/framework.

Step 2 :  Creating the solution

Let's open the terminal/Powershell as a administrator to create our solution. Lets create a solution named DotNetCoreDemoApi

  dotnet new sln -o DotNetCoreDemoApi  

The above command will create a new folder and DotNetCoreDemoApi a solution file with the  name DotNetCoreDemoApi sln .

Lets get into that folder.

Step 3: Creating the web API project

Run the following command,

 cd DotNetCoreDemoApi 

Now that the solution is here, we can create our API project. Lets name the web API as DotNetCoreDemoApi. Run the following command to create the project.

dotnet new webapi -o DotNetCoreDemoApi  

That command will create a sub folder named DotNetCoreDemoApi  inside the solution DotNetCoreDemoApi and the ouput is as follows.

The web API folder should contain a few files generated as above  but what we require right now is DotNetCoreDemoApi.csproj. We will add a reference to it in our solution. To do so, run the following command:

 dotnet sln add ./DotNetCoreDemoApi/DotNetCoreDemoApi.csproj


Step 4: Run the Web API After getting a confirmation message as above , lets start the API by running that command:

 dotnet run --project DotNetCoreDemoApi  


After a few seconds, it should display a message  that the API is now running locally as above. You may access it at http://localhost:5000/api/values which is the Values API default endpoint.

That's all , API is ready and it is up and running locally. I will continue setting up the TestProject in the same solution in the upcoming blog. With the DotNet core it is very feasible to get your web api setup and running in 5 minutes.

· 4 min read

This is my first blog and Azure and i am inspired to write this one after attending the Microsoft's workshop "App innovation day".There was a cool technology "Windows Workflow Foundation" provided by Microsoft with dot net framework to create workflows to cater business logic in dot net applications. With Azure, The Logic Apps service fulfill the purpose to have business processes or workflows take shape of an app.

It required no coding just simple logic that needs to placed in a right way to have right business flow. It was also meant for the purpose of integrating 3rd party apps like Facebook,YouTube, Twitter and Evernote etc. All we need to have is the dynamic work flow.There are different benefits and different use cases in which we can apply azure logic apps. Let's discuss some of the benefits when using logic apps!

Rapid development

Logic Apps is great for rapid development.With ever growing list of connectors, we can easily create a workflow to monitor invoice, send for approval to a admin, upload to dropbox and send email notification in matter of few seconds.

Solutions with Hybrid cloud

5 years back ,Lot of businesses have invested heavily in on premises solutions and hardware, so it’s not possible to move everything to the cloud. With Logic Apps, it’s easy to have a hybrid cloud during this transition. With its on premises data gateway, you can easily connect your on premises database, file share, BizTalk server to Azure cloud.

It is the new way of Automating business process. You can build long running business process, that orchestrate data and services across all cloud services and not just Azure. It's not only for the developers but for everyone. The best bit you need to write code , you can use Visual editor to build your orchestration.

Lets Dive into Simple Demo Use Case: Filter twitter feeds with specific hashtags and post the specific tweets on the Facebook wall. In this example , i just created a process that repeats every few minutes to pull some data from twitter feed and post it on your Facebook wall. Even though this feature is already supported with Facebook, here its slightly different since it is filtering only the specific keywords which is a custom filtering.

The entire flow i described about is composted of 3 simple steps , that you can build using a Visual UI.

Step 1: Select Logic App click "Create" and give a specific name ,resource 


 Step 2: There are number of workflow templates will be shown as below and select the appropriate one , in this case i will use "when a new tweet is posted"

also authorize with your twitter account from which you want to fetch the feeds

Also configure the conditions by mentioning the filters and the timeline you want to trigger the action.


Step 3: Next step is to post on facebook wall , click "Add step"  

Search for Facebook and authenticate will your Facebook account as follows,

Click post to my timeline

Also you can map the fields that you want to fetch from the feed and post it on the wall as below,


That's it folks, once all fields are mapped you need to save the Logic app with the save button.

With the above 3 steps posting a filtered tweet on Facebook wall is configured and can be scheduled as you need. If the above particular feature needs to be developed without azure means it will need a huge development time and cost, which can be avoided using the Logic app as shown above.

That's the demo. You can explore several steps and several templates provided in the portal without writing a single line of code. I will be writing a separate blog on how to configure custom logic app in the upcoming blog posts. Happy connecting with app logic!