I'm excited to announce the release of Angular Agent Kit - a collection of AI coding agent skills designed specifically for Angular developers. This toolkit extends the capabilities of AI coding assistants like GitHub Copilot, Claude Code, Cursor, and Gemini CLI with deep Angular expertise.
Angular Agent Kit is a collection of skills that follow the Agent Skills specification. These skills are packaged instructions and scripts that extend AI agent capabilities, enabling them to provide expert-level guidance on Angular development.
While AI coding assistants are powerful, they sometimes lack the specialized Angular knowledge needed to provide optimal recommendations. Angular Agent Kit bridges this gap.
As someone who works extensively with Angular and AI development tools, I noticed a gap between generic AI coding assistance and Angular-specific expertise. The rules in this kit are distilled from years of Angular development experience, official Angular documentation, and community best practices.
Contributions are welcome! If you have Angular best practices that should be included, or improvements to existing rules, please check out the CONTRIBUTING.md file for guidelines.
I'm thrilled to introduce Angular Visual Storybook - an interactive learning resource that transforms complex Angular concepts into easy-to-understand visual infographics. Whether you're a beginner starting your Angular journey or an experienced developer looking for quick reference guides, this comprehensive collection has something for everyone.
Angular Visual Storybook is a static website that provides a comprehensive visual guide to Angular development through 26 beautifully designed infographics. It's built with pure HTML5, CSS3, and JavaScript - no frameworks required! The project is perfect for visual learners and developers who prefer a structured, comprehensive approach to learning Angular.
# Clone the repository
git clone https://github.com/sajeetharan/angular-graphic.git
cd angular-graphic

# Using Python
python -m http.server 8000

# Or using Node.js
npx http-server

# Then visit http://localhost:8000
Microsoft introduced App Service Static Web Apps in Preview at Build 2020 as"Azure static web apps", a service which allows web developers to build and deploy website to any environment from Github repository for free. Developers can deploy applications in minute while taking the advantage of scaling and cost savings offered by azure functions as backend. One of the frequent questions that i heard from the developers was the availability of Azure Devops support with Azure static web apps.
I have already published an article which demonstrates how to deploy to Azure Static Web Apps using GithubActions. Azure static web apps team announced the public preview of Azure Devops with Azure static web apps yesterday.
In this post you I will walk you through on how to deploy an angular application to Azure static web apps using Azure Devops.
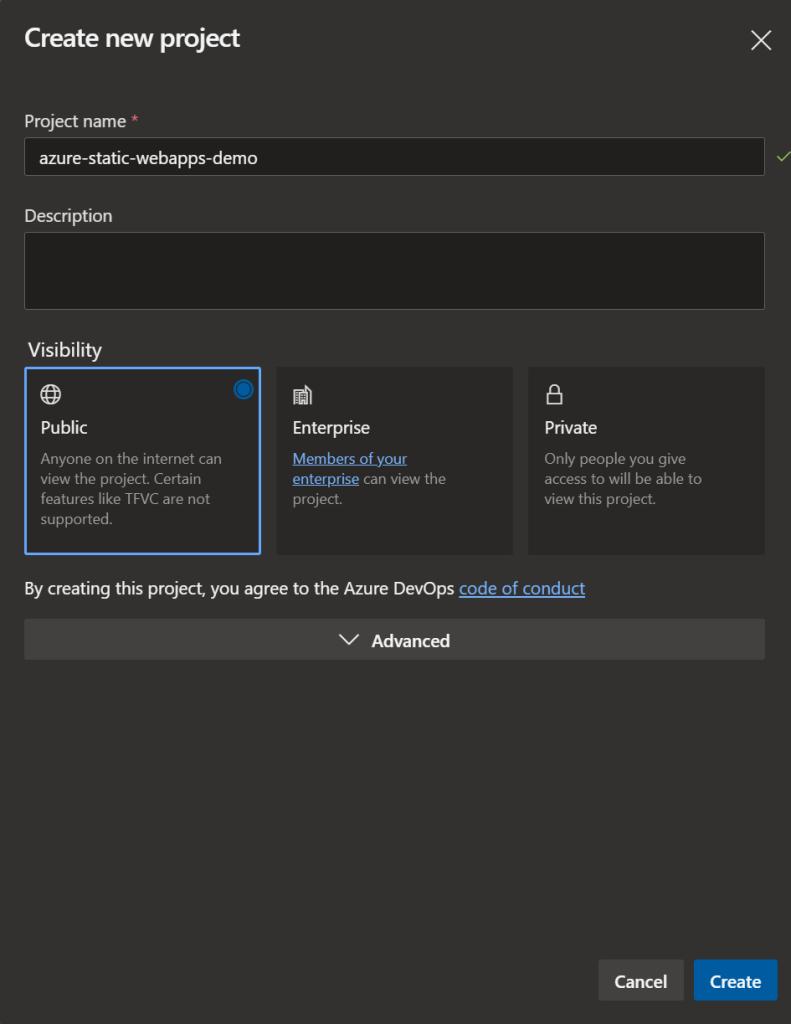
Navigate to Dev.Azure.com and create a new Devops Repository as below
Azure Devops repository
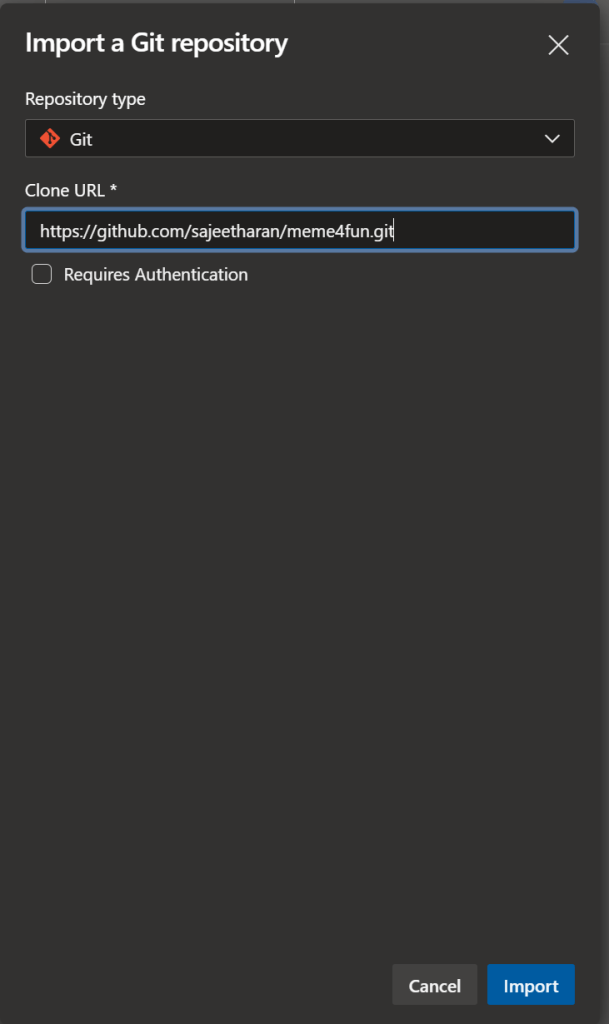
Step 2 : Import your static web application to Azure Devops repository
https://github.com/microsoft/static-web-apps-gallery-code-samplesNext step is to import the web application from any source control to your newly created Azure Devops repository. In this case i am importing the same "Meme generator" app which was made of Angular. Meme4Fun is an app to create custom programming memes from a picture and it also identifies features of people in the image which is available as part of code samples for Azure static web apps.
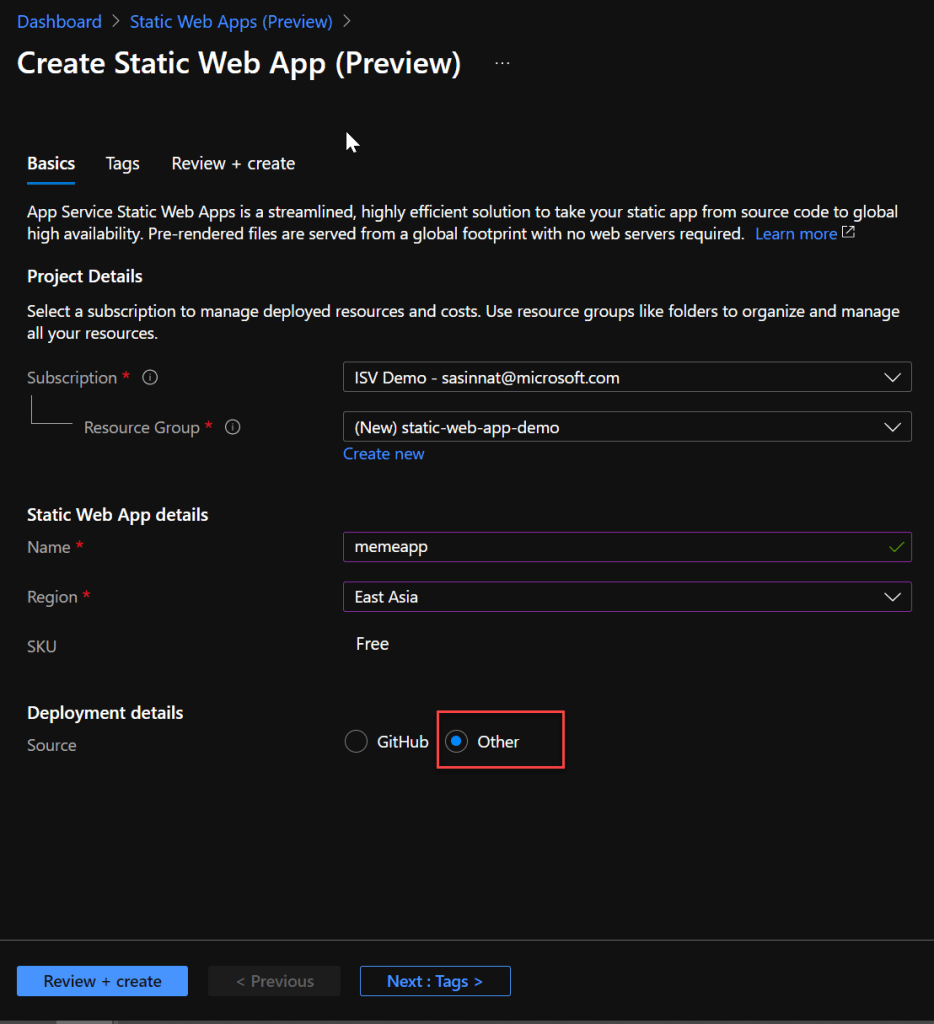
Next step is to create the static web application on azure, navigate to azure portal and create a new resource by searching for Static Web apps, and create it.
Note : Since I am going to leverage Azure Devops as the deployment method, select Other as the option.
Choose Devops as the Deployment
Once the deployment is successful, navigate to the new Static Web Apps resource and select Manage deployment token.
If you are using Azure Devops to deploy applications in the past, you will need to have the pipeline in plact to deploy to particular resource. In this case, lets create a build pipeline to deploy the angular application.
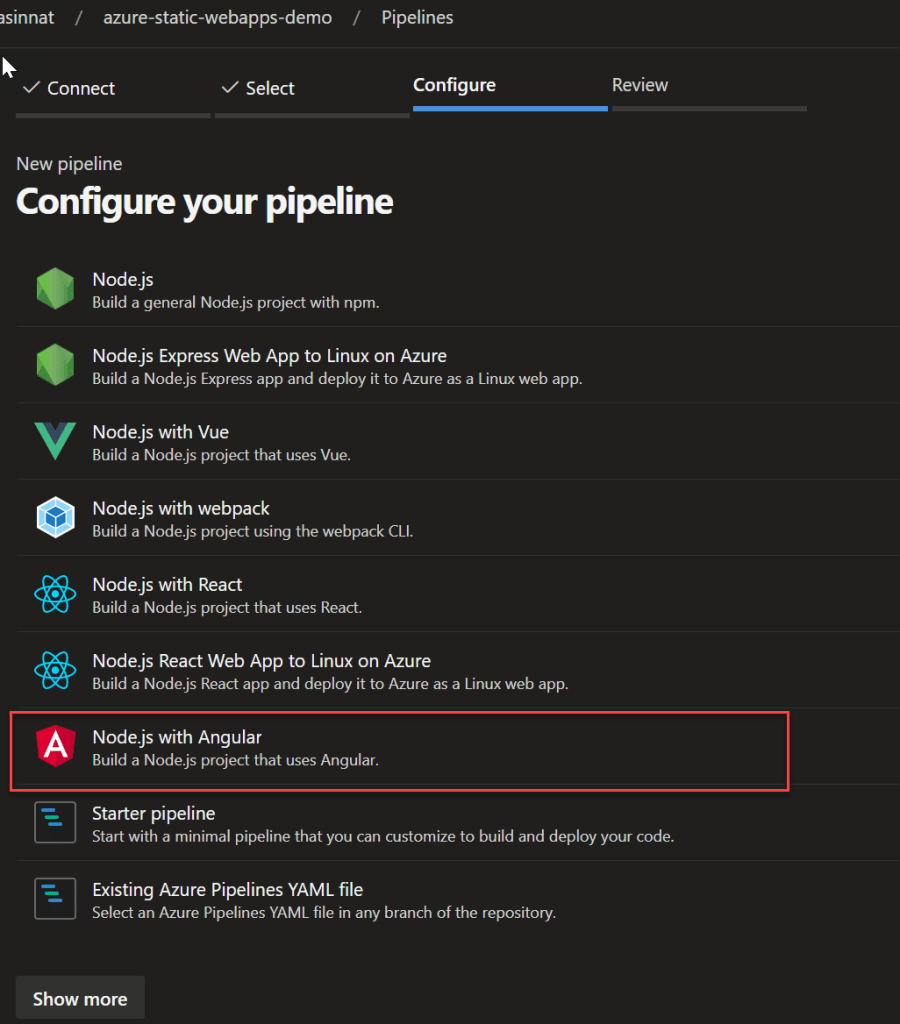
Next step is to select the template, since we are deploying an angular application, you can select the template as angular with nodejs
Angular template
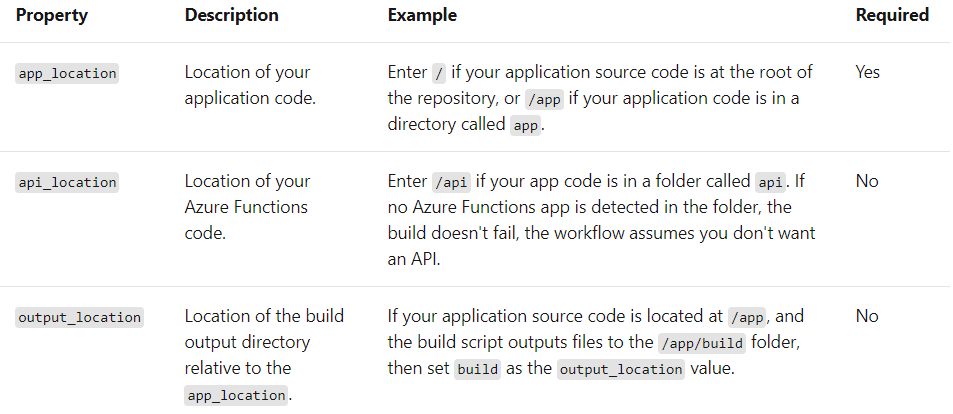
Also for static web apps it is important to include the following step in the yaml which has the app_location, api_location, and output_location , you need to pass those values if you have those details if not keep it empty.
and the final configure YAML will look similar to the below,
# Node.js with Angular
# Build a Node.js project that uses Angular.
# Add steps that analyze code, save build artifacts, deploy, and more:
# https://docs.microsoft.com/azure/devops/pipelines/languages/javascript
trigger:
- master
pool:
  vmImage: ubuntu-latest
steps:
- task: NodeTool@0
  inputs:
    versionSpec: '10.x'
  displayName: 'Install Node.js'
- script: |
    npm install -g @angular/cli
    npm install
    ng build --prod
  displayName: 'npm install and build'
- task: AzureStaticWebApp@0
  inputs:
      app_location: "/"
      api_location: "api"
      output_location: "dist/meme4fun"
  env:
      azure_static_web_apps_api_token: $(deployment_token)
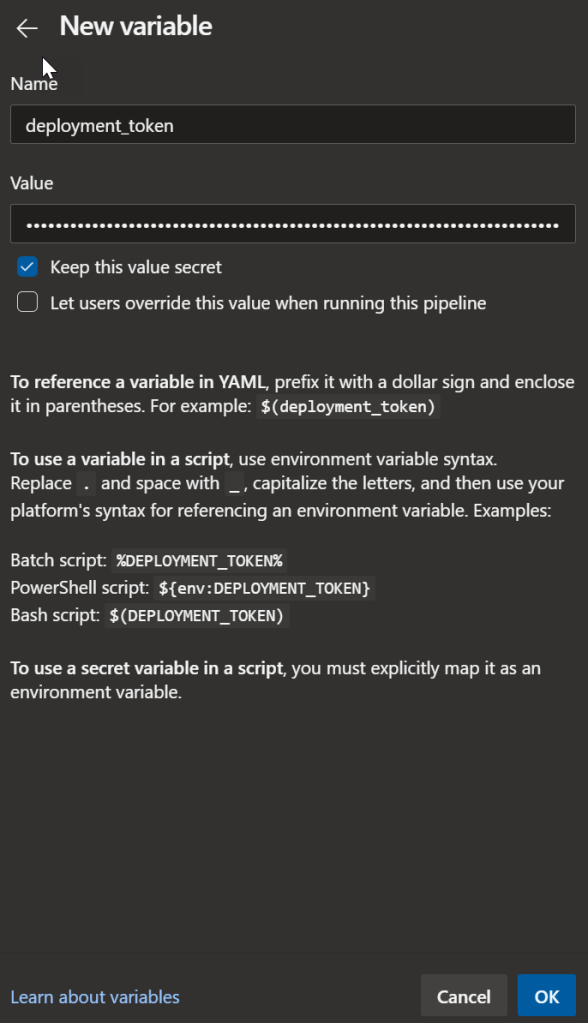
Next step is to provide the The **azure_static_web_apps_api_token** value is self managed and is manually configured. Select Variables in the pipeline and create a new variable named as "deployment_token"(matching the name in the workflow) below.
Add new Variable
Paste the deployment_token value which was copied from Azure portal
Make sure to check "Keep the value secret" and save the workflow and run.
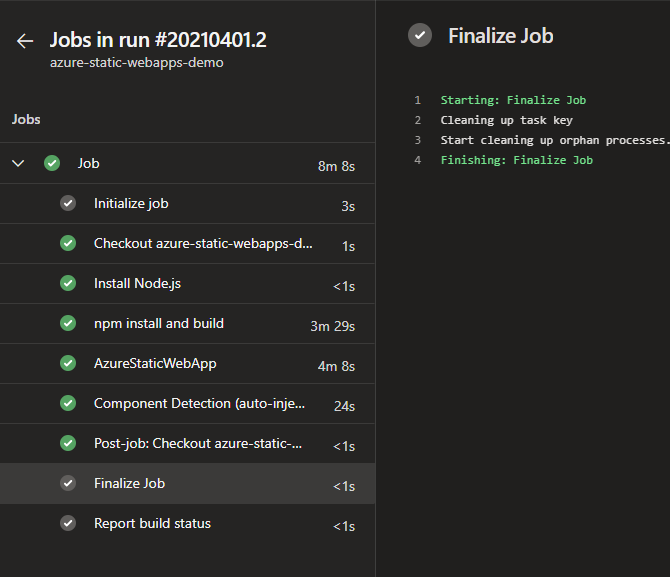
With that step Azure Devops will execute the pipeline and deploy the application to azure static web apps.
Successful deployment
Now you can access the application from the static static web app from the URL.
Static web app with azure devops deployment
If you had any trouble in executing the above steps, you can watch the same tutorial published as a video here.
It's great to see that with few steps of configuration, i was able to deploy the application with Azure Devops. If you have enabled backend support with the azure functions, it can be deployed as well. Support with Azure Devops has been one of the most requested features by developers and great to see it in live now. It's your chance to explore various application deployments with different frameworks, hope this is useful. Cheers!
One of the highlight among the announcements made at Microsoft Build 2020 was announcement of the new Azure service in the keynote which is Azure App Static Web Apps. AzureStaticWeb Apps is a service that automatically builds and deploys full stack web apps to Azure from a GitHub repository. This service allow web developers to publish websites to a production environment by building apps from a GitHub repository for free. Developers can use modular and extensible patterns to deploy apps in minutes while taking advantage of the built-in scaling and cost-savings offered by serverless technologies.
It provides the killer features for developers such as:
Free web hosting for static content like HTML, CSS, JavaScript, and images.
Integrated API support provided by Azure Functions as backend APIS
First-party GitHub integration where repository changes trigger builds and deployments with Github Actions
Globally distributed static content, putting content closer to your users.
Free SSL certificates, which are automatically renewed.
Custom domains* to provide branded customizations to your app.
Seamless security model with a reverse-proxy when calling APIs, which requires no CORS configuration.
Authentication provider integrations with Azure Active Directory, Facebook, Google, GitHub, and Twitter.
Customizable authorization role definition and assignments.
Back-end routing rules enabling full control over the content and routes you serve.
Generated staging versions powered by pull requests enabling preview versions of your site before publishing.
I was building this meme generator app for an angular session today with Azure cognitive service to detect persons in the image and also to generate a meme by adding a text as the user wanted. As soon as Azure static web apps was announced I wanted to check it out with this application on how easy it is to deploy. Experience was seamless and easy to deploy and generate a url in few seconds.
Let me explain, how i achieved this in quick time.
Step 1. Sign-in to the Azure Portal, Search for “Static Web Apps”, and click the Create button
Visit https://portal.azure.com, sign-in, and use the search box at the top to locate the Static Web Apps service (note that it’s currently in “preview”). click the Create button to get started.
Create Static Web App
In this step you’ll fill out the Static Web Apps form and sign-in to your Github account to select your repository.
Select a region (as of now its not available in all regions)
Sign-in to Github and select your org, repo, and branch.
Once you’re done filling out the form click the Next: Build > button.
Step 2: Define Angular App location, API, and Build Output
The next step is to define the path where my app is located in the repository, and i did not have any azure function integrated and i will keep it as empty, and the directory where my build artifacts (your bundles) are located(i.e dist/meme-4-fun). After entering that information click the Review + create button.
Defining Paths
Step 3: Click the Create and Look for the Magic !
Once you are good with everything you can go ahead and click the create button and you will see the application successfully gets deployed and end point generated to access it public.
Deployment complete
Once the deployment is done, if you go the resource and click on overview you will see a configuration as follows,
Overview
It has the urls of the Github Actions and as well as Github source code and also the url of the application deployed. If you’d like to see the build in action on Github, click the Workflow file above.
One of the highlight among the announcements made at Microsoft Build 2020 was announcement of the new Azure service in the keynote: Azure App Static Web Apps. AzureStaticWeb Apps is a service that automatically builds and deploys full stack web apps to Azure from a GitHub repository. This service allow web developers to publish websites to a production environment by building apps from a GitHub repository for free. developers can use modular and extensible patterns to deploy apps in minutes while taking advantage of the built-in scaling and cost-savings offered by serverless technologies.
It provides the killer features for developers such as:
Free web hosting for static content like HTML, CSS, JavaScript, and images.
Integrated API support provided by Azure Functions as backend APIS
First-party GitHub integration where repository changes trigger builds and deployments with Github Actions
Globally distributed static content, putting content closer to your users.
Free SSL certificates, which are automatically renewed.
Custom domains* to provide branded customizations to your app.
Seamless security model with a reverse-proxy when calling APIs, which requires no CORS configuration.
Authentication provider integrations with Azure Active Directory, Facebook, Google, GitHub, and Twitter.
Customizable authorization role definition and assignments.
Back-end routing rules enabling full control over the content and routes you serve.
Generated staging versions powered by pull requests enabling preview versions of your site before publishing.
I was building this meme generator app for an angular session today with Azure cognitive service to detect persons in the image and also to generate a meme by adding a text as the user wanted. As soon as Azure static web apps was announced I wanted to check it out with this application on how easy it is to deploy. Experience was seamless and easy to deploy and generate a url in few seconds.
Let me explain, how i achieved this in quick time.
Step 1. Sign-in to the Azure Portal, Search for “Static Web Apps”, and click the Create button
Visit https://portal.azure.com, sign-in, and use the search box at the top to locate the Static Web Apps service (note that it’s currently in “preview”). click the Create button to get started.
Create Static Web App
In this step you’ll fill out the Static Web Apps form and sign-in to your Github account to select your repository.
Select a region (as of now its not available in all regions)
Sign-in to Github and select your org, repo, and branch.
Once you’re done filling out the form click the Next: Build > button.
Step 2: Define Angular App location, API, and Build Output
The next step is to define the path where my app is located in the repository, and i did not have any azure function integrated and i will keep it as empty, and the directory where my build artifacts (your bundles) are located(i.e dist/meme-4-fun). After entering that information click the Review + create button.
Defining Paths
Step 3: Click the Create and Look for the Magic !
Once you are good with everything you can go ahead and click the create button and you will see the application successfully gets deployed and end point generated to access it public.
Deployment complete
Once the deployment is done, if you go the resource and click on overview you will see a configuration as follows,
Overview
It has the urls of the Github Actions and as well as Github source code and also the url of the application deployed. If you’d like to see the build in action on Github, click the Workflow file above.
I was working with a partner recently in developing Apps and integrated them as a part of Teams. At times there are questions from customers whether they would be able to utilize the features of teams within their application. The simple answer for the will be NO as Teams Platform Architecture is enabling developers to bring adoption to teams by building more applications from different industry verticals which can be embedded inside teams
However there are two ways you can make the user to navigate to Microsoft Teams from the web application or even from Outlook.
Make a clickable link for Teams chat :
Here is a handy tip on how to make a one-click link that will open up Teams chat to you or the person who is already logged in. Say if you are using a web application which is on Angular, simply you can add a click event to navigate to teams with the code,
When the user click on the button it will open a web page where the user will sign-in with their Microsoft account. If the Teams app is installed on the client's computer, the web page will offer to open the chat in the Teams client, otherwise they can use the Teams web browser experience
User Navigation from web app to Teams
Opening chat seamlessly once user login
This is a very simple tip but most of the customers are asking for a way to do the same.
Third-party websites can also use the launcher script to embed Share to Teams buttons on their webpages which will launch the Share to Teams experience in a popup window when clicked. This will allow you to share a link directly to any person or Microsoft Teams channel without switching context.
Step 1: Add launcher.js script on your webpage.
https://teams.microsoft.com/share/launcher.js
Step 2 : add an HTML element on your webpage with the teams-share-button class attribute and the link to share in the data-href attribute.
This is my 2nd post about a Chatbot solution to address the world wide problem "CoronaVirus" panademic. As it is now spreading across the world and its really vital to provide all citizens of the countries with up-to-date information. As we know it has come to a level that certain countries are in lockdown mode , more and more people are started to practice social distancing and work from home. As we have seen in the previous blog about the sentiment analysis of employees working form home, in this blog i will explain about how to build a chat bot to provides answers to most of the queries related to health information and latest learning. Chatbot is a platform which can be integrated with Web inteface or any collaboration tools such as MS Teams, Slack or Telegram and it can be operated 24*7 without any downtime.
As the first step, we need to create the resource group that contains all the resources needed. Navigate to Azure Portal and create the resource group named “rg-chatbot”
As the next step, navigate to QnA maker,sign-in with your Microsoft account and then click "Create a knowledge base" option
QnA maker
click "Create a QnA service" button in "Step 1" as shown below;
Create QnA service
You will be re-directed to Azure portal. Fill in the template form, and make sure to set pricing tier for "QnA Maker service" to F0, and for the supporting Azure Search service to F, if you want to host your Bot components for free. Then click "Create" button;
Create QnA service
As you could see in the portal Deployment of the relevant resources in your target resource group. If successful, you should get notification as resources deployed. As you will see the following resources under the particular resource group
Resources in QnA
Click on the App Service Plan you created
Note : By Default when you create, App Service Plan for the website is set to S1 pricing tier. You need to change it to the F1 tier if you don't want to have much cost incur on your subscription. You can do this by navigating to Scale Up(App Service Plan) and then select Dev/Test tab and select F1 and Apply.
Navigate to the QnA maker again and click 'Refresh" button in "Step 2"
Click on Refresh and select the bot we created
Give a meaningful name to your Knowledge Base (KB)
Name your KB
Step 4 : Populate Knowledge base from different sources
You can specify different sources to feed your knowledge base. It can be populated uploaded from files (e.g., in PDF, MS Word, MS Excel, etc. formats) or typed manually or from Web sites (containing FAQ). For this example, we will be using the recommended standard Knowledge base with Covid-19 FAQs from the Centers for Disease Control and Prevention and World Health Organisation Web sites.
Knowledge Base Sources
Also in the next step chit-chat" section you may choose "personality" for your bot, so that it can answer some additional small talk questions. This option will enrich the knowledge base with additional question/answer details, so you bot may respond to various greetings.
Populate KB
Now you can create your KB with a simple button click to setup your knowledge base and populate it with the data from the different configured sources.
Select the way it should answer small-talk questions
Once it successfuly created, you will see a window as follows,
Once it got successfully published, you can click on Create Bot as follows,
Create Bot
You will be re-directed to Azure portal where you can set the pricing tier of your Azure Bot Service to F0 (free one) , and you can pick SDK language as the one you are familiar with (either C# or Node) and the click "Create" button;
Create Web Bot
You can obtain the QnA authKey by clicking on it and from the deployment details,
Obtaining AuthKey
Once we filled everything, just hit Create button. Once it get deployed you will be able to see it from the notification.
Once Web App Bot is deployed , you may verify its functionality by selecting "Test in Web Chat" in the left navigation bar and then typing your messages in the Test window.
Test in Web Chat
If you get replies similar to what is shown on the screenshot above, congratulations - you have successfully completed setup and training of your bot !
Next step would be to make it accessible in your platform of choice.
Step 7 : Embed your bot into any web site of yours
Azure Web App Bot can communicate with external world via so called "channels". The channels are built for the relevant collaborating platforms, e.g. Skype,MS teams or Telegram. To find out more about supported channels, please consult Microsoft documentation here. By default, Web App Bot has "Web Chat" channel activated. It means that you can easily start using it on your Web site.
Navigate to Channels on the blade of created bot, then click "Get bot embedded codes" and finally click "Click here to open Web Chat configuration page" link.
Web Chat
Now click the "Show" link to reveal one of the secret keys. Use it to replace the <YOUR_SECRET_CODE> placeholder in the provided embedded code sample.
You can now paste this embedded code into the source code of your target website.
Now you can embed this into a Web sites can be built using various Web development frameworks: be it Angular,React,Vue,Angular or anything else.
Copy the code and embed in your site
Simply clone the repository, then replace the <PUT_YOUR_SECRET_CODE> placeholder on line 1059 with the secret code from your Web Chat configuration page (as described above).
You will then have a fully functional web page with an embedded QnA chatbot.
In this case, i already have built an Covid Tracker application with Angular and this how it looks when i embed the code what we got from the portal.
Say if you want to serve internal audience such as employees and if you are widely using Microsoft Teams in this crisis situation, you would nee to activate relvant channel in the bot's configuration.
Open Web App bot resource in the Azure portal again and select "Channels" option from the blade and click Microsoft Teams icon and press Save button
Select the channel you want to integrate with
Once it got successfully published, you can navigate to Channels blade again and see the Microsoft Teams channel in running state.
MS teams on running state
Now, switch to Microsoft Teams client, select "App Studio" from the left navigation bar if you dont have App studio, just install it from here
Click "Manifest Editor" tab and then click "Create a new app" button.
Create a new App on teams
Fill all the details which are necessary and mandatory,
Add the details and make sure you get through all validation
Next in Capabilities -> Bots" choose your Azure bot from "Existing bot" tab's drop-down list and then define its scope in MS Teams, e.g. "Personal" and "Team" for your users to chat with the bot directly and within specific teams.
Setup the bot
Finish -> Test and distribute", use "Install" button (if you have MS Teams administrator access) or "Download" button (to send .ZIP package with the manifest details to your MS Teams administrator) to make your bot available in your MS Teams environment.
We're adone
If successful, then you should be able to chat now with your bot directly from within MS Teams.
BOT in Lit Mode
The above can be integrated into any social media platform listed in the channels and its quite easy
You can also consider using HealthCare Bot if you are focused to have the chatbot to handle related scenario only and he is a detailed article on how to build the same.
Modify your bot with lot more cool features with images and more content via the code (either c#/Node)
Keep the knowledge base upto date : As shown aove it is important to keep your bot's knowledge base up to date. You can just navigate to the QnA maker website and click on Save and Train button and publish as we shown above.
I am sure this would be useful to those who have built COVID trackers , you can just create and embed this chat bot within your web application, and for others to support employees who are working from home you can extend this bot on the respective collaboration tool. Let's fight against COVID with these cool technology and make this world a better place. Cheers!
It's been almost a week since Angular 9 was released which included several new features such as new Ivy Renderer, SSR, Type checking etc. In this post, i will be going through on how to build and deploy an Angular9 application as a static website to Azure with GitHub Actions.
We will use the package by Wassim Chegham to deploy the application to Azure. Next step in your Angular project make sure to install the Hexa.run CLI as a prod dependency as you can see from the package.json of this project.
Next step is to create the necessary resources to deploy the angular application. In this way, we will deploy our application to static website for Azure Storage which is the optimum option to host a single page application (SPA) on Azure.Hosting a SPA in pure Storage is by far the cheapest and most efficient way of running in Azure.
You can login to azure account with the command,
npm run hexa:login
which will list down the available subscriptions and you need to pick the subscription where you want to deploy the application.
Next step is to initiate the configuration needed for the deployment of the application. Run the Hexa CLI command as follows,
npm run hexa:init
which will ask for few inputs from the user such as the project name, storage account name and the destination folder. Eventually, you will see a new file generated as hexa.json which will look like the below,
You need to use the service principal identity mechanism to do the authorization of the deployment. In order to generate the service principal using hexa, run the below command,
npm run hexa:ci
Hexa.run will automatically:
create an Azure resource group (or lets you choose an existing one)
create the Azure storage account
configure the storage account and make it static-website ready
upload the angular bundle.
prints the generated URL from the Azure service.
Also it will generate the necessary credentials as a JSON and make a note of them.
Now it's the time to create the Actions workflow, you can create a new workflow by navigating to actions and click New Worfklow. There are few sample template workflows available , in this case we will use own workflow. So you need to click on setup workflow yourself.
Setting up own workflow GitHub Actions
Immediately you could see new workflow.yml file created where you need to add the steps and actions needed to deploy the app. Here is the workflow file look like after adding all the steps.
name: Deploy to Azure with Hexa.ru
on:
  push:
    branches:
    - master
    - release/*

jobs:
  build:

    runs-on: ubuntu-latest

    strategy:
      matrix:
        node-version: [12.x]

    steps:
    - uses: actions/checkout@v1
    - name: Use Node.js ${{ matrix.node-version }}
      uses: actions/setup-node@v1
      with:
        node-version: ${{ matrix.node-version }}
    - name: npm install
      run: |
        npm install
    - name: npm build, and deploy
      env:
        AZURE_SERVICE_PRINCIPAL_ID: ${{ secrets.AZURE_SERVICE_PRINCIPAL_ID }}
        AZURE_SERVICE_PRINCIPAL_PASSWORD: ${{ secrets.AZURE_SERVICE_PRINCIPAL_PASSWORD }}
        AZURE_SERVICE_PRINCIPAL_TENANT: ${{ secrets.AZURE_SERVICE_PRINCIPAL_TENANT }}
      run: |
        npm run hexa:login
        npm run build -- --prod
        npm run hexa:deploy
As you could see, the steps are very much simple starting with installing the dependencies and deploying the angular application using the hexa:deploy command.
Also you need to configure the secrets in the github repository which were generated in the step 6. You can create a new secret by navigating to settings and then secrets. you need to define the below secrets which are associated with the service principal.
Github Secrets
The rest in the workflow can be easily understood as its about the environment and the trigger(whenever someone push the changes to master/release there should be a build)
Step 9 : See Github Actions in Action
Immediately when you save the workflow.yml you can see there will be a new build triggered and the steps are executed, which you can notice in the Actions tab as follows,
That's all you need to do inorder to deploy the Angular application to Azure. If you need to include end to end testing and different tasks you could simply modify the flow and it. Github Actions definitely a future to believe in! Try this out and let me know if you have any queries! Cheers!
It's been almost a week since Angular 9 was released which included several new features such as new Ivy Renderer, SSR, Type checking etc. In this post, i will be going through on how to build and deploy an Angular9 application as a static website to Azure with GitHub Actions.
We will use the package by Wassim Chegham to deploy the application to Azure. Next step in your Angular project make sure to install the Hexa.run CLI as a prod dependency as you can see from the package.json of this project.
Next step is to create the necessary resources to deploy the angular application. In this way, we will deploy our application to static website for Azure Storage which is the optimum option to host a single page application (SPA) on Azure.Hosting a SPA in pure Storage is by far the cheapest and most efficient way of running in Azure.
You can login to azure account with the command,
npm run hexa:login
which will list down the available subscriptions and you need to pick the subscription where you want to deploy the application.
Next step is to initiate the configuration needed for the deployment of the application. Run the Hexa CLI command as follows,
npm run hexa:init
which will ask for few inputs from the user such as the project name, storage account name and the destination folder. Eventually, you will see a new file generated as hexa.json which will look like the below,
You need to use the service principal identity mechanism to do the authorization of the deployment. In order to generate the service principal using hexa, run the below command,
npm run hexa:ci
Hexa.run will automatically:
create an Azure resource group (or lets you choose an existing one)
create the Azure storage account
configure the storage account and make it static-website ready
upload the angular bundle.
prints the generated URL from the Azure service.
Also it will generate the necessary credentials as a JSON and make a note of them.
Now it's the time to create the Actions workflow, you can create a new workflow by navigating to actions and click New Worfklow. There are few sample template workflows available , in this case we will use own workflow. So you need to click on setup workflow yourself.
Setting up own workflow GitHub Actions
Immediately you could see new workflow.yml file created where you need to add the steps and actions needed to deploy the app. Here is the workflow file look like after adding all the steps.
name: Deploy to Azure with Hexa.ru
on:
  push:
    branches:
    - master
    - release/*

jobs:
  build:

    runs-on: ubuntu-latest

    strategy:
      matrix:
        node-version: [12.x]

    steps:
    - uses: actions/checkout@v1
    - name: Use Node.js ${{ matrix.node-version }}
      uses: actions/setup-node@v1
      with:
        node-version: ${{ matrix.node-version }}
    - name: npm install
      run: |
        npm install
    - name: npm build, and deploy
      env:
        AZURE_SERVICE_PRINCIPAL_ID: ${{ secrets.AZURE_SERVICE_PRINCIPAL_ID }}
        AZURE_SERVICE_PRINCIPAL_PASSWORD: ${{ secrets.AZURE_SERVICE_PRINCIPAL_PASSWORD }}
        AZURE_SERVICE_PRINCIPAL_TENANT: ${{ secrets.AZURE_SERVICE_PRINCIPAL_TENANT }}
      run: |
        npm run hexa:login
        npm run build -- --prod
        npm run hexa:deploy
As you could see, the steps are very much simple starting with installing the dependencies and deploying the angular application using the hexa:deploy command.
Also you need to configure the secrets in the github repository which were generated in the step 6. You can create a new secret by navigating to settings and then secrets. you need to define the below secrets which are associated with the service principal.
Github Secrets
The rest in the workflow can be easily understood as its about the environment and the trigger(whenever someone push the changes to master/release there should be a build)
Step 9 : See Github Actions in Action
Immediately when you save the workflow.yml you can see there will be a new build triggered and the steps are executed, which you can notice in the Actions tab as follows,
That's all you need to do inorder to deploy the Angular application to Azure. If you need to include end to end testing and different tasks you could simply modify the flow and it. Github Actions definitely a future to believe in! Try this out and let me know if you have any queries! Cheers!
I have come across this question about "How to deploy a web app within a sub folder on Azure" in Stackoverflow many times. Even though there is an official documentation, this question has not been addressed in general. With Virtual Directories, You could keep your web sites in separate folders and use the ‘virtual directories and applications’ settings in Azure to publish the two different projects under the same site.
However, say if you have an ASP.NET Core/Angular app to a sub-folder inside Azure Web App (App Service), and wanted to deploy on Azure inside a sub-folder. You can simply navigate to Azure portal -> Select the Web App -> Overview
Download the publish profile
Import in Visual Studio
Edit the web-deploy profile(Normally the publish profile will have Web Deploy as well as FTP profile)
Change Site Name from your-site to your-site\folder\sub-folder
Change the Destination URL from http://your-site.azurewebsites.net to http://your-site.azurewebsites.net/folder/sub-folder
Publish
You should be getting an error as follows,
System.TypeLoadException: Method ‘get_Settings’ in type ‘Microsoft.Web.LibraryManager.Build.HostInteraction’ from assembly ‘Microsoft.Web.LibraryManager.Build
You can resolve the above issue by updating the nuget package named Microsoft.Web.LibraryManager.Build in your project.
One other thing that you should be aware is that, Go to portal > demo-site App Service > Configuration > Path Mappings > Virtual applications and directories. And add the following,
Virtual Path
Physical Path
Type
/folder
site\wwwroot\folder
Folder
/folder/sub-folder
site\wwwroot\folder\sub-folder
Application
Configuration Virtual Directory
Now publish from Visual Studio. If you only need to publish to a first level folder, i.e to your-site\folder, then all you have to do is, change the Type to Application in the Path mappings for /folder, and skip the sub-folder entry since you don’t need it. And correct the Site Name and Destination URL in the publish profile accordingly.
Hope there will be no more questions on the same. Happy Coding!
I came across this question about "How to deploy a web app within a sub folder on Azure" in Stackoverflow many times. Even though there is an official documentation, this question has not been addressed in general. With Virtual Directories, You could keep your web sites in separate folders and use the ‘virtual directories and applications’ settings in Azure to publish the two different projects under the same site.
However, say if you have an ASP.NET Core/Angular app to a sub-folder inside Azure Web App (App Service), and wanted to deploy on Azure inside a sub-folder. You can simply navigate to Azure portal -> Select the Web App -> Overview
Download the publish profile
Import in Visual Studio
Edit the web-deploy profile(Normally the publish profile will have Web Deploy as well as FTP profile)
Change Site Name from your-site to your-site\folder\sub-folder
Change the Destination URL from http://your-site.azurewebsites.net to http://your-site.azurewebsites.net/folder/sub-folder
Publish
You should be getting an error as follows,
System.TypeLoadException: Method ‘get_Settings’ in type ‘Microsoft.Web.LibraryManager.Build.HostInteraction’ from assembly ‘Microsoft.Web.LibraryManager.Build
You can resolve the above issue by updating the nuget package named Microsoft.Web.LibraryManager.Build in your project.
One other thing that you should be aware is that, Go to portal > demo-site App Service > Configuration > Path Mappings > Virtual applications and directories. And add the following,
Virtual Path
Physical Path
Type
/folder
site\wwwroot\folder
Folder
/folder/sub-folder
site\wwwroot\folder\sub-folder
Application
Configuration Virtual Directory
Now publish from Visual Studio. If you only need to publish to a first level folder, i.e to your-site\folder, then all you have to do is, change the Type to Application in the Path mappings for /folder, and skip the sub-folder entry since you don’t need it. And correct the Site Name and Destination URL in the publish profile accordingly.
Hope there will be no more questions on the same. Happy Coding!
The first ever Github Universe viewing party in SriLanka took place on last Thursday organized by the Github Campus Experts in the country. It was an event to share all the exciting news and updates on Github and it was a great success. I decided to write this blog based on the session i presented on “Github Actions”. It’s amazing to see the new features announced by the Github over the span of last 12 months out of which Github actions was the latest one and it was made generally available on few days ago (November 13, 2019) to build CI/CD pipelines from GitHub itself. I was excited about this announcement and tested it with two of my projects and I have to say I’m impressed.
As a example, in this post I will explain about how to build a “Emotion detection app” with angular and deploy it on one of the public cloud(Azure) with Github Actions. Below is the simple architecture diagram to get an understanding on how I am going to leverage Github action to deploy my Angular application to the Cloud. Here is the simple architecture of the application that i have demonstrated.
As the first step, we need to create the AppService on Azure to Deploy the Angular application.Navigate to https://portal.azure.com/ and you will be directed to the home page on the portal. Let’s create a resource group to group the resources we create.
Step 2: Create the App service to deploy the Angular app.
As the second step, create an app service to deploy the Angular application
You need to create the component to upload a file and pass the file to the cognitive service to detect the attributes and use ngFor on the template to display the results.
Get the keys of the cognitive service and the url from the portal as follow
You can access the whole code from here. Make sure to replace the Ocp-Apim-Subscription-Key and the url according to the endpoint you created above.
You can push the code to your own repository on GitHub and let’s create the build and deploy pipeline via the GitHub actions. Navigate to your repository and click on Actions
Create a new workflow by clicking on the new workflow. You will get to see different templates by default to build the pipeline according to the application language as below
In this case, I will create my own workflow by clicking on the setup workflow for yourself. Name the workflow as angular.yaml. You can see a new file being generated under your repository as github_action_angular/.github/workflows/azure.yml
The workflow is really simple. As you see it includes a name and few actions starting with when you need to do the build and deploy. Buildon: push indicates that whenever there is a new commit the code needs to be built again. Also you have to define NodeJS version and will run our build on ubuntu server. And you have a few regular steps that we usually do with building angular application if we are familiar with Angular apps development.
Also as an option you run that configuration only for branches other than master. For master branch we have separate configuration (with deployment to Azure). So it is flexible to maintain different workflows to different branches/environments. Is not that cool?
As the next step you need to create in GitHub Secrets page new secrets. It’s important to save the secret name whenever you need to deploy to production/development using secrets is one of the best practice. You can get the the keys from the publish profile of the app service.
Create new secret as above with the values got from profile.
We have to configure the values in angular.yaml as follows:
app-name — application name in Azure
publish-profie — name of the secret from GitHub
package — path to directory which we would like to deploy (in above example: ./dist/yourSPAApp.
And that’s it. Really clear and simple! You can just check if the deployment has been successful or not by navigating to the Kudu.
And you can see the application working successfully on Azure. As the next step you can include unit tests to run when you do the build. Using the Angular CLI and Github Actions, it has become very easy to create and test frontend Web apps. Check out the fulling working demo repo below as well as the current build status for the demo!.
Start using Github Action and deploy your app within few seconds. You can use Github actions to deploy any application to any cloud as i've explained above.
You can access the Session Slides from here and the repository from here.
I was at the Global Azure Bootcamp recently concluded last week, one of the participant came and asked me, "Hey what is Cosmos DB" I casually responded “Well, that’s Microsoft’s globally distributed, massively scalable, horizontally partitioned, low latency, fully indexed, multi-model NoSQL database". The immediate question came after that was whether it supports hybrid applications. In this blog I will be explaining how to leverage the features of cosmos db when you're building hybrid applications.
Ionic framework is an open source library of mobile-optimized components in JavaScript, HTML, and CSS. It provides developers with tools for building robust and optimized hybrid apps which works on Android,IOS and web. Ionic comes with very native-styled mobile UI elements and layouts that you’d get with a native SDK on iOS or Android.
Let's see how to build Hybrid application with Ionic and Cosmosdb
You need to have npm and node installed on your machine to get started with Ionic.
Step 1: Make sure you've installed ionic in your machine with the following command,
ionic -v
Step 2: Install Ionic globally
if it's not installed, install it by using the command
npm i -g ionic
Step 3: Create a new ionic project
Ionic start is a command to create a new ionic project. You pass in the directory name to create, and the template to use. The template can be a built-in one (tabs, blank) or can point to a GitHub URL.
The aim is to create a simple ToDo application which displays lists of tasks, and user should be able to add new tasks.
Lets create a blank project with the command
ionic start cosmosdbApp tabs
You will see a new project getting created.
Step 4: Run the ionic app
You can run the app with a simple command by navigating to the folder and then run
Ionic serve
This starts a local web server and opens your browser at the URL, showing the Ionic app in your desktop browser. Remember, ionic is just HTML, CSS and JavaScript!
It will open the application in the default browser with the default app.
If you're stuck at any point you can refer to my slides on How to get started with Ionic and follow the steps.
Step 8: You need to add two pages home and todo page , home to display the lists of items inside the containerand todo page to add a new item. These two pages can be generated insdie the module with the command,
As we need to make use of the available methods inside the @azure/cosmos You can import cosmos with the line,
import * as Cosmos from "@azure/cosmos";
Now make use of all the available functions in the SDK to add,delete,update items in the cosmosdb.
Step 8: To make application compatible with android/ios , run the following command,
Ionic cordova build ios/android
If you want to make the development faster, you could try building your ionic application with capacitor as well.
Now your hybrid application uses cosmosdb as a backend, with this demo you know how to use cosmosdb as a database for your hybrid application. I hope you should be able to create more applications in the future with cosmosdb and ionic.
You can check the demo application source code from here.
This is going to be a very small blog post, but indeed it will be helpful for lot of Angular developers out there. One of the recent question i answered on Stack overflow on how to reverse engineer an Angular application.
The question was " I built an Angular app using ng build. I have the built version but I accidently deleted my code. Is there any way I can get my code back from my build version? "
Even though the correct answer is NO, but you will be able to retrieve 80% of the code with the following steps.
Step 1: Deploy the app code in the Dist folder
Step 2: Use Google Chrome Developer tools (F12).
Step 3: Under debugger tab, look under Webpack -> Src you will see all typescript files. you can copy and past the code provided which would help you to at least build the structure of your application.
The wait is over and Angular 7 is out, finally time has come to write about some tips to build fast angular application. In this blog i will share my experience with practices that you need to follow when you are starting a new project.
There are three primary things important when you are starting to build an application with Angular.
Always place the Angular application outside your backend code
Keep the application in its own repository so that can be deployed/version separately. It will also help in tooling. One key rule is to treat it as a real application.
Encourage your team to switch to VS Code which has immense support for development with Angular. It has strong support for extensions used in Angular projects and well-regarded by front end community.
'refactor(order models): rename couponId to couponCodeId
Use Codelyzer to do statistical analysis on Angular/Typescript code
It's a set of tslint rules for static code analysis of Angular TypeScript projects. If you are doing continuous deployment configure with your pipeline.
In the templates always use safe navigation type operator which can help in preventing the following annoying errors "cannot read property "name" of undefined"
Don't make your component code go more than 300 lines. Split the pieces that can be reused in a component and make them as a new component. The component should be made as dumb as possible. It should not dependent on any inputs or outputs provided, it should work simple. General rule of thumb is to make the last child in the component tree to be the dumbest. Reusable components reduce the duplication of code and you can make changes easily.
Components should deal only with the presentation logic Don't have logic other than the presentation logic. Components are designed for presentational purposes and only should focus on what the view should do. Business logics should be separated out to services/methods from the presentation/view logic.
DOM manipulations are always expensive, immutable practices always generate a new collection which will result in bad performance. When your array changes, Angular will be rendering the whole DOM tree, when you use trackBy, it will know which elements has changed and will make changes only to those particular elements.
Make use of let and const wherever its appropriate. It will help a lot in identifying issues when a value is reassigned to a constant accidentally with a compile error and it improves the readability of the code.
With Angular version above 5.5 , you can use pipeable operators which are tree-shakable (only the code need to execute will be included when they are imported) and it will be easy to identify unused code in the component files.
Rather than subscribe in service or async popes unsubscribe themself automatically it will make the code simpler by stopping the need to manually manage subscriptions which could cause a memory leak. When using subscribe, the risks can be eliminated by using a lint rule to detect unsubscribed observables.
switchMap: when you want to ignore the previous emissions when there is a new emission mergeMap: when you want to concurrently handle all the emissions
concatMap: when you want to handle the emissions one after the other as they are emitted
exhaustMap: when you want to cancel all the new emissions while processing a previous emisssion
Always declare variables or constants with a type other than any. This is the advantage that you have with Typescript when you have good typings in your application which makes refactoring easier and safe and also avoid unintented issues.
TSLINT has various options built-in already like no-any, no-magic-numbers, no-console, etc that you can configure in your tslint.json to enforce certain rules in your code base
One of the common mistake that i did as a developer was copy paste the same code in all components. Do not repeat or have the same code in different places in the code base. Extract the repeating code and make them as a generic method which could be used in different components.
Place the logic in the component file rather than on the template such as && condition since it cannot be possible to unit test also it is prone to more bugs when changing template code
When you are building application with large number of modules always do lazy loading which could improve your application performance by large margin. Angular CLI makes this easy and helps break up your app into logical bundles. With Lazy loading users only pay for what they want. For example, Sensitive (admin only) code will not be downloaded for users that don't have access.
If you are using any bundling mechanism always analyze the size of the bundle generated. You can use webpack-bundle-analyzer for example and you can improve the performance there on.
It is always good to have a common debug service to assist with the development. This service could replace the calls to console.log. You can use Visual studio extension codelensto track down the calls with console.log.This service can be toggled at run time with local storage value and needs to be switched off with production builds.
When using it becomes handy to handle so many operations with Rxjs operators. Always remember to include/import only the things you need. Also make sure to add noUnusedLocals in the tsconfig.
Even though Angular is build with Typescript, many of the developers tend to use services from a base class. This should be only if necessary. It will result in restricting the flexibility as when your app grows and use cases changes.
Also create a utility.services.ts to contain all the base helper services. For ex: debug.service.ts , notification.service.ts session.service.ts can be placed within utility.service.ts which helps in preventing app wide changes to base constructor.
It is really important to follow Redux patern (RxJS) to have a better state management in application. Also in components use ngUnsubscribefor complex Observable management in Components. Use shareReplayoperator and/or async pipe for simpler cases
Always consider browser caching and application versioning. Test the update process and the experience across browsers. Always figure out user experience and continuously work on it. Use global error handler to store report errors to API and do not access Document or Window Objects manually.
One of the primary thing that you need to consider before starting a project is the architecture on how to build flexible,simple,fast application. It needs lot of planning and consistency to get the basement correct. Building things is really hard enough. When it comes to building Angular application i would recommend to follow the following Guidelines
One best place to start with good practices is by following the recommended style guide. You need to take what works for your team and skip what does not work. Also try to learn from others mistakes or any other projects that you've already worked with.
While designing module,s it is really important to know about how to structure your modules and what should go under Feature/Core/Shared Modules.
Keep a flat file structure as long as possible which means you should not add hierarchy with less than 20 files and you can always move files as the app grows larger.
Maintain your application version using the package.json which could be embedded in your app.
Use package management tooling to guarantee reproducible dev environment and builds.
Set custom host for the application by changing the default url.
Use proxies if you are integrating with an API.
Lets look at what you can do while implementing the above architecture in your application
The above are the some of the most important practices that you need to follow when you are starting a new project with Angular. Hope this helps someone out there.
This should help all the Angular developers out there to test yourself on the knowledge on Angular. I have listed down the concepts/questions from various sources such as Stackoverflow,Medium etc. Will be continuing this with 2 more posts.
Angular Elements- Angular Elements is a project that lets you wrap your Angular components as Web Components and embed them in a non-Angular application.
New Rendering Engine: Ivy - increases in speed and decreases in application size.
Tree-shakeable providers- a new, recommended, way to register a provider, directly inside the @Injectable() decorator, using the new providedIn attribute
RxJS 6- Angular 6 now uses RxJS 6 internally, and requires you to update your application also. RxJS released a library called rxjs-compat, that allows you to bump RxJS to version 6.0 even if you, or one of the libraries you’re using, is still using one of the “old” syntaxes.
ElementRef- in Angular 5.0 or older, is that the said ElementRef had its nativeElement property typed as any. In Angular 6.0, you can now type ElementRef more strictly.
Animations- The polyfill web-animations-js is not necessary anymore for animations in Angular 6.0, except if you are using the AnimationBuilder.
i18n- possibility to have “runtime i18n”, without having to build the application once per locale
The Constructor is a default method of the class that is executed when the class is instantiated and ensures proper initialization of fields in the class and its subclasses.
ngOnInit is a life cycle hook called by Angular to indicate that Angular is done creating the component. We have to import OnInit in order to use like this (actually implementing OnInit is not mandatory but considered good practice).
3. Difference between "declarations", "providers" and "import" in NgModule
imports makes the exported declarations of other modules available in the current module. It is also used to import supporting modules likes FormsModule, RouterModule, CommonModule, or any other custom-made feature module.
declarations are to make directives (including components and pipes) from the current module available to other directives in the current module. Selectors of directives, components or pipes are only matched against the HTML if they are declared or imported.
providers are to make services and values known to DI. They are added to the root scope and they are injected to other services or directives that have them as dependency.
A special case for **providers**are lazy loaded modules that get their own child injector. **providers**of a lazy loaded module are only provided to this lazy loaded module by default (not the whole application as it is with other modules).
Angular Ahead-of-Time compiler pre-compiles application components and their templates during the build process.Apps compiled with AOT launch faster for several reasons
Application components execute immediately, without client-side compilation.
Templates are embedded as code within their components so there is no client-side request for template files.
You don't download the Angular compiler, which is pretty big on its own.
The compiler discards unused Angular directives that a tree-shaking tool can then exclude.
Lazy loading is useful when the application size is growing. In lazy loading, feature module will be loaded on demand and hence application start will be faster.To load a feature module lazily we need to load it using loadChildren property in route configuration and that feature module must not be imported in application module.
Hey guys, There has not been a proper resource to have a checklist to make sure that applicaiton is flawless.I decided to write a simple tips on checklist items needed before you deploy your app to production.Following are a few Angular Code Review Checklists useful while doing a peer review of Angular code. Make sure to check these when you are building a production ready application
My first post for the year 2018 and i wanted to write something about a technology in which i have vast experience and passionate about. This blog will be very useful for those who want to start with angular for developing web applications.In this blog i am going to set up Angular 5 app using Visual Studio Code. I will be using Angular CLI for our sample application. The following are the steps needed to create your first angular application using angular5.
Steps
Install Node.js.
Install Angular CLI.
Design our Angular App.
Launch App in the browser.
Displaying our custom information on a page.
1. Install Node.js
In this approach, the first step is to install Node.js. If you have not installed nodejs in your machine visit the website and download according to your OS. You will see the following display.
Download and install the latest LTS version as per the configuration of your machine. The current version of Node LTS is 8.9.3. Installing node.js will also install npm (node package manager) on your system.
Next step is to make sure everything related to node is installed, To check the version of node and npm installed on your machine, run the following command in command prompt.
node -v
npm -v
which will be as follows,
2. Install Angular CLI
We are done with the step1, next is to install angular cli. For those who are very new to angular , angular cli is a command line interface for angular applications. After installing node and npm, the next step is to install Angular CLI. Run the following command in a command window.
npm install -g @angular/cli
The above command will start Angular CLI installation on your machine. This might take bit of time based on the internet connectivity.
3. Design our Angular App.
That's all folks, we have setup the necessary environment to start coding. Lets create our application in a folder named Angular5Demo. Run the following command to create a folder for our application.
mkdir Angular5Demo
lets navigate to our created folder, so run the following command.
cd Angular5Demo
we are in the same folder where our application resides, so lets create our template/structure for our application using angular cli. run the following command
ng new myFirstApp
if you have missed anything the following screen shows the steps and the output.
Lets see the code in visual studio code editor. Type code. in the command prompt.
code .
Which will open up the code in the visual studio code. And that’s it. You can see the following file structure in Solution Explorer. We have created our first Angular app using VS Code and Angular CLI.
4. Launch App in the browser
To launch the application and to start the web server run the following command
ng serve
After running this command, you can see that it is asking to open http://localhost:4200 in your browser. So, open any browser on your machine and navigate to this URL. Now, you can see the following page.
We'll leave the web server as it is while we look into the code of this application. Again open the code inside the path by typing the foolwoing command.
code .
D****isplaying our custom information on a page.
Now, Let's display a message saying "" using JSON data on the page instead of the message “Welcome to app!”. To achieve this, open /src/app/app.component.ts file. Change it as follows or according to the data you want to see on the page.
and HTML template as,
Change the value of title property to a JSON object as shown above. You can see the updated web page as shown below.
With angular cli If the web server is running and you make any changes in the Angular application, then you don’t need to refresh the web page. It will automatically update itself as you save the application code file. You can now play with the appellation by using various JSON objects also by making requests.
That's it folks, we have learned about creating our first Angular 5 app using VS Code and Angular CLI. Please post your valuable feedback in comments section.
Even though there have been plenty of tools/extension to check the typescript/javascript code, but there have not been any extension to validate the HTML code or related features to it. Angular Language Service was released to make the developers more productive and reduce the errors by offering better code completion.
This service is available in the market place for installation for the Visual Studio as well as other code editors that support Type Script. Errors can be detected at the time of code creation . Hints are also provided for code completion. This effectively allows us to use the Intellisence for variables defined and used in the template. The navigation service is provided to link properties and their definition. This extension provides a rich editing experience for Angular templates, both inline and external templates including:
Completions lists
AOT Diagnostic messages
Quick info
Go to definition
The language service is developed by the Angular core team. At the time of writing, it is ready to use in VSCode, Sublime Text and WebStorm.
Language service uses the Angular compiler for parsing our application and producing diagnostics. It decorates the TypeScript language service in and uses its logic again. The coolest feature about the service is that it is not coupled to a specific Angular version and can be used in any text editor and IDE as soon as there’s an available plugin.