8 posts tagged with "nosql"

View All Tags

· 8 min read

Overview :

In this blog post you will learn about the Azure Cosmos DB SQL API queries and How to get started with Cosmos DB SQL API. I recently published a video on youtube and decided to have it available in blog as well. Azure Cosmos DB is a fully managed NoSQL multi model database service provided by Azure which is highly available, globally distributed, and responds back within the minimum latency in single digit millisecond. It's becoming the preferred database for developers on Azure to build modern day applications.

You can access the slides here and repository for the queries here.

Azure supports multiple data models including documents, key-value, graph, and column-family with multi models APIs such as SQL,Mongo,Cassandra,Gremlin and Table. SQL APi is one of them and its oldest offerings on cosmos db. SQL API is also known as Core API which means that any new feature which is rolled out to cosmos db usually first available in SQL API accounts. It supports for querying the items using the Structured query language Syntax which provides a way to query JSON objects.

Also cosmos db SQL API queries can be done using any SDK we provide with Net, Java, Node and python.
Azure Cosmos DB SQL API

Azure Cosmos DB is truly schema-free. Whenever you store data, it provides automatic indexing of JSON documents without requiring explicit schema or creation of secondary indexes.

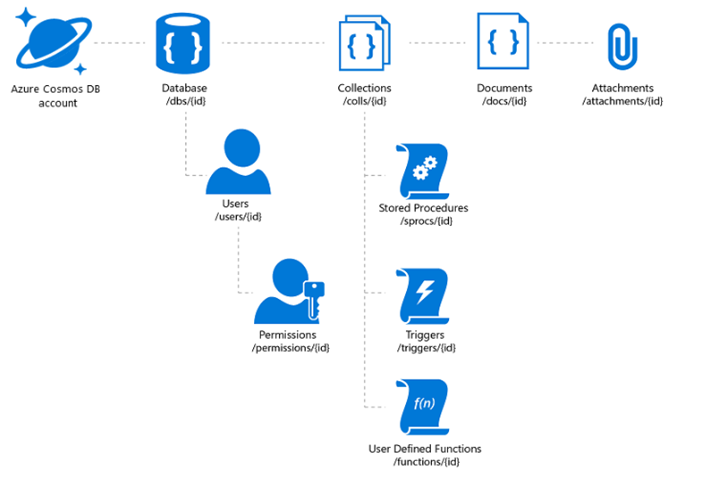
The Azure Cosmos DB database account is a unique name space that gives you access to Azure Cosmos DB.

A database account consists of a set of databases, each containing multiple collections, each of which can contain stored procedures, triggers, UDFs, documents, and related attachments.

Cosmos DB SQL API Account Structure

Ways to Manage Cosmosdb Documents :

With the Cosmos DB SQL API , you can create documents using a variety of different tools :

Portal: The Data Explorer is a tool embedded within the Azure Cosmos DB blade in the Azure Portal that allows you to view, modify and add documents to your Cosmos DB API collections. Within the explorer, you can upload one or more JSON documents directly into a specific database or collection which i will be showing in a bit

SDK: Cosmos DB database service that was released prior to Azure Cosmos DB featured a variety of SDKs available across many languages

REST API : As we mentioned previously, JSON documents stored in SQL API are managed through a well-defined hierarchy of database resources. These resources are each addressable using a unique URI. Since each resource has a unique URI, many of the concepts in Restful API design applies to SQL API resources

Data Migration Tool: The open-source Cosmos DB data migration tool which allows you to import data into a SQL API collection from various sources including MongoDB, SQL Server, Table Storage, Amazon DynamoDB, HBase and other Cosmosdb collections.

Prerequisites:

For this overview demo , I will be using a dataset Tweets which contains Tweets by users across the world on certain tags says #Azure and #Cosmosdb

To replicate the demo you can use the Emulator which you can download from here Cosmosdb Emulator . Or you can create a Cosmosdb free tier account which is handy for developers.Azure Cosmos DB free tier makes it easy to get started, develop, test your applications, or even run small production workloads for free. When free tier is enabled on an account, you'll get the first 1000 RU/s and 25 GB of storage in the account for free.

In this demo let me migrate this sample dataset tweets which has 1000 recent tweets from users who actually tweeted about different technologies. I have uploaded the dataset in my github account and we will be using the same to understand different queries.

  • Create a CosmosDB Account of type SQL API and database/collection named Tweets
  • Insert the data inside the folder Tweets to CosmosDB using the Data Migration Tool

SQL API Queries :

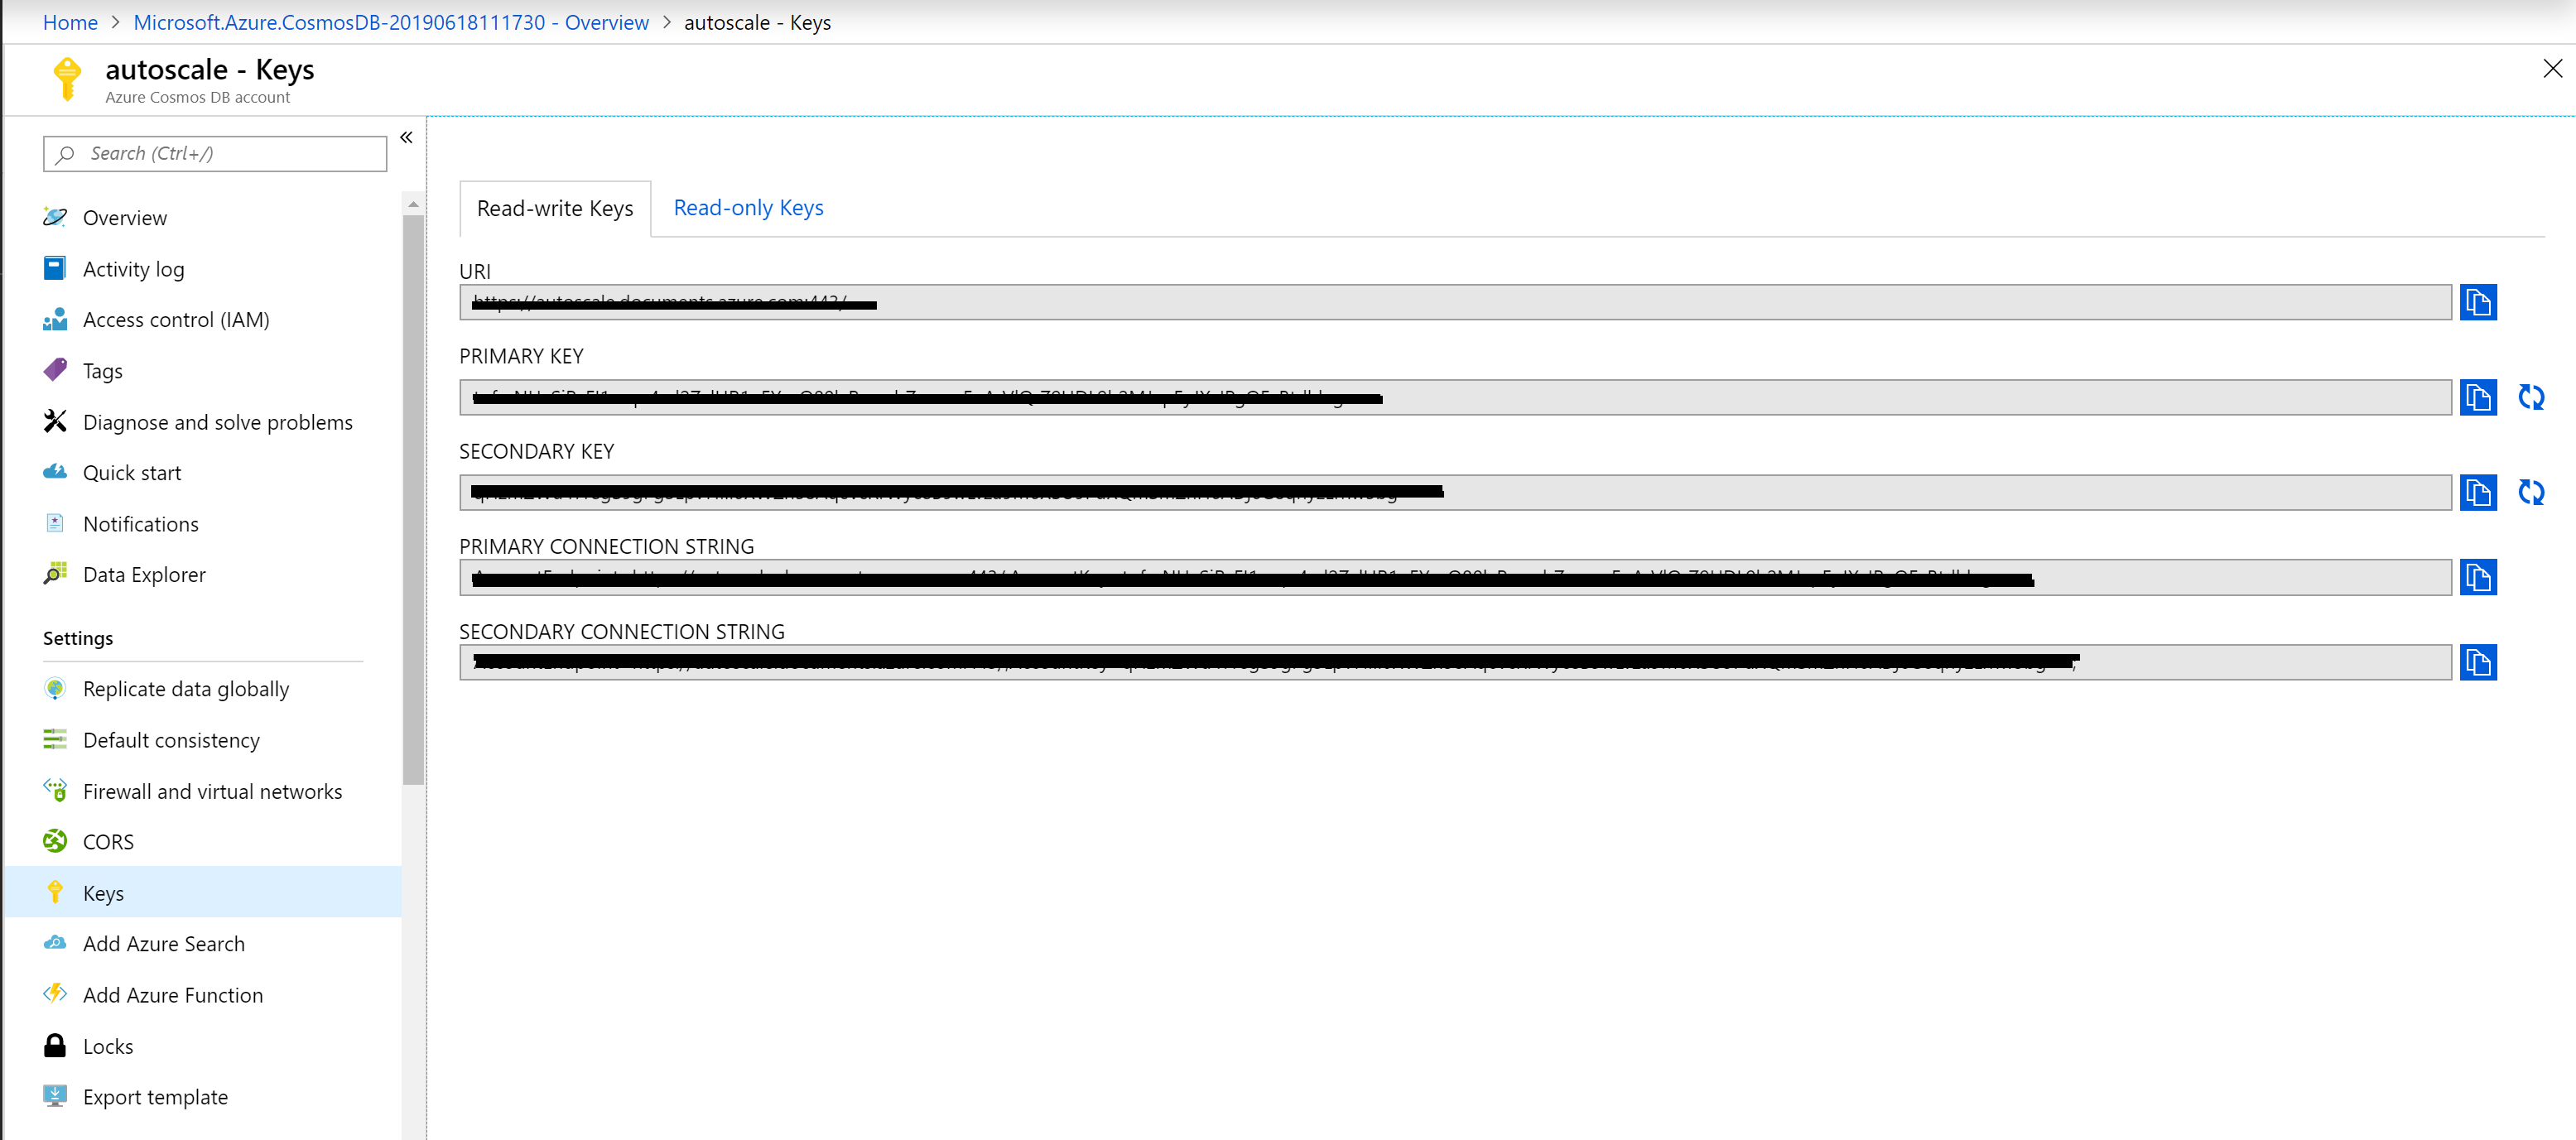
Once you created the Cosmos DB account on Azure , Navigate to Settings -> Key and copy the Endpoint and the Url for the Cosmos DB account and replace the values in the Program.cs ( This is not recommended for production use , use Keyvault instead).
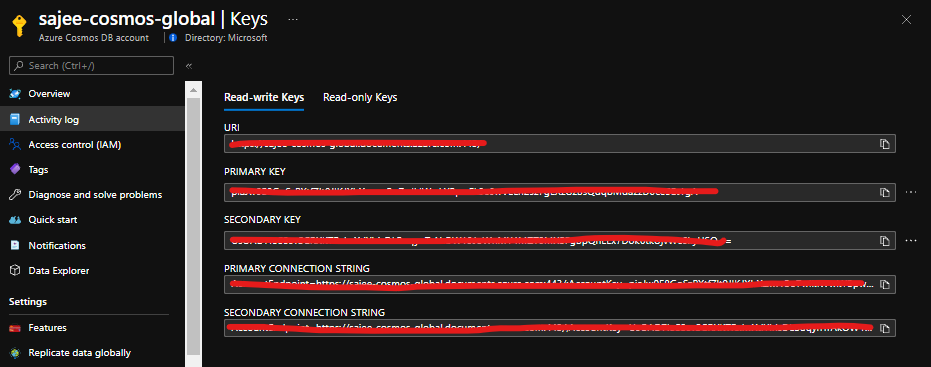
Obtain Keys and Endpoint from Azure portal

  // The Azure Cosmos DB endpoint for running this sample.
private static readonly string EndpointUri = "https://sajee-cosmos-notebooks.documents.azure.com:443/";
// The primary key for the Azure Cosmos account.
private static readonly string PrimaryKey = "==";

Before dive into the queries , let me explain one of the most important thing to deal with queries in Cosmos DB. In Cosmos DB SQL API accounts, there are two ways to read data.

Point reads – Which denotes you can do a key value lookup on a single item id and a partition key. Point reads usually cost 1 RU With a latency under 10 Milli seconds.

SQL queries - SQL queries consume more Rus in general than the point reads . So if you need a single item, point reads are cheaper and faster.

As a developer we tend to execute select * from table which might cause you more RUs since you are reading the whole data across multiple partitions.

Query vs Point Read

Let's dive into some of the queries with SQL API

Query 1 : Select All

To retrieve all items from the container, in this case let's get all the tweets. Type this query into the query editor:

SELECT *
FROM tweets

...and click on Execute Query!
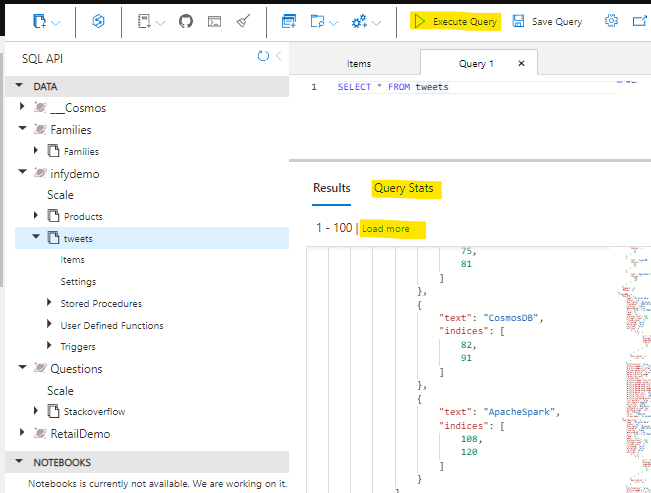
Cosmos DB SQL API queries

Few things to note here are, It retrieves the first 100 items from the container and if you need to retrieve the next 100, you could click on load more , under the hood it uses the pagination mechanism. Another handy thing here is that you can navigate to query stats and see more details on the query such as RUs, Document size, Execution time etc.
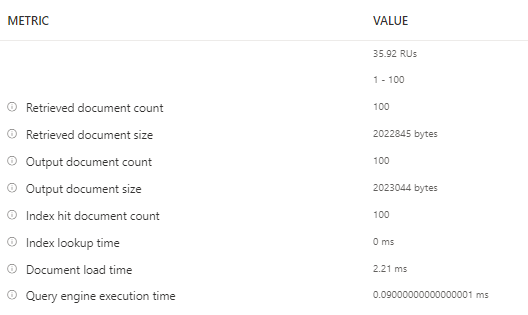
Query Metrics

Query 2 : Filter Path

When referring to fields you must use the alias you define in the FROM clause. We have to provide the full "path" to the properties of the objects within the container. For example, if you need to get the RetweetCount from the container for all the items.

SELECT tweets.RetweetCount
FROM tweets

Query 3 : Join

Lets see how we can find out the hashtags that have been used in all the tweets. We can use the JOIN keyword to join to our hashtags array in each tweet. We can also give it an alias and inspect its properties.

Let's see the JOIN in action. Try this query:

SELECT hashtags
FROM tweets
JOIN hashtags IN tweets.Hashtags

Now that we know how to join to our child array we can use it for filtering. Lets find all other hashtags that have been used along with the known hashtags (#Azure, #CosmosDB):

SELECT hashtags
FROM tweets
JOIN hashutcDate IN tweets.Hashtags
WHERE hashtags.text NOT IN ("CosmosDB", "Azure")

Similarly we can use OR,IN,DISTINCT,GROUPBY etc.

Query 4 : KEYWORDS (IN,OR etc)

To return the entire tweet where the indices of the hashtag is between 11 and 18 simply by selecting the tweets rather than the indices

SELECT tweets
FROM tweets
JOIN hashtags IN tweets.Hashtags
JOIN indices IN hashtags.indices
WHERE indices BETWEEN 11 AND 18

Query 5 : ORDERBY and TOP

We can also order our query so we can find the most recent tweet(s) and retrieve the top 5 tweets. (use ASC for ascending and DESC for Descending) :

SELECT TOP 5 tweets
FROM tweets
JOIN hashtags IN tweets.Hashtags
JOIN indices IN hashtags.indices
WHERE indices BETWEEN 21 AND 28
ORDER BY tweets

Query 6 : PROJECTION

We can use a feature called Projection to create an entirely new result set. We could use this to create a common structure or to make it match a structure we already have.

Try this query:

SELECT tweets.CreatedBy.Name AS Name,
tweets.FullText AS Text,
tweets.CreatedAt AS CreatedTime,
tweets.TweetDTO.metadata.iso_language_code AS LanguageCode
FROM tweets

Query 7 : USER DEFINED FUNCTION

The SQL API supports javascript User defined functions, there that you can use on this server called displayDate which removes the time parts of a UTC date string.

This is the function :

function displayDate(inputDate) {
return inputDate.split('T')[0];
}

Let's have a go at using it

SELECT tweets.CreatedAt,
udf.displayDate(tweets.CreatedAt) AS FormattedDate
FROM tweets

The SQL API also supports stored procedures written in JavaScript which enables you to perform ACID transactions over multiple records. This allows scalable and almost unlimited expandability on the functionality Azure Cosmos DB can offer.

These are some of the basic queries to get started with CosmosDB SQL API. If you want to get to know more about SQL API the following references would be useful.

Hope this post help you get started with CosmosDB SQL API! Cheers!

· 3 min read

I've been gaming since 2003 till now.I remember those sleepless nights and how much fun i had playing PC games. I always wanted to be a game designer since my childhood days and have built lot of small games during my university days. After a very long time i invested some time and built a simple game using Python and Azure cosmosdb. I wanted to write how to build the game "Corona escape" with others in this blog post.

PreRequisities:

  • Python 3 Installed
  • VScode or Pycharm
  • Azure Subscription

Game Structure :

The coronavirus is fairly new that has taken the world by shock. It’s been two months since the outbreak started and it has shown that it isn’t as deadly as the SARS virus. This game "Corona Escape" is built using Pygame which is a library for beginners to cut their teeth on to get comfortable with learning programming and the process of game development and feel successful in making games. It's also a great rapid prototyping tool. This game is very similar to any jump game. The idea is that to escape from the virus as much as you can, user will be provided with a capsule to make the move fast and a mask to escape from the virus. I will not go in detail on the logic side of it as the source code is published here.

Corona Escape Game

Architecture below is fairly easy, its just a diagram with Cosmosdb to store the data and application insights to gather the user details (type of device,location etc). If you have plan to expand the game, you could add other components in the architecture such as azure functions etc.

Highest score is pushed to a text file and Azure cosmosdb for sharing the score across the users in the world. The related code resides in the cosmos.py which as follows,

def getLeaderBoard(self):
options = {}
options['enableCrossPartitionQuery'] = False
options['maxItemCount'] = 100
query = {'query': 'SELECT * FROM server s'}

results = self.client.QueryItems(self.container['_self'], query, options)

for result in results:
print(result['message'])


def pushData(self,username,highscore):
data = self.client.CreateItem(self.container['_self'], {
"username": str(username),
"highscore": str(highscore),
"message" : str(username) + " got " + str(highscore)
})


Make sure to create a cosmosdb account with the SQL API and pass those credentials under config.

self.config = {
'ENDPOINT': 'your endpoint',
'PRIMARYKEY': 'your cosmosdb primary key',
'DATABASE': 'your db',
'CONTAINER': 'your container'
}

How to run the Game:

  • Clone the repository from here
  • Make sure to install the dependencies using pip such as pygame
  • Run the game with the command python main.py

Hope this helps someone who want to build games using python and cosmosdb. Play the game and add your comments below. cheers!

· One min read

One of the interesting queries that i got from my colleague is that how to get rid of the metadata properties when retrieving documents from Cosmosdb. It seemed like a very reasonable expectation to have the option with the document "GET" API call to be able to retrieve exactly what he created using the document "POST" API call, without these Cosmosdb Metadata properties mixed in:

"_rid":"ehszALxRRgACAAAAAAAAAA==", "_ts":1408340640, "_self":"dbs\/ehszAA==\/colls\/ehszALxRRgAALxRRgACAAAAAAAAAA==\/", "_etag":"00002500-0000-0000-0000-53f192a00000", "_attachments":"attachments\/"

As of now there is no direct way to omit these properties when you are querying the documents. However, cosmosdb team is aware of this feature request, understand the reasons for it, and are considering it for a future release.

For those who are wondering how to omit these system generated properties, you can simply handle this with a User Defined Function.

function stripMeta(doc) {
var metaProps = ["_rid", "_ts", "_self", "_etag", "_attachments"];
var newDoc = {};
for(var prop in doc) {
if (metaProps.indexOf(prop) == -1) {
newDoc[prop] = doc[prop];
}
}

return newDoc;
}

And you can retrieve your documents with whatever queries as follows,

select value udf.stripMeta(c) from c

Hope this helps someone out there.

· 6 min read

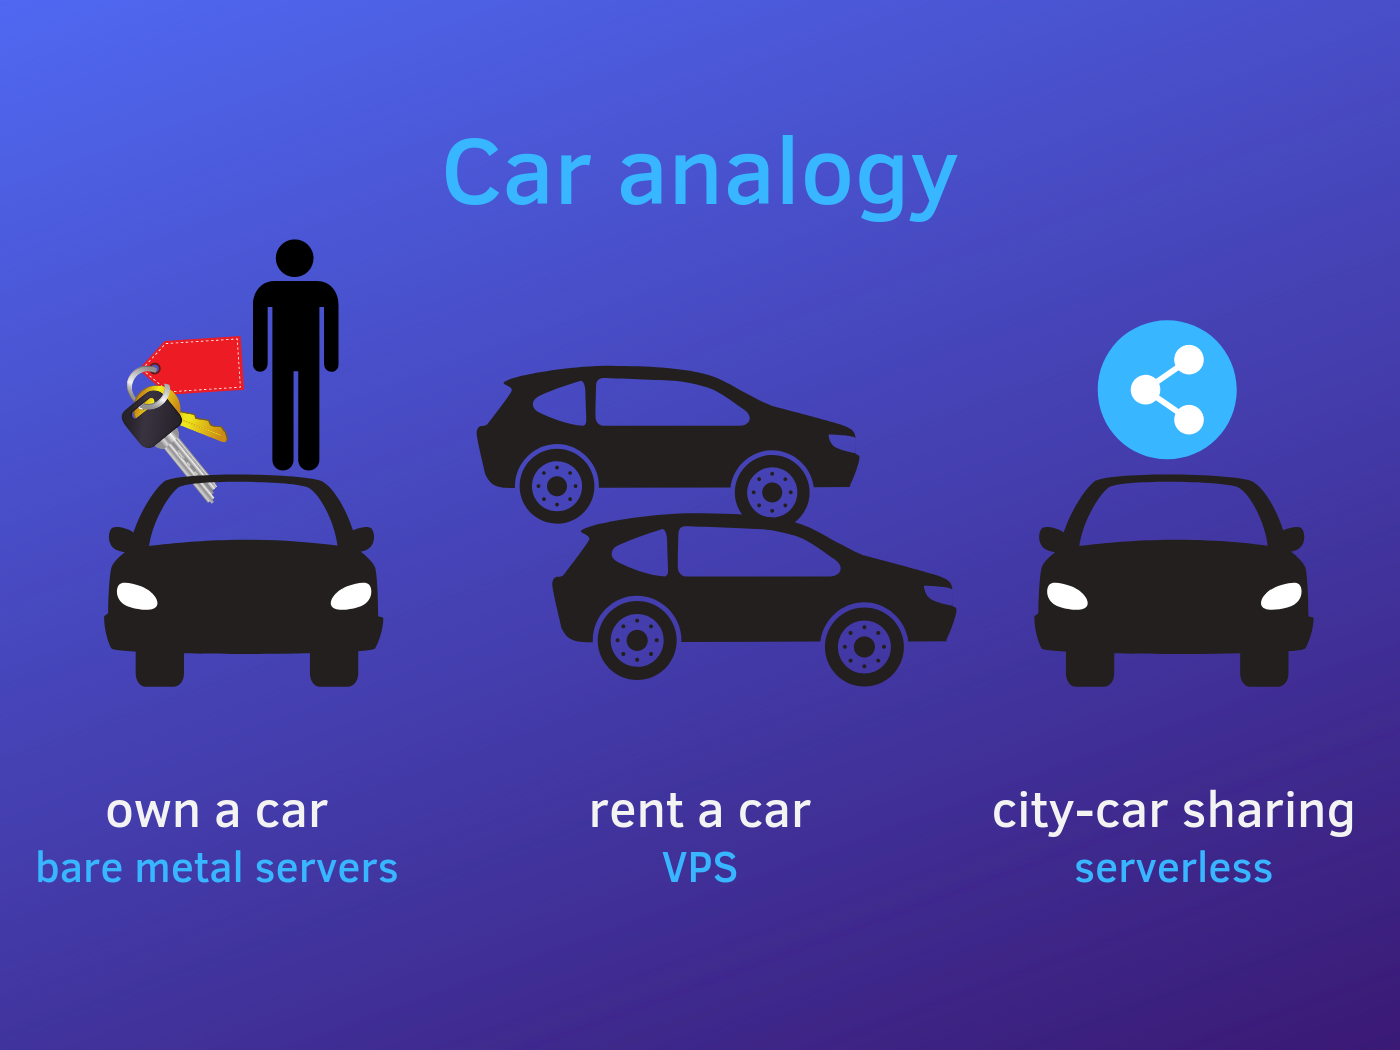
When you are involving in an architectural discussion which involves Azure's cosmosdb, a mandatory question that you get is "Is not Azure Cosmos DB very expensive?". Based on the fact that Cosmos DB is evolving very fast, there are lot of customers stepping in to use the service in their architecture. To understand one thing Cosmos DB is not priced based on the usage the pricing is based on what you reserve. One of the best serverless example we could consider here is renting out a car rather than managing and hailing it. Key point here is you pay for what you reserve, which is the capacity, which is refered in terms as Request Units (RUs). Any customer consuming the Cosmos DB serivce will be paying for the RUs as well as the space.

There have been many questions asked on forums,discussions on how to scale up/down cosmos DB Request units. Being a fan of two major services in Azure, i decided to write on how to scale Cosmos DB with Azure function.Azure Functions and Cosmosdb services are getting more closer and closer together in the recent times. One of the case study that we can consider here is whenever you are experiencing throttling(429) due to the burst of high traffic for a period of time, you will be increasing the Request Units(RUs) in the portal to handle it. Which is sort of a pain to handle it manually and the resulting cost will be very high if you've forgotten to scale it down. Let's see how to autoscale using Azure function to mitigate this issue. It involves 2 steps ,

  • Create an Azure function to scale throughput on a collection and publish
  • Connect the function to CosmosDB alert using an HTTP webhook.

The following solution will help you only to scale up , but the same function can be used to sacle it down if you pass a negative value for the CosmosDB_RU attribute.

Step 1: Let's create the Function and Publish

Step 1: Open Visual Studio 2019

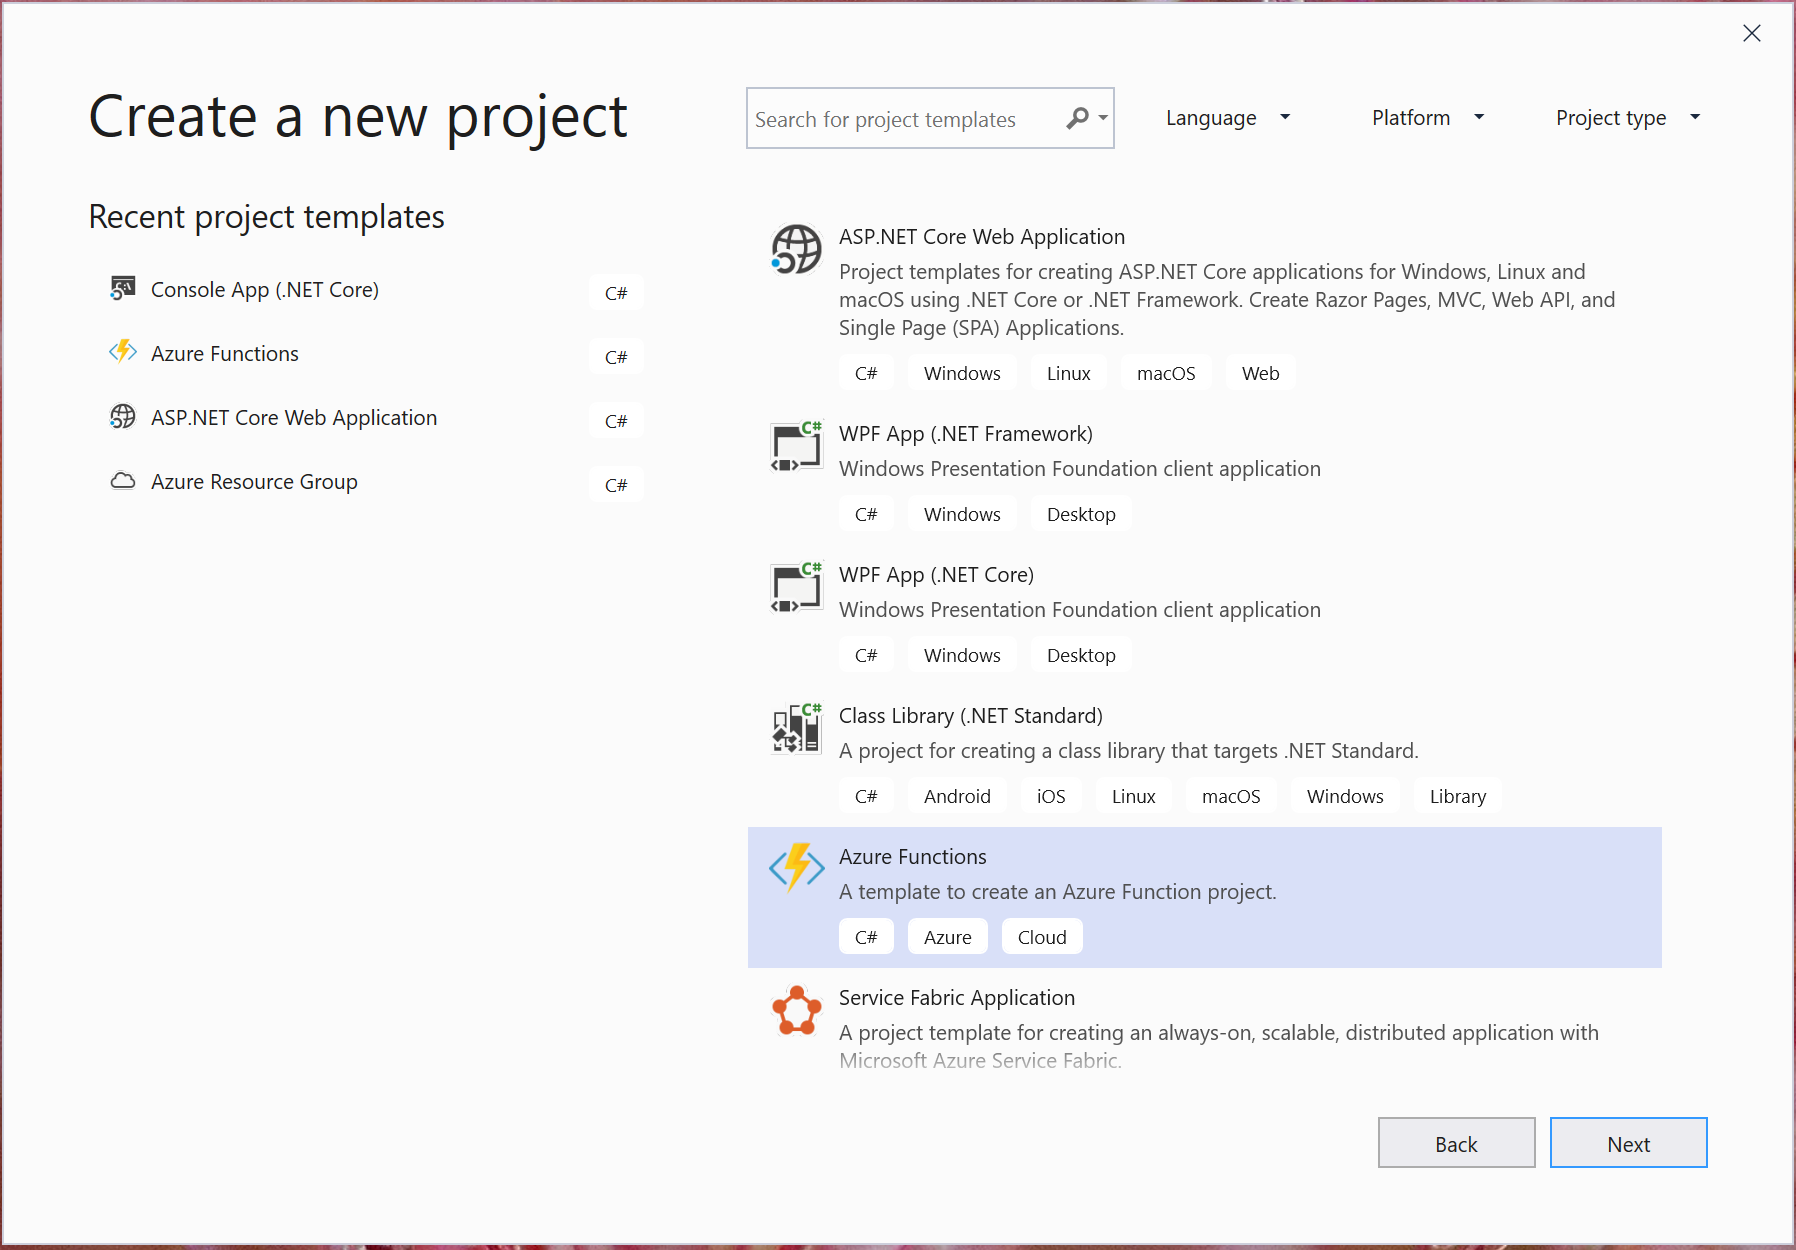
Click File->New Azure Functions from the templates available and give a name for your function and click ok. I have given the name as Cosmos_scale

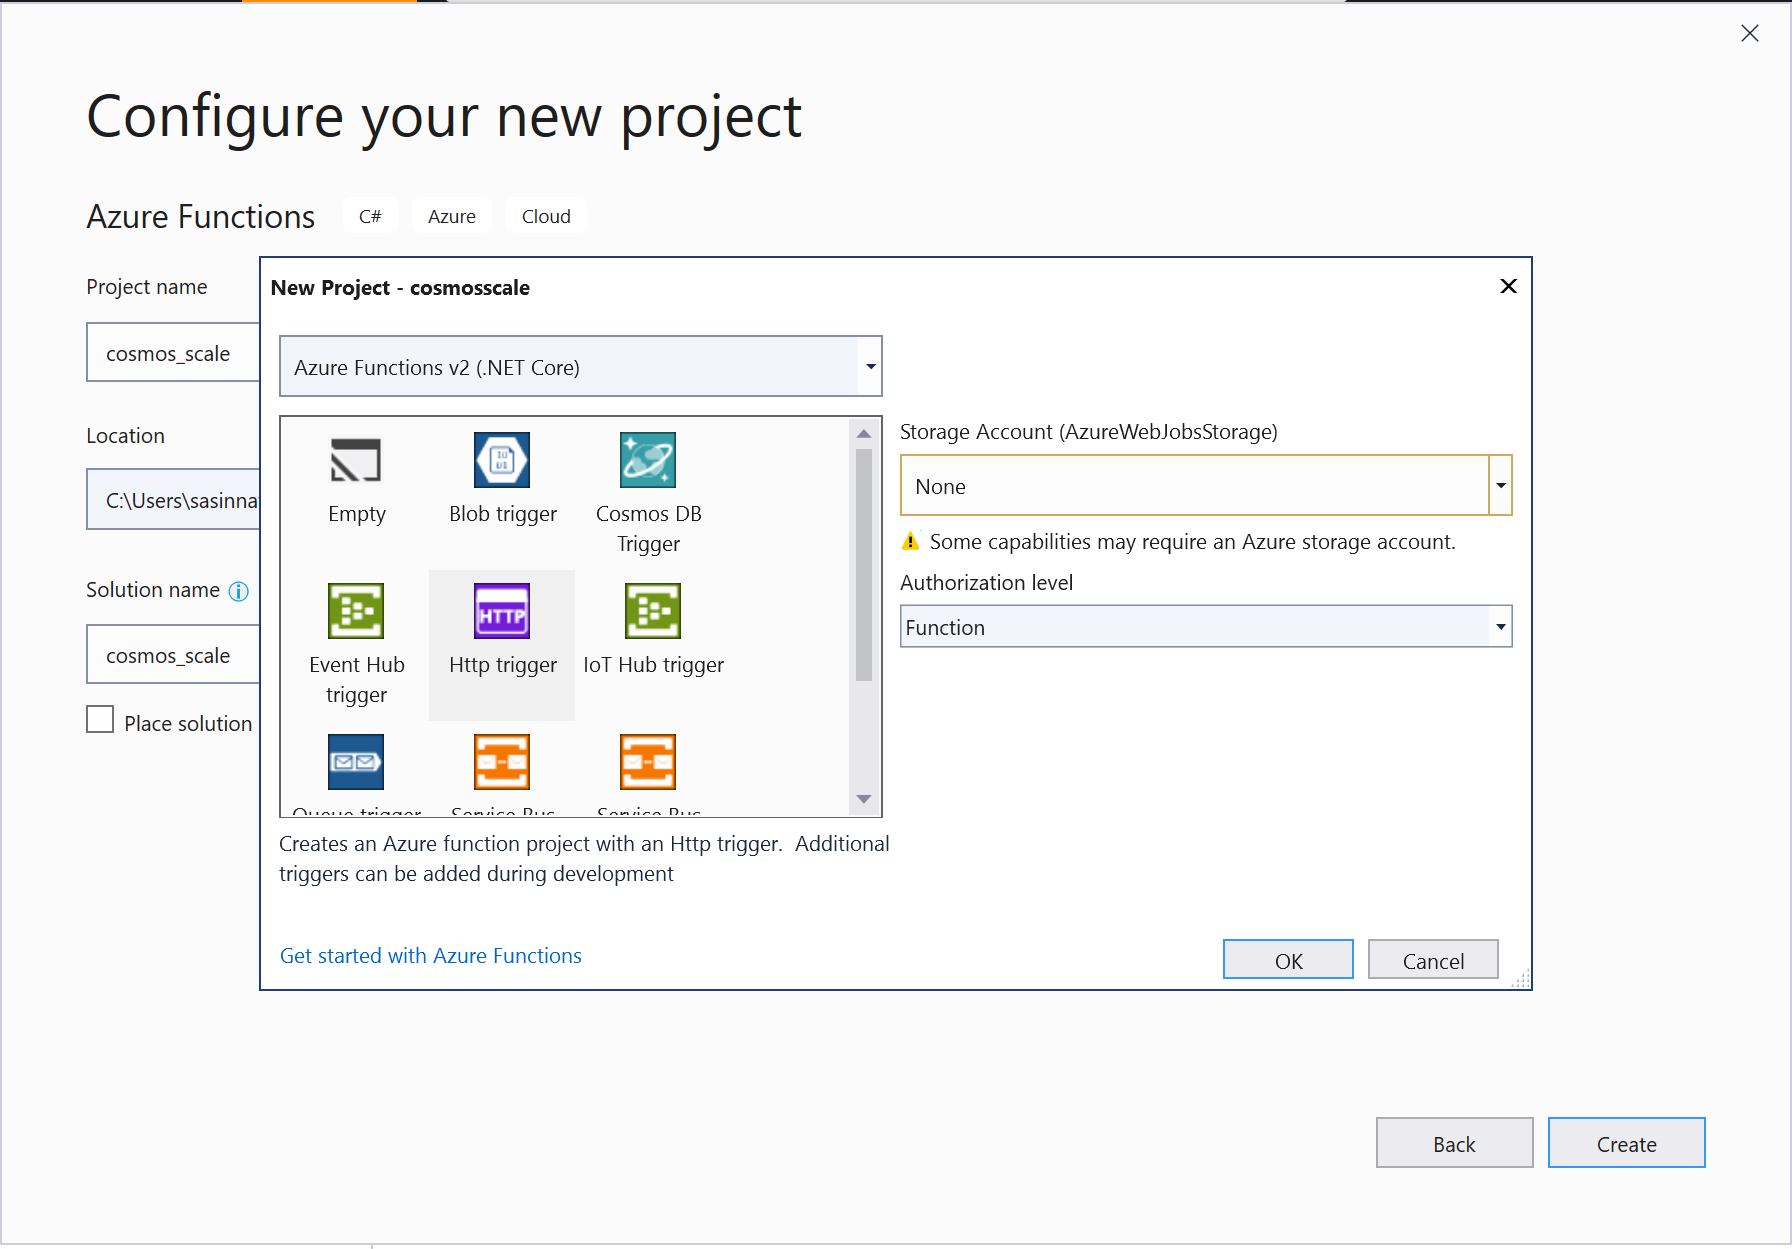
I will be using Azure function 2.x , so you will be taken to a new window where select Trigger type as HttpTrigger and select Authorization level as Function and no need for Storage Account

Once the project is created, rename the default Function1.cs with your name, in this case it will be Cosmosscale.cs. Let's get into the actual implementation of the function

Step 2: Add Microsoft.Azure.Documents.Core Nuget Package to the solution

In order to communicate with the Cosmos DB account and make use of the operations let's add the Nuget package Microsoft.Azure.Documents.Core package.

Step 3: Add Microsoft.Extensions.Configuration to the solution

In order to connect to Cosmos DB we need to get the connection string and the key from the appsettings, lets add Microsoft.Extensions.Configuration. For Azure Functions v2, the ConfigurationManager is not supported and you must use the ASP.NET Core Configuration system:

Let's understand the logic here,

As a first step, lets create the Client to connect to Cosmos DB

https://gist.github.com/sajeetharan/788a6acf99416dde8e6ebd652c2b3ed2

Get the connection self link

https://gist.github.com/sajeetharan/80c87e46cf2969eb11c3c4971f6759ac

As we have already created the account and the collection, lets get the current offer of it

https://gist.github.com/sajeetharan/a3d2d5357791f50276585aa2a04461c1

Let's get the current throughput count

https://gist.github.com/sajeetharan/38302ad7f17b4844afdfd6fd0162e776

Set the new offer with the throughput increment added to the current throughput

https://gist.github.com/sajeetharan/d38fbb251e9e57177a5e68c5735a0fef

That's it, additional step would be to handle the failure and return the response back.

This is how the whole function would look like,

https://gist.github.com/sajeetharan/06544e38bb460df5de44cbaef9b05b43

Step 4: Add the config values to local.settings.json

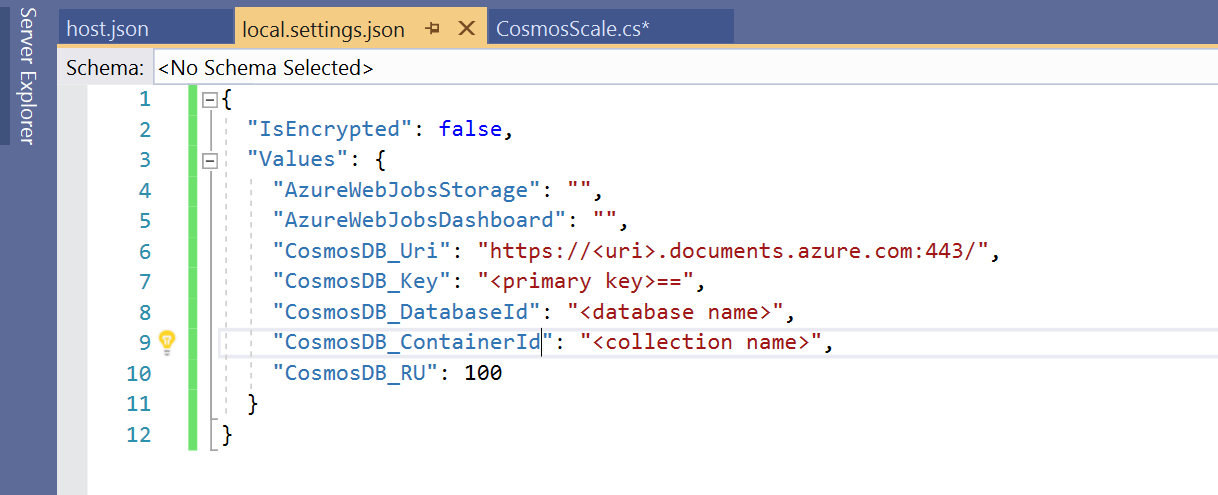
Now we need to add the values to "local.settings.json". These values will be used to test the function locally before deploying it to Azure.

The setting key "CosmosDB_RU" is to increase the RU by 100, and if you want to decrease you can set a negative value say "-100".

You can get these values from the portal by navigating to the Cosmos DB account.

Step 5: Check the function with Postman

Now we have setup and created the function locally. To test the app locally, click on the run button. Using PostMan send a GET or Post request by using the url

http://localhost:7071/api/Cosmosscale

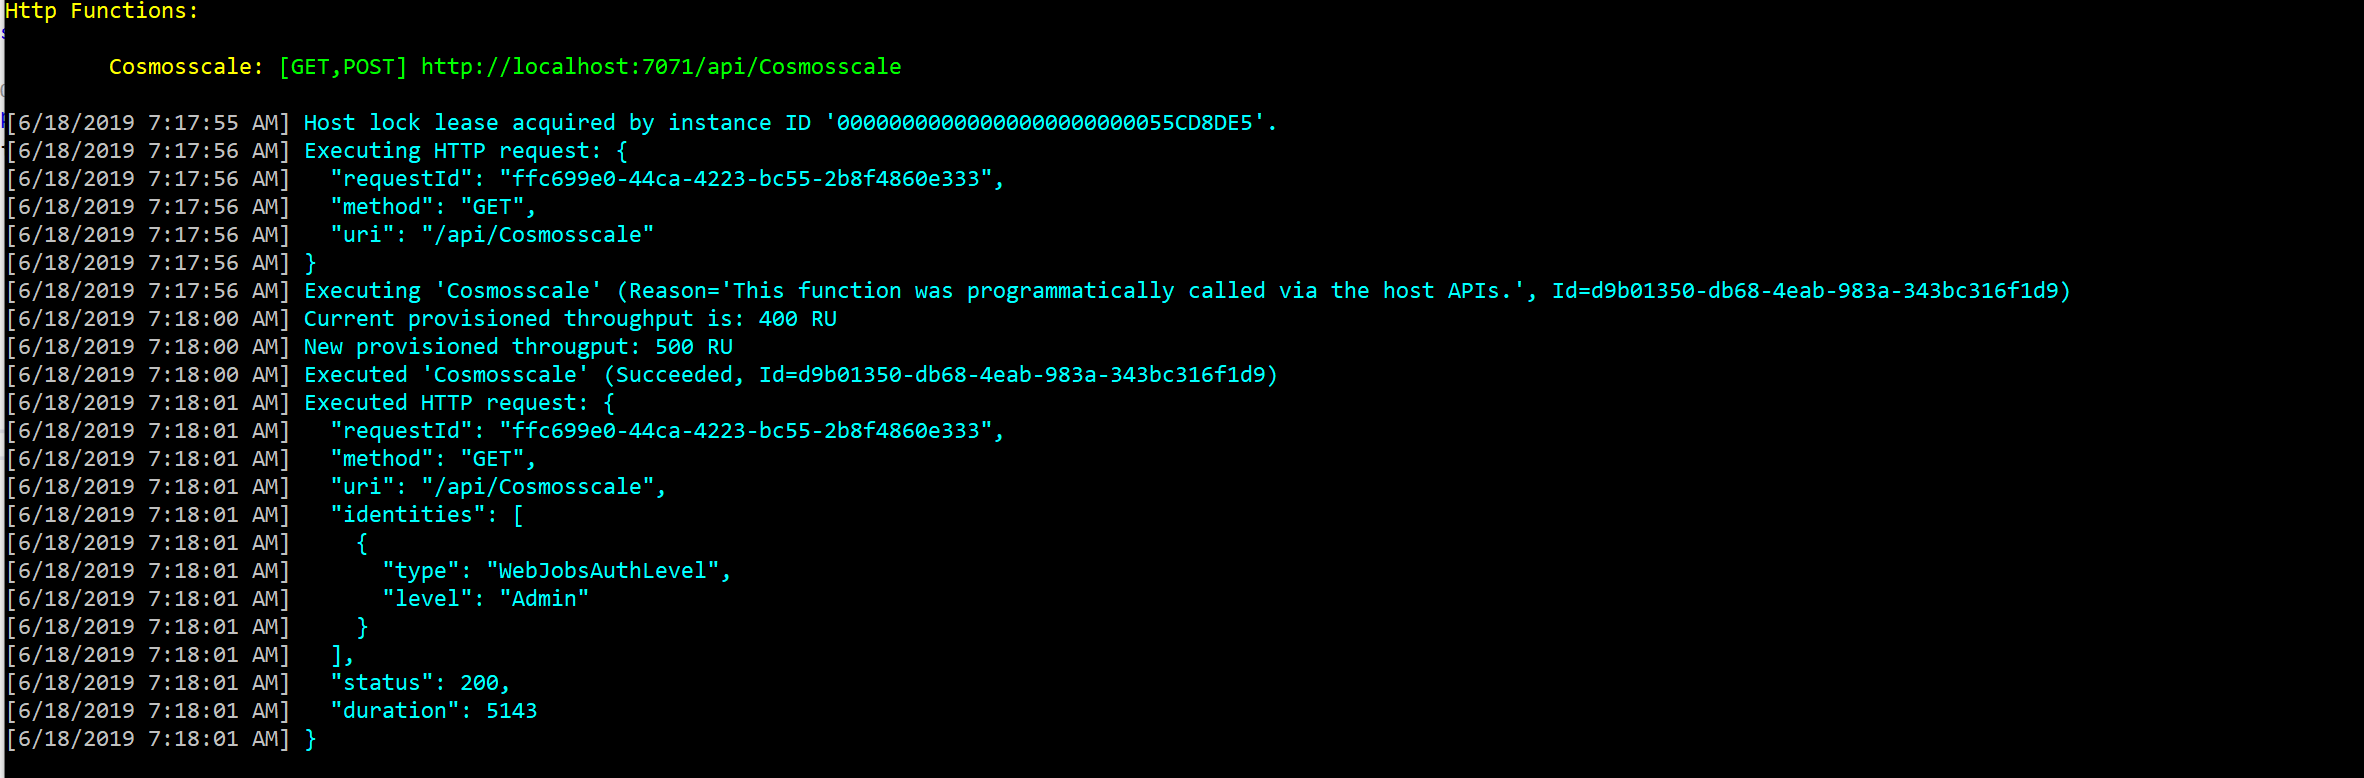
If you have followed the steps and set up everything correctly, you will be seeing he following response in the console. LogInformation messages will specify the current and the provisioned throughput.

Now we have successfuly tested the autoscaling function in local. Let's publish the Function.

Publish the Function on the portal

In this ste, lets deploy the function through the portal to the new function app.

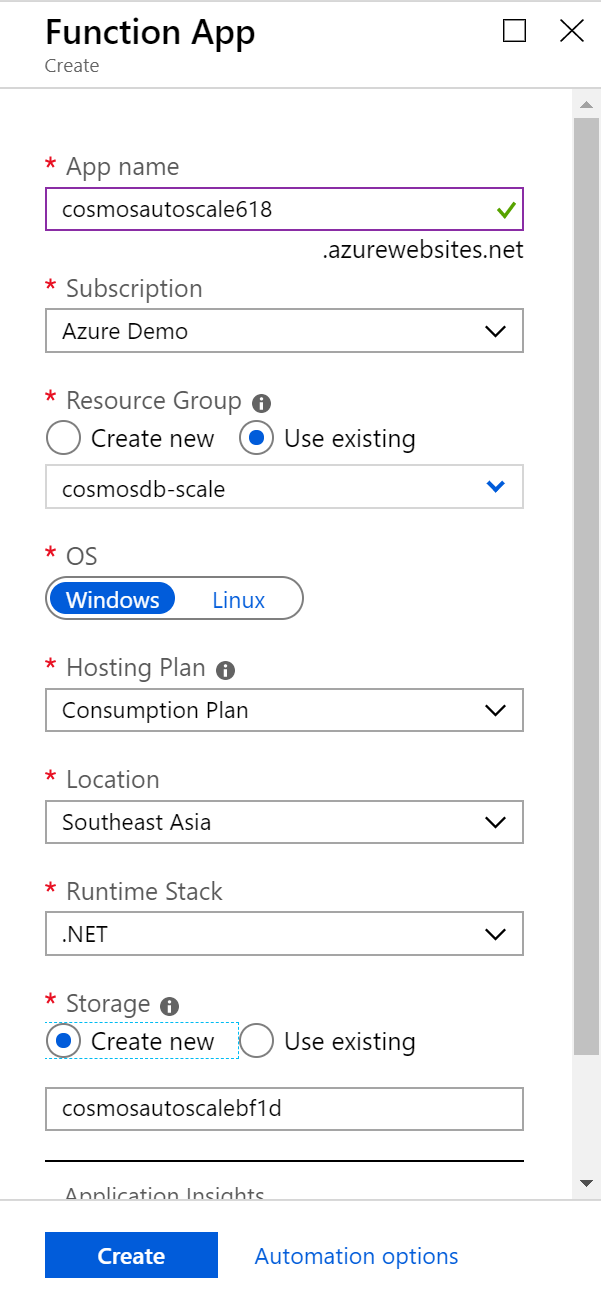
Navigate to the Azure portal and provision a Function App with the default settings.

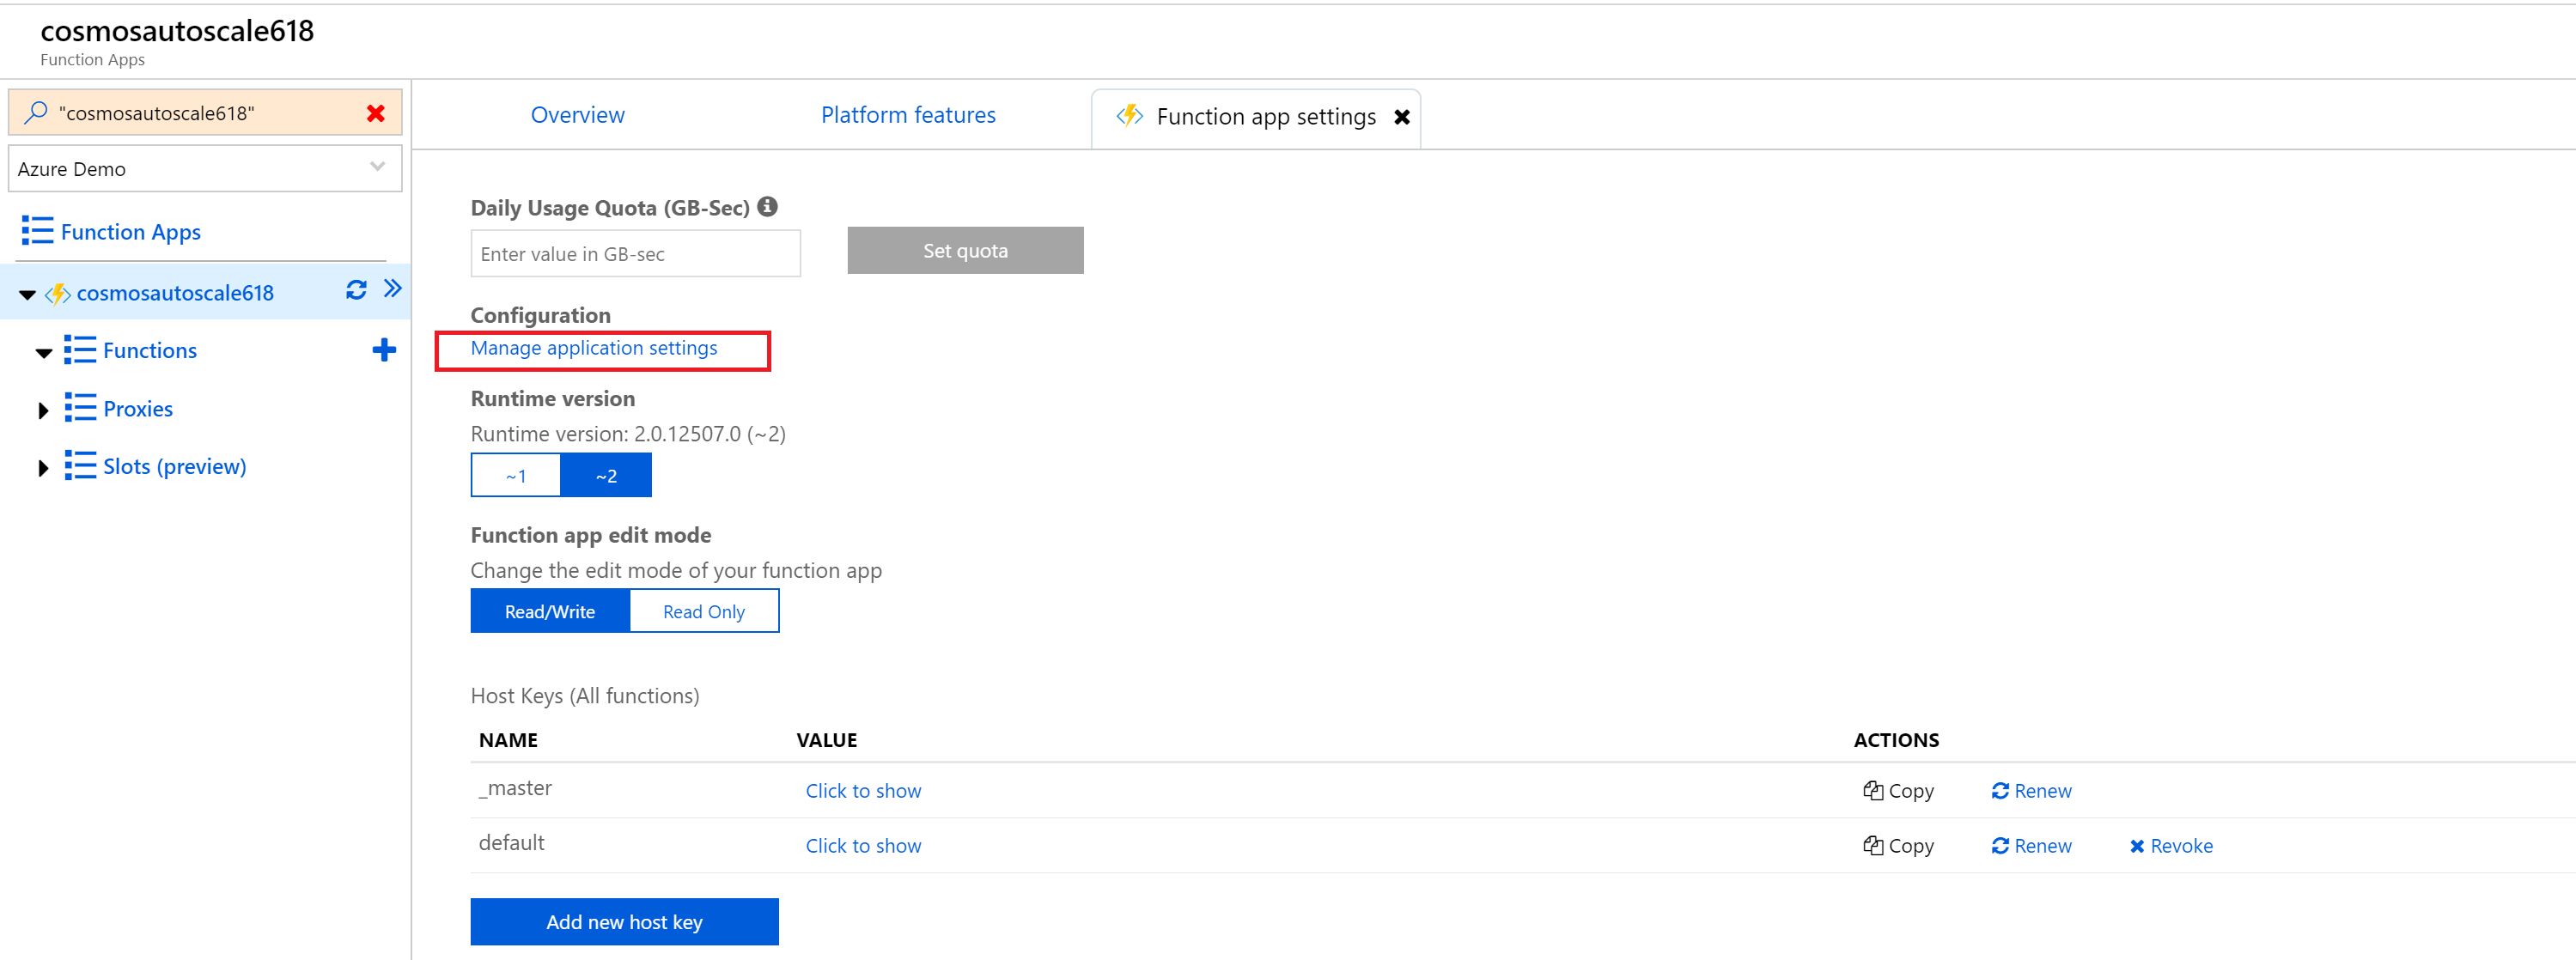
Click on “Function app settings” on your Function App’s homepage, then click on “Manage application settings”. Add the values in the table below to Application settings. The advantage of Adding values to Application settings allows the function’s manager to edit the values later.

KeyValue
CosmosDB_Urihttps://<uri>.documents.azure.com:443/
CosmosDB_appKey<primarykey>
CosmosDB_DatabaseId<database_name>
CosmosDB_ContainerId<container name>
CosmosDB_RU<RU increment/decrement as integer>

Let's publish the function app using Visual Studio.

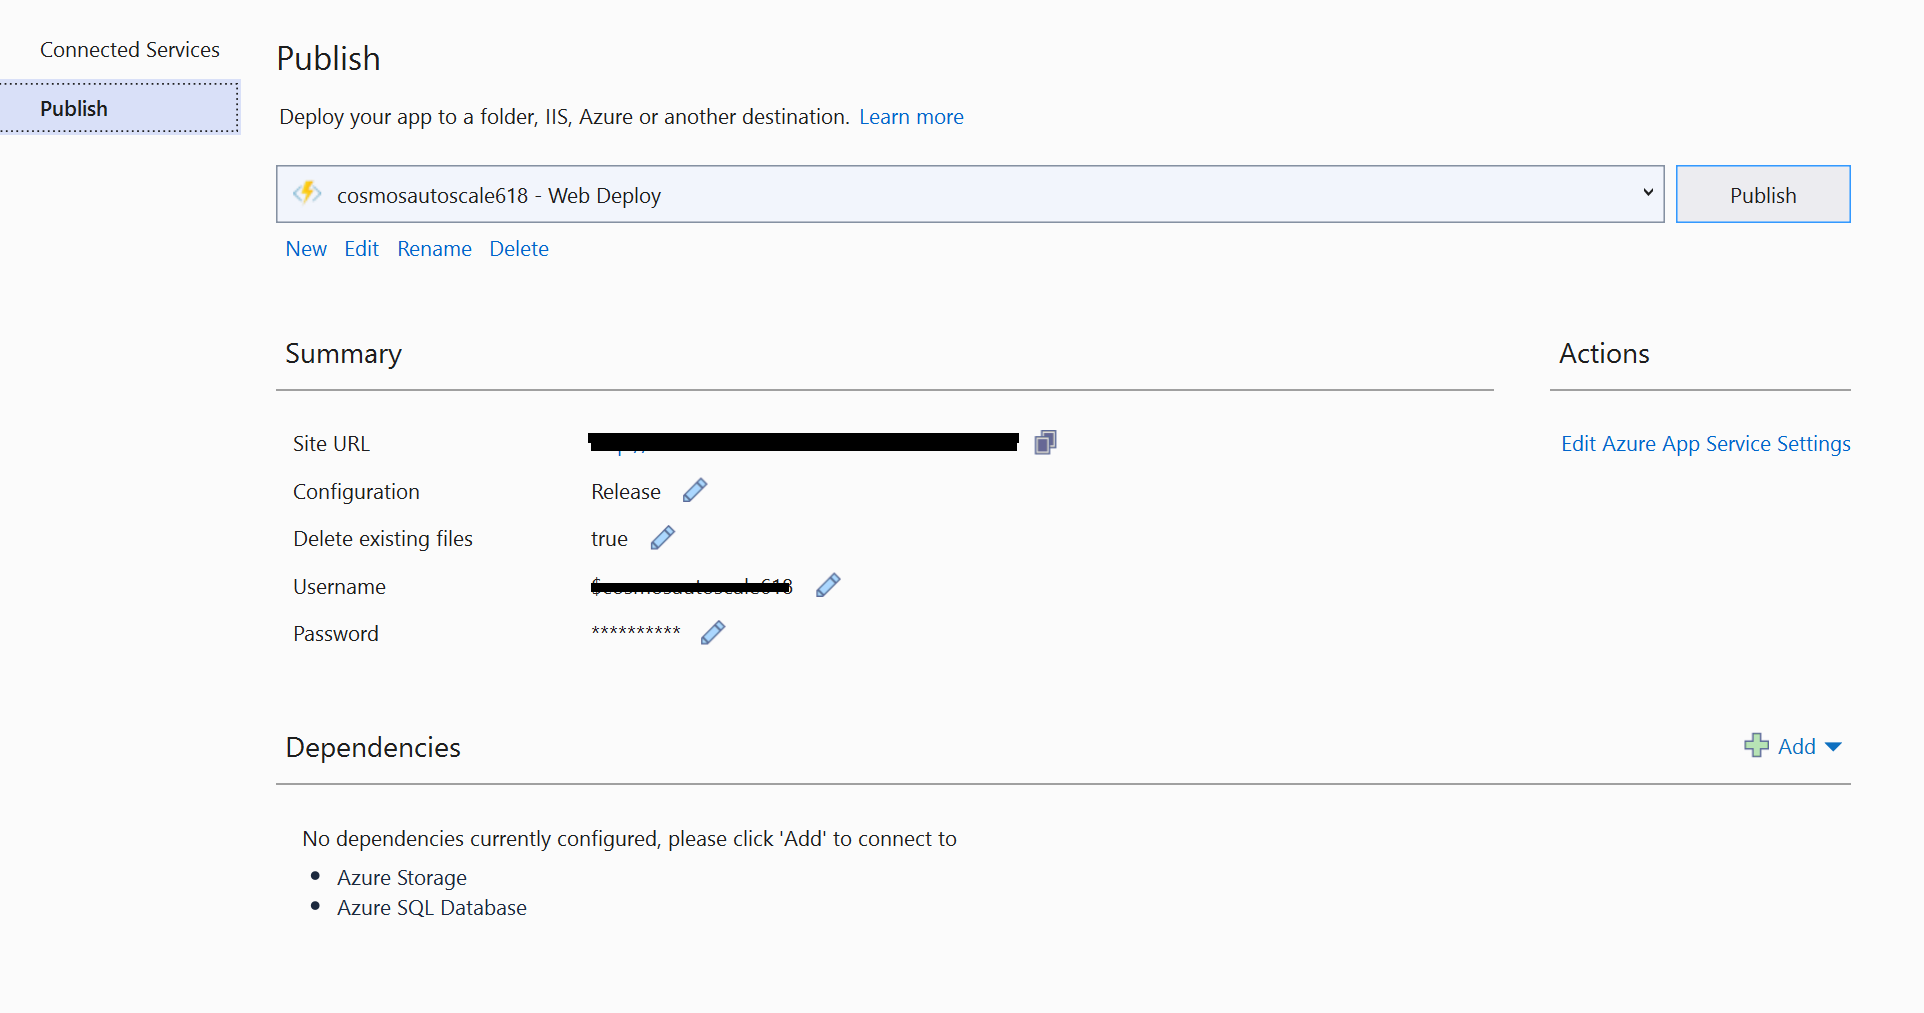
Right click on the project file > Publish… > Select Existing > Publish > Select the Function App we provisioned in the previous step and click ok.

Now we have successfuly deployed the function to Azure. Let's do the final step

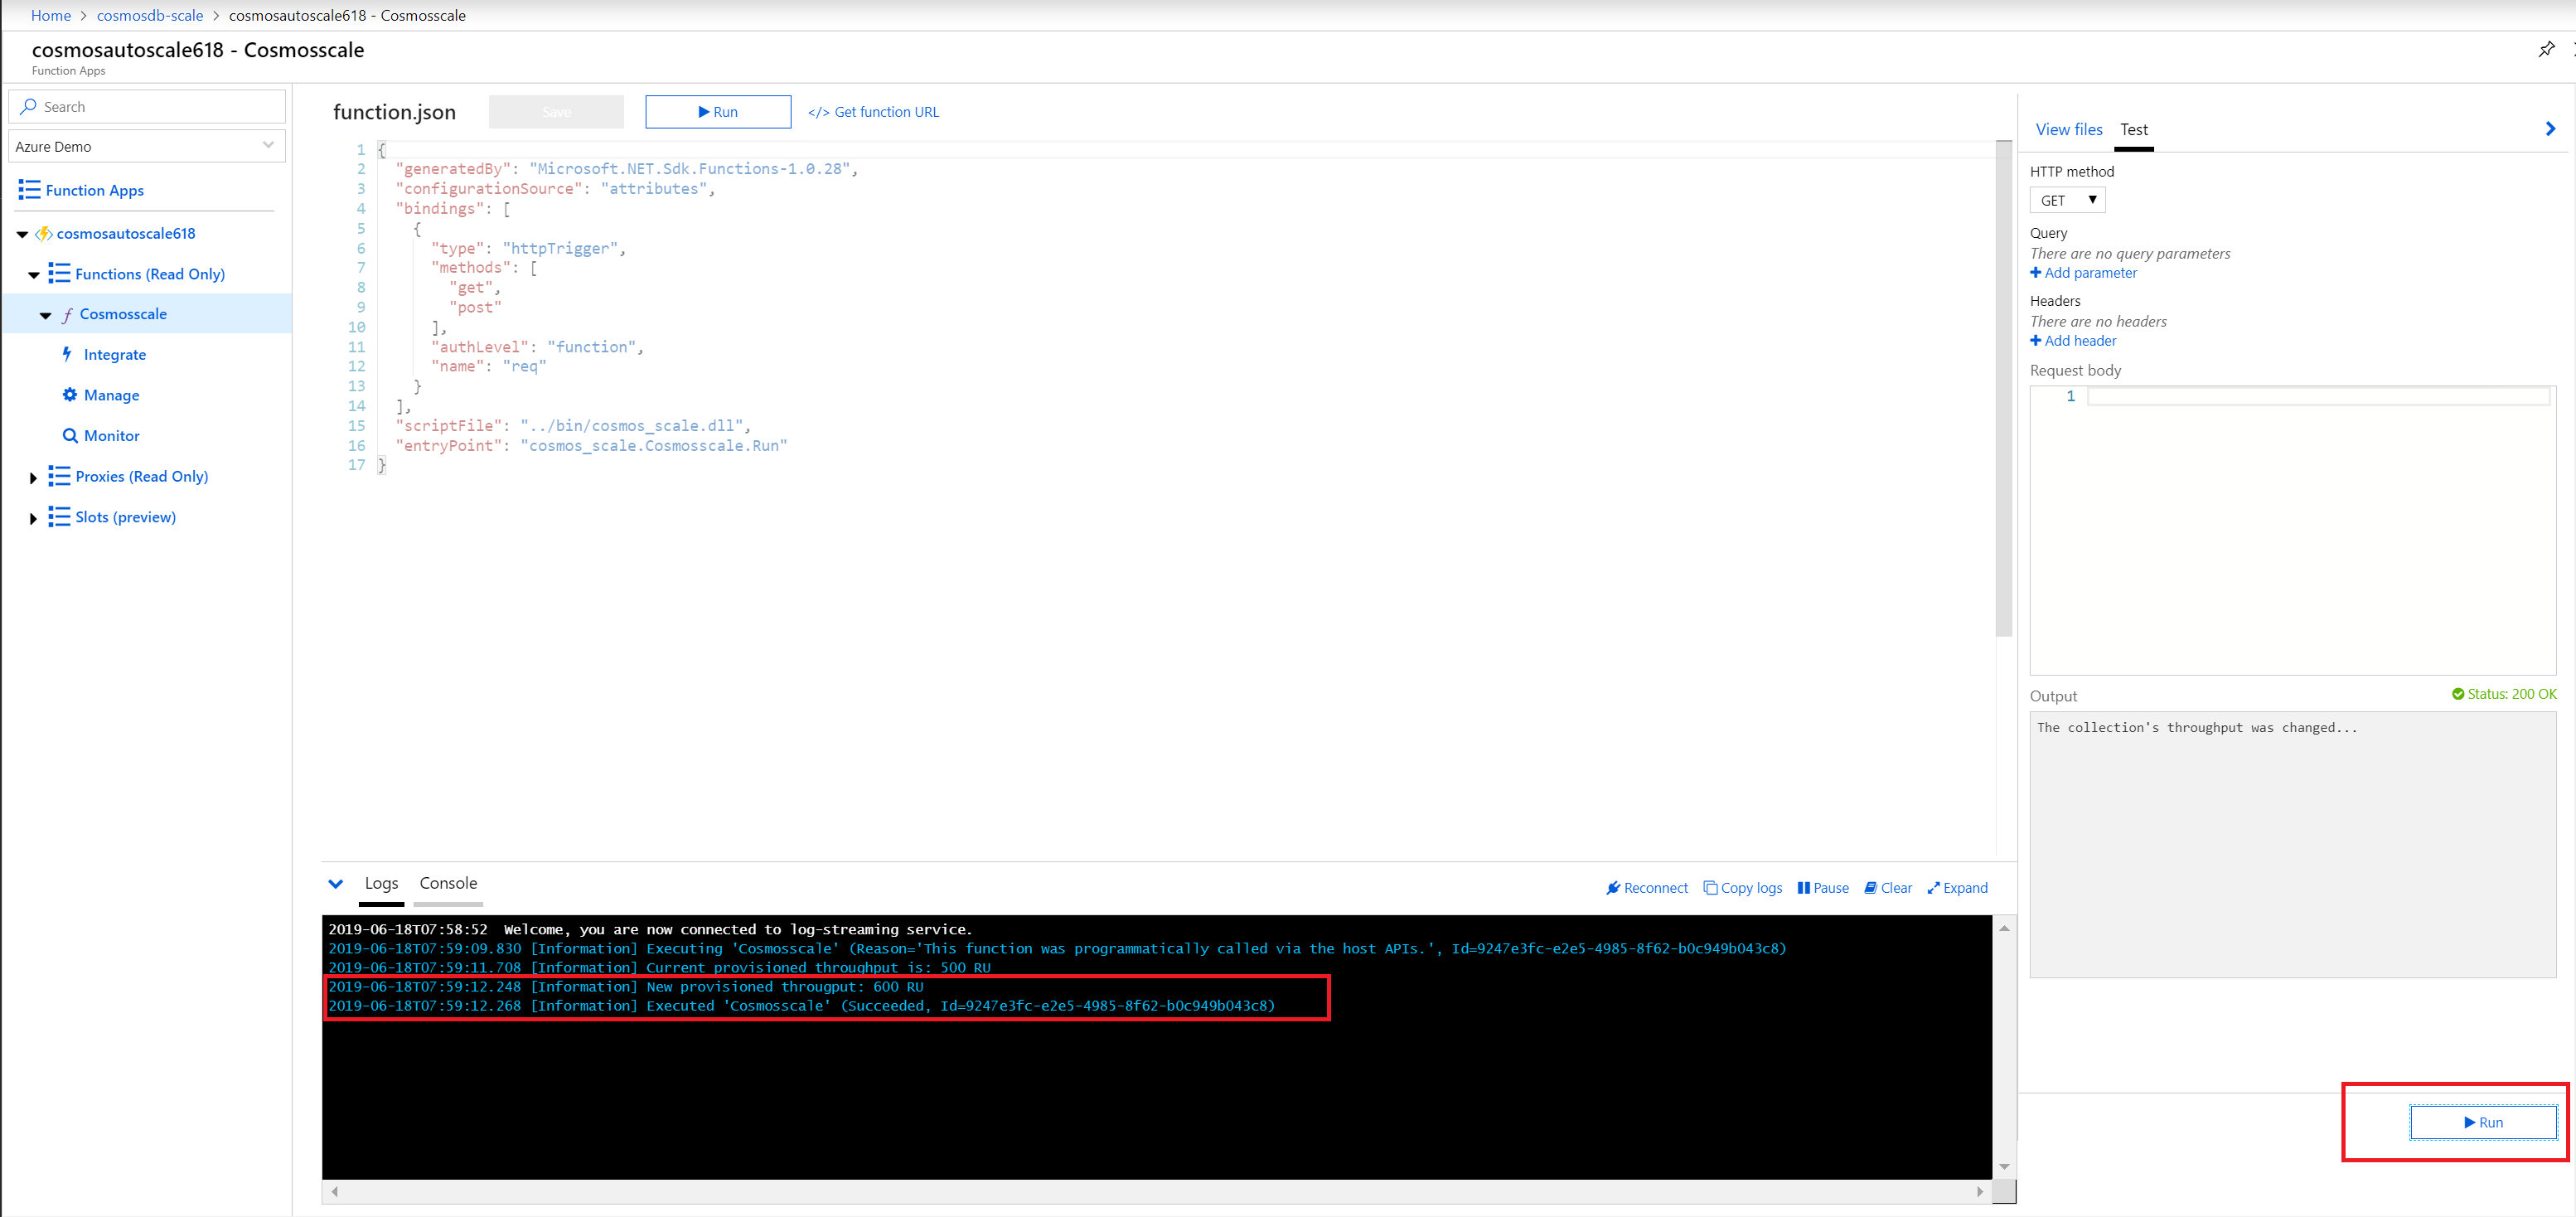
Test the function on Azure by navigating to the function, in the portal blade, and clicking run. We should see the following output if the function succeeds.

If it does not work, make sure you have entered the configuration correctly in the app settings.

You can access the full source code from here.

As this function can be invoked periodically, you can ammend the logic to scale up/down RUs based on time/month/year etc.

Now you can use this function url as a webhook and can be called from anywhere to scale up/down automatically. Hope this will help someone out there to manage the consumption and reduce the cost.

· 2 min read

I have been working with couple of applications built with CosmosDB and one of the things that surprised me was one cannot clear all documents in a collection from the Azure web portal or using the Storage Explorer. As I was struggling to do this while doing some tests on the application I decided to write a blog on the solution I used. There are two ways to achieve the same

  • Using a stored procedure
  • Using Cosmosdb SDK

Using Cosmosdb SDK:

I came up with a script in Node which can be done with any of the programming languages such as C#,Python supported by the SDK

Let’s go through the steps:

Step 1:

Open VScode and Create a file named cosmosdb_helper.js

Step 2:

Let’s install the necessary packages needed.

Install documentdb javascript sdk with the following command,

npm i documentdb

and you will see the output as follows

2019-02-04_21-36-10

Let’s install require to handle the dependencies with the following command,

npm i require

and you will see the output as follows,

2019-02-04_21-36-31

Step 3: 

Let's do some coding. You will be able to understand the following code with the comments added on each line,

https://gist.github.com/sajeetharan/8efe2c9424dfc89d1f58b34627858944

Suppose if you have partitionKey created with your collection, you need to pass queryoptions with the partitionKey in selectAll as well as deletDocument as follows,

https://gist.github.com/sajeetharan/d5302257d3b5e54a33e5601b215decf1

Step 4:

Let’s run the script and see the output,

You can run the helper script as follows,

if you want to list all documents in the collection,

node cosmosdb_helper.js selectAll

which will list the output of all documents in the collection.

If you want to delete all documents within a collection, you can run the script as,

node cosmosdb_helper.js deletAll

which will remove all documents in the collection.

Using a stored procedure:

As mentioned above, 2nd way is to use the stored procecure given by Microsoft employee as mentioned here.

Hope the helper script will help someout out there in order to delete all documents in a collection. You can get the whole code from Cosmosd_Helper

· 5 min read

Traditional Architecture :

In a traditional Application with the normal approach, transactional use-cases usually involve persisting data in a few SQL tables or in a NOSQL database. When the changes are performed on the object the database is updated to match the new state.

The traditional approach works well in case if you do not need to know the changes that object has gone through, but in modern systems customers always comes up with a requirement to get the log of changes that particular entity has gone through. With the traditional approach, there is no way of knowing what the user had in the object before changing it, or at which point of time the contents changed. We can still solve this with the traditional way by storing the extra information about the modifications but the solution becomes more complex.

For example in traditional approach,

https://gist.github.com/sajeetharan/2d9921571c67f7038ec5a4053882b85f

Which will create an entry for each insert in the SQL database as follows,

2019-02-03_13-10-23

The current state is saved in a relational database. We load the object, change it and save  it back.

EventSourcing Architecture :

In the eventsourcing solution, we look at the problem as a sequence of events that occur and save the occurrence of events as it is. The events contains all details about what actually happened at particular point of time. These are historical information and once it is saved it should not be modified.

https://gist.github.com/sajeetharan/825ec83fd780b7670146649bf6d4a0ce

All events for a certain product are stored. Their data and sequence define the current state of the product. Event is the easiest way to remember what happened at a certain time. Event sourcing comes with an advantage of having audit trail by itself and to get full understanding of what the system is doing.

Event Sourcing Architecture with AzureCosmosdb and EventHub

To implement event sourcing in your application, Microsoft azure provides the following services to  full fledged solution and we will discuss in this blog.

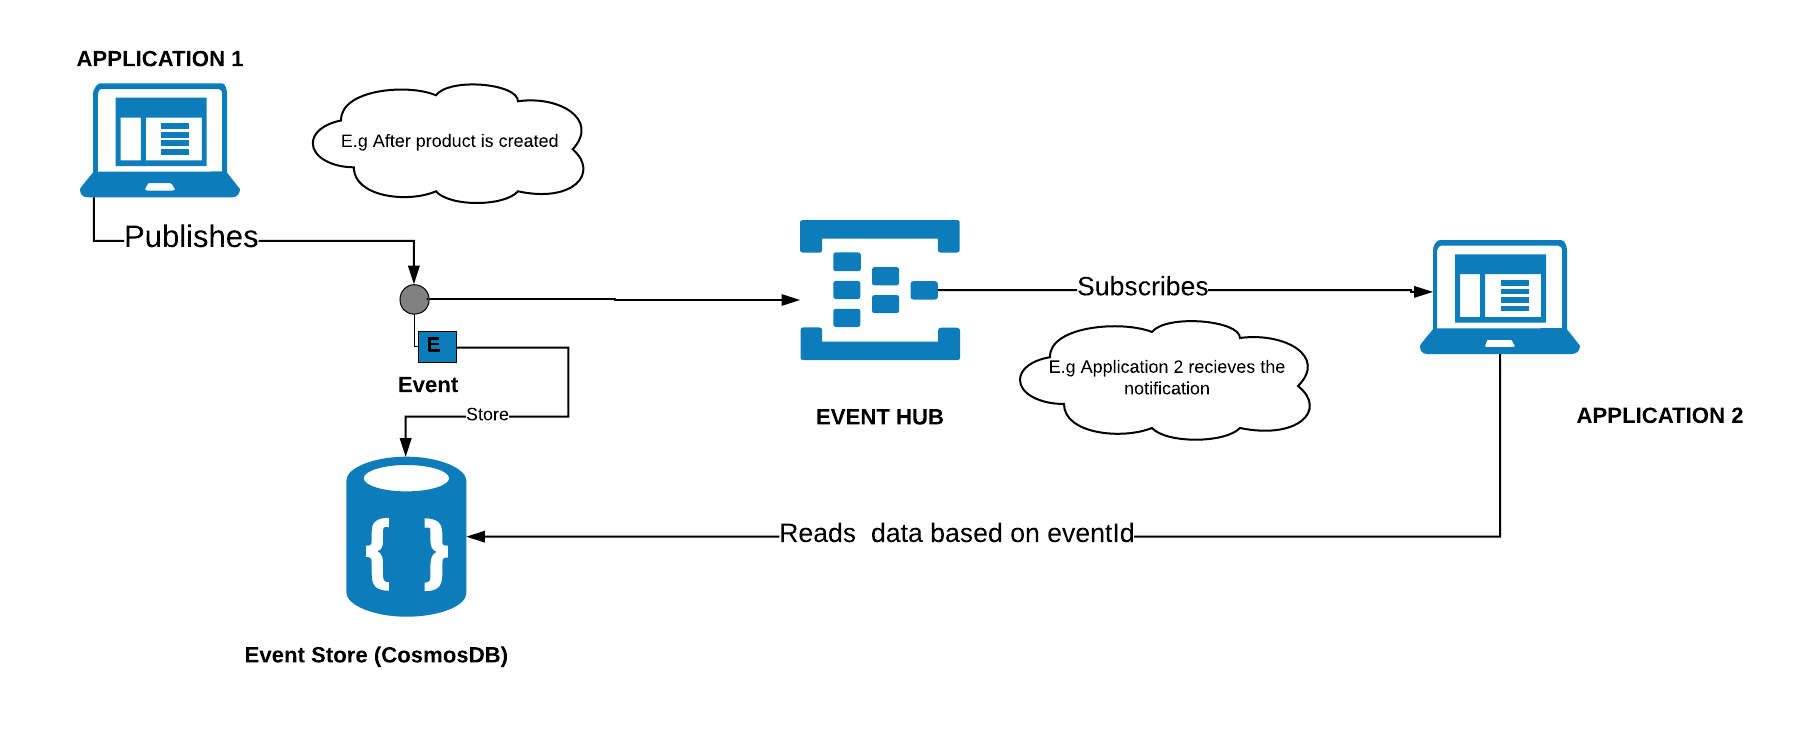
Lets look at the diagram below,

NEW_LEGAL

Application 1 stores the data in the traditional database and your customer needs the changes that has been done on the product. The above architecture will easily fulfill the requirement with the event sourcing.

Components involved in the architecture as follows,

Azure EventHub

Azure Eventhub is a managed service to receive and process millions of events per second. It is intended to handle event based messaging in huge scale. This could be used in an product if you have devices application publishing events and send them to eventhub. It will create a stream of all these events which can be read by different applications in different ways. Eventhub provides interfaces such as AMQP and HTTP to make it easy to send messages to it. In Eventhub we can define consumer groups which lets us to read stream of events. We can decide on consumer group based on the number of receivers(applications)

CosmosDB

Azure Cosmos DB is a globally-distributed, multi-model database as a service build for low latency and elastic scalability.  It supports the following options to store the data and it is highly available from anywhere in the world,

  • Key-value
  • Column-family
  • Document: MONGO or SQL
  • Graph

I will be not going in detail as there are enough blogs to get started with CosmosDB. In the above architecture there will be millions of events created after each update hence we need to store them in the cosmosdb with the state of the object. This way brings a lot of benefits. First, the event store with cosmosdb becomes your canonical source of truth that describes the updates applied to your domain in an unbiased form.

Implementation:

Application 1:

Whenever user updates an object in the application1, there will be notification message sent to the EventHub with an ID (unique id for each message) that something has happened on application. We could make use of epoch timestamp with 8 digits to make sure it is a unique one. A sample payload would look like,

{"MessageId": 1547632386819}

Note:  As Eventhub can have a message of maximum size 256k it is always better to have minimum size of message.

Once the notification is sent, the state of the object is stored in the eventstore(cosmosdb).

Application 2:

Application 2 will have an EventHub receiver which runs on the background which will subscribe to the EventHub and get the latest message. Once the id is retrieved by the receiver, it can request the eventstore with the id and get all the changes prior to the id as follows,

https://gist.github.com/sajeetharan/c34965a606c8afff9d02f2a3a17522bf

which will create the documents in Cosmosdb as,

2019-02-03_16-55-58

With the above approach ensures that all changes to product are stored as sequence of events. When we look at broader picture, it also ensures that all changes to application state are stored.

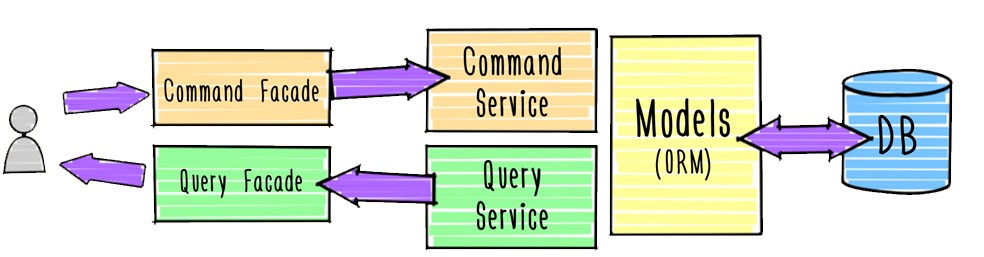
This is the simple architecture diagram to implement event sourcing in your application. One of the very good pattern to implement event sourcing is by using CQRS(Command Query Responsibility Segregation).

test

Lets look at the etail implementation with the code in the upcoming blogs. Hope this will help someone out there to implement event sourcing in your application if you are using Azure platform.

· 8 min read

Azure CosmosDB (Azure Cosmos DB – Globally Distributed Database Service (formerly DocumentDB) | Microsoft Azure) is a super set of the service once known as “Azure Document Db”. In short: “Azure CosmosDB ” = “Azure Document Db” + new data types + new APIs.

You can try CosmosDB  for free on Azure or you can setup the CosmosDB on your local environment by following my previous blog. I am becoming a fan of .NET Core with all the features and it is getting better day by day . In this blog post i just wanted to take that initial steps of how to work with CosmosDB from .NET Core Client context. After reading this blog, you should be able to do the following with CosmosDB programmatically,

  • Create Database
  • Create Collection
  • Create Documents
  • Query a Document
  • Delete Database

Pre-Requisities Needed:

I have the following in my local environment , hope you guys have already have😊, if not start setting up.

  • Windows 10 OS
  • Azure CosmosDB Emulator
  • Visual Studio Code editor with C# plugin
  • .NET Core 2.0

Ok folks, lets get started.

Step 1: Create .Net Core Console Application :  As other tutorials, to make it simple I will be creating a dotnetcore console app to work with CosmosDB . With Net Core , we now  have a CLI. Lets create the new app with the following steps. (I’ve mentioned in the previous blog)

  1. Open command prompt or poweshell (Administrator Mode)
  2. Navigate to your folder where you need to create the app
  3. Execute the following command
dotnet new console -n CosmosCoreClient -o CosmosCoreClient

here -n denotes the name of the application, and -o tells the CLI to create a folder with that name and create the application inside the folder

Open the newly created project in Visual Studio Code. Execute the following command

Code.

Here is a screenshot of how it should look on your end:

I am using C# 7.1 feature to create a async Main method in my console app. For that, we will need to make a small change in our project file a little. Open CosmosDBClient.csproj file to edit. Add the following XML node to PropertyGroup node.

<LangVersion>latest</LangVersion>

After changes, your csproj file should look like below:

Lets move to the core part of integrating CosmosDB with .netCore application and start building the features.

Step 2: Add CosmosDB Nuget Package

If you have followed the above steps, we have successfully created the application, next is to add reference to CosmosDB nuget package to get the client libraries. Advantage of these packages/libraries are, they make it easy to work with Cosmosdb.

  1. Open a command prompt and navigate to root of your project.
  2. Execute the following command
dotnet add package Microsoft.Azure.DocumentDB.Core

You might wonder the namespace has DocumentDB in it. In fact DocumetDB is where the whole journey started and hence the name sticks in Cosmos world too. If you now look at the project file a new reference for DocumentDB would have been added. Here is the screenshot of my project file.

Step 3: Creating Model for CosmosDB

Lets build the database. If you are new to CosmosDB you should know that CosmosDB has a query playground here https://www.documentdb.com/sql/demo. It is a sandboxed environment with couple of databases and you can try around with different queries you can write against the database. For this post, lets create the database named Course locally.

Since we our application is to deal with the Courses we need 4 Models here.

  1. Course
  2. Session
  3. Teacher
  4. Student

Here are the Models of the above 4.

Course.cs

using Microsoft.Azure.Documents;
using Newtonsoft.Json;
using System;
using System.Collections.Generic;
public class Course : Document
{
[JsonProperty(PropertyName = "CourseId")]
public Guid CourseId { get; set; }

[JsonProperty(PropertyName = "Name")]
public string Name
{
get
{
return GetPropertyValue<string>("Name");
}
set
{
SetPropertyValue("Name", value);
}
}

[JsonProperty(PropertyName = "Sessions")]
public List<Session> Sessions { get; set; }

[JsonProperty(PropertyName = "Teacher")]
public Teacher Teacher { get; set; }

[JsonProperty(PropertyName = "Students")]
public List<Student> Students { get; set; }
}

Session.cs

using System;

public class Session
{
public Guid SessionId { get; set; }

public string Name { get; set; }

public int MaterialsCount { get; set; }
}

Teacher.cs

using System;

public class Teacher
{
public Guid TeacherId { get; set; }

public string FullName { get; set; }

public int Age { get; set; }
}

Student.cs

using System;

public class Student
{
public Guid StudentId { get; set; }
public string FullName { get; set; }

}

Lets create the Client as the next step.

Step 4: Creating the Client

Next step you will need to instantiate the CosmosDb client before we do anything with the database. In order to connect to the local instance of the cosmosDb, we need to configure 2 things,

  1. URL of the CosmosDb instane
  2. Authentication key needed to authenticate.

As stated above, When you start the CosmosDb  local emulator, the db instance is available at https://localhost:8081. The authkey for local emulator is a static key and you can find it here in this article(https://docs.microsoft.com/en-us/azure/cosmos-db/local-emulator#authenticating-requests). This key works only with the local emulator and wont work with your Azure instance, you can find the key if you are using azure instance from the portal as mentioned in the answer. Here is the code snippet to instantiate the client:

        static string endpointUri = "https://localhost:8081";
static string authKey = "C2y6yDjf5/R+ob0N8A7Cgv30VRDJIWEHLM+4QDU5DE2nQ9nDuVTqobD4b8mGGyPMbIZnqyMsEcaGQy67XIw/Jw==";
string dbName = "CourseDB";
string collectionName = "Courses";
static void Main(string[] args)
{
Console.WriteLine("Press any key to run");
Console.ReadLine();

Run();

Console.ReadLine();

}
private static async void Run()
{
DocumentClient documentClient = new DocumentClient(new Uri(endpointUri),
authKey);
}

When the method Run is exectued the Client is instantiated with the local CosmosDB emulator.

Step 5: Lets start building the features

Next step is to build the features as listed above. Lets add the methods inside the Async method.

Creating Database:

To create a new database programmatically, we make use of CreateDatabaseAsync() or CreateDatabaseIfNotExistsAsync(). When creating the database we pass the database name. Here is the code snippet:

private static async Task<Database> CreateDatabase(DocumentClient documentClient)
{
Database database = documentClient.CreateDatabaseQuery().Where(c => c.Id == "courseDatabase").AsEnumerable().FirstOrDefault();
if (database == null)
{
database = await documentClient.CreateDatabaseAsync(new Database()
{
Id = "courseDatabase"
});
}
return database;
}

When you refresh the URL of local CosmosDB emulator, You should see the database created in your local db emulator as follows,

Creating Collection:

Once the database is created, we can then create a collection. We make use of CreateDocumentCollectionAsync() or CreateDocumentCollectionIfNotExistsAsync().

We will need to provide what is known as the database link (basically the URI at which the db can be reached) and the collection name to the create method. Here is the code snippet.

private static async Task<DocumentCollection> CreateDocumentCollection(DocumentClient documentClient, Database database)

{
DocumentCollection documentCollection = documentClient.CreateDocumentCollectionQuery(database.CollectionsLink).Where(c => c.Id == "courseDocumentCollection").AsEnumerable().FirstOrDefault();

if (documentCollection == null)
{
documentCollection = await documentClient.CreateDocumentCollectionAsync(database.SelfLink, new DocumentCollection()
{
Id = "courseDocumentCollection"
});
}

return documentCollection;
}

Now you should the the Collection for Course is created as follows,

Creating Document :  After creating the database and collection, we can now create the documents. We make use of CreateDocumentAsync() for this purpose. We will need to pass the URI of the collection under which we want to create the document and the document data itself. In this example we make use of the Course data mode i showed earlier and pass it to the create method. Here is the code snippet:

private static async Task CreateCourse(DocumentClient documentClient, DocumentCollection documentCollection)
{
Course course = new Course()
{
CourseId = Guid.NewGuid(),
Name = "En",
Teacher = new Teacher()
{
TeacherId = Guid.NewGuid(),
FullName = "Scott Hanselman",
Age = 44
},
Students = new List<Student>()
{
new Student(){
FullName = "Trump",
StudentId = Guid.NewGuid()
}
},
Sessions = new List<Session>(){
new Session(){
SessionId = Guid.NewGuid(),
Name = "CosmosDB",
MaterialsCount = 10
},
new Session(){
SessionId = Guid.NewGuid(),
Name = "Ch1",
MaterialsCount = 3
}
}
};
Document document = await documentClient.CreateDocumentAsync(documentCollection.DocumentsLink, course);
}

You should see the document inserted in localdb Emulator as follows.

Querying Document:

Now that we have created a document, we can see how to query it. We can make use of CreateDocumentQuery() method for this purpose. We will need to pass the collection link on which we need to query. We can then build the query as a LINQ expression and the client library does the rest. This is the best part of the client library. It has the ability to translate your LINQ expression to cosmos REST URIs without me having to crack my head in constructing those URIs. Here is the code snippet:

private Course QueryCourse(Guid guid, String dbName, DocumentClient documentClient, string collectionName)
{
Course selectedCourse = documentClient.CreateDocumentQuery<Course>(
UriFactory.CreateDocumentCollectionUri(dbName, collectionName))
.Where(v => v.Name == "CosmosDB")
.AsEnumerable()
.FirstOrDefault();
return selectedCourse;
}

Note that you will need to import System.Linq for the LINQ expression to work.

Deleting Database:

Finally, we can make use of DeleteDatabaseAsync() method to delete the database programmatically. We will need to provide the database link to the delete method. We can use the UriFactory.CreateDatabaseUri() helper method to create the database link. Here is the code snippet:

await documentClient.DeleteDatabaseAsync(UriFactory.CreateDatabaseUri(dbName));

Well, those are the main features that Azure CosmosDB client provides and if you are stuck with any of the steps above , you can check out the repository i have added with the samples.

Happy Coding! Lets spread Azure's CosmosDB to the world.

· 4 min read

Recently I started experimenting with Azure's CosmosDB and developed few applications using the same. To start with it this blog will help all the Azure/CosmosDB developers out there to easily setup with visual studio code. I will be sharing how to connect to Azure CosmosDB without using the portal in local machine.

To start with it, You should have visual studio code installed on your machine. If not download it from here.

We need to setup an extension with visual studio code as a initial step. Azure CosmosDB extension for visual studio code gives developers set of cool commands to work with CosmosDB. With the help of Azure CosmosDB extension developers can easily do the actions which could be done on the azure portal such as Create,delete,modify databases,Collections,views and documents. Also the hierarchical representation will provide a better way to understand the structure of database.

Step 1:

To start with, you must install the Azure CosmosDB from the market place. So, search for Azure Cosmos DB extension in the market place and click on install

Go to View - > Extensions or press Ctrl + Shift + X

Once the extension is installed, you can find Azure CosmosDB in explore section of visual studio code.

Step 2:

To explore the different types of commands with Azure Cosmos DB, open show all command palate and search for Cosmos. It will list down a different set of commands that you can play with,

Go to View - > Extensions or press Ctrl + Shift + P              

Step 3:

Now the extension is installed successfully. Lets see how to connect to Azure CosmosDB  in local machine. Move back to Azure CosmosDB extension section in the explorer panel. Sign in to Azure account to view the CosmosDB accounts inside the visual studio code alternatively you can select “Attach Database Account”

Select the specific Database Account API, in this case it is DocumentDB and enter the connection string copied from the portal

To get the connection string from the Azure Portal, navigate to the respective CosmosDB  Resource, and from the left side panel Settings –> Keys -> Connection String Copy the Primary Connection String.

Now you can see the database displayed with the account provided in the azure CosmosDB explorer pane.

That’s it Now you can Add, Modify Database, collection, and documents within Visual Studio Code. Play around with all the commands and features of the extension.

Step 4: Installing Azure Cosmos DB Emulator

Azure Cosmos DB Emulator provides a local environment that emulates the Azure CosmosDB service for your development. With the Azure Cosmos DB Emulator, you can develop and test your application locally, without creating an Azure subscription and without internet connection. With the extension we installed already you can connect with Local Emulator as well.

Download Azure CosmosDB emulator:

You can download emulator from Microsoft Download Center.

  1. Extract setup and run emulator exe.
  2. Once you completed the setup, type Azure Cosmos DB Emulator in Start menu.

Start the local Azure CosmosDB Emulator, and make sure it’s running.

Verify the access by exploring the local emulator on this address.

https://localhost:8081/_explorer/index.html and you should see a screen as follows.

Step 5:

Once you verify your Azure Cosmos DB Emulator is running, you can go back to Visual Studio Code and try to attach the emulator by selecting Connected with Azure Cosmos DB Emulator option

After 1 or 2 minutes, you can find your local Cosmos DB data also mapped in Visual Studio Code.

As a developer I found this extension is very powerful and if you are developing Azure based solution with Visual Studio code, you must start exploring this.

Start building application with cosmosdb today 😊 Cheers!