Since the acquisition by Microsoft, Github been so much better! They have added so many new features, made mobile app. GitHub recently made lot of improvements on the UI aspects including adding a twitter handle to your profile. Also introduced a special feature for developers, that allows you to showcase yourself by pinning a README.md containing information about you, your work, portfolio and anything else on your GitHub profile.
In this post, I'll show you how to create a rocking Github profile to showcase your skills when someone visits your profile
Expertise on Making Gifs would be an added advantage
Step 1 :
Create a new ✨special✨ repository with your username. The special repository is case sensitive, ensure to use the same case as your account's username.
Creating special repository
Step 2 :
Click on the checkbox: "Initialize this repository with a README". This will create a README.md file inside your <Username>/<Username> repository, where you will be adding the details.
Template Github Profile
If you are not sure what to add, you also get a free template out of the box, cool right?
Here's my own finished rocking profile page from the special repository:
My Github Profile
This is definitely a great feature for developers to expose their skills and also to showcase to recruiters, followers etc. I would ask everyone to get creative and showcase everything about yourself to your frollowers
Done with your special repository ? Drop a link to your GitHub account in the comments and let's see how amazing yours look. ✌🏾 Cheers!
Hey NG folks, ng-Srilanka 2019, the First-ever Angular conference on the 14th of September 2019 was a great success. It was a dream come true moment for me. Yes, I am one of those developers who marries one platform or framework and doesn’t care too much about the other ones. I have been an Angularjs/Angular developer for the past 7 years. One of the reasons why I wanted to make this happen was because of the strong and wide Angular community in Sri Lanka. When I became a GDE in Angular in 2018, my first aim was to build a strong developer,especially Angular community in SriLanka. NG-Srilanka has been a 2 year dream and finally I am glad it happened with all grandeur .
To those who missed the event this year, below are some of the biggest highlights and benefits that ng-Srilanka had to offer that you can take right back to your development desk.
It was such an honor for me and my team to organize this fantastic conference for the first time in SriLanka and 2nd Angular conference in SouthEast Asia. When we started it we never imagined NG-Srilanka will grow into a large international conference which will attract such a strong support from the industry.
A set of volunteers from the two top universities in SriLanka focused on reaching out to and building interest in the local community. The event was adorned by 400+ passionate developers from 15+ universities and 20+ companies. We ensured that we had a diverse speaker line up and further promoted diversity with scholarships and ensured that most participants made it to the event.
Unlike most of the Angular conferences, we came up with a scholarship program to provide free training on Angular by the local experts. The scholarship winners were selected based on the knowledge on Angular and their passion to learn more.
NG-Sri Lanka 2019 kicked off with @mgechev of the Angular team, who joined us from California and delivered the keynote. Later, the sessions were divided into two tracks named "Stacked" and "Sandwich". "Stacked" track touched upon various topics on Angular and "Sandwich track" deep dived into specific workshops. The event was also garnsihed with few lighter moments like entertainment performances by NSBM students.
Finally the speakers addressed the audience in an open QnA session, through which certain Angular topics were further discussed.This was a huge value add for the attendees, and proved truly a platform where many meaningful conversations can happen.
The real success of ng-Srilanka was the team behind it. Thank you, to the fantastic co-organizers who worked with me day and night, the amazing support staff , dedicated volunteers, the sponsors, the awesome speakers and of course the great attendees.I would like to thank everyone who contributed to the success of the event, devoted their time and support to make this conference a big HIT.
Such a nerve wracking but amazing experience! So lucky to work with such a supportive team.
We've been recieving wonderful feedback from the speakers,attendees and several others on social media about the conference. Looking forward to NG-Srilanka 2020!
I have been working with Cosmos DB for almost 2 years and most of the time i have used SDKs to connect to Cosmos DB. In the recent times i started consuming Rest API for my hybrid application. One of the tricky part in Cosmos DB is that connecting to it and running queries with REST API. In this blog post, I want to elaborate more on the repository i have created to test the APIs in one go. Also will discuss more on how to call Azure Cosmos DB by using its REST API. I will be using the Cosmosdb account and Postman tool.
If you are very new to Cosmosdb, read my blog on how to setup Cosmos DB in local and connect via Visual Studio Code. Many of us come from the SQL background, when we want to connect to SQL Server, usually we need to have a username and password. You need to do more than that to connect and run queries in CosmosDB. But CosmosDB needs some more parameters to connect to it.
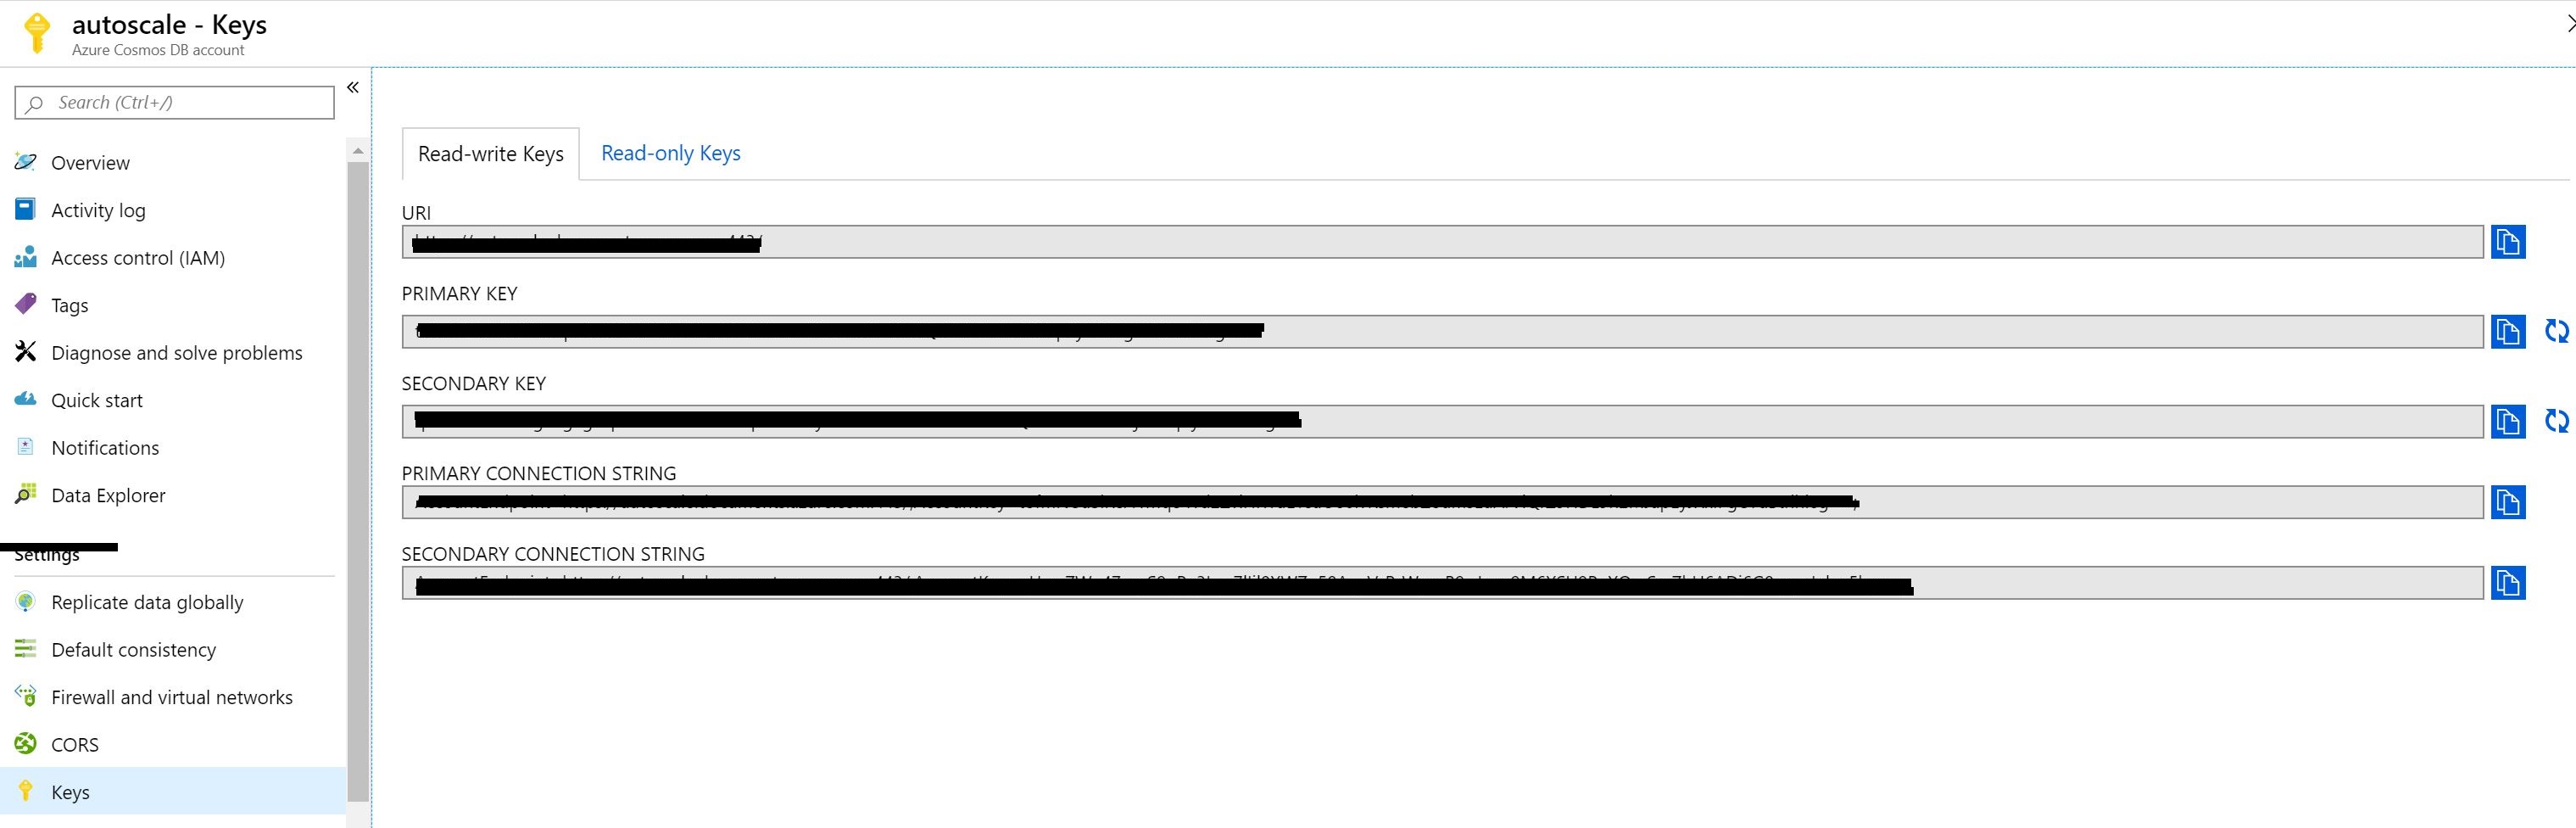
Once you create the Cosmos DB account on Azure and navigate to the keys section on the left pane. You will see two types of tabs on the Keys. There are two types of keys, one type of users having the Key can Read and Write. Other type ofusers having the key can only Read.
Let's understand different terms used while making a connection to Cosmos DB
Master Keys are keys are created when the Cosmos DB Account is created. This key can be regenerated by clicking on refresh icon to regenerate them in the Azure portal. When you are using Cosmos DB emulator you won't be able to generate it. These keys are very sensitive ones and provide access to the administrative resources. We should be very careful when weneed to store them. Recommended way is to use Read-Only Keys as much as we can.
Resource Tokens are responsible for providing access to specific containers, documents, attachments, stored procedures, triggers, and UDFs. Each user must have a resource token. It is mandatory that every application needs to use a resource token to call Cosmos DB API.
Users are specific for Cosmos DB databases. You can attach specific permissions or roles to each user like the way we do in SQL server.
As i mentioned earlier we have many options to access to CosmosDB. Rest API is one of these options and it is the low level access way to Cosmos DB. Most of the features supported with SDK are available and you can customize all options of CosmosDB by using REST API. To customize the calls, and pass the required authorization information, you need to use http headers.
In the following example, I am going to try to create a database in CosmosDB emulator by using the REST API. First let’s look at the required header fields for this request. These requirement applies to all other REST API calls too.
x-ms-version : As the name indicates this is the version of the REST API. You can find the available versions here. If you are confused on what to use always use the latest one.
x-ms-date : This is the date of your request. It must be formatted by Coordinated Universal Time. (ex: Sun, 30 June 2019 05:00:23 GMT)
x-ms-session-token: It is required if you want to use session consistency. For each of your new write request in Session consistency, CosmosDB assings a new SessionToken to the calls. You need to track the right session token and use it in this header property to keep usng the same session. SDK does this for you in the background, if you want to use the REST API, you need to do this manually.
Authorization: This one is the most important and tricky one. This needs to get generated for each of your call to Cosmos DB. It must be in the following format
How to Call APIs with Postman:
To call Cosmos DB directly from POSTMAN, you need to get the Cosmosdb account URL we need to use. If you are using the emulator, you can get it from the the local environment which should be like https://localhost:8081. I will be using the account created in Azure protal.
One other thing you need to setup is the environment variable as you see we are using some of the configured variables in the script, you can create a new environment variable using Postman by navigating to environments and add new environment with configured variables.
Create environments
Configured variables
we need to look at the documentation of CosmosDB Rest API. You can find all URL locations from this link. Since I am trying to list the databases inside a collection, I am going to use the following path.
Also, documentation tells us that this must be a GET Http Action. In Postman, I pick the GET and type the URL to the URL section in the following example.
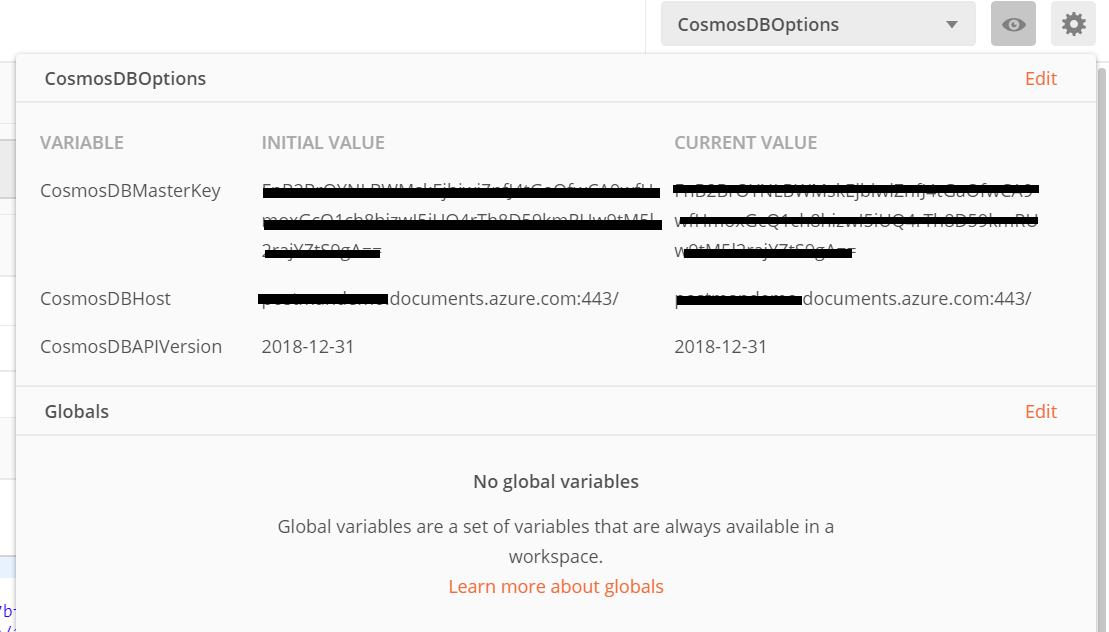
As Next step, we need to create an environment in Postman to store some variables. As connecting to cosmos db needs a token we need to generate a token for CosmosDB and get the current date to fill the header named x-ms-date. I am going to use variables in Environment to store the values. To Create an environment. Click on gears icon and click on Add.
The below example shows the environment variables that we will frequently use to test Cosmos DB API.
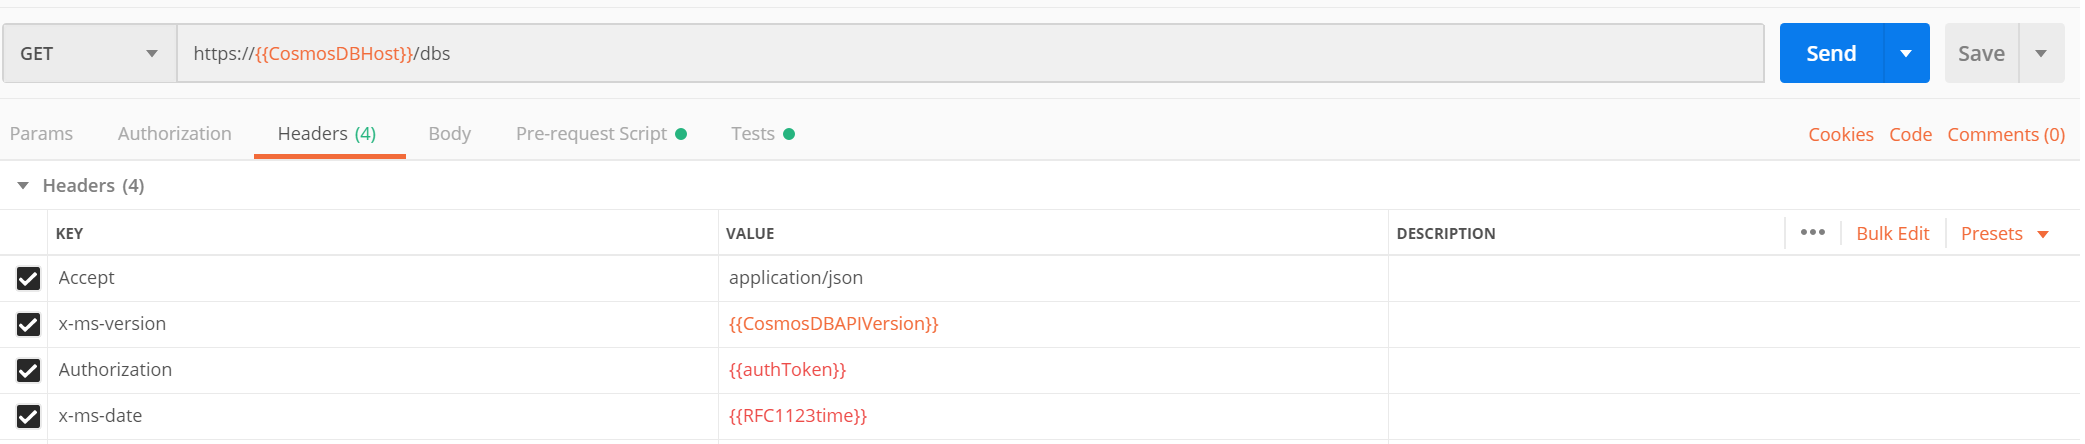
As we are requesting to get the list of databases, we are ready to add values to headers section. Click on Headers link, and add the following headers. These are the required HTTP headers for all CosmosDB REST API calls.
x-ms-version : 2019-06-30
(This is the latest version. You can find the other versions here.)
x-ms-date: {{utcDate}}
(This is the variable we defined in the Postman environment. Its value will be generated dynamically in the Pre-request Script.)
authorization : {{authToken}}
(This is the other parameter we just created. We are going to generate its value in script.)
Accept : application/json.
(This is required since this is going to be a GET Http Action.)
Your screen should looks like this.
Next, we need to generate an authorization token and the current date in the required format.
To do this, we’ll use the Pre-request Script section in Postman. This script runs automatically before each request. In this step, we’ll generate the authToken and utcDate parameters.
Simply copy and paste the following code into the Pre-request Script tab:
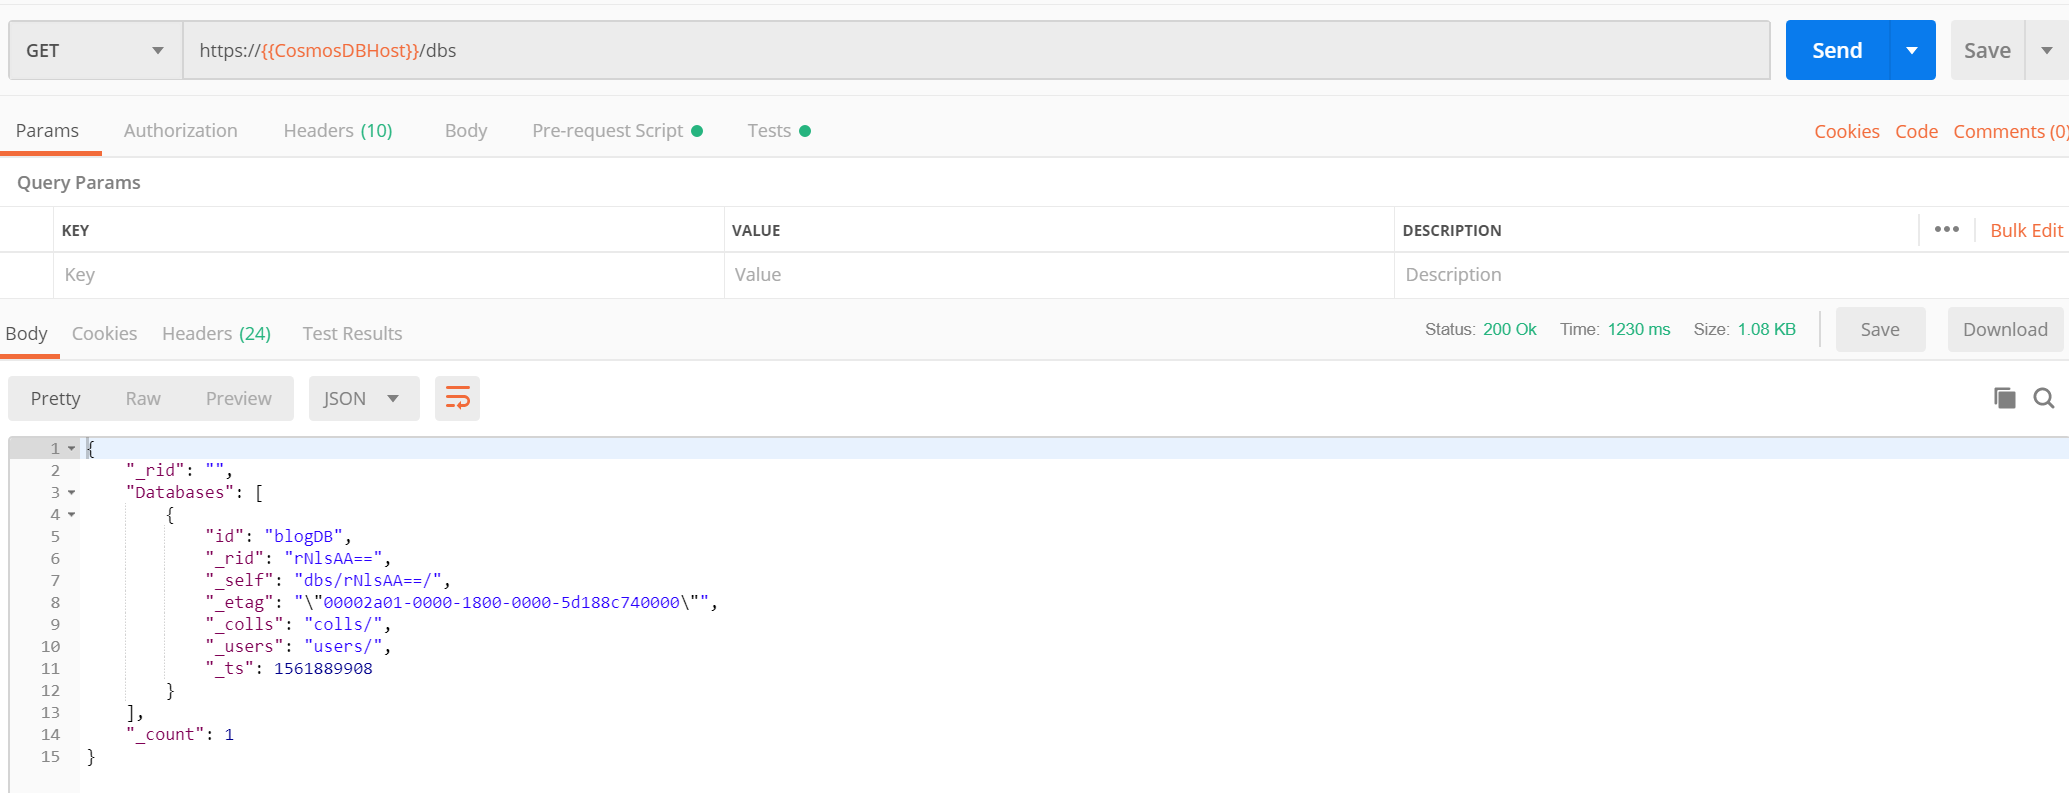
We are done with all the things needed to get the list of databases. Click on the send button to see the list of databases as response.
Great! Look at all that information we received back in the body of the Response.
This is the way to test Cosmos DB API with POSTMAN. You can try different APIs with the simple collection we've created here. Now it becomes easy for developers to leverage the Cosmos DB api and to play around with it.
I just uninstalled Visual Studio 2017 and installed Visual Studio 2019 and the transition was very smooth. The installation just took 17 minutes and its faster than the time it took to install earlier versions. I managed to explore few features and it looks quite impressive. I decided to list down the top features that i noticed after exploring them.
The top feature according to me and for almost every developers out there is Live Share. It allows multiple developers from different locations who are working remotely to collaborate and to jointly edit the same code in Visual Studio 2019 in real time.Almost 35 developers can work together on code at the same time and Live Share can be used with both VSCode and VisualStudio and you do not have to install any dependencies or libraries. Is not that cool?
Live sharing is straight forward with a single click of a button, simply requiring you to click on the Live Share button, hit 'Start collaboration session'.
The same can be done on VSCode as well. Amazing thing here is you get to see each and every action of other developer and what he/she is doing. There's also an audio channel so you can talk to those collaborating with you. With this real problem of collaboration is solved.
One of the coolest thing that every developer like about Visual Studio is IntelliSense support. With Visual Studio 2019 IntelliCode's intelligent suggestions, with a wider range of AI-powered assistance for the auto complete and auto-formatting feature for AI developers and for even someone who wants to get started with AI.
The new Visual Studio 2019 header search box, seen at the top of the screen, is designed to find anything in Visual Studio — including menu items, settings,
tool windows and more. The tool uses fuzzy search that return the correct information even if you make a typo(like google).
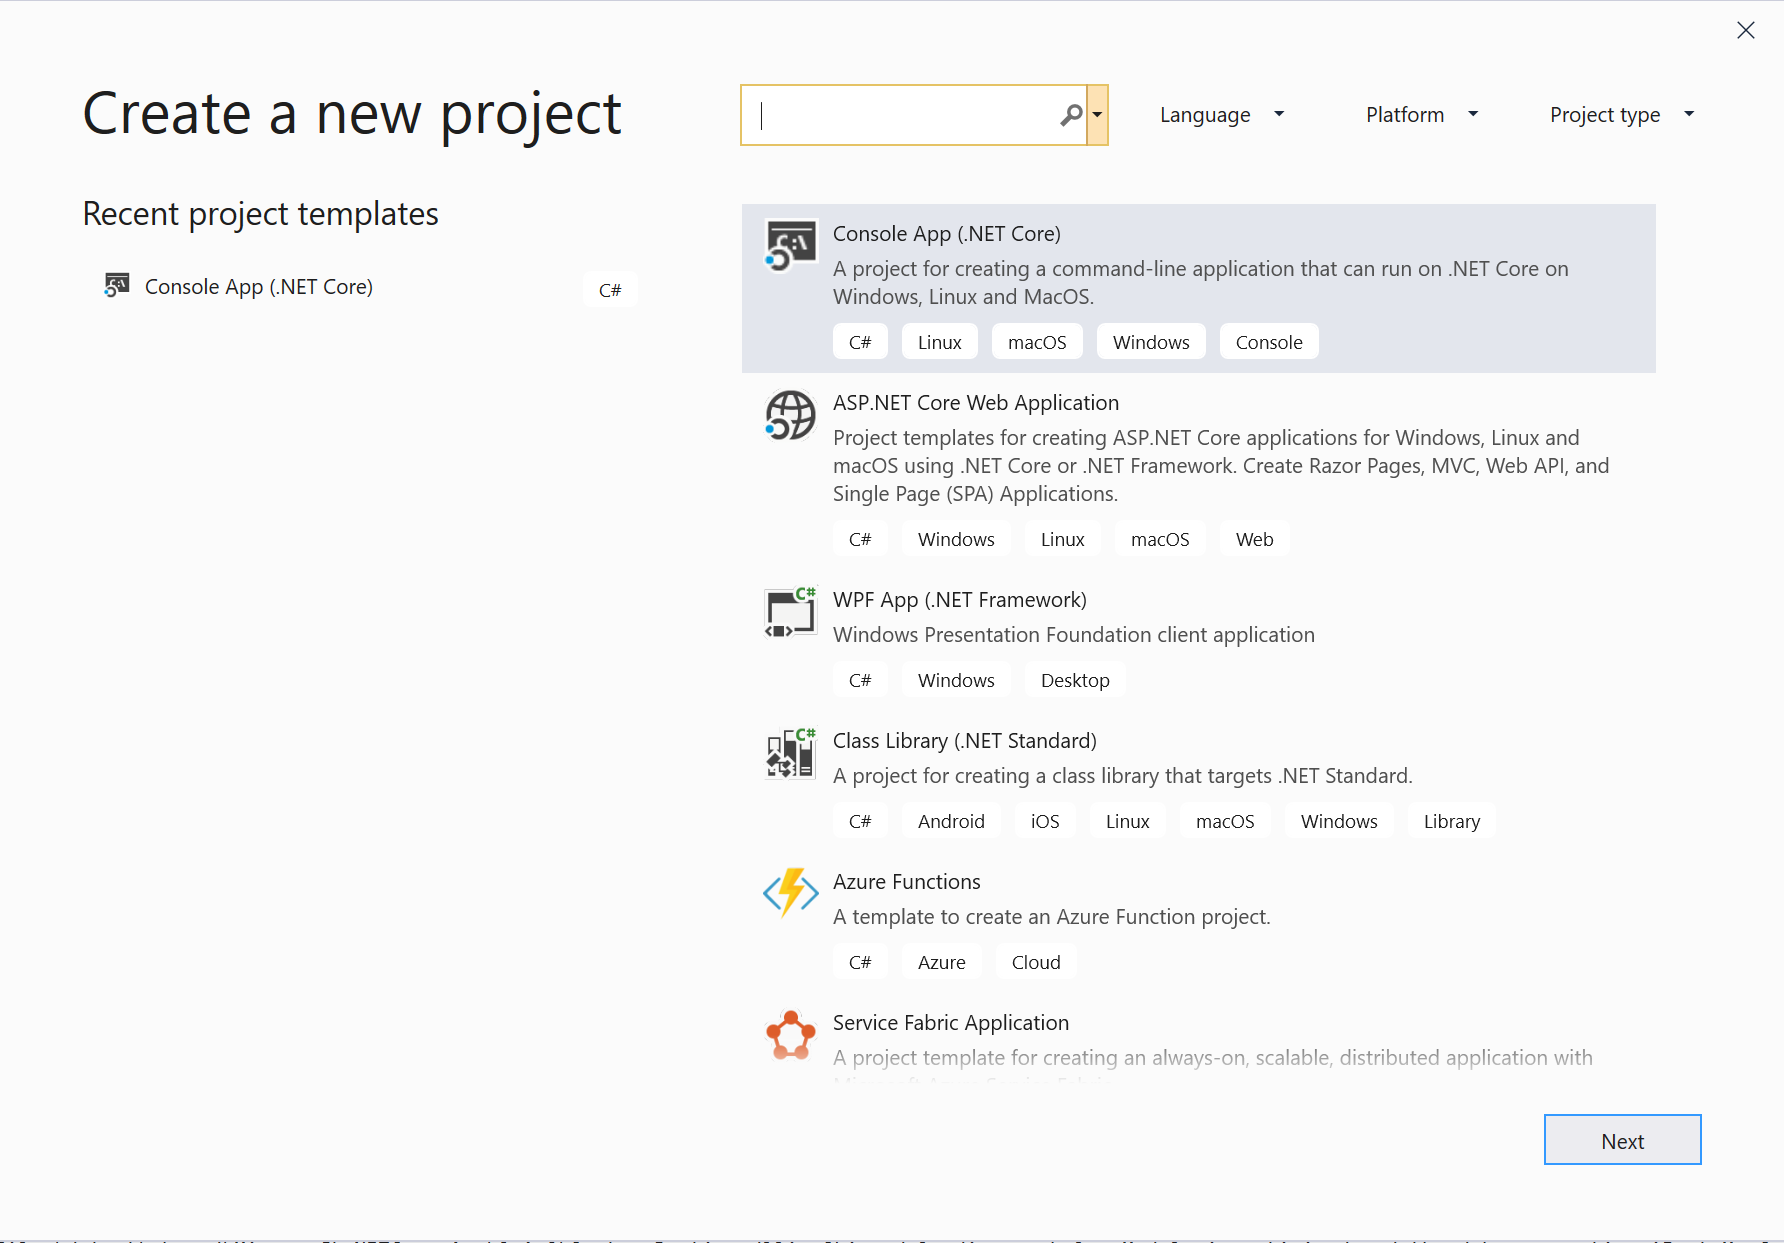
Additionally, fresh look of the new project window is really cool. You get to search for the project you want to create in the typehead, rather than having it as a treeview in the earlier versions of visual studio. Also you could add a filter on the window with the provided options as follows.
Microsoft is no more a typical Microsoft as you see above. you get to explore different types of languages with different platforms with Visual studio 2019.
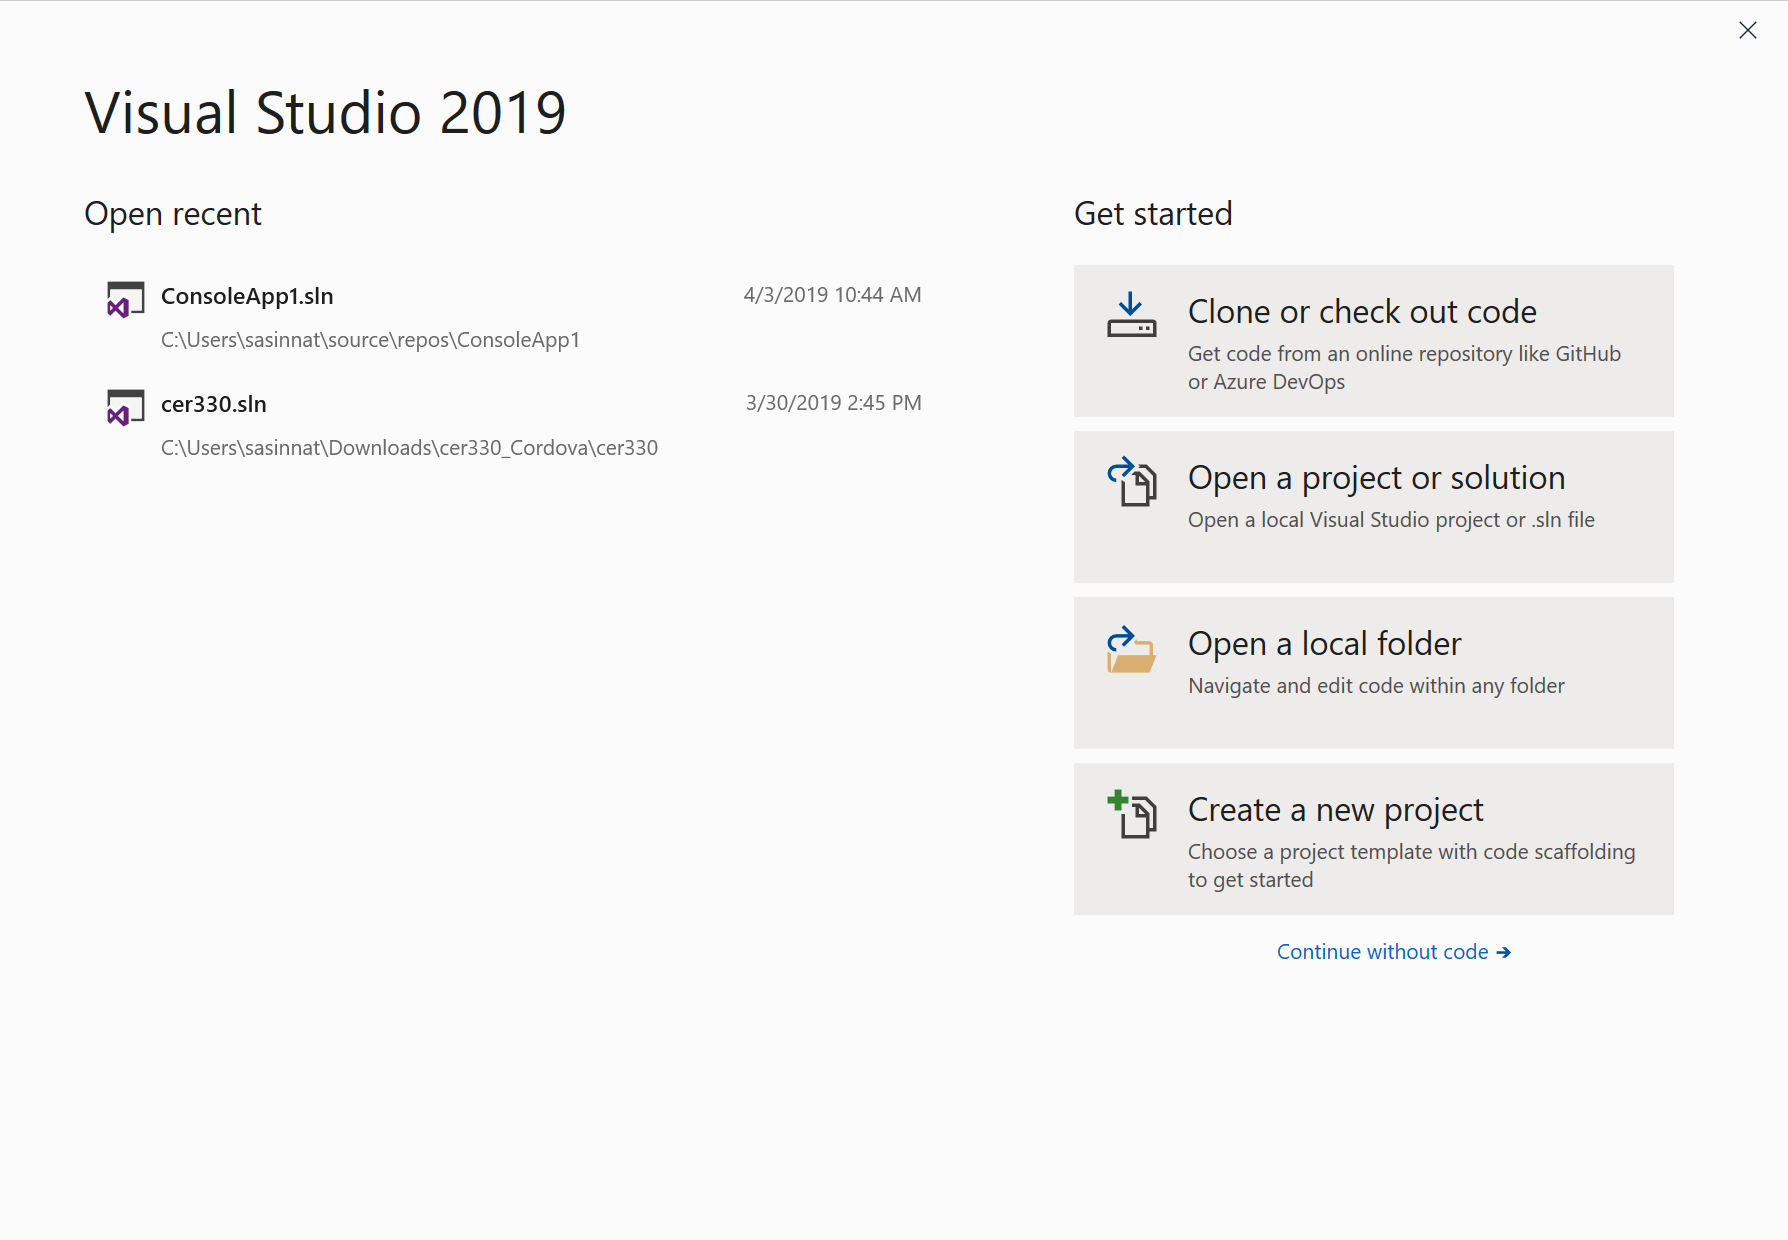
One other thing which i liked the most in visual studio is the ever fast loading screen of the start window. The team has used asynchronous way to load the previous/recent projects which loads in few seconds which is very faster compared to the previous versions of visual studio.
As you can see, you can now clone or check out a GitHub repository directly from the Start window with devops integration. This is really amazing.
There are n number of cool things have been added to visual studio 2019 to make developers life easy which includes the following features,
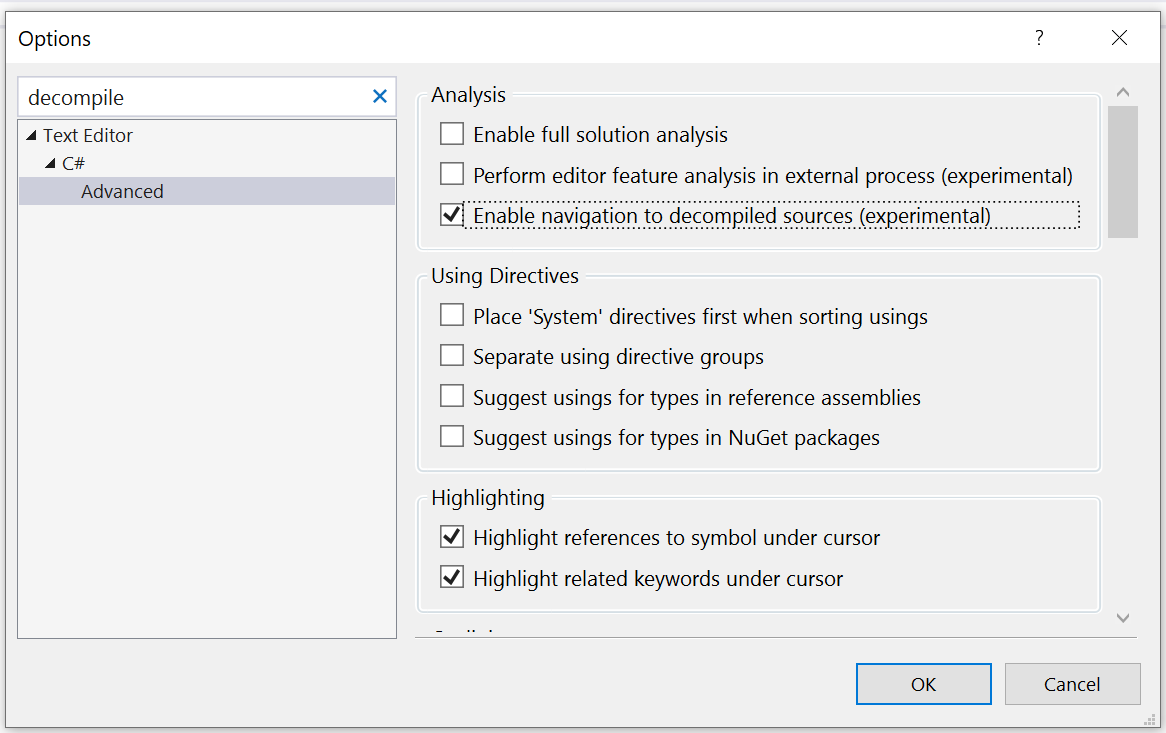
DeCompiled resources :
Now you can debug and step into the external packages you pull in from Nuget and anywhere! You can enable this by Go to the top menu bar. Select Tools > Options. Type “decompile” into the search bar. The Advanced section of Text Editor for C# will appear. Click on Advanced. Check the box that says Enable navigation to decompiled sources
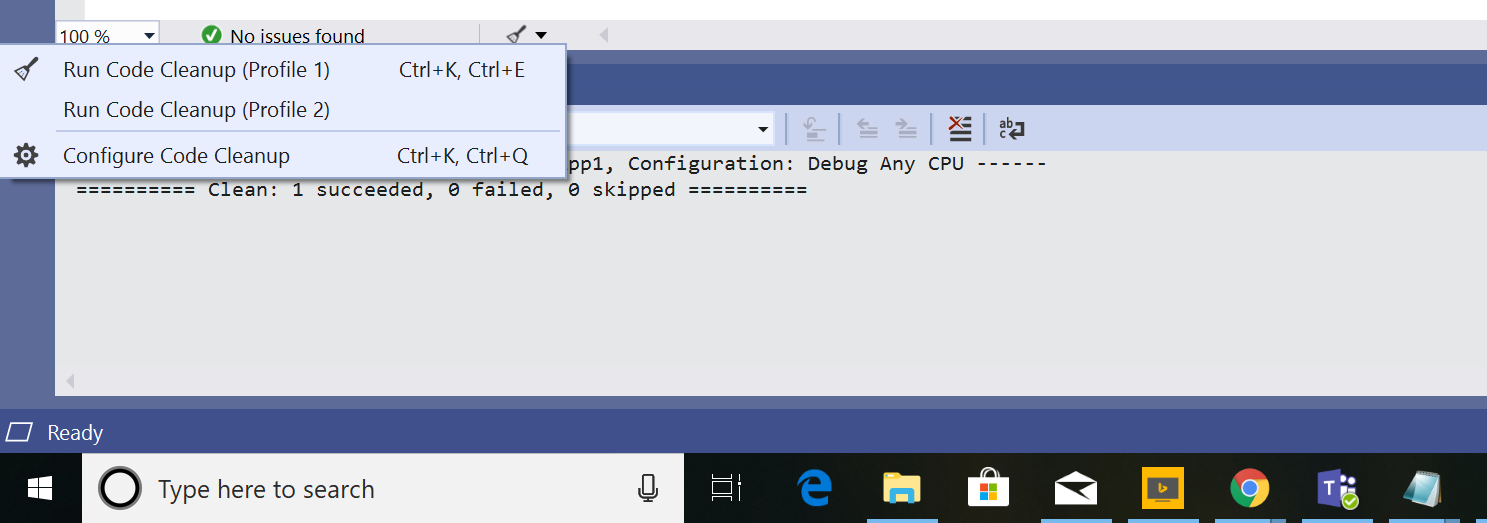
Code CleanUp:
In VSCode and VS2017, Similar to Format Document, this new feature allows you to configure a predefined set of several rules to clean up in your code all at once. To set this up, follow the steps below.
Click the little broom icon at the bottom of the window. Select Configure Code Cleanup.
You do not have to manually do things anymore.
Solution Filter:
Are you working on the same project for longer years?. Ever had a monolithic solution with way too many projects inside of it? Does it all take a while to load? Now you can save the state of your solution with only the desired projects loaded up. I will not be explaining in detail, certainly this is supported in VS2019. This is a nice way to keep everything organized and loading fast when first opening up the solution in Visual Studio 2019. This can be really refreshing for any enterprise developer who is working on several projects.
Interested in what else this new Visual Studio 2019 has to offer? You can get to know by checking out the Release Notes and FAQ.
I already started loving the new features, performance and collaboration improvements inside Visual Studio 2019. What about you? Don't wait just get started by downloading from here.
Even though there have been plenty of tools/extension to check the typescript/javascript code, but there have not been any extension to validate the HTML code or related features to it. Angular Language Service was released to make the developers more productive and reduce the errors by offering better code completion.
This service is available in the market place for installation for the Visual Studio as well as other code editors that support Type Script. Errors can be detected at the time of code creation . Hints are also provided for code completion. This effectively allows us to use the Intellisence for variables defined and used in the template. The navigation service is provided to link properties and their definition. This extension provides a rich editing experience for Angular templates, both inline and external templates including:
Completions lists
AOT Diagnostic messages
Quick info
Go to definition
The language service is developed by the Angular core team. At the time of writing, it is ready to use in VSCode, Sublime Text and WebStorm.
Language service uses the Angular compiler for parsing our application and producing diagnostics. It decorates the TypeScript language service in and uses its logic again. The coolest feature about the service is that it is not coupled to a specific Angular version and can be used in any text editor and IDE as soon as there’s an available plugin.