There are few cool speed test tools available out there which allows you to test network latencies and speed to data centers from different countries and locations. Along with finding the closest Datacenter near your location, it tests the storage latency as well as upload and download speeds.
I have been working with Cosmos DB for almost 2 years and most of the time i have used SDKs to connect to Cosmos DB. In the recent times i started consuming Rest API for my hybrid application. One of the tricky part in Cosmos DB is that connecting to it and running queries with REST API. In this blog post, I want to elaborate more on the repository i have created to test the APIs in one go. Also will discuss more on how to call Azure Cosmos DB by using its REST API. I will be using the Cosmosdb account and Postman tool.
If you are very new to Cosmosdb, read my blog on how to setup Cosmos DB in local and connect via Visual Studio Code. Many of us come from the SQL background, when we want to connect to SQL Server, usually we need to have a username and password. You need to do more than that to connect and run queries in CosmosDB. But CosmosDB needs some more parameters to connect to it.
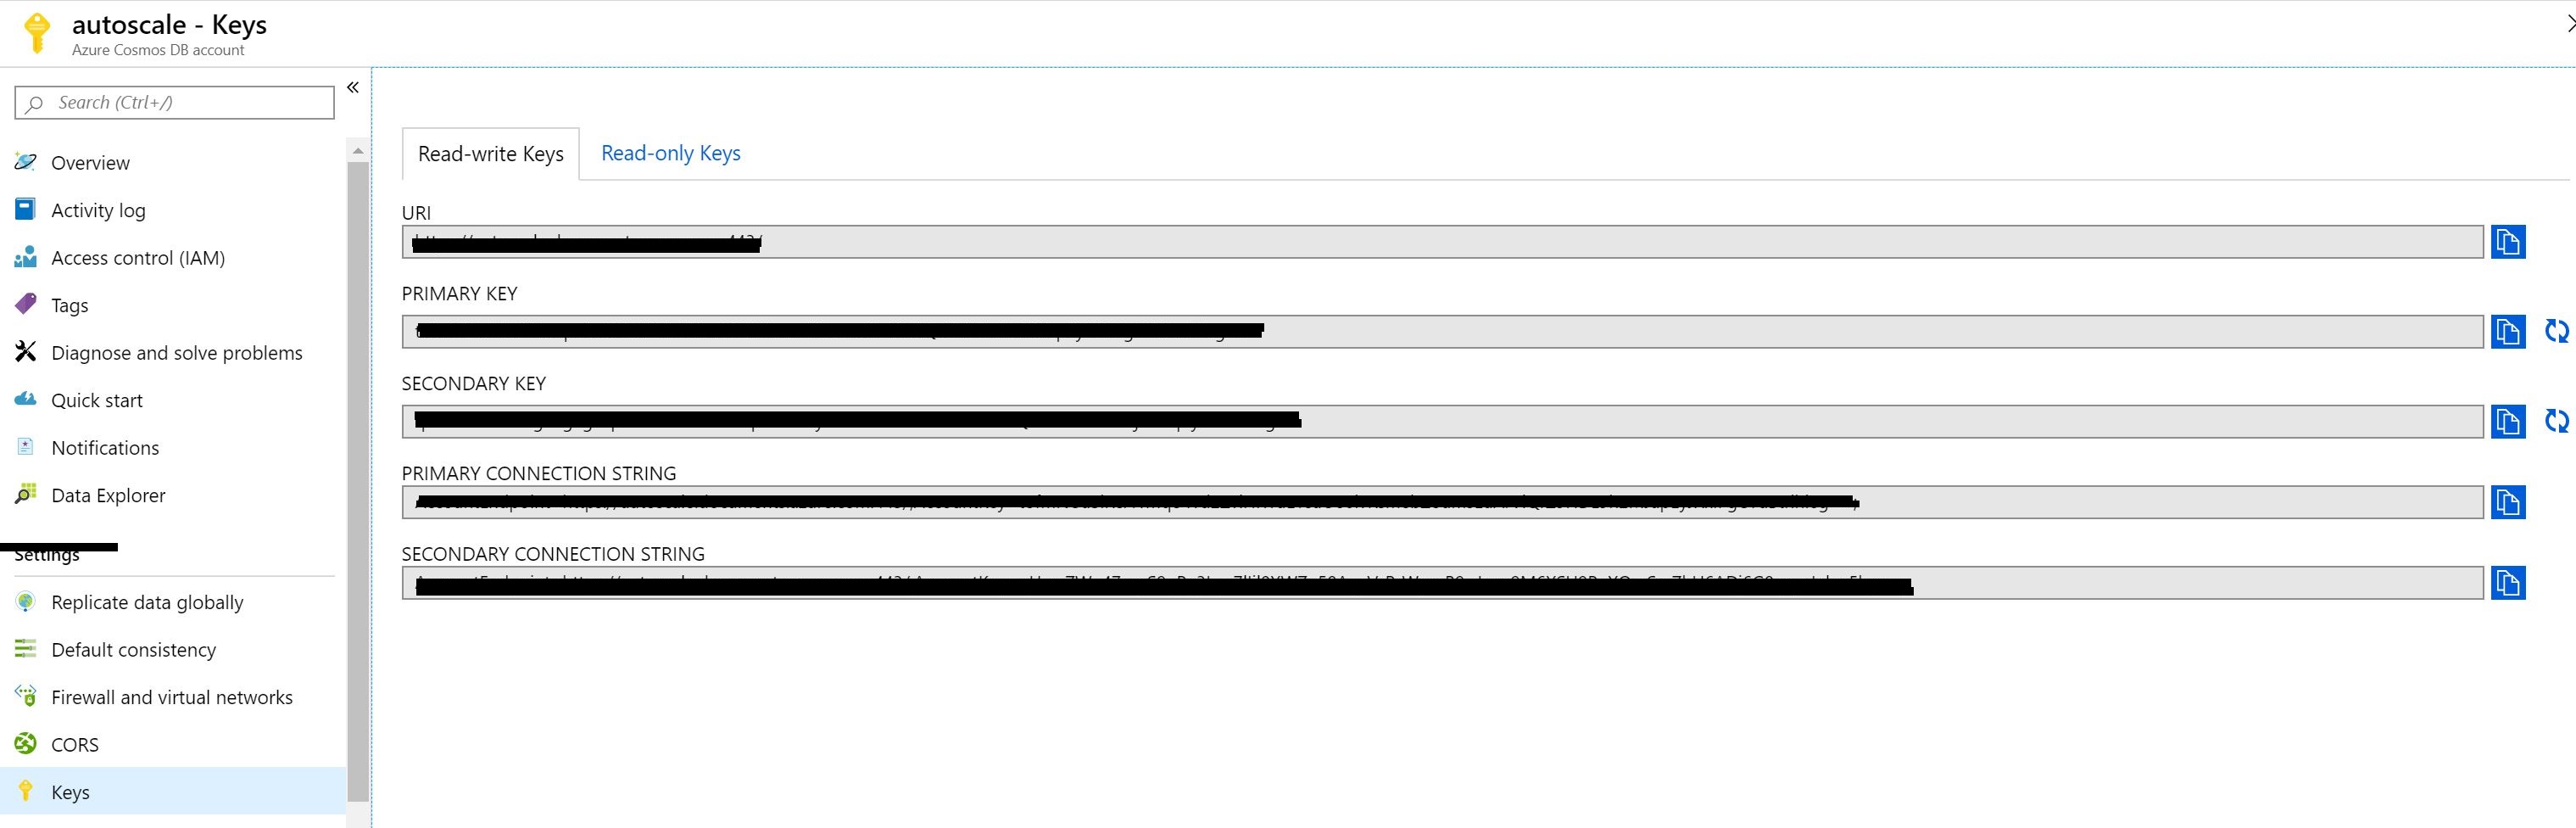
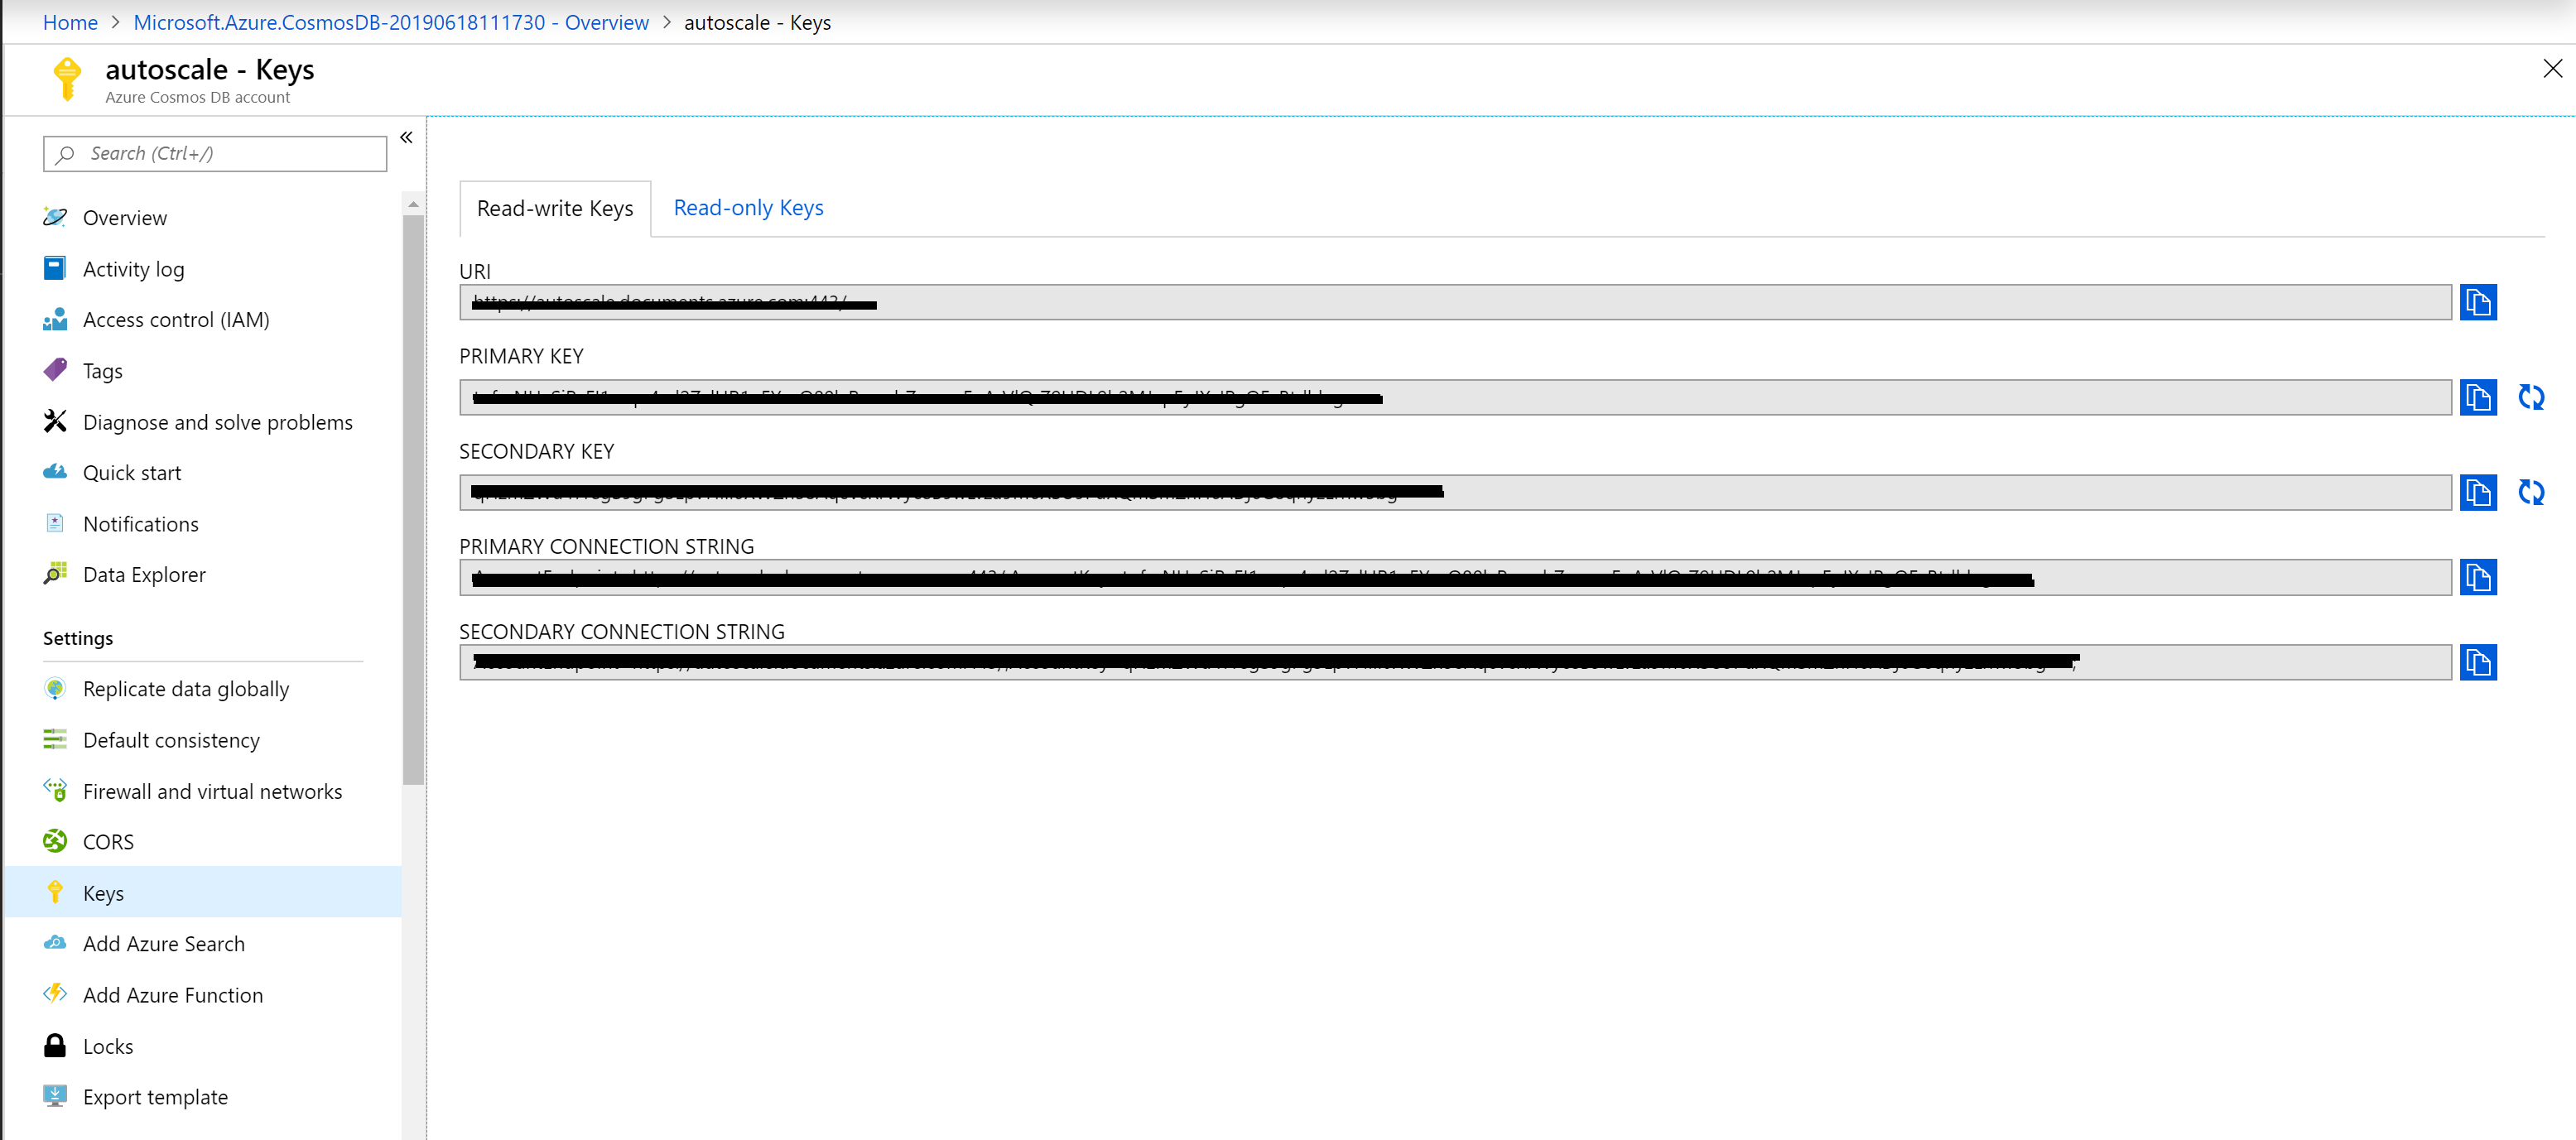
Once you create the Cosmos DB account on Azure and navigate to the keys section on the left pane. You will see two types of tabs on the Keys. There are two types of keys, one type of users having the Key can Read and Write. Other type ofusers having the key can only Read.
Let's understand different terms used while making a connection to Cosmos DB
Master Keys are keys are created when the Cosmos DB Account is created. This key can be regenerated by clicking on refresh icon to regenerate them in the Azure portal. When you are using Cosmos DB emulator you won't be able to generate it. These keys are very sensitive ones and provide access to the administrative resources. We should be very careful when weneed to store them. Recommended way is to use Read-Only Keys as much as we can.
Resource Tokens are responsible for providing access to specific containers, documents, attachments, stored procedures, triggers, and UDFs. Each user must have a resource token. It is mandatory that every application needs to use a resource token to call Cosmos DB API.
Users are specific for Cosmos DB databases. You can attach specific permissions or roles to each user like the way we do in SQL server.
As i mentioned earlier we have many options to access to CosmosDB. Rest API is one of these options and it is the low level access way to Cosmos DB. Most of the features supported with SDK are available and you can customize all options of CosmosDB by using REST API. To customize the calls, and pass the required authorization information, you need to use http headers.
In the following example, I am going to try to create a database in CosmosDB emulator by using the REST API. First let’s look at the required header fields for this request. These requirement applies to all other REST API calls too.
x-ms-version : As the name indicates this is the version of the REST API. You can find the available versions here. If you are confused on what to use always use the latest one.
x-ms-date : This is the date of your request. It must be formatted by Coordinated Universal Time. (ex: Sun, 30 June 2019 05:00:23 GMT)
x-ms-session-token: It is required if you want to use session consistency. For each of your new write request in Session consistency, CosmosDB assings a new SessionToken to the calls. You need to track the right session token and use it in this header property to keep usng the same session. SDK does this for you in the background, if you want to use the REST API, you need to do this manually.
Authorization: This one is the most important and tricky one. This needs to get generated for each of your call to Cosmos DB. It must be in the following format
How to Call APIs with Postman:
To call Cosmos DB directly from POSTMAN, you need to get the Cosmosdb account URL we need to use. If you are using the emulator, you can get it from the the local environment which should be like https://localhost:8081. I will be using the account created in Azure protal.
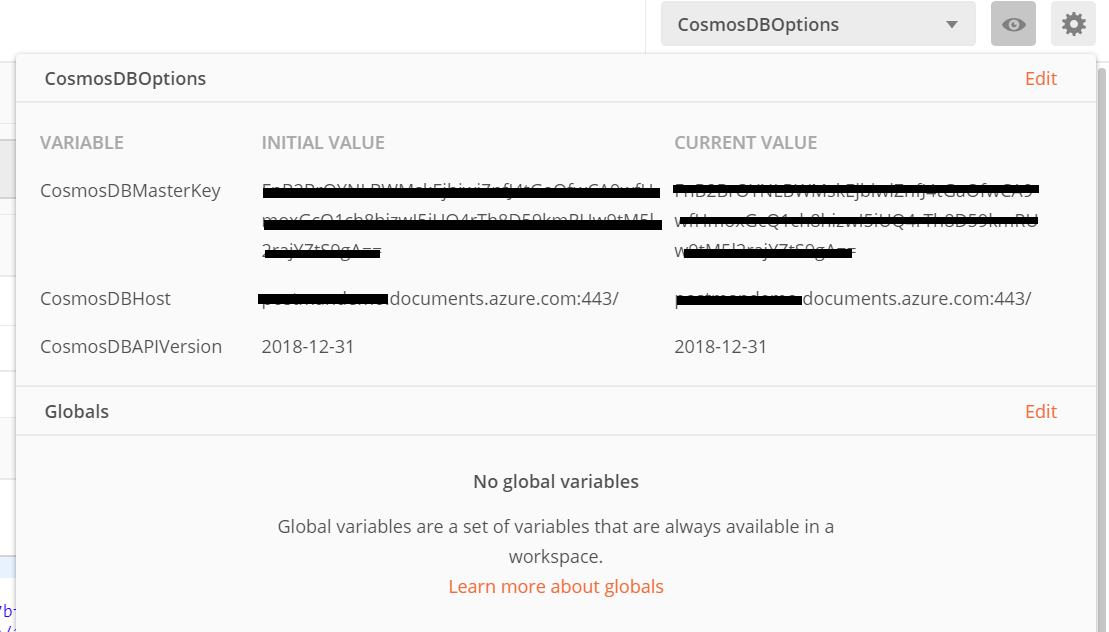
One other thing you need to setup is the environment variable as you see we are using some of the configured variables in the script, you can create a new environment variable using Postman by navigating to environments and add new environment with configured variables.
Create environments
Configured variables
we need to look at the documentation of CosmosDB Rest API. You can find all URL locations from this link. Since I am trying to list the databases inside a collection, I am going to use the following path.
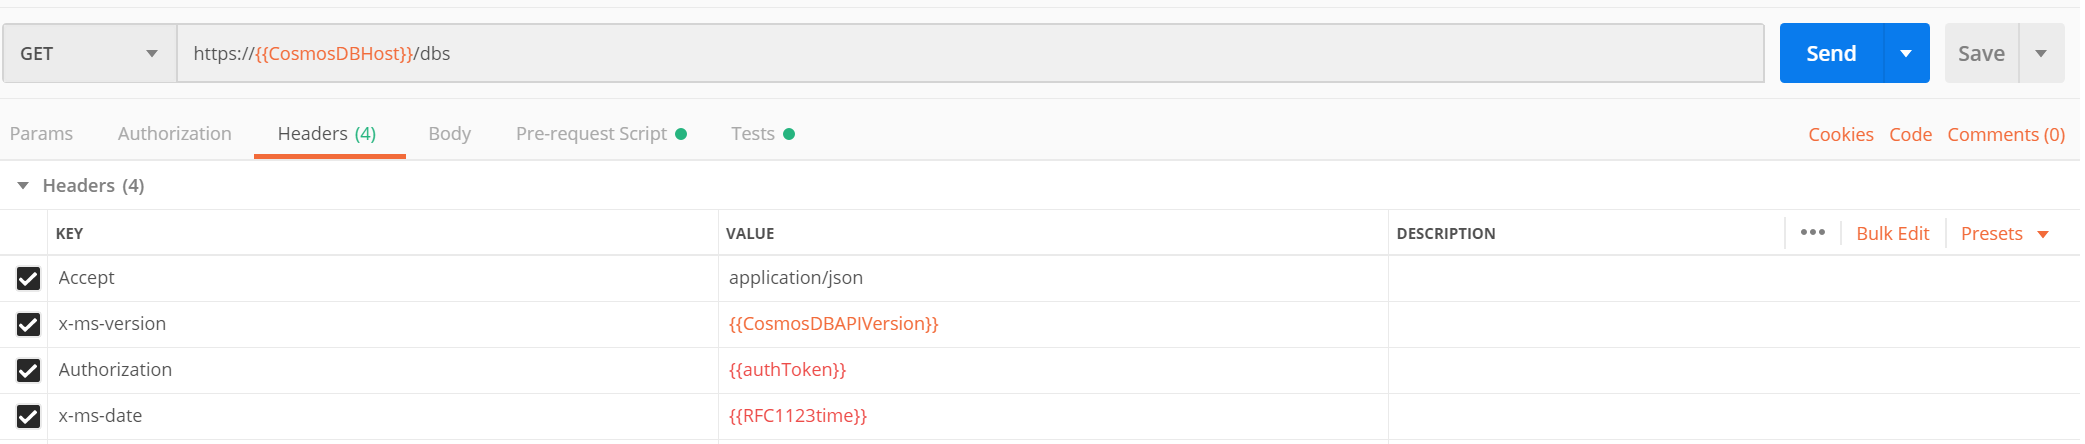
Also, documentation tells us that this must be a GET Http Action. In Postman, I pick the GET and type the URL to the URL section in the following example.
As Next step, we need to create an environment in Postman to store some variables. As connecting to cosmos db needs a token we need to generate a token for CosmosDB and get the current date to fill the header named x-ms-date. I am going to use variables in Environment to store the values. To Create an environment. Click on gears icon and click on Add.
The below example shows the environment variables that we will frequently use to test Cosmos DB API.
As we are requesting to get the list of databases, we are ready to add values to headers section. Click on Headers link, and add the following headers. These are the required HTTP headers for all CosmosDB REST API calls.
x-ms-version : 2019-06-30
(This is the latest version. You can find the other versions here.)
x-ms-date: {{utcDate}}
(This is the variable we defined in the Postman environment. Its value will be generated dynamically in the Pre-request Script.)
authorization : {{authToken}}
(This is the other parameter we just created. We are going to generate its value in script.)
Accept : application/json.
(This is required since this is going to be a GET Http Action.)
Your screen should looks like this.
Next, we need to generate an authorization token and the current date in the required format.
To do this, we’ll use the Pre-request Script section in Postman. This script runs automatically before each request. In this step, we’ll generate the authToken and utcDate parameters.
Simply copy and paste the following code into the Pre-request Script tab:
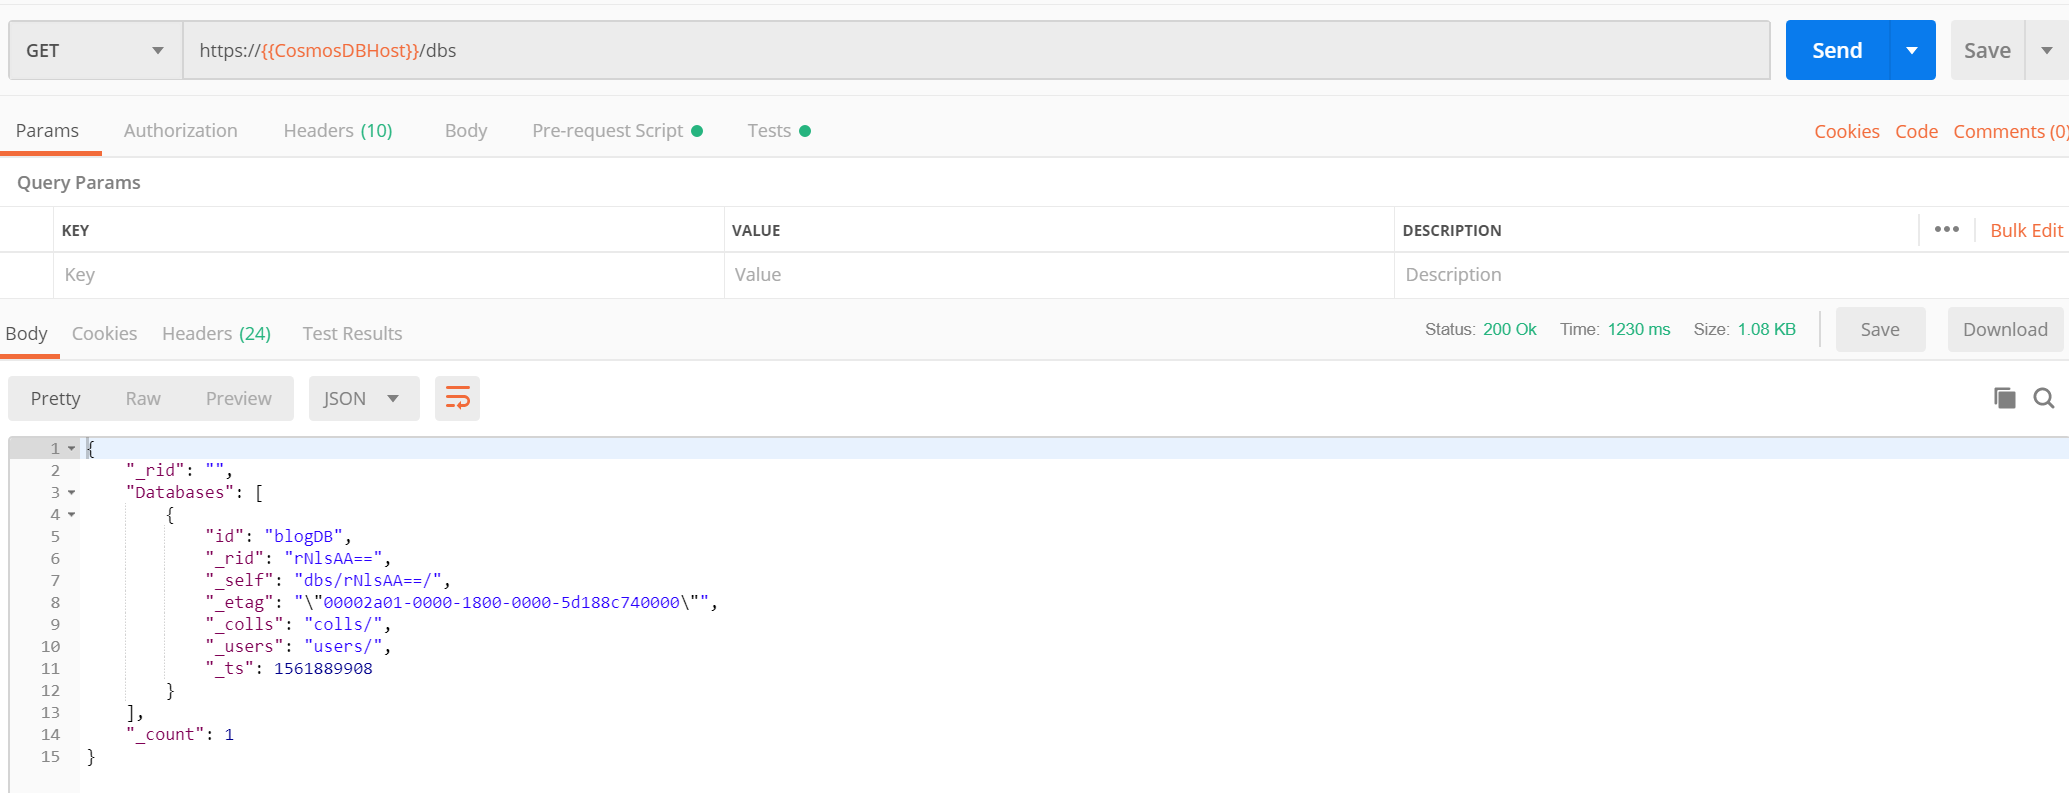
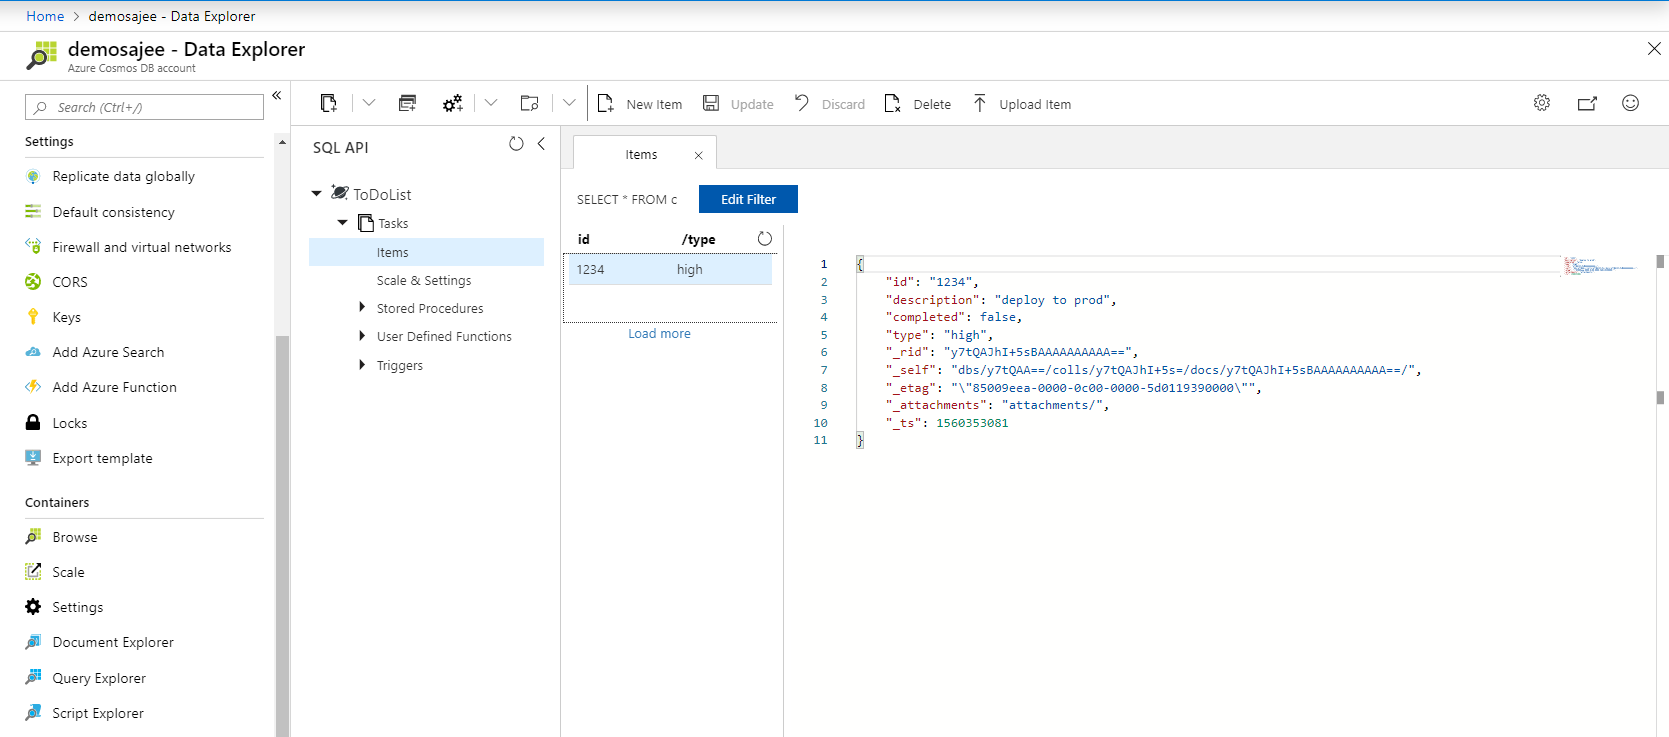
We are done with all the things needed to get the list of databases. Click on the send button to see the list of databases as response.
Great! Look at all that information we received back in the body of the Response.
This is the way to test Cosmos DB API with POSTMAN. You can try different APIs with the simple collection we've created here. Now it becomes easy for developers to leverage the Cosmos DB api and to play around with it.
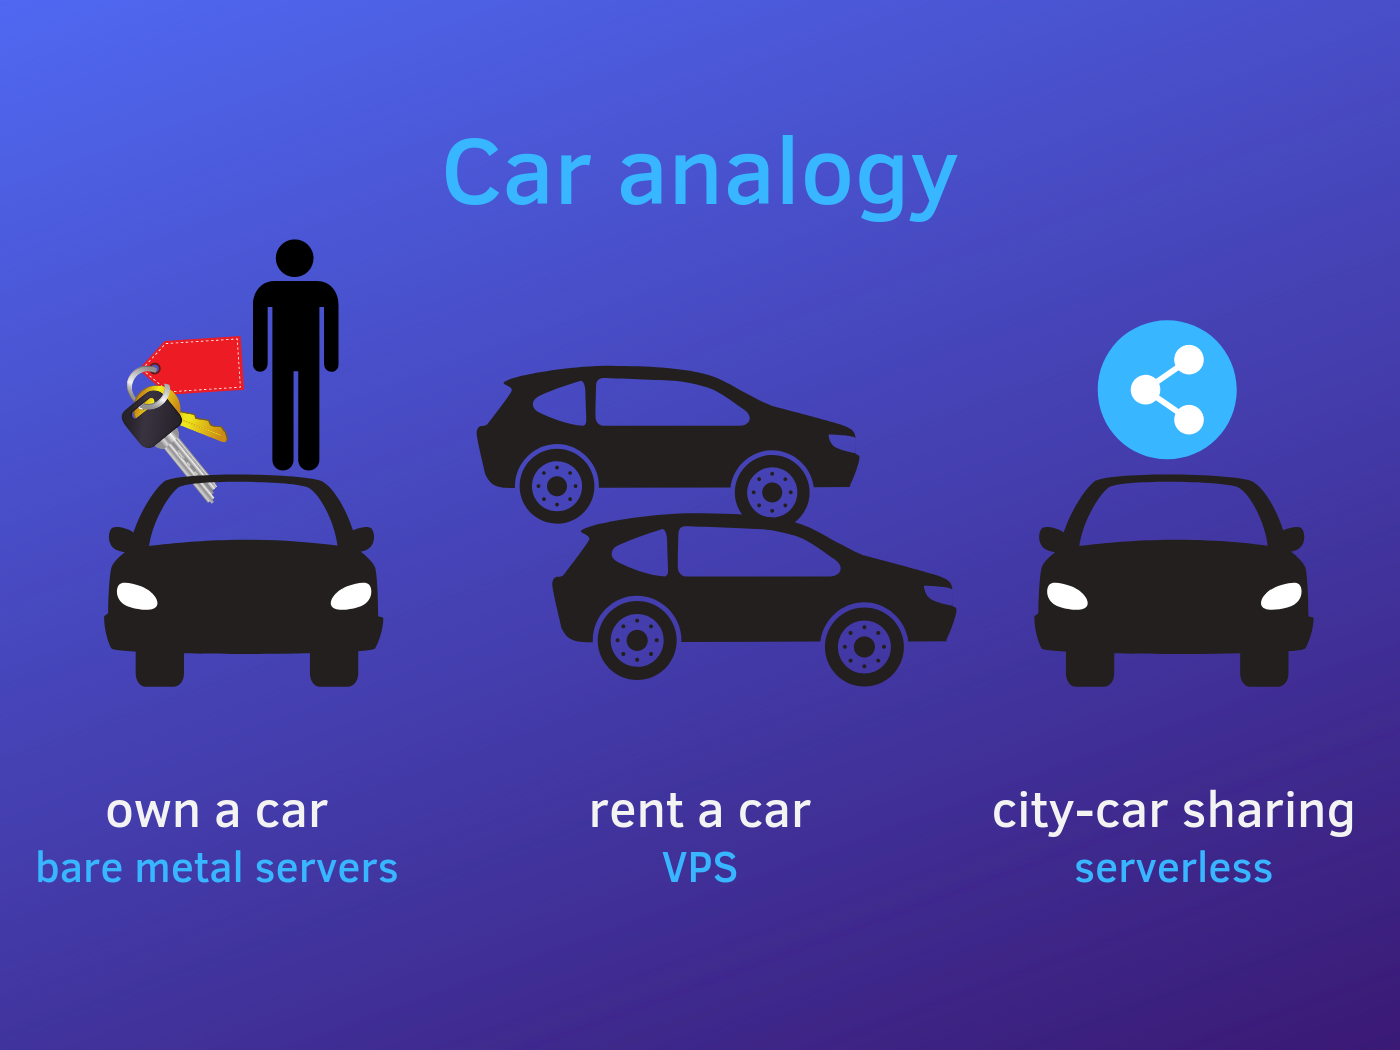
When you are involving in an architectural discussion which involves Azure's cosmosdb, a mandatory question that you get is "Is not Azure Cosmos DB very expensive?". Based on the fact that Cosmos DB is evolving very fast, there are lot of customers stepping in to use the service in their architecture. To understand one thing Cosmos DB is not priced based on the usage the pricing is based on what you reserve. One of the best serverless example we could consider here is renting out a car rather than managing and hailing it. Key point here is you pay for what you reserve, which is the capacity, which is refered in terms as Request Units (RUs). Any customer consuming the Cosmos DB serivce will be paying for the RUs as well as the space.
There have been many questions asked on forums,discussions on how to scale up/down cosmos DB Request units. Being a fan of two major services in Azure, i decided to write on how to scale Cosmos DB with Azure function.Azure Functions and Cosmosdb services are getting more closer and closer together in the recent times. One of the case study that we can consider here is whenever you are experiencing throttling(429) due to the burst of high traffic for a period of time, you will be increasing the Request Units(RUs) in the portal to handle it. Which is sort of a pain to handle it manually and the resulting cost will be very high if you've forgotten to scale it down. Let's see how to autoscale using Azure function to mitigate this issue. It involves 2 steps ,
Create an Azure function to scale throughput on a collection and publish
Connect the function to CosmosDB alert using an HTTP webhook.
The following solution will help you only to scale up , but the same function can be used to sacle it down if you pass a negative value for the CosmosDB_RU attribute.
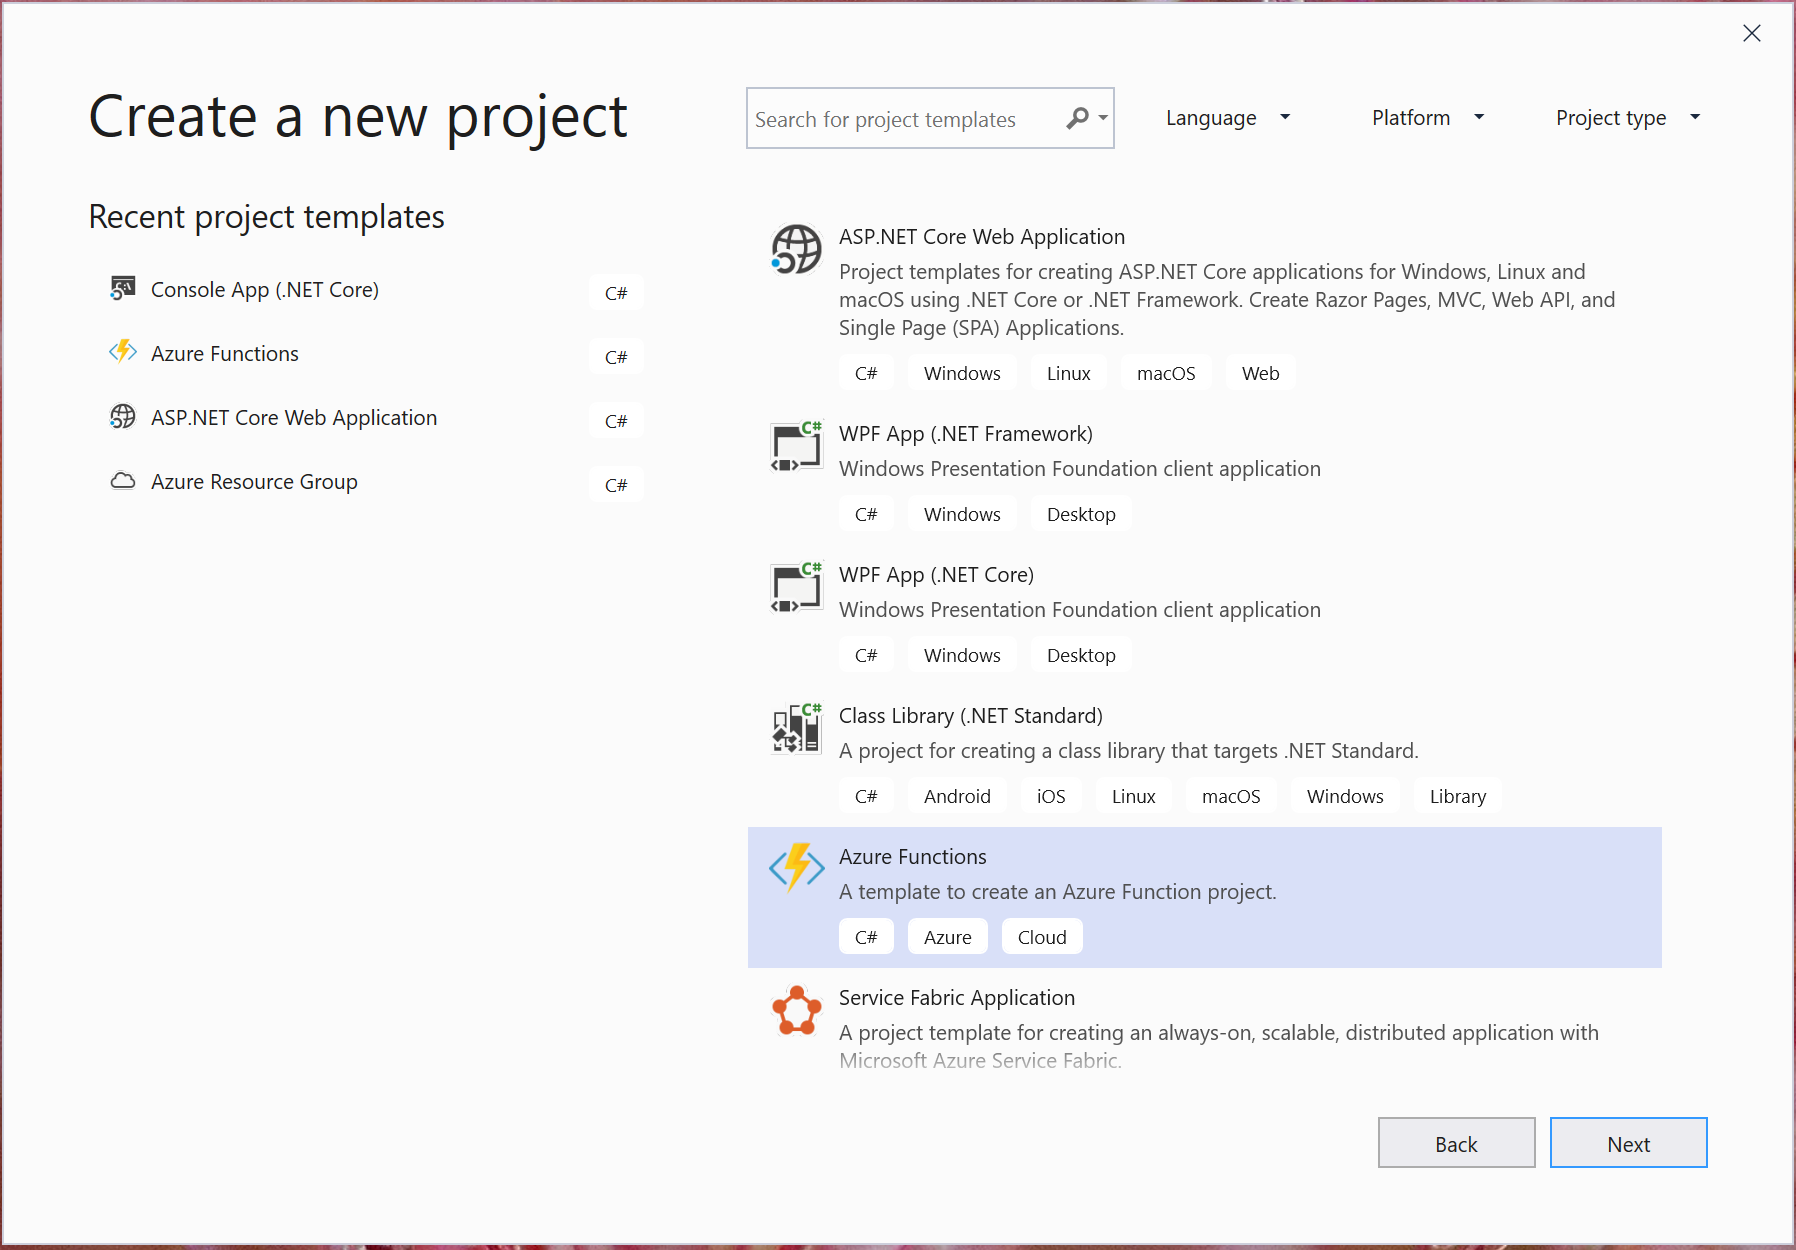
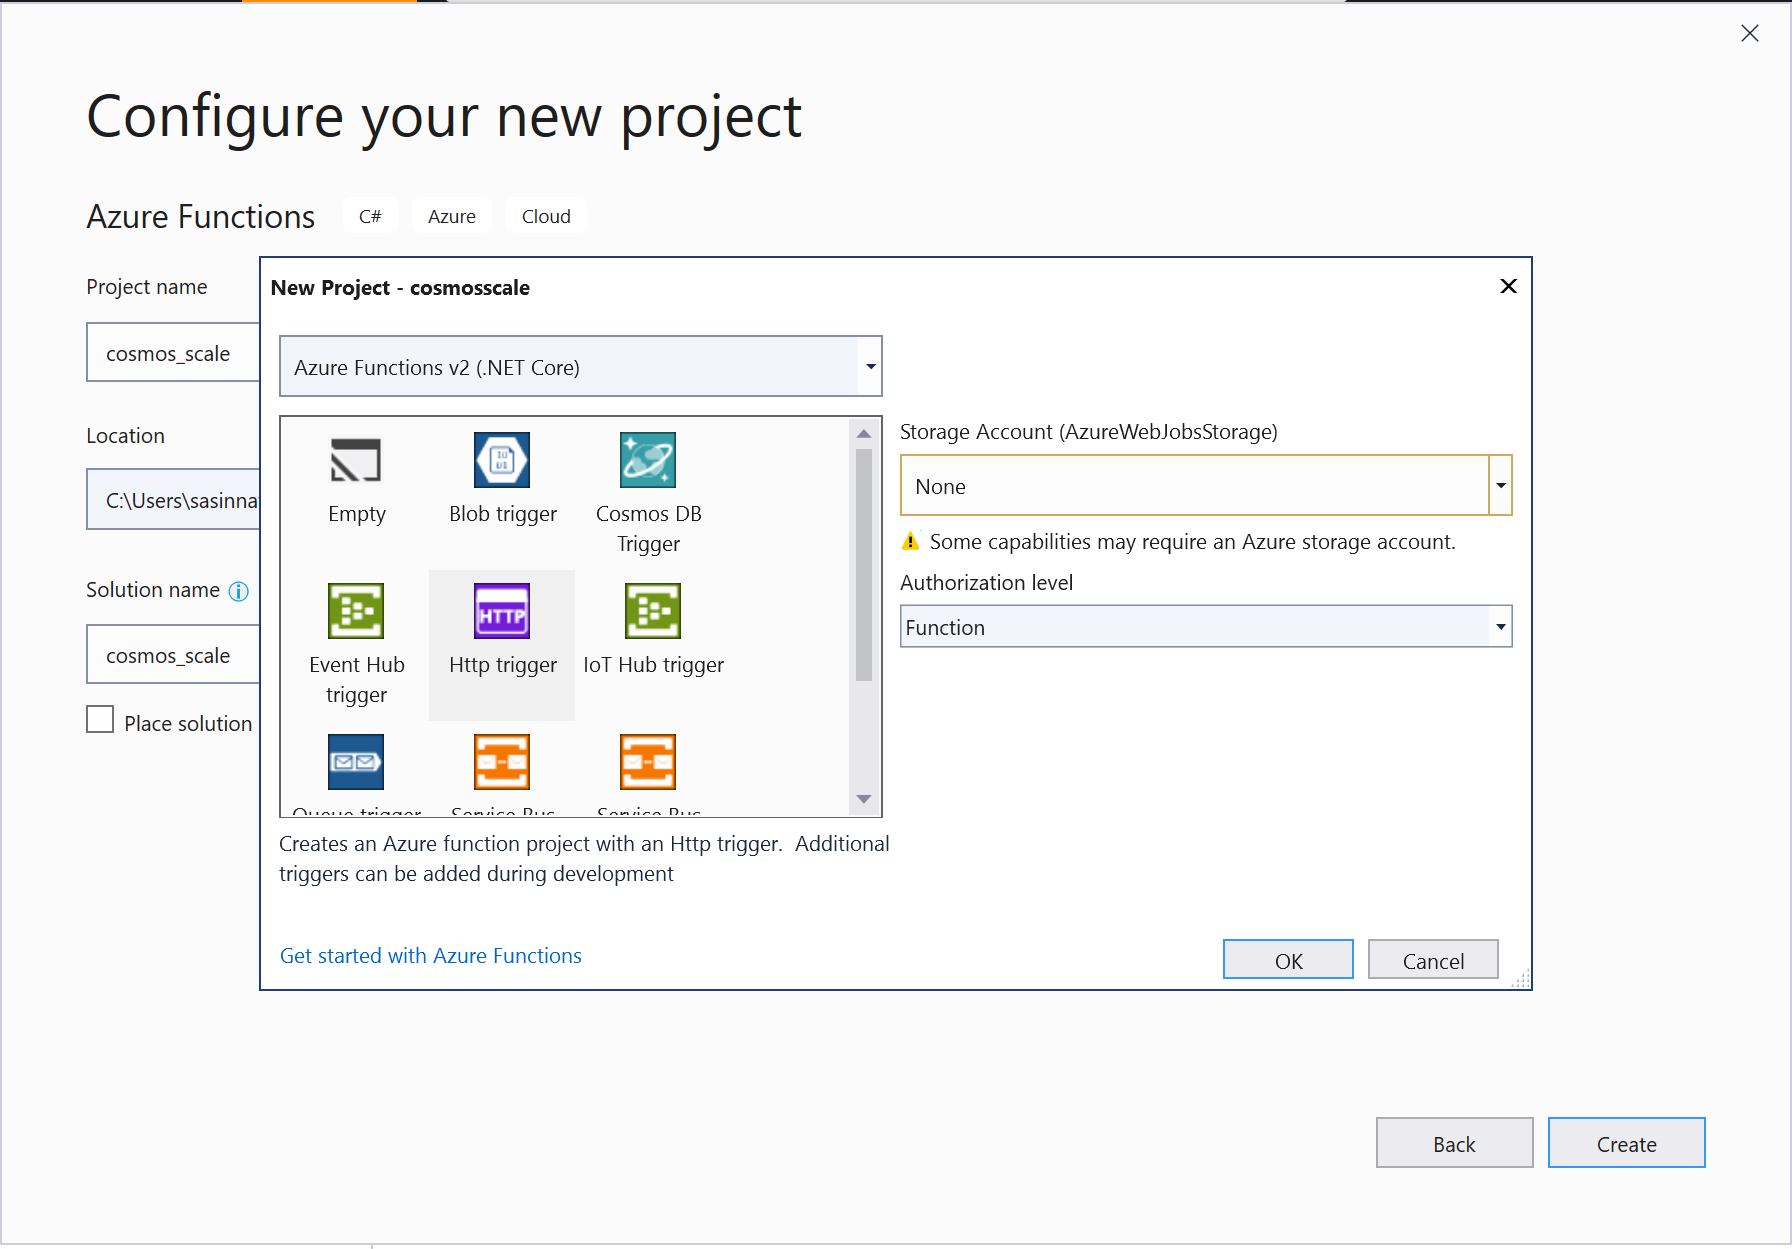
Click File->New Azure Functions from the templates available and give a name for your function and click ok. I have given the name as Cosmos_scale
I will be using Azure function 2.x , so you will be taken to a new window where select Trigger type as HttpTrigger and select Authorization level as Function and no need for Storage Account
Once the project is created, rename the default Function1.cs with your name, in this case it will be Cosmosscale.cs. Let's get into the actual implementation of the function
Step 2: Add Microsoft.Azure.Documents.Core Nuget Package to the solution
In order to communicate with the Cosmos DB account and make use of the operations let's add the Nuget package Microsoft.Azure.Documents.Core package.
Step 3:Add Microsoft.Extensions.Configuration to the solution
In order to connect to Cosmos DB we need to get the connection string and the key from the appsettings, lets add Microsoft.Extensions.Configuration. For Azure Functions v2, the ConfigurationManager is not supported and you must use the ASP.NET Core Configuration system:
Let's understand the logic here,
As a first step, lets create the Client to connect to Cosmos DB
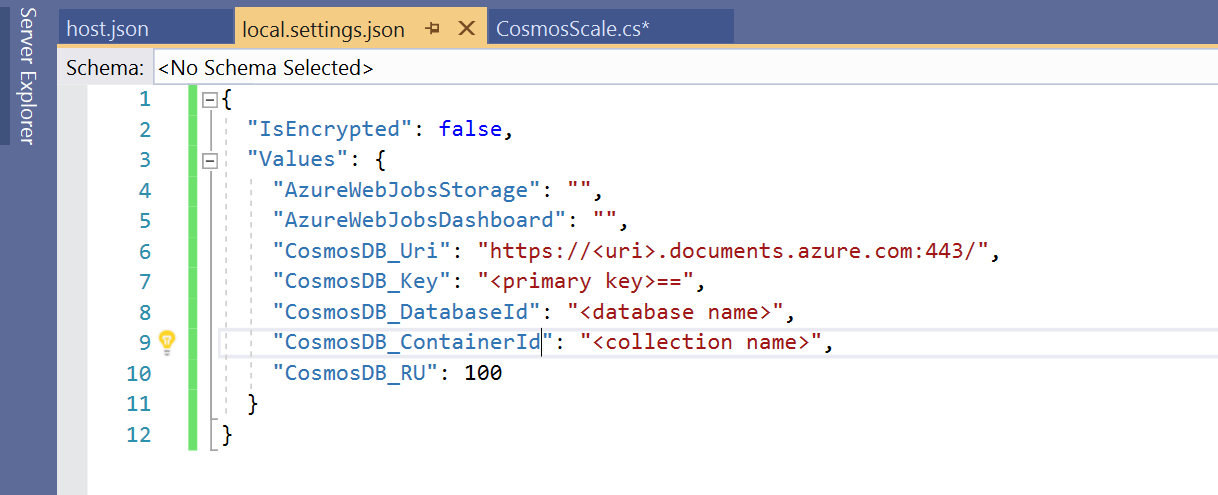
Step 4: Add the config values to local.settings.json
Now we need to add the values to "local.settings.json". These values will be used to test the function locally before deploying it to Azure.
The setting key "CosmosDB_RU" is to increase the RU by 100, and if you want to decrease you can set a negative value say "-100".
You can get these values from the portal by navigating to the Cosmos DB account.
Step 5: Check the function with Postman
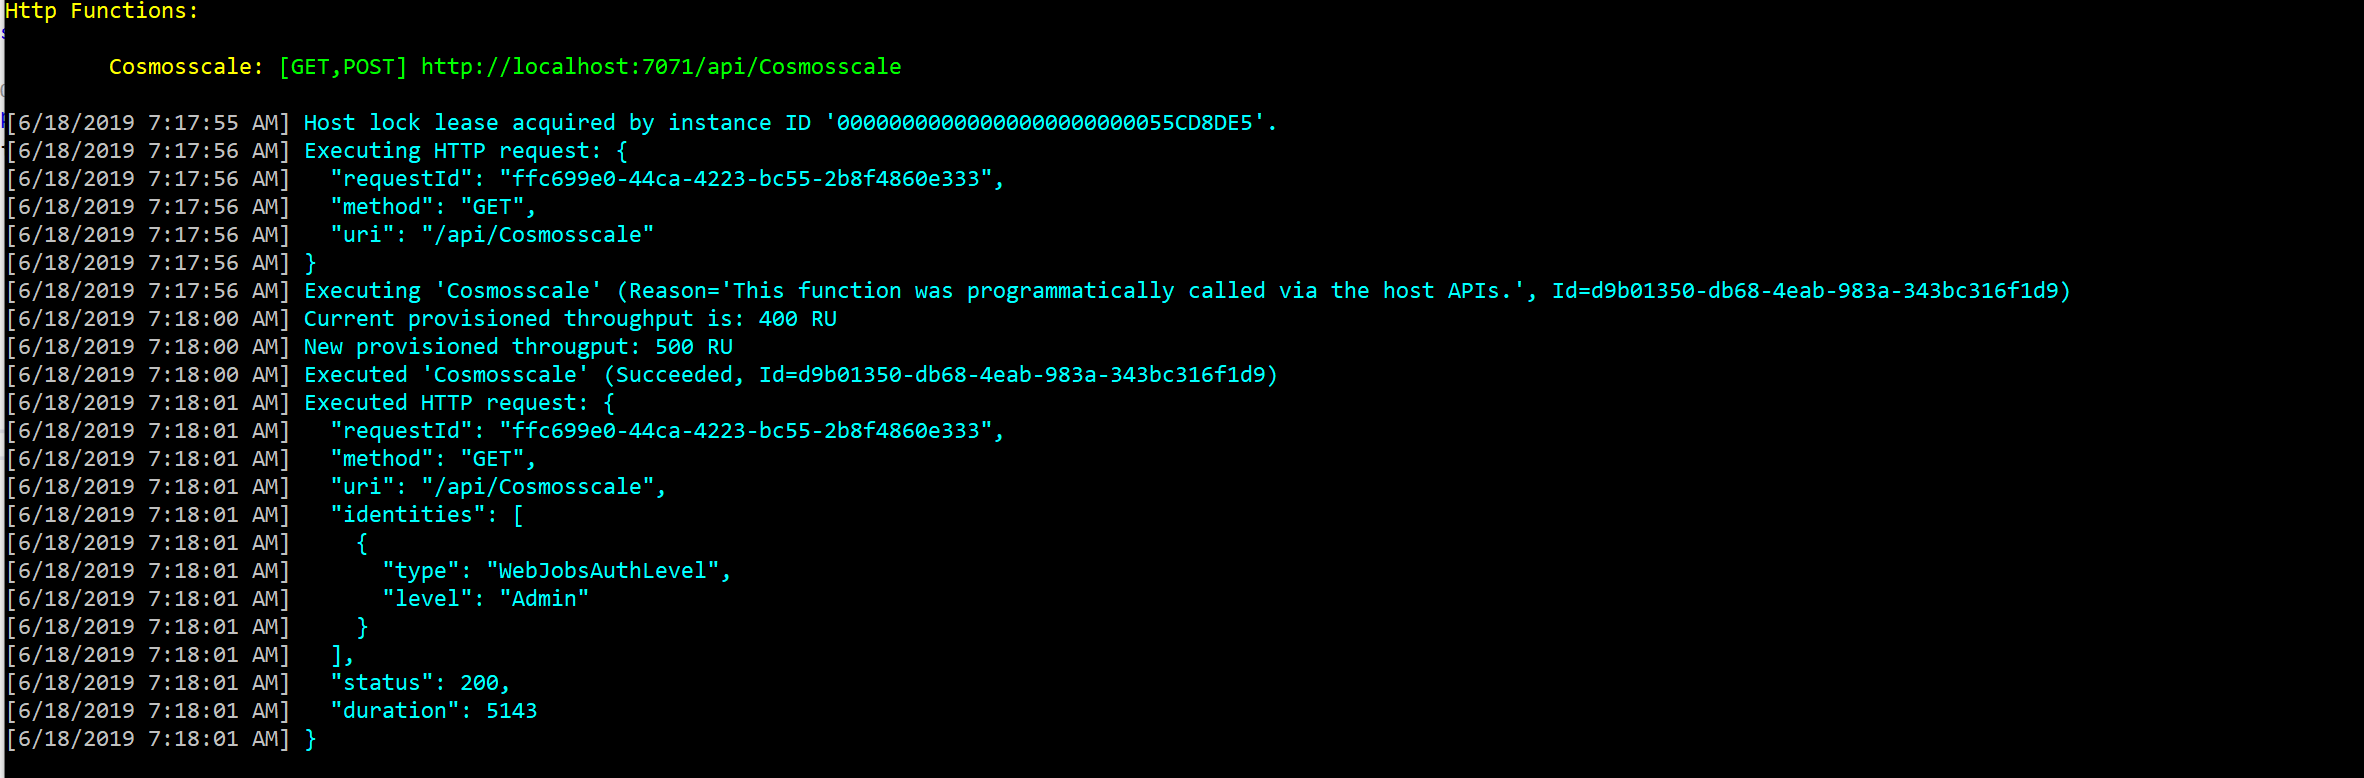
Now we have setup and created the function locally. To test the app locally, click on the run button. Using PostMan send a GET or Post request by using the url
If you have followed the steps and set up everything correctly, you will be seeing he following response in the console. LogInformation messages will specify the current and the provisioned throughput.
Now we have successfuly tested the autoscaling function in local. Let's publish the Function.
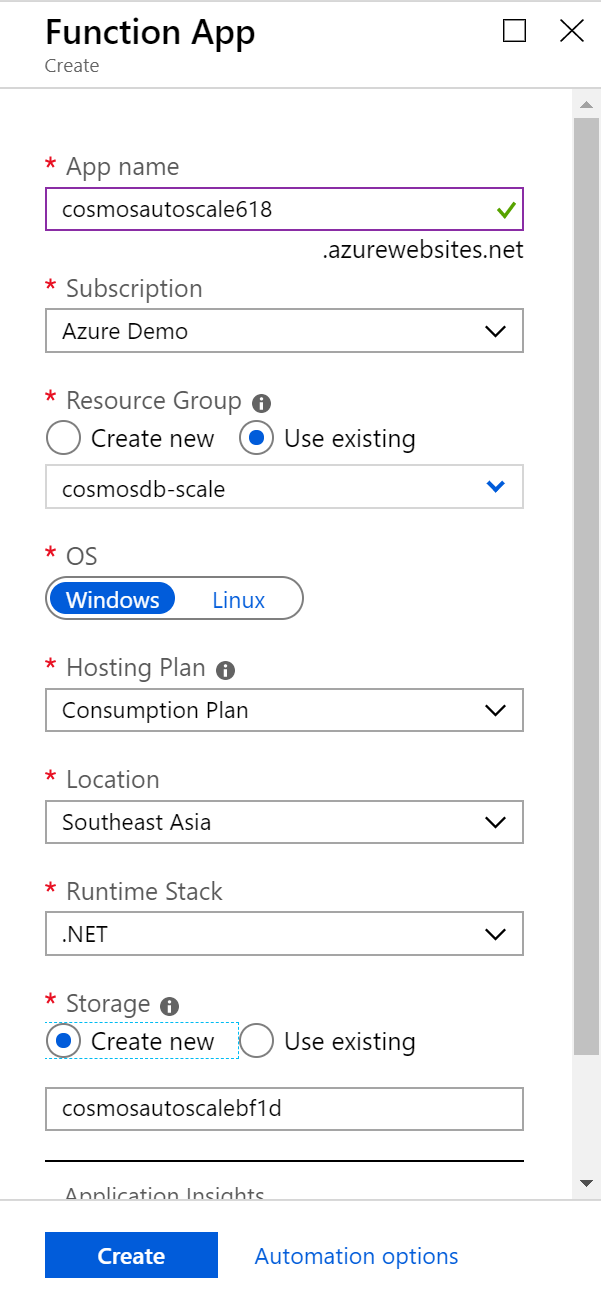
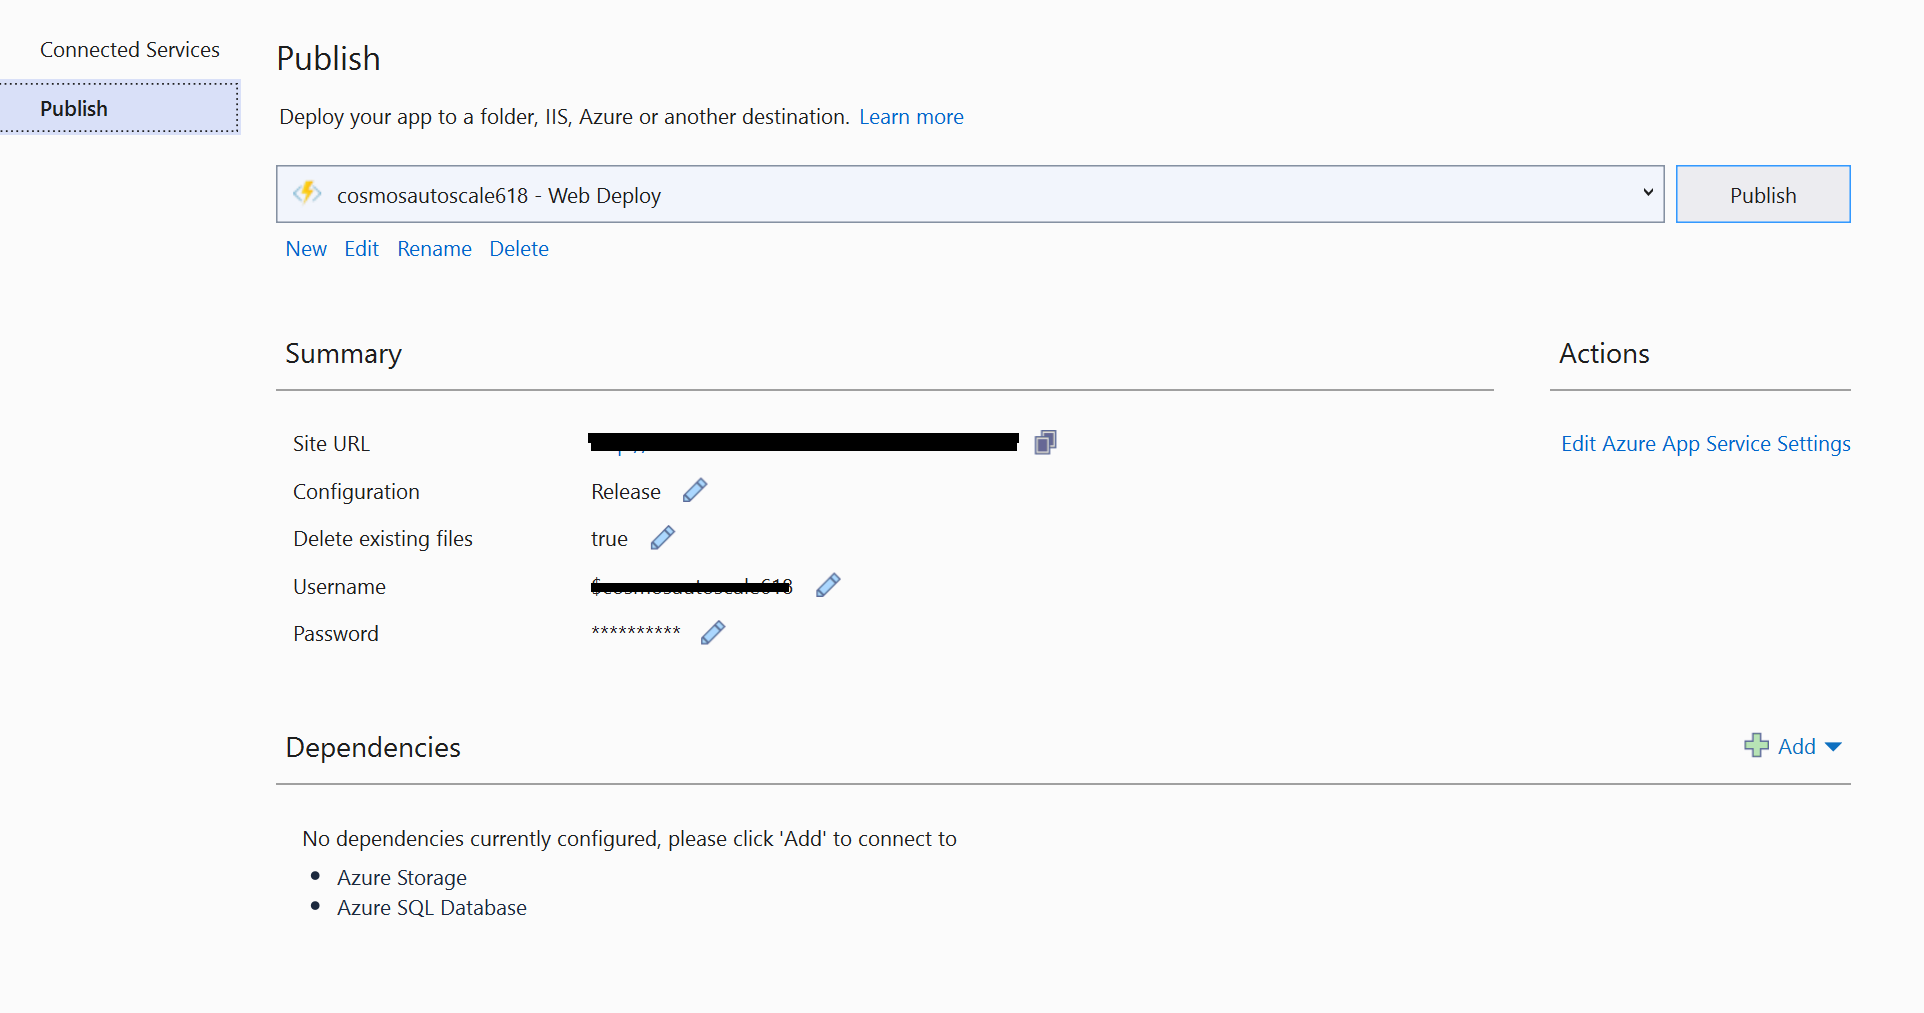
In this ste, lets deploy the function through the portal to the new function app.
Navigate to the Azure portal and provision a Function App with the default settings.
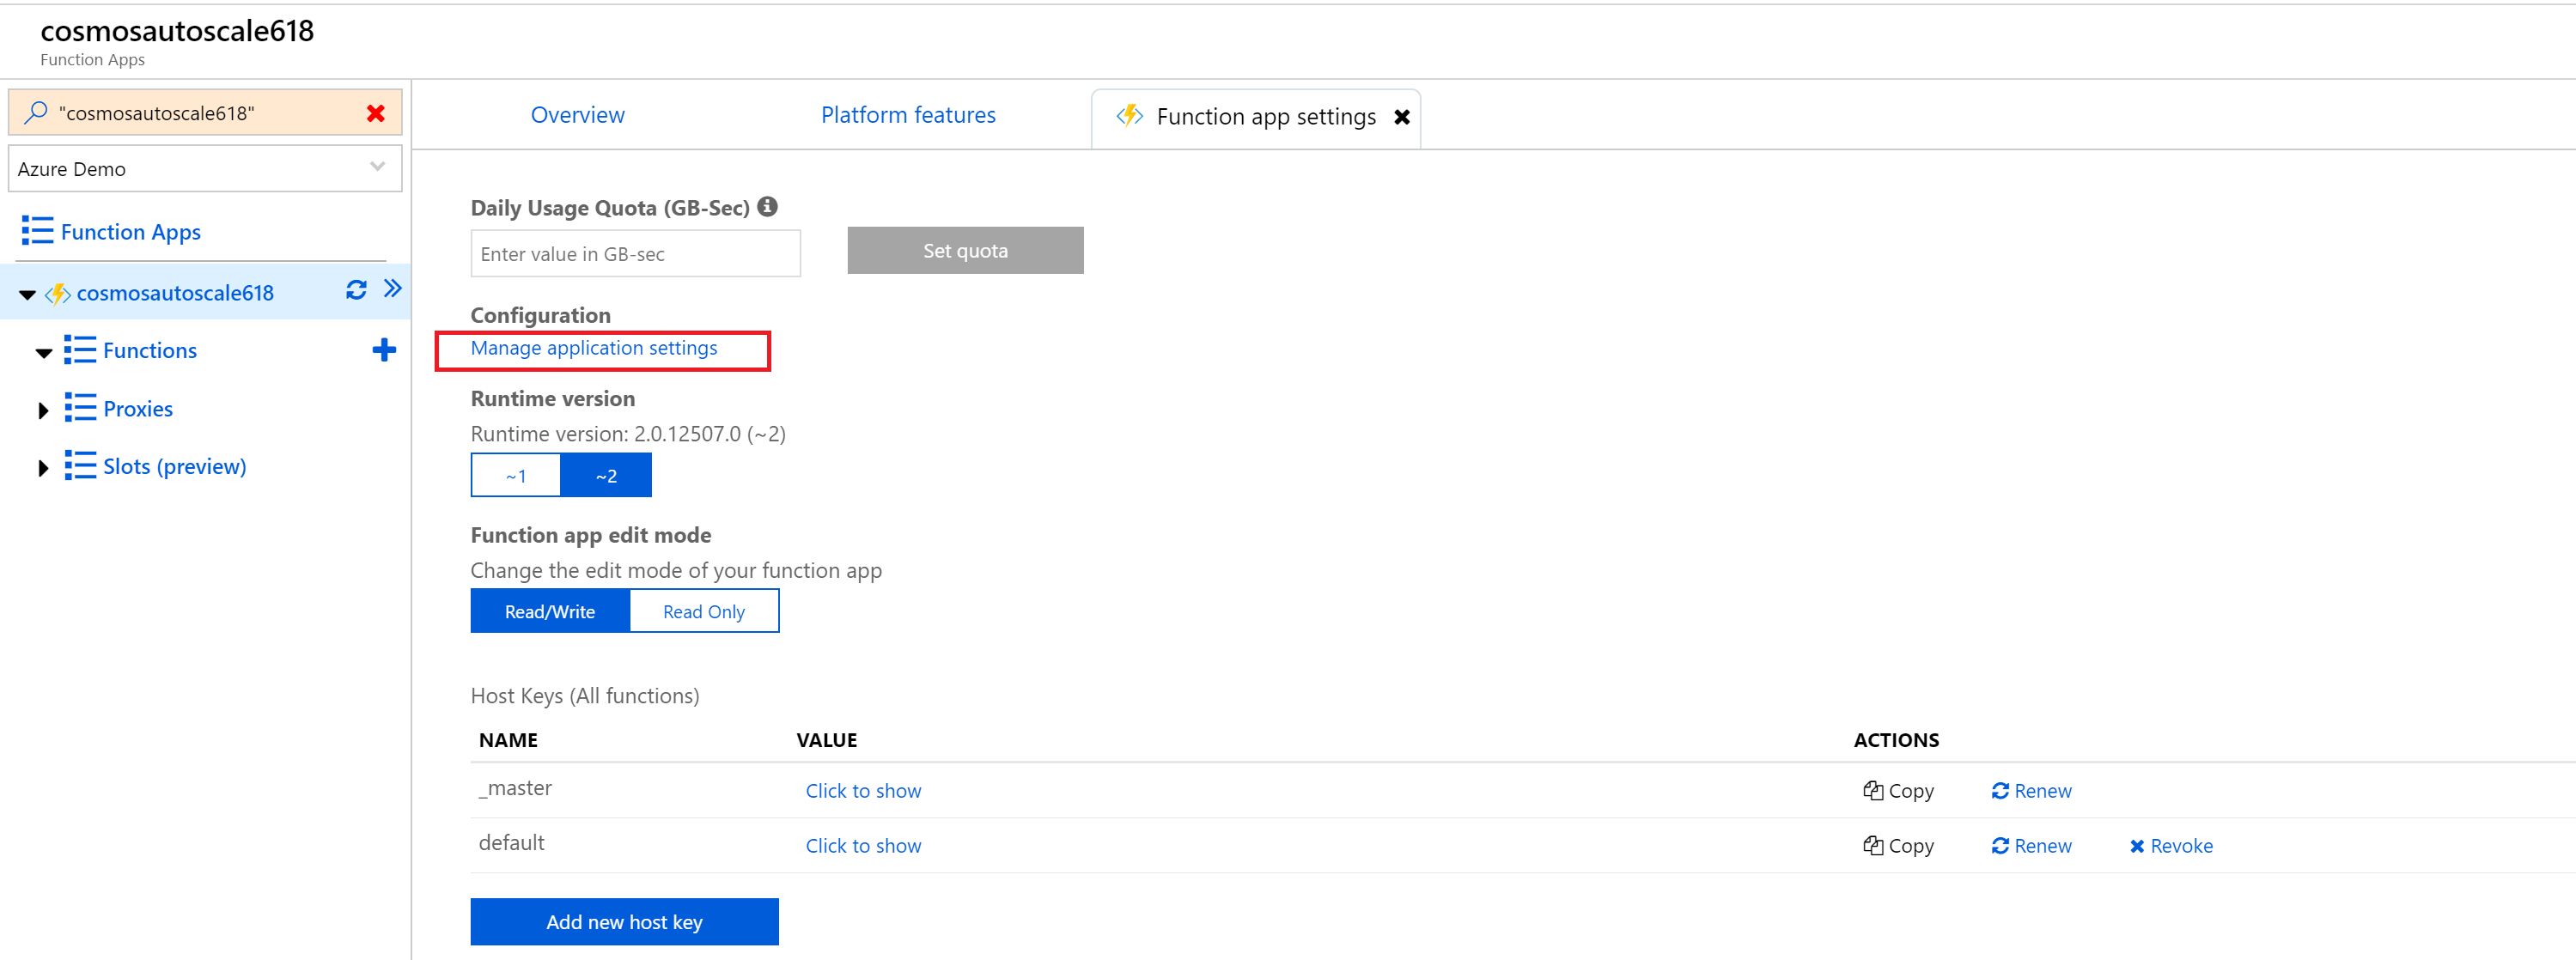
Click on “Function app settings” on your Function App’s homepage, then click on “Manage application settings”. Add the values in the table below to Application settings. The advantage of Adding values to Application settings allows the function’s manager to edit the values later.
Let's publish the function app using Visual Studio.
Right click on the project file > Publish… > Select Existing > Publish > Select the Function App we provisioned in the previous step and click ok.
Now we have successfuly deployed the function to Azure. Let's do the final step
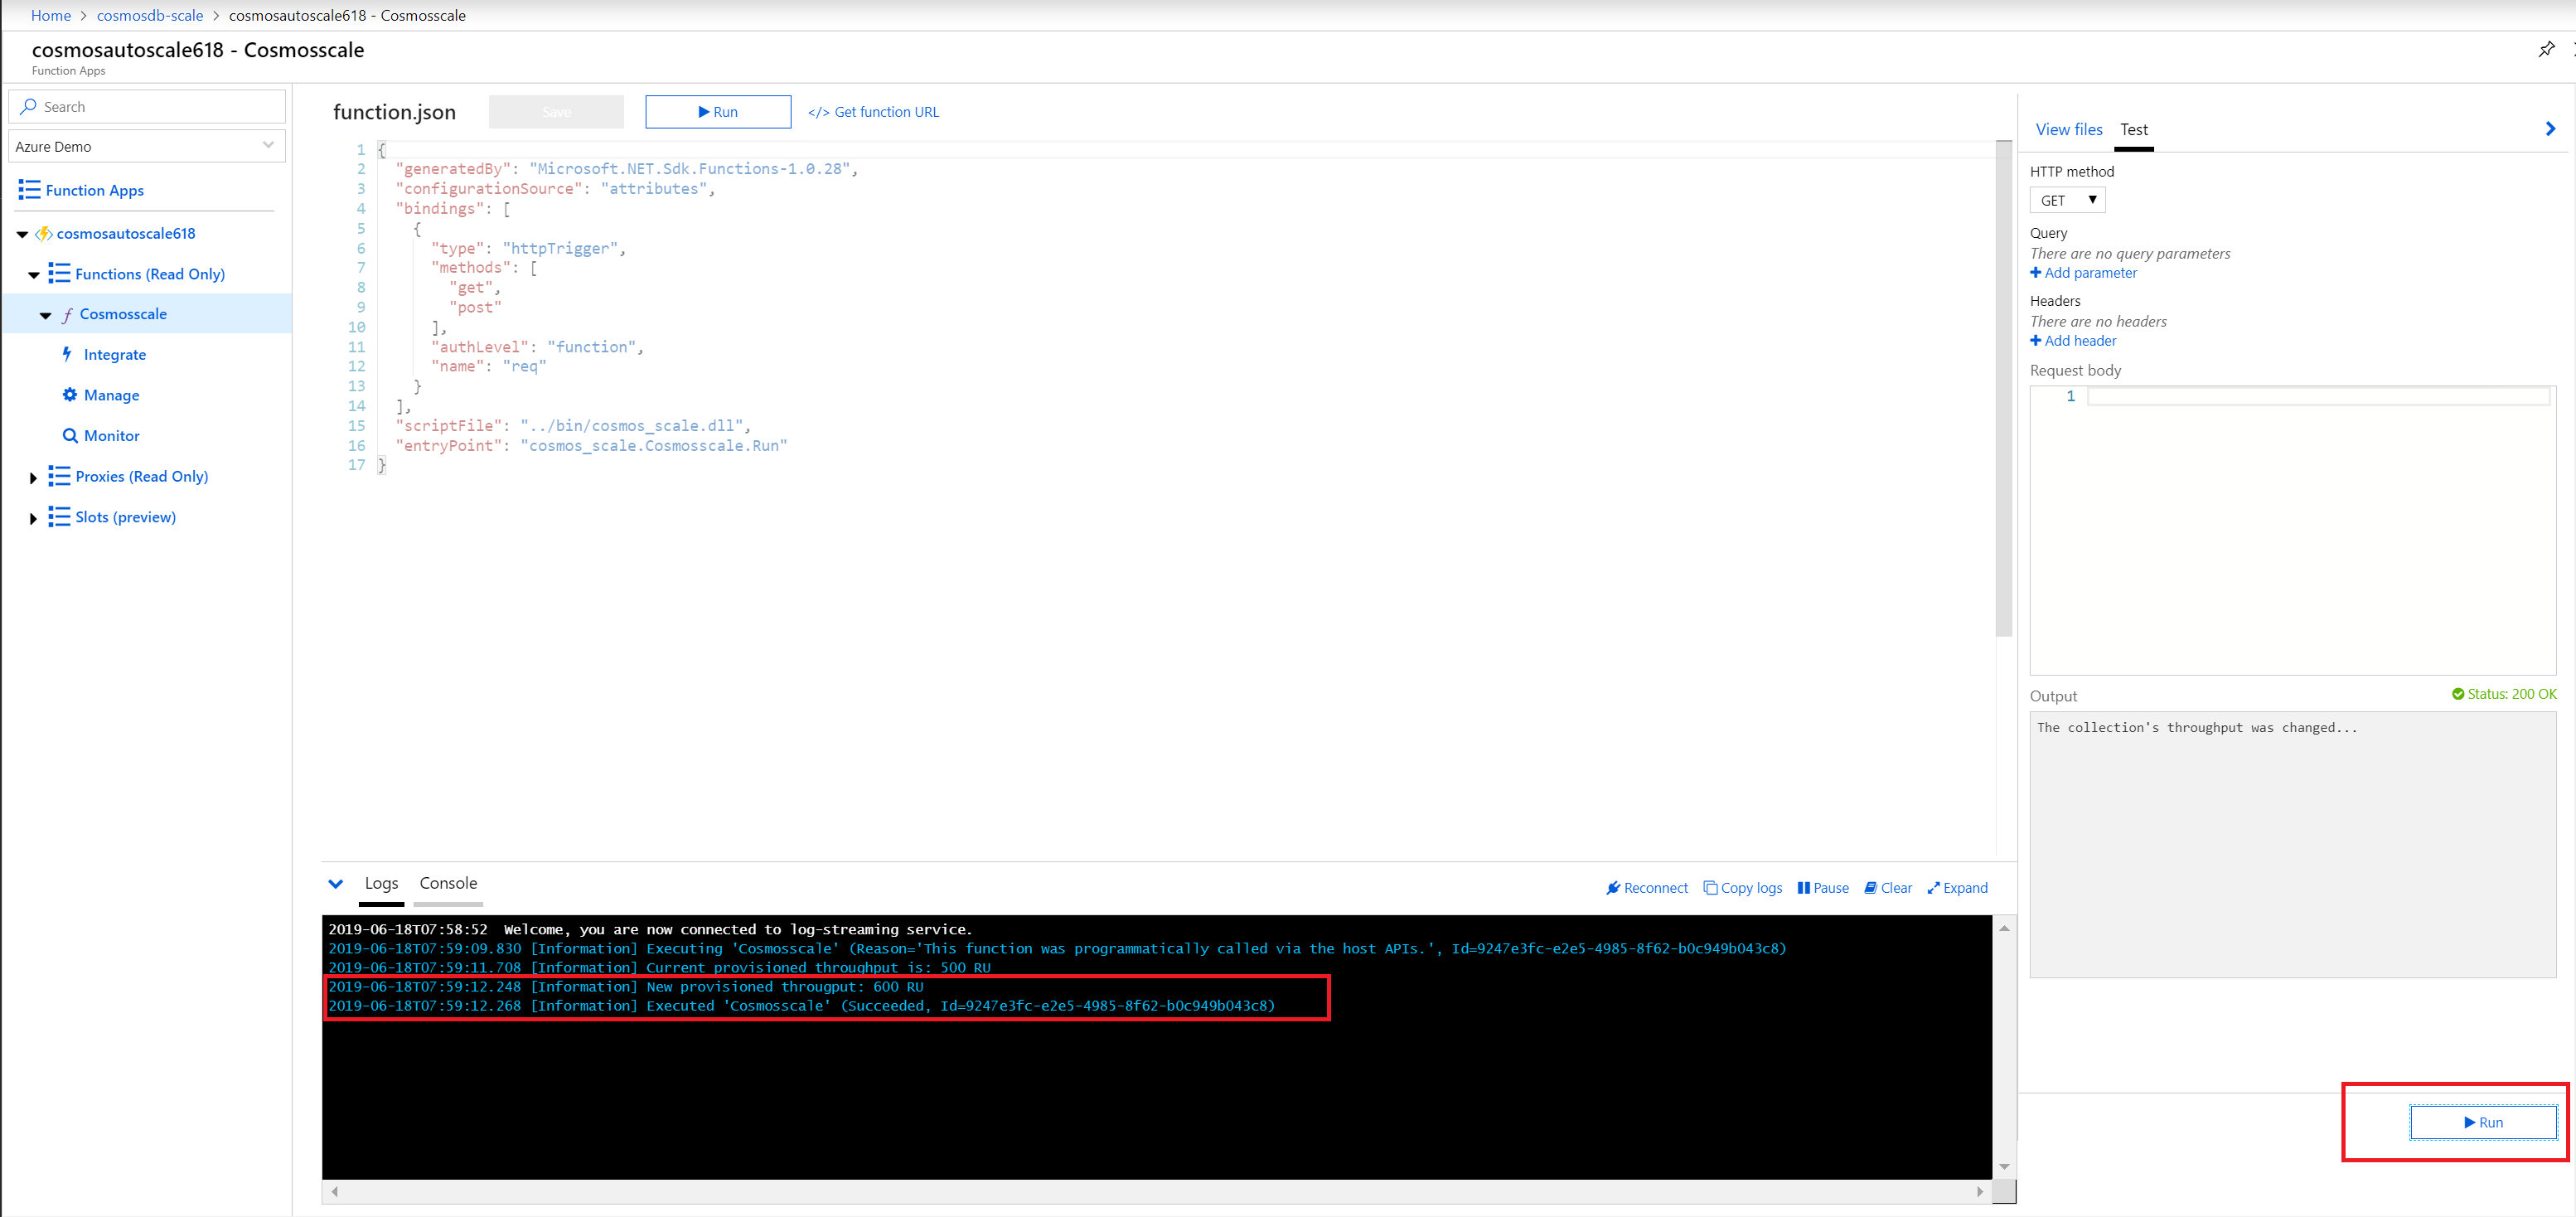
Test the function on Azure by navigating to the function, in the portal blade, and clicking run. We should see the following output if the function succeeds.
If it does not work, make sure you have entered the configuration correctly in the app settings.
As this function can be invoked periodically, you can ammend the logic to scale up/down RUs based on time/month/year etc.
Now you can use this function url as a webhook and can be called from anywhere to scale up/down automatically. Hope this will help someone out there to manage the consumption and reduce the cost.
Road traffic is a very classic and burning problem in Sri Lanka and in most of the Asian countries. Personally I have to spend 2 hours on the road everyday by just stuck in the traffic and I assume the same for other people who gets stuck for many hours with no way out.
I was thinking of implementing a solution through various ways with PaaS provided by Azure, this blog focus on one of the solution with Azure by using various services such as IOT hub,Functions,Cosmosdb,Powerbi and bot framework
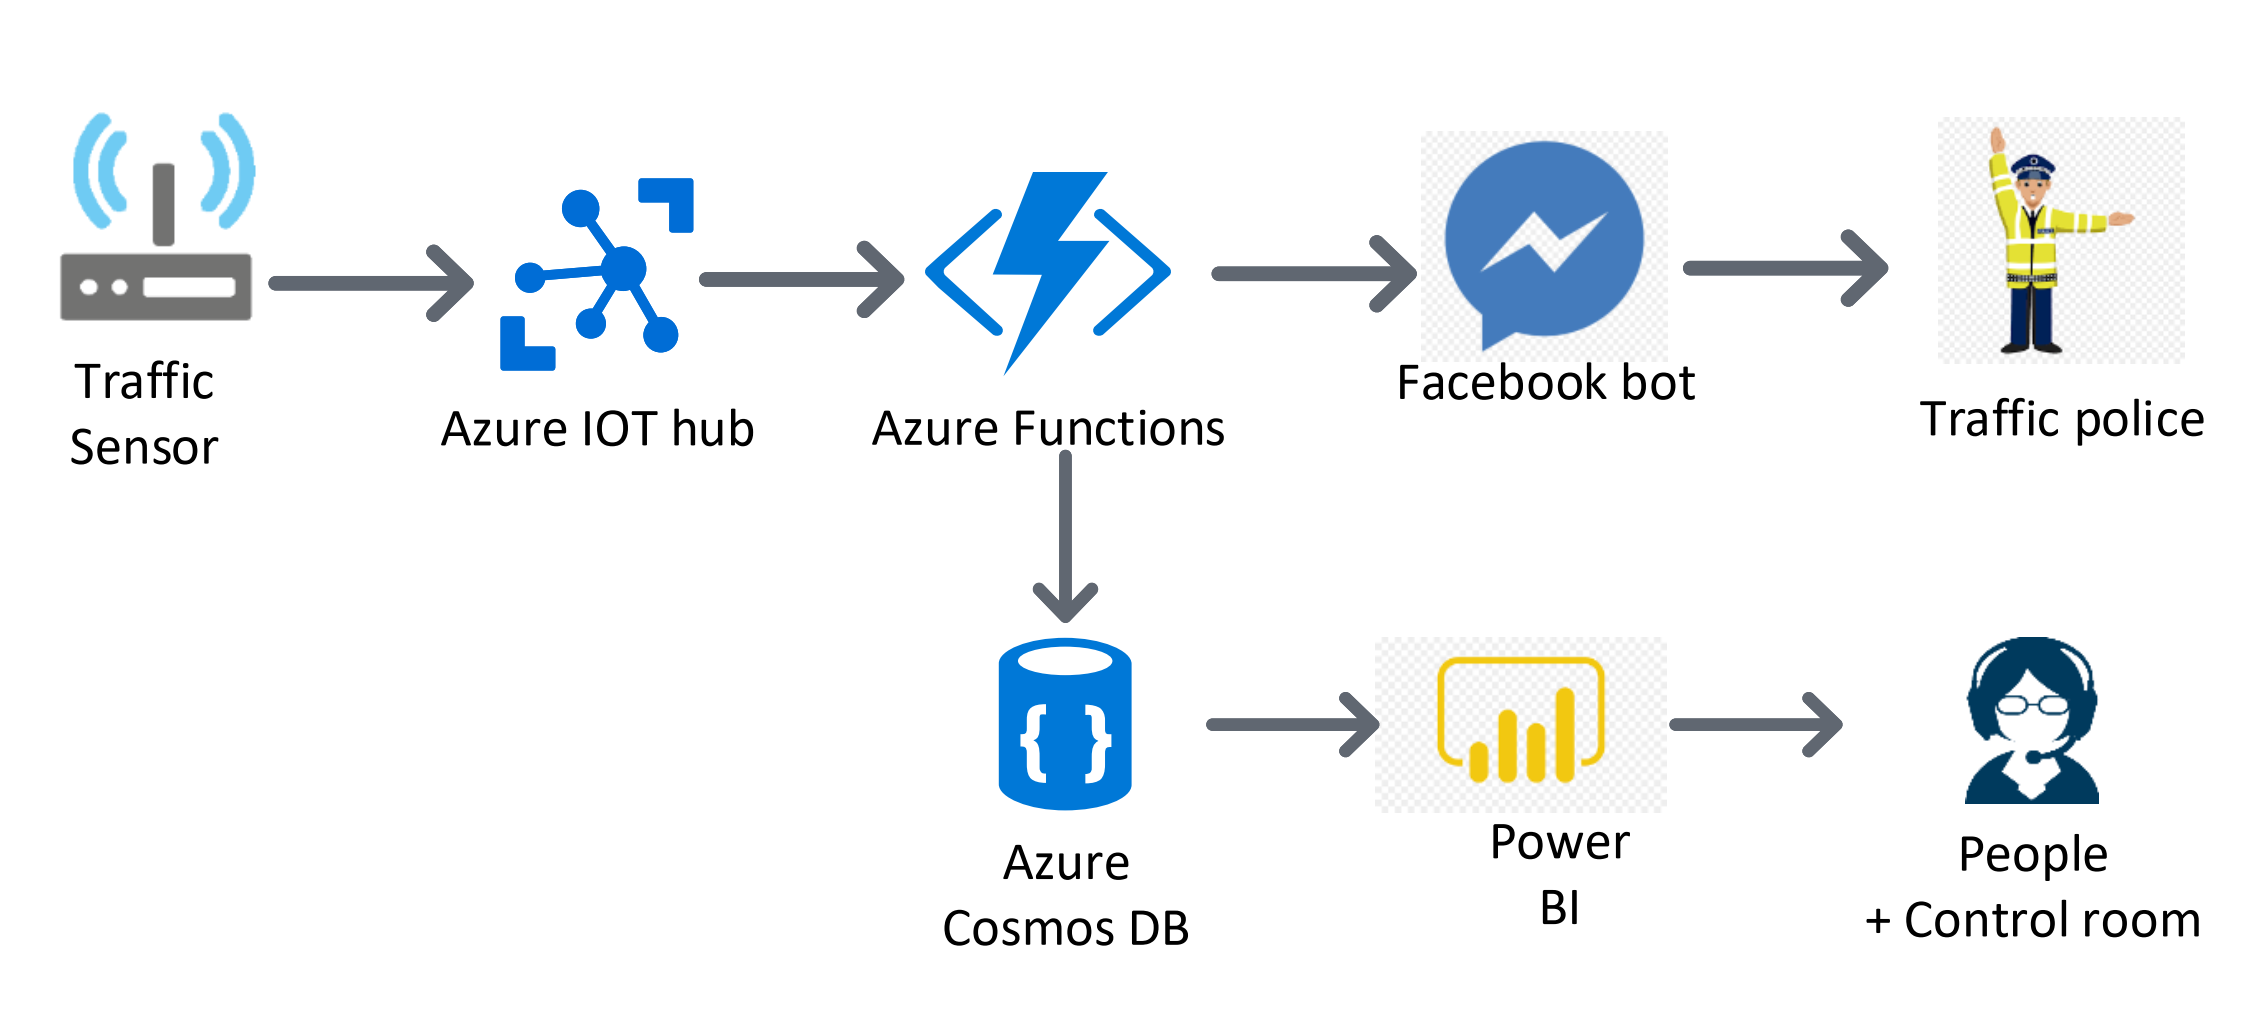
IOT sensors can be placed in heavy traffic areas to monitor traffic level along the road. Everyone can access the data using Facebook messenger bot and subscribe on specific road/area. When there is heavy traffic, push notification will be sent to subscribers allow them to avoid that area and redirected to some other road. Also a notification will be send to the traffic police to take over the control.
IOT sensors placed over the areas will send data to the Azure IOT hub.
Azure IoT Hub will be configured to trigger Azure Functions to Store data into Cosmos DB and also send notification to Facebook messenger bot(This could be replaced with LINE,Telegram,Skype etc) subscribers.
Facebook messenger bot connects to Azure Functions which will acts as serverless bots over HTTPS and Azure Functions to process message from Facebook messenger users and reply back
PowerBI connects to Cosmos DB and then Visualize Traffic level on map in real time and could be displayed on the control room.
I will be implementing this POC and publish the code in my github repository in the coming days. In the meantime if you have any suggestions feel free to comment below.
I was at the Global Azure Bootcamp recently concluded last week, one of the participant came and asked me, "Hey what is Cosmos DB" I casually responded “Well, that’s Microsoft’s globally distributed, massively scalable, horizontally partitioned, low latency, fully indexed, multi-model NoSQL database". The immediate question came after that was whether it supports hybrid applications. In this blog I will be explaining how to leverage the features of cosmos db when you're building hybrid applications.
Ionic framework is an open source library of mobile-optimized components in JavaScript, HTML, and CSS. It provides developers with tools for building robust and optimized hybrid apps which works on Android,IOS and web. Ionic comes with very native-styled mobile UI elements and layouts that you’d get with a native SDK on iOS or Android.
Let's see how to build Hybrid application with Ionic and Cosmosdb
You need to have npm and node installed on your machine to get started with Ionic.
Step 1: Make sure you've installed ionic in your machine with the following command,
ionic -v
Step 2: Install Ionic globally
if it's not installed, install it by using the command
npm i -g ionic
Step 3: Create a new ionic project
Ionic start is a command to create a new ionic project. You pass in the directory name to create, and the template to use. The template can be a built-in one (tabs, blank) or can point to a GitHub URL.
The aim is to create a simple ToDo application which displays lists of tasks, and user should be able to add new tasks.
Lets create a blank project with the command
ionic start cosmosdbApp tabs
You will see a new project getting created.
Step 4: Run the ionic app
You can run the app with a simple command by navigating to the folder and then run
Ionic serve
This starts a local web server and opens your browser at the URL, showing the Ionic app in your desktop browser. Remember, ionic is just HTML, CSS and JavaScript!
It will open the application in the default browser with the default app.
If you're stuck at any point you can refer to my slides on How to get started with Ionic and follow the steps.
Step 8: You need to add two pages home and todo page , home to display the lists of items inside the containerand todo page to add a new item. These two pages can be generated insdie the module with the command,
As we need to make use of the available methods inside the @azure/cosmos You can import cosmos with the line,
import * as Cosmos from "@azure/cosmos";
Now make use of all the available functions in the SDK to add,delete,update items in the cosmosdb.
Step 8: To make application compatible with android/ios , run the following command,
Ionic cordova build ios/android
If you want to make the development faster, you could try building your ionic application with capacitor as well.
Now your hybrid application uses cosmosdb as a backend, with this demo you know how to use cosmosdb as a database for your hybrid application. I hope you should be able to create more applications in the future with cosmosdb and ionic.
You can check the demo application source code from here.