Are you hearing the word Devspaces for the first time?. Let me put this way, Imagine a developer having to deal with a large application which has chunks of Microservices and want to get some functionality done?. There will be many risks and one of them would be dealing with right environments. As we know the best way to counter this issue within a team would be to containerize and host it on cloud. Which will let the developer to work on the particular feature and debug the container without creating the environment locally. That is what exactly Azure Dev Spaces does.
What is Devspaces?
Devspaces allows you to build, test and run code inside any Kubernetes cluster. With a DevSpace, you run everything remotely inside pods running on top of a Kubernetes cluster. Additionally, the DevSpace CLI takes care things automatically such building and pushing images for you when you make changes to your Dockerfile. If you are making a source code change, the DevSpace CLI does not require you to rebuild and redeploy.
It rather syncs your locally edited source to straight to the containers running inside Kubernetes. This makes you to edit locally but compile and run everything remotely inside Kubernetes and still use modern development features such as hot reloading. Azure Dev Spaces supports development with a minimum development machine setup. Developers can live debug on Azure Kubernetes Services (AKS) with development tools like Visual Studio, Visual Studio Code or Command Line.
With the recent announcement of Bridge To Kubernetes GA, Azure Dev Spaces will be retired on October 31, 2023. Developers should move to using Bridge to Kubernetes, a client developer tool.
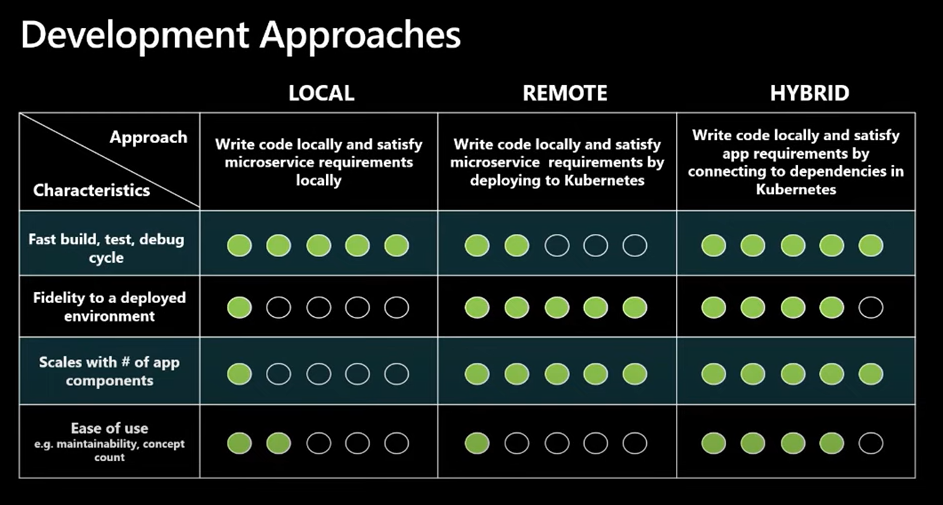
It was formerly called as Local Process with Kubernetes. Bridge to Kubernetes is an iterative development tool offered in Visual Studio and VS Code through extensions that you can pick up in the marketplace. IT allows developers to write, test and debug microservice code on their development workstations while consuming dependencies and inheriting existing configuration from a Kubernetes environment. There are lot of different tools and methods for solving these kind of challenges when you are working on a single micro-service in the context of a larger application. Those different methods and tools into three main types .There's the local, remote and hybrid approach as shown in the image below
Development Approaches
If you look at the above picture, developers are shifting from Local development methods to hybrid methods which offers the best way to deal with building applications to the cloud with containers/kuberentes. With Hybrid approach, it allows developers to write code on their development workstation, but also allow them to connect to external dependencies that are running in some remote environment. So it actually fulfilling all those external dependencies by connecting them. Let's say if you are running your application on Kubernetes on Azure, you can connect all the dependencies from your local environment and have the whole end-to-end workflow.
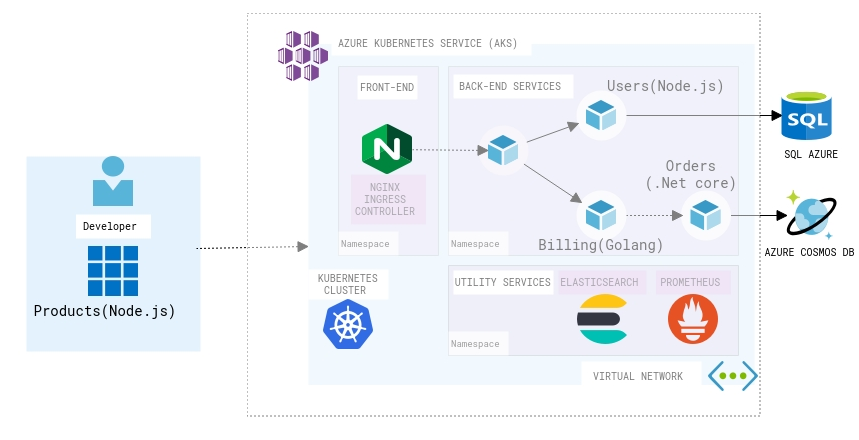
Bridge to Kubernetes Scenario
Consider the above scenario in the diagram, Assuming that i am working on a Microservice that deals with Products and the other Microservices which are developed using different stack are deployed on Kubernetes cluster on Azure. If i want to connect to any or multiple microservices and run some integration tests in my local environment Bridge to Kubernetes will help to achieve the requirement. Following are some of the Key features that Bridge to Kubernetes offers similar to Devspaces,
Accelerating and Simplifying Microservice Development
It basically eliminates the need to manually push code, configure and compile external dependencies on your development environment so that you can focus on code without worrying about other factors.
Easy DebuggingCode
It lets you to run your usual debug profile with the added kuberentes cluster configuration. It allows developers to debug code in the way they want would while taking advantage of the speed and flexibility of local debugging.
Developing and Testing End-to-End
One of the important feature is the Integration testing during development time. Select an existing service in the cluster to route to your development machine where an instance of that service is running locally. Developers can initiate request through the frontend of the application running in Kubernetes and it will route between services running in the cluster until the service you specified to redirect is called same as how you would do debugging by adding a breakpoint in your code.
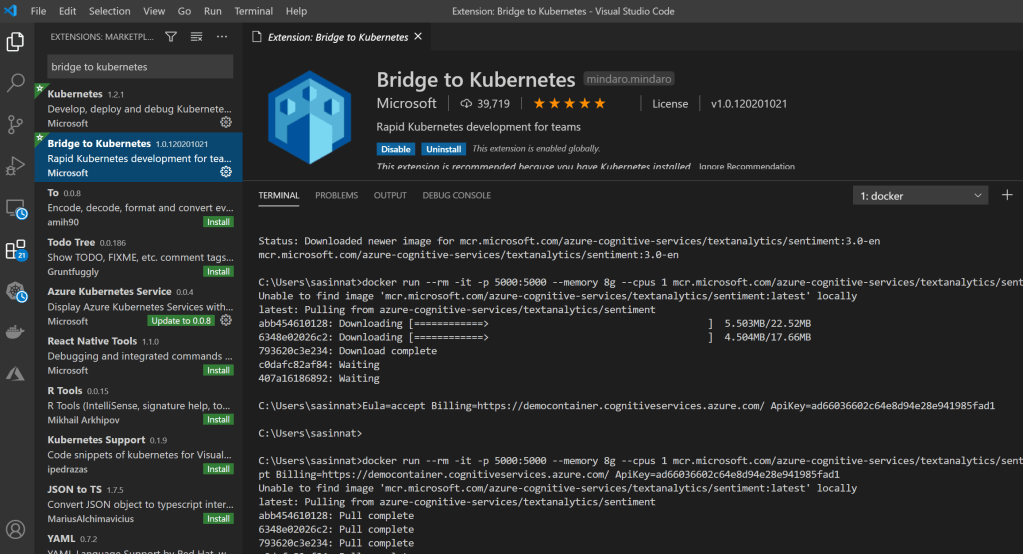
You can Start debugging your Kubernetes applications today using Bridge to Kubernetes.You need to download the extensions from the Visual Studio and VS Code marketplaces.
Bridge to Kubernetes VSCode extension
If you would like to explore more with a sample application follow the example given on Use Bridge to Kubernetes . Also kindly note the Bridge to Kubernetes collects usage data and sends it to Microsoft to help improve our products and services.
Start using Bridge to kuberentes and deploy things to production even faster than before! Cheers!
This year I've started focusing deeply on the areas around App Modernization with various cloud native offerings with different cloud vendors. One of my main focuses has been Kuberentes and how it can help organizations to design scalable applications to cater their needs. Scaling is one of the interesting concepts on Kuberentes and a very important subject to look at. This post will help you to understand the basics of the scalability aspects in Kuberentes and how you can use Event driven Applications with Kubernetes in detail.
Scaling Kubernetes
In general, Kuberentes provides two ways to scale your applications with the capabilities such as,
Cluster Scaling - It Enables users to add and remove nodes to provide more resources to run on. This is applicable to scale in an infrastructure level
Application Scaling - It can be achieved based on how your applications are running by changing the characteristics of underlying pods. Either by adding more copies or by changing the resources available to run same as how you do with services like App service on Azure.
Cluster Autoscaler : The first way of scaling can be achieved with Cluster Autoscaler. It is a tool enables automatically scaling the cluster. Most of the cloud vendors have this capability which automatically add nodes that user don't have to take care of adding more nodes. It basically add nodes when the capacity demand is there and remove nodes when they are no longer needed. I have widely used the Autoscaler with Microsoft Azure Kubernetes Service which allows you to start scaling your AKS cluster.
Event-driven applications are a key pattern for cloud-native applications. Event-driven is at the core of many growing trends, including Serverless compute like Azure Functions. There are so many scenarios where Kubernetes with Azure functions can be used in order to serve your applications with minimized cost.
Hybrid Solutions, Which needs some data to be processed on their environment
Applications with some specific requirements of Memory and GPUs
Applications which are already running on Kubernetes, so that you can leverage existing investments
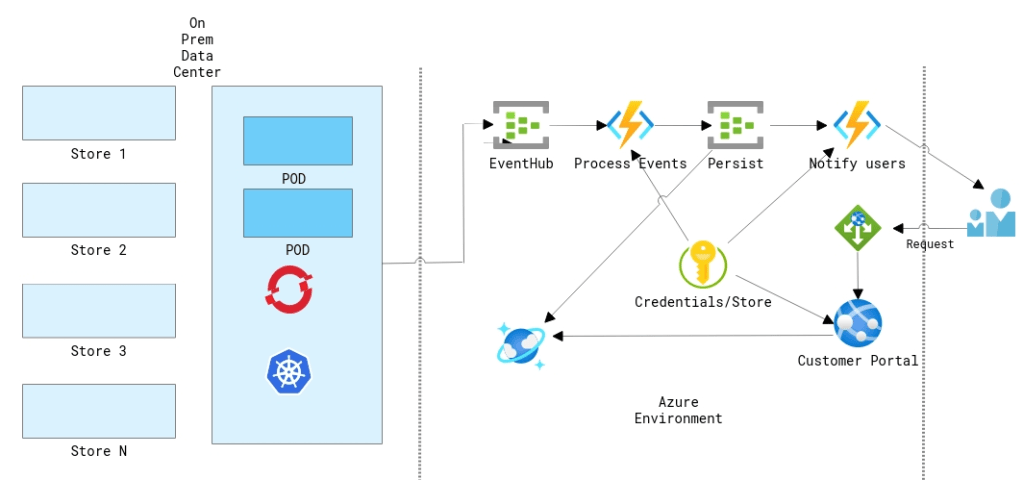
Example Scenario:
Customer Scenario
In this example, lets consider a retail customer like eBay. For a retail customers who processing millions of orders and having a hybrid environment. If the customer does a lot of processing on the data center using things like Kubernetes and at some point they push those data to the cloud using eventhub or transform their data and put in the right place etc. What if the customer is getting sudden spike on a certain day like "Black Friday" and need to make sure that the compute can scale rapidly and also wanted to make sure that the orders are processed in the correct manner.
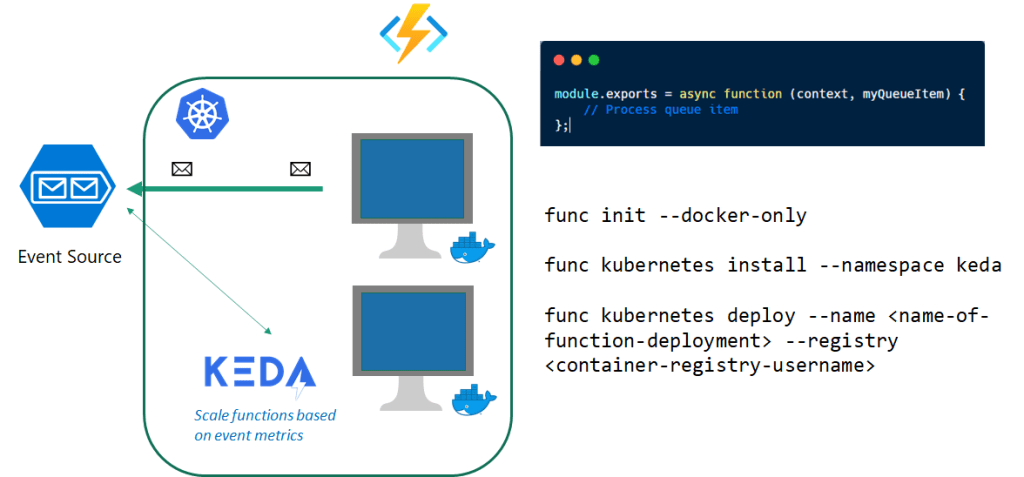
Since Azure functions is open sourced so one of the things that azure functions team working with and talking to the community some partners like Redhat is how can they start to bring more of these experiences to that other side to where you don't want to have lock-in to a specific cloud vendor and to run these service workloads anywhere could be on other clouds. Kubernetes Event-Driven Autoscaling (KEDA) which is a Microsoft & Red Hat partnership that would make auto scaling Kubernetes workloads a lot easier. With Azure Functions, you write code which is triggered when a certain trigger occurs and they handle the scaling for you, but you have no control over it. With combining Kubernetes you have to tell it how to scale your application so it's fully up to you! On May 6th, 2019 Microsoft announced that they have partnered with Red Hat to build Kubernetes-based event-driven autoscaling (KEDA) which brings both worlds closer together.
What is Kubernetes-based event driven autoscaling (KEDA) ?
KEDA provides an autoscaling infrastructure that allows you to very easily autoscale your applications based on your criteria. Nothing to process? No problem, KEDA will scale your app back to 0 instances unless there is work to do.
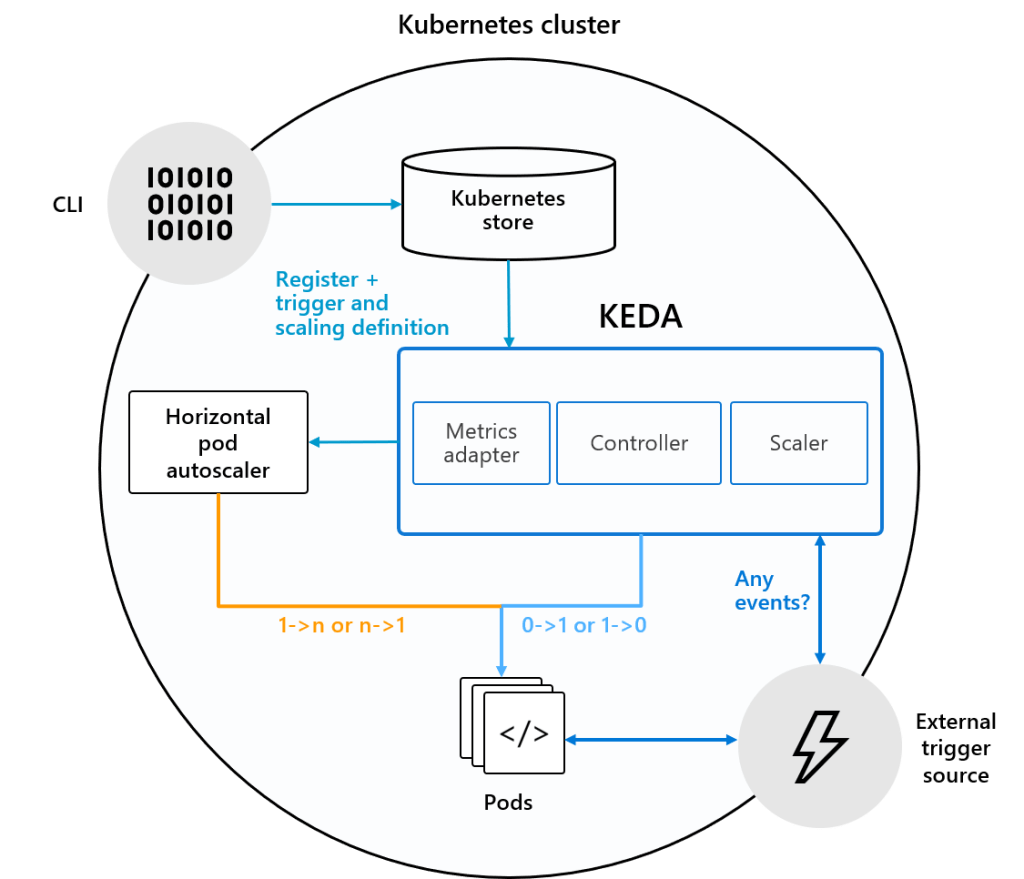
How does it work?
KEDA comes with a set of core components to provide the scaling infrastructure:
A Controller to coordinate all the work and watch for new ScaledObjects
A Kubernetes Custom Metric Server
A set of scalers which allow you to scale on external services
The controller is the heart of KEDA and is handling the following responsibilities :
Watching for new ScaledObjects
Ensuring that deployments where no events occur, scale back to 0 nodes. Once events occur, it makes sure that it scales from 0 to n.
How it Differs from Kubernetes ?
"Default Kubernetes Scaling is not well suited for Event Driven Applications"
By default kuberentes is not very well suited for event-driven scaling and that's because by default kuberentes can really only do resource based scaling looking at CPU and Memory.
As an application admin, you can deploy ScaledObject resources in your cluster which define the scaling rules for your application based on a given trigger.
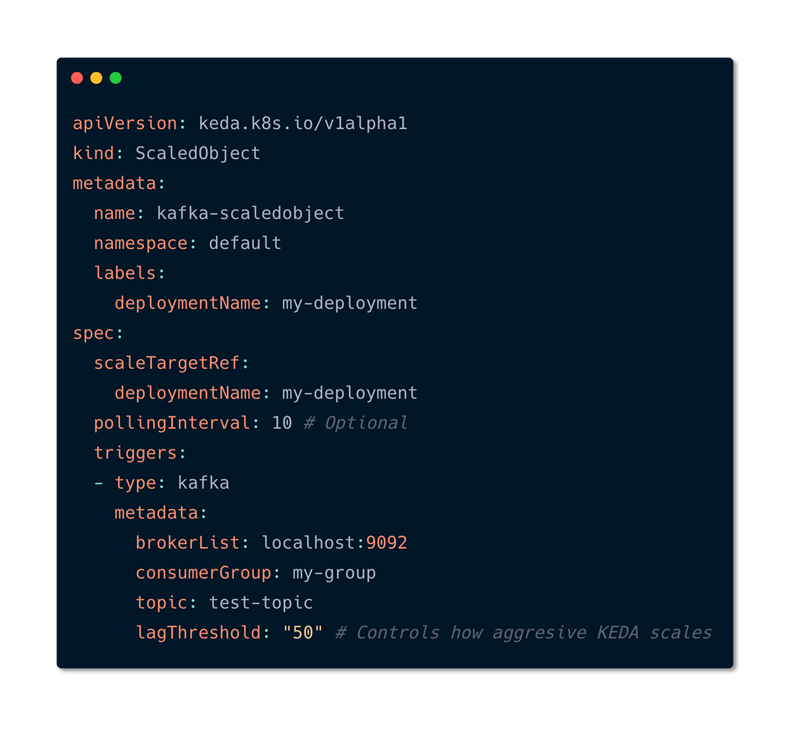
These triggers are also referred to as “Scalers”. They provide a catalog of supported sources on which you can autoscale and provide the required custom metric feeds to scale on. This allows KEDA to very easily support new scale sources by adding an individual scaler for that service. Let’s have a look at a ScaledObject that automatically scales based on Service Bus Queue depth.
Scaled Object Deployment with Kafka using KEDA
As you see in the file, All it contains is that whatever deployment that you are going to scale it goes under scaletargetreference. You can also set some metadata such as how frequently to pull for events that you can control. Metadata such as Minimums and maximums and then you can define the event source in this case it is mention as Kafka, you can also mention things like service bus etc. Once the deployment is applied on kuberentes you can see that it will identify that scaled objects. Based on the events on the eventssources it is going to identify and scale it automatically. HPA does the autoscaling.
With the production release of KEDA back in 2019, you can now safely run your azure function apps on Kubernetes and its recommended by the product group. This allows the users to build serverless applications once re-use them on other infrastructures as well. Let's see How to build an application that supports the above scenario discussed.
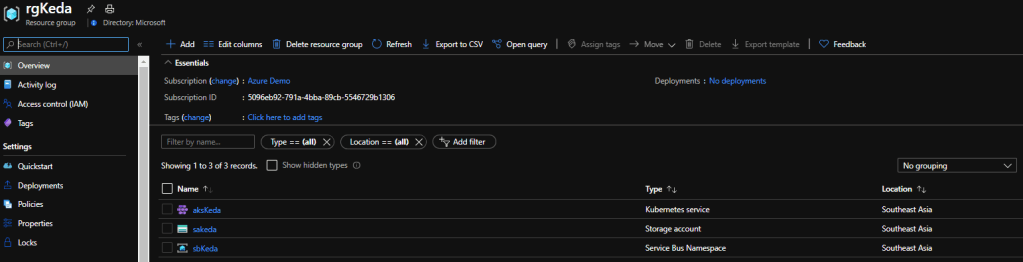
Once these resources are created you can double check it by navigating to azure portal and opening the resource group.
Resources for the Kubernetes Event Driven Autoscaling
Now we have created all the necessary resources. In the above step you can see that we have create two nodes but have not deployed anything to those nodes, but in real scenarios that nodes can contain some applications already running on Kubernetes.
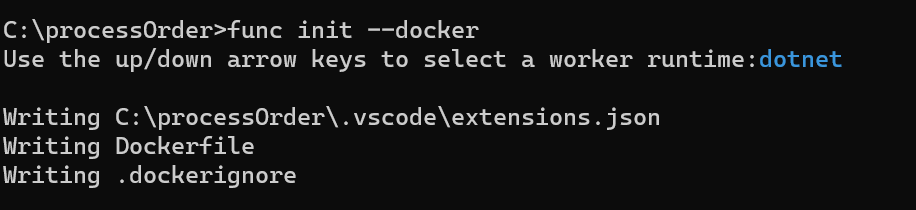
Step 5 : Create Azure Function to Process the Queue Message
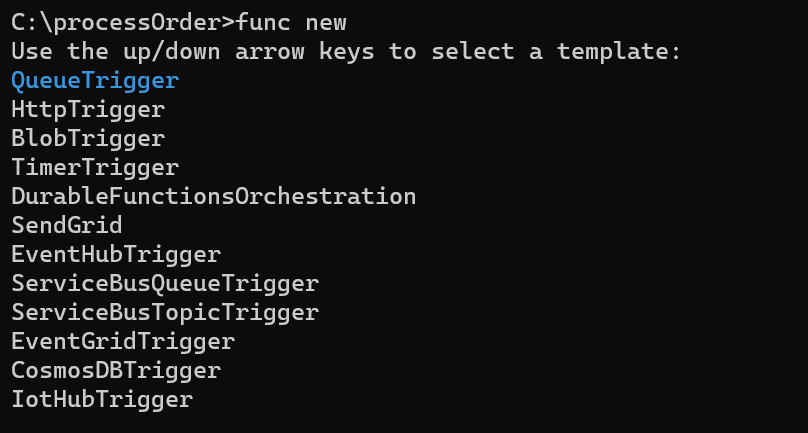
Let's create an Azure function to process these queue messages, you can navigate to the folder and create a containerized function as follows,
In this case we need to create a function to get triggered when there is a new message in the queue, so select the Trigger as QueueTrigger from the template,
Select Queue Trigger
and give a function name as follows,
Create Function with QueueTrigger template
Open the function in vscode and configure the storage queue connection string in the local.appsettings.json, the connection string can be obtained from the Azure portal in Storage Account "saKeda" -> Queues -> Access Keys
Step 6 : Build the function and Enable Keda on AKS cluster
As we have everything ready, let's build the function with the below command,
docker build -t processorder:v1 .
As the next step , we need to enable KEDA on the Azure Kubernetes Cluster. This is similar on any Kubernetes environment which can be achieved by below,
Keda.yaml is the configuration file which has all details. In our case we define that we want to use the queue trigger and what our criteria is. For our scenario we’d like to scale out if there are 5 or more messages in the orders queue with a maximum of 10 concurrent replicas which is defined via maxReplicaCount. Let's apply the yaml file on the cluster.
Make sure that you are tagging the correct registry name , here i am using my docker registry, instead you can consider using Azure Container Registry as well.
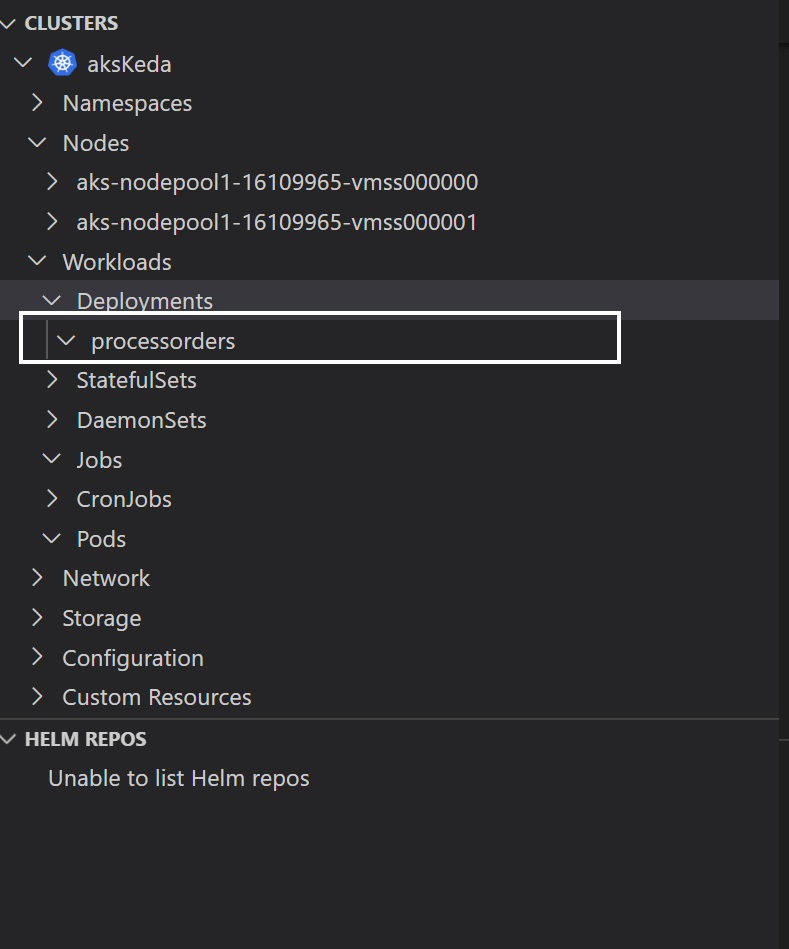
Let's view the kubernetes cluster. if you have install the kubernetes extension you can easily view the status of the cluster using vscode.
Step 8 : Publish messages to the Queue
Inorder to test the scaling of Azure function with KEDA, i created a sample console application which pushes the messages to the queue we created. And the code looks as follows,
using Microsoft.WindowsAzure.Storage;
using Microsoft.WindowsAzure.Storage.Queue;
using System;
using System.Threading;
using System.Threading.Tasks;

namespace Serverless
{
    class Program
    {
       static async Task Main(string[] args)
        {
            CloudStorageAccount storageClient = CloudStorageAccount.Parse("connection string");
            CloudQueueClient queueClient = storageClient.CreateCloudQueueClient();

            CloudQueue queue = queueClient.GetQueueReference("sqkeda");
            for (int i = 0; i < 100000000; i++)
            {
                await queue.AddMessageAsync(new CloudQueueMessage("Hello KEDA , See the magic!"));
            }

        }
    }
}
As the messages are getting inserted to the queue, the number of replicas gets increased which you can see from the image below.
Once all the messages have been processed KEDA will scale the deployment back to 0 pod instances. Overall process is simplified in the diagram below,
We have easily deployed a .NET Core 3.1 Function on Kubernetes which was processing messages from Storage Queue. Once we’ve deployed a ScaledObject for our Kubernetes deployment it started scaling the pods out and in according to the queue depth. This makes the application very easily plug in autoscaling with existing application without making any changes!
This makes Kubernetes-based event-driven autoscaling (KEDA) a great addition to the autoscaling toolchain, certainly for Azure customers and ISVs who are building solutions. Hope this was useful in someway! Cheers!
Before two weeks Ryan Dahl (Founder of Node.JS) announced the first version of [Deno](https://deno.land/). As the tagline says A secure runtime for JavaScript and TypeScript.Deno is a runtime for Javascript and Typescript that is based on the V8 JavaScript engine and the Rust programming language. I have been a Node developer for 2 years in the past, if you want to get started with Deno knowing Node.js would be an added advantage. Even though Deno has arrived as a competitor for NodeJS in the industry not so quick but people are sure that it'll take over.
I was reading lot of documentations and materials to understand the difference. So, here are the advantages that i see from Deno,
It is Secure by default. No file, network, or environment access, unless explicitly enabled.
Supports TypeScript out of the box.
Ships only a single executable file.
Has built-in utilities like a dependency inspector (deno info) and a code formatter (deno fmt).
Deno does not use npm
Deno does not use package.json in its module resolution algorithm.
All async actions in Deno return a promise. Thus Deno provides different APIs than Node.
Uses "ES Modules" and does not support require().
Deno has a built-in test runner that you can use for testing JavaScript or TypeScript code.
Deno always dies on uncaught errors.
I was very excited as other developers when Deno was announced. In this post i will demonstrate how to create a simple Web API with Deno and deploy to production on Web App with Azure.
I will not be going through each step on how to create the REST API, however if you are familiar with creating APIs with Node , it is the same way that you need to do. You need to have the main file server.ts which will have those routes defined. (server.ts)
import { Application } from "https://deno.land/x/oak/mod.ts";
import router from "./routes.ts";
const PORT = 8001;

const app = new Application();

app.use(router.routes());
app.use(router.allowedMethods());

console.log(`Server at ${PORT}`);
await app.listen({ port: PORT });
One feature that i personally liked in DENO is that it provides developers to code with TypeScript that addresses "design mistakes" in Node.js. In this case i am going to create an API to fetch/add/delete products and my interface would look like as below (types.ts),
Similar to how you would define routes in Node, you need to define the routes for different endpoints when user want to execute fetch/add/delete operations as follows(routes.ts),
The final step is to create the code for the logic of those each routes. You need to implement the methods which are defined in those routes. For example get_products would look like
Now we are good with the first step and you can see the app running successfully in local. As the next step let's go ahead and deploy the app to Azure. Inorder to deploy the app, you need to create a Resource Group first.
Create a ResourceGroup Named Deno-Demo
You can navigate to Azure Portal and search for Resource Group in the search bar and create a new one as defined here!
Next step is to create the Web App , as we are going to deploy this app to a Linux environment, you can set the configuration as follows,
One of the recent inventions by Github team that was loved by all developers were Github Actions. Personally i am a big fan of Github actions and i have published few posts earlier explaining the same. To configure the Github Action to our application, first you need to push the code to your github repository.
Create a deno.yml
To deploy the app , we first need to create the workflow under the actions. you can create a new workflow by navigating to Actions tab and create new workflow
New Workflow
I am assuming that you are familiar with important terms of Github Actions, if you are new you can explore here. In this particular example i will be using one package created by Anthony Chu who is a Program Manager in Azure functions team. And my deno.yml looks like below,
# A workflow run is made up of one or more jobs that can run sequentially or in parallel
jobs:

  build-and-deploy:
    runs-on: ubuntu-latest
    steps:

    - uses: actions/checkout@v2

    - uses: azure/[email protected]
      with:
        creds: ${{ secrets.AZURE_CREDENTIALS }}

    - name: Set up Deno
      uses: denolib/setup-deno@master
      with:
        deno-version: 1.0.2

    - name: Bundle and zip Deno app
      run: |
        deno bundle server.ts server.bundle.js
        zip app.zip server.bundle.js
    - name: Deploy to Azure Web Apps
      uses: anthonychu/azure-webapps-deno-deploy@master
      with:
        app-name: denodemo
        resource-group: deno-demo
        package: app.zip
        script-file: server.bundle.js
        deno-version: "1.0.2"
One important thing you need to verify is the resource-group and the app-name as you created on Azure.
Also you need to add secrets of your application under secrets in Github repository. You can generate a new Service Principal and obtain the secret as below,
az ad sp create-for-rbac --name "deno-demo" --role contributor --scopes /subscriptions/{SubscriptionID}/resourceGroups/deno-demo --sdk-auth
It will generate a JSON like below,
Generate Service Principal
You can copy and paste the JSON under the secret named "AZURE_CREDENTIALS" ,
Add Secret
Now we are good with everything, you can update some file on the repository and see the workflow getting triggered. You can monitor the deployment by navigating to the workflow.
Workflow Execution
Once everything is successful you can navigate to Azure portal and open the Web App endpoint to see if the app is running successfully.
WebApp with Deno API
You can see the app running successfully on Azure.
I really enjoyed learning about the Deno project and created this simple app. I hope this article can be of value for anyone getting started with Deno with Azure. I see it Deno gaining in popularity, yes. However, I do not see it replacing NodeJS and npm based on several factors. If you found this article useful, or if you have any questions please reach out me on Twitter. Cheers!
One of the highlight among the announcements made at Microsoft Build 2020 was announcement of the new Azure service in the keynote which is Azure App Static Web Apps. AzureStaticWeb Apps is a service that automatically builds and deploys full stack web apps to Azure from a GitHub repository. This service allow web developers to publish websites to a production environment by building apps from a GitHub repository for free. Developers can use modular and extensible patterns to deploy apps in minutes while taking advantage of the built-in scaling and cost-savings offered by serverless technologies.
It provides the killer features for developers such as:
Free web hosting for static content like HTML, CSS, JavaScript, and images.
Integrated API support provided by Azure Functions as backend APIS
First-party GitHub integration where repository changes trigger builds and deployments with Github Actions
Globally distributed static content, putting content closer to your users.
Free SSL certificates, which are automatically renewed.
Custom domains* to provide branded customizations to your app.
Seamless security model with a reverse-proxy when calling APIs, which requires no CORS configuration.
Authentication provider integrations with Azure Active Directory, Facebook, Google, GitHub, and Twitter.
Customizable authorization role definition and assignments.
Back-end routing rules enabling full control over the content and routes you serve.
Generated staging versions powered by pull requests enabling preview versions of your site before publishing.
I was building this meme generator app for an angular session today with Azure cognitive service to detect persons in the image and also to generate a meme by adding a text as the user wanted. As soon as Azure static web apps was announced I wanted to check it out with this application on how easy it is to deploy. Experience was seamless and easy to deploy and generate a url in few seconds.
Let me explain, how i achieved this in quick time.
Step 1. Sign-in to the Azure Portal, Search for “Static Web Apps”, and click the Create button
Visit https://portal.azure.com, sign-in, and use the search box at the top to locate the Static Web Apps service (note that it’s currently in “preview”). click the Create button to get started.
Create Static Web App
In this step you’ll fill out the Static Web Apps form and sign-in to your Github account to select your repository.
Select a region (as of now its not available in all regions)
Sign-in to Github and select your org, repo, and branch.
Once you’re done filling out the form click the Next: Build > button.
Step 2: Define Angular App location, API, and Build Output
The next step is to define the path where my app is located in the repository, and i did not have any azure function integrated and i will keep it as empty, and the directory where my build artifacts (your bundles) are located(i.e dist/meme-4-fun). After entering that information click the Review + create button.
Defining Paths
Step 3: Click the Create and Look for the Magic !
Once you are good with everything you can go ahead and click the create button and you will see the application successfully gets deployed and end point generated to access it public.
Deployment complete
Once the deployment is done, if you go the resource and click on overview you will see a configuration as follows,
Overview
It has the urls of the Github Actions and as well as Github source code and also the url of the application deployed. If you’d like to see the build in action on Github, click the Workflow file above.