4 posts tagged with "deployment"

View All Tags

· 2 min read

I have come across this question about "How to deploy a web app within a sub folder on Azure" in Stackoverflow many times. Even though there is an official documentation, this question has not been addressed in general. With Virtual Directories, You could keep your web sites in separate folders and use the ‘virtual directories and applications’ settings in Azure to publish the two different projects under the same site.

However, say if you have an ASP.NET Core/Angular app to a sub-folder inside Azure Web App (App Service), and wanted to deploy on Azure inside a sub-folder. You can simply navigate to Azure portal -> Select the Web App -> Overview

  • Download the publish profile
  • Import in Visual Studio
  • Edit the web-deploy profile(Normally the publish profile will have Web Deploy as well as FTP profile)
    • Change Site Name from your-site to your-site\folder\sub-folder
    • Change the Destination URL from http://your-site.azurewebsites.net to http://your-site.azurewebsites.net/folder/sub-folder
  • Publish

You should be getting an error as follows,

System.TypeLoadException: Method ‘get_Settings’ in type ‘Microsoft.Web.LibraryManager.Build.HostInteraction’ from assembly ‘Microsoft.Web.LibraryManager.Build

You can resolve the above issue by updating the nuget package named Microsoft.Web.LibraryManager.Build in your project.

One other thing that you should be aware is that, Go to portal > demo-site App Service > Configuration > Path Mappings > Virtual applications and directories. And add the following,

Virtual PathPhysical PathType
/foldersite\wwwroot\folderFolder
/folder/sub-foldersite\wwwroot\folder\sub-folderApplication

Configuration Virtual Directory

Now publish from Visual Studio. If you only need to publish to a first level folder, i.e to your-site\folder, then all you have to do is, change the Type to Application in the Path mappings for /folder, and skip the sub-folder entry since you don’t need it. And correct the Site Name and Destination URL in the publish profile accordingly.

Hope there will be no more questions on the same. Happy Coding!

· 2 min read

I came across this question about "How to deploy a web app within a sub folder on Azure" in Stackoverflow many times. Even though there is an official documentation, this question has not been addressed in general. With Virtual Directories, You could keep your web sites in separate folders and use the ‘virtual directories and applications’ settings in Azure to publish the two different projects under the same site.

However, say if you have an ASP.NET Core/Angular app to a sub-folder inside Azure Web App (App Service), and wanted to deploy on Azure inside a sub-folder. You can simply navigate to Azure portal -> Select the Web App -> Overview

  • Download the publish profile
  • Import in Visual Studio
  • Edit the web-deploy profile(Normally the publish profile will have Web Deploy as well as FTP profile)
    • Change Site Name from your-site to your-site\folder\sub-folder
    • Change the Destination URL from http://your-site.azurewebsites.net to http://your-site.azurewebsites.net/folder/sub-folder
  • Publish

You should be getting an error as follows,

System.TypeLoadException: Method ‘get_Settings’ in type ‘Microsoft.Web.LibraryManager.Build.HostInteraction’ from assembly ‘Microsoft.Web.LibraryManager.Build

You can resolve the above issue by updating the nuget package named Microsoft.Web.LibraryManager.Build in your project.

One other thing that you should be aware is that, Go to portal > demo-site App Service > Configuration > Path Mappings > Virtual applications and directories. And add the following,

Virtual PathPhysical PathType
/foldersite\wwwroot\folderFolder
/folder/sub-foldersite\wwwroot\folder\sub-folderApplication

Configuration Virtual Directory

Now publish from Visual Studio. If you only need to publish to a first level folder, i.e to your-site\folder, then all you have to do is, change the Type to Application in the Path mappings for /folder, and skip the sub-folder entry since you don’t need it. And correct the Site Name and Destination URL in the publish profile accordingly.

Hope there will be no more questions on the same. Happy Coding!
· 3 min read

There has been plenty of tutorials and blogs on how to configure webpy application with apache and mod_wsgi, but none of them turned into successful one. After 2 days of research i have found the solution and decided to write a blog on the same. Hope it will be useful for others.

In the future, I hope to update this post to also include a complete list of steps for getting setup with python’s webpy over lighttpd.

1. Install web.py

1.1. Install webpy with apt-get

sudo apt-get install python-webpy

1.2. Install webpy using easy_install using python setuptools 

1.2.1. Install python setuptools (easy_install)

# 1.2.1.1. Using apt-get:

sudo apt-get install python-setuptools
# 1.2.1.2. Manually retrieving easy_install from the web using wget

wget http://peak.telecommunity.com/dist/ez\_setup.py
sudo python ez_setup.py

# 1.2.2. Now get the web.py egg using python’s easy_install
# This will put the python ‘web’ module in your python environment path

sudo easy_install web.py

1.3. Install webpy straight from git

# Or, get webpy straight from git

git clone git://github.com/webpy/webpy.git ln -s `pwd`/webpy/web .

2. Write Your Web.py App
Choose a directory where you would like your web.py python application to live. If my username is ‘mek’ and I want to name my project ‘project’, I might make a directory /home/sajee/project.

2.1. Make a directory for your web.py app to live
# Replace the word project in the path below with your desired project name

mkdir ~/project
cd ~/project # move into the project directory you have created

2.2. Create your application file using web.py
# this will create our application file ~/project/main.py

touch main.py
2.3. Open your application with your favourite editor

# Substitute “emacs -nw” with an editor of your choice: vim, nano, etc

emacs -nw main.py

2.4. Paste the following in your app file and save

import os
import sys
import web

app_path = os.path.dirname(file)
sys.path.append(app_path)

if app_path: # Apache
os.chdir(app_path)
else: # CherryPy
app_path = os.getcwd()

urls = (
'/(.*)', 'hello'
)

**3\. Install Apache2**

3.1. Install apache and wsgi dependencies

sudo aptitude install apache2 apache2.2-common apache2-mpm-prefork apache2-utils libexpat1 ssl-cer
\# I like to also install python-dev (optional) to make sure I have
\# python’s latest support files

sudo apt-get install python-dev
3.2. Install apache mod\_wsgi and enable mod\_wsgi + mod\_rewrite

sudo aptitude install libapache2-mod-wsgi
sudo a2enmod mod-wsgi;sudo a2enmod rewrite
Need help troubleshooting your apache/mod\_wsgi installation?

**4\. Configure Apache2 With Your App**

In the following steps, replace ‘project’ with the name of your project

4.1. Make Apache Directories for your project

sudo mkdir /var/www/project
sudo mkdir /var/www/project/production
sudo mkdir /var/www/project/logs
sudo mkdir /var/www/project/public\_html
4.2. Create Symlinks
Creating symlinks to your project files is an important covention as, if there is a problem with one of your code bases, you can simply change your symlink to a stable codebase without having to modify your apache configuration.

ln -s ~/project/ production
ln -s ~/project/static public\_html # If you created the static directory in step 2.4.
4.3. Replace you /etc/apache2/sites-available/default with:


ServerAdmin [email protected] /var/www/project.com/public_html/ErrorLog /var/www/project.com/logs/error.logCustomLog /var/www/project.com/logs/access.log combinedWSGIScriptAlias / /var/www/project.com/production/main.pyAlias /static /var/www/project.com/public_htmlAddType text/html .pyWSGIDaemonProcess www-data threads=15WSGIProcessGroup www-dataOrder deny,allowAllow from allOptions +FollowSymLinksOptions -Indexes


4.4. Change the group and owner of files requiring write access to apache’s www-data
Careful in this step to only change the group and owner of directories or files that will require write access.

sudo chgrp -R www-data
sudo chown -R www-data

**5.Try to run!**

sudo /etc/init.d/apache2 restart # Open your browser and visit the url: http://localhost or 127.0.01

You will see Hello World on the browser.

· 3 min read

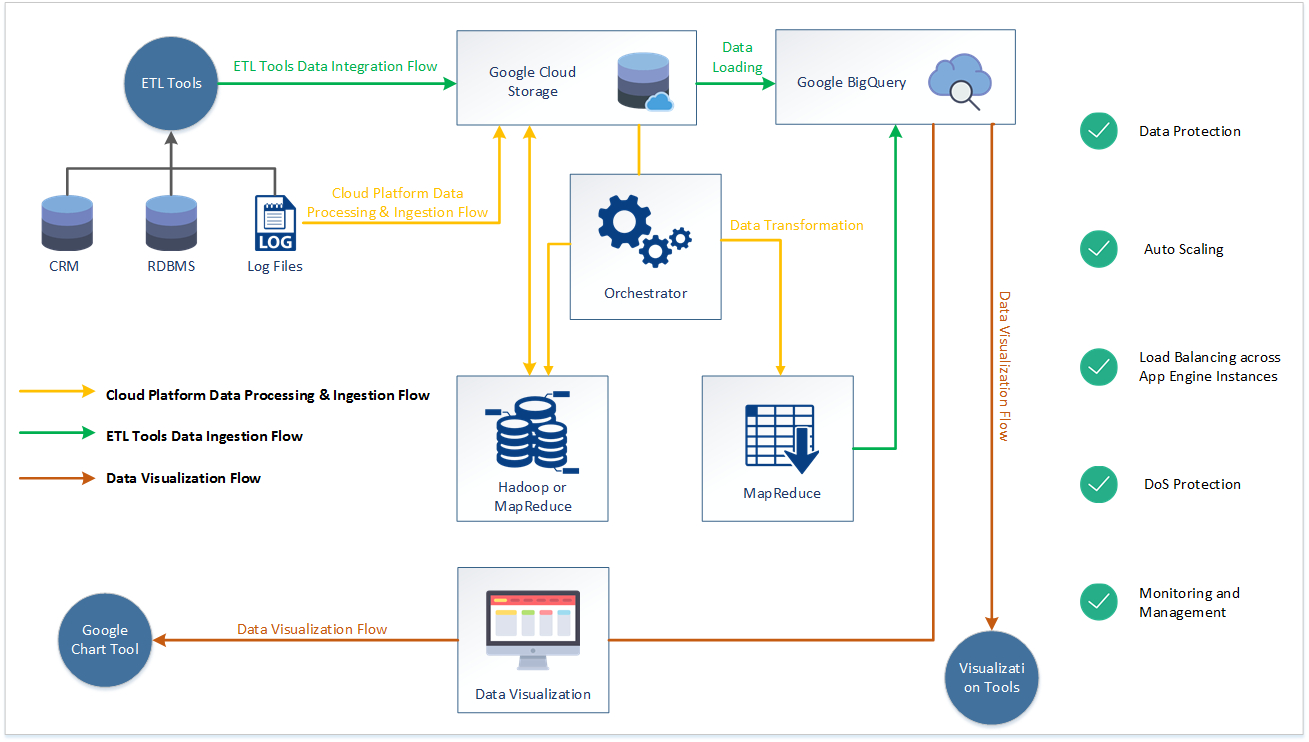
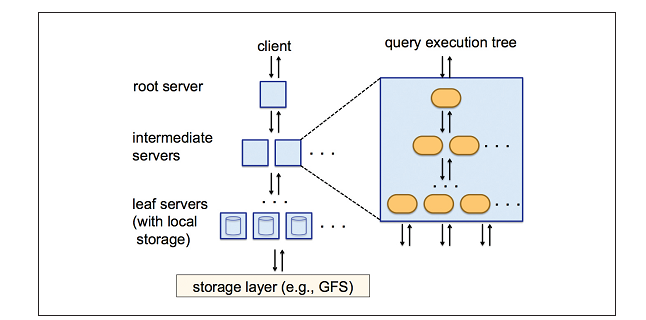
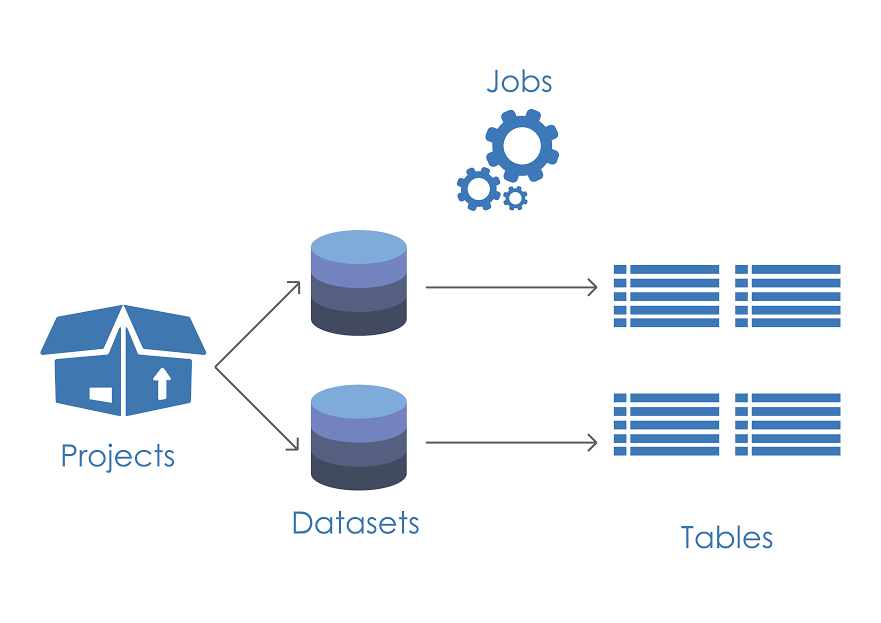
Well, i was one of the speaker at Colombo Big Data Meetup which was held yesterday and i spoke about Google's bigquery. Hence i have decided to write a blog on that so that you could get benefited if you are a BigData Fan.

What is Big Data?

There are so many definitions for Big Data , let me explain what does it really mean? In the near feature, every object on this earth will be generating data including our body.We have been exposed to so much information everyday.In vast ocean of data, complete picture of where  we live where we go and what we say, its all been recorded and stored forever.More data allows us to see new , better different things.Data in the recent times have changed from stationary and static to fluid and dynamic.we rely a lot on data and thatch is  major part of any business.we live in a very exciting world  today, a world where technology is advancing at a staggering pace, a world data is exploding, tons of data being generated. 10 years before we were measuring data in mega bytes, today we are talking about data which is in petabyte size, may be in few years we are going to reach zetabyte era, that means the end of English alphabets.Does it means the end of Big Data? .No . If you have shared a photo or post or a tweet on any social media,You are one of them who is generating data, and you are doing it very rapidly.

Once you have decided to use bigquery there are certain things you need to know before using for optimizations and less cost.

Do not use queries that contains Select * , which is going to execute entire dataset and hence it will result in a high cost.

Since bigquery stores values in nested fields it is always better to use repeated fields.

Store in multiple tables as possible since it is recommended not to have JOINS

Bigquery also supports extensions such as ebq and dry run to encrypt the data and for executing the query to actually check how much resources that actual query is going to consume, which makes lot of developers and data analysts job easy.

I will be writing two separate blogs in the coming days on how to integrate with Bigquery and How to ingest the data into bigquery.

You can find the slides of the presentation from here