One of the most repeated question that i came across on stackoverflow on the tag #Cosmosdb is that how to resolve the error "The partition key supplied in x-ms-partitionkey header has fewer components than defined in the the collection"
This error could occur when you are attempting to get a Document from Cosmosdb using the REST API or using SDK. If you are using using a partitioned Collection and therefore you need to add the "x-ms-documentdb-partitionkey" header. Even after adding the header if you get the error you can fix it by the following methods,
Partition key must be specified as an array (with a single element). For example:
Partition key for a partitioned collection is actually the path to a property in Cosmosdb. Thus you would need to specify it in the following format:/{path to property name} e.g. /abc
Hope this helps someone out there who is struggling to fix this issue!
Due to the recent COVID outbreak and as it continues to spread throughout the world, employees are being to asked to work from home. While most of the companies are already getting adapted to this new way of working, there are mixed opinions among employees from different parts of the world. IMO , Working from home is a good option for new parents, people with disabilities and others who aren’t well served by a traditional office setup. As this was appreciated by most of my colleagues and industry friends, i wanted to see how everyone is reacting to this new way of working across the world. In this post, i will explain how i built an application in 10 minutes to solve this particular question in mind using server less computing offered by Azure.
Architecture of the solution is very simple and it uses most of the Azure managed services that handle the infrastructure for you.Whenever a new tweet is posted Logic Apps receives and processes the tweet. Sentiment score of the tweet can be analyzed using the Cognitive service then Azure function is used here to detect the sentiment of the tweet and finally inserted as a row in the powerBI to visualize in the dashboard. You can also use SQL server/Cosmosdb to store the tweet data if you want to process it later.
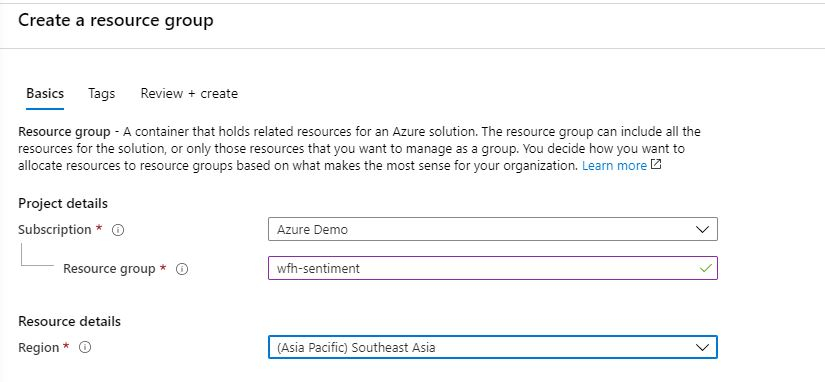
As the first step, we need to create the resource group that contains all the resources needed. Navigate to Azure Portal and create the resource group named "wfh-sentiment"
As the next step lets create the Function App which we need to detect the sentiment of the tweet. You can create and deploy the function app using Visual Studio Code. Open Visual Studio Code(Make sure you have already installed the VSCode with the function core tools and extension). Select Ctrl + Shif + P to create a new Function Project and select the language as C# ( But you could consider using any of the language that you are familiar with)
Create new Function App
Select language as C#
Select the trigger as HttpTrigger
Give the name of the Function
Provide the name of the function
and the logic of the Function app is as follows,
using System;
using System.IO;
using System.Threading.Tasks;
using Microsoft.AspNetCore.Mvc;
using Microsoft.Azure.WebJobs;
using Microsoft.Azure.WebJobs.Extensions.Http;
using Microsoft.AspNetCore.Http;
using Microsoft.Extensions.Logging;
using System.Net.Http;
namespace WorkFromHome
{
    public static class DecideSentinment
    {
        [FunctionName("DecideSentinment")]
        public static async Task<HttpResponseMessage> Run(
            [HttpTrigger(AuthorizationLevel.Anonymous, "get", "post", Route = null)] HttpRequestMessage req,
            ILogger log)
        {
            log.LogInformation("C# HTTP trigger function processed a request.");
             string Sentiment = "POSITIVE";
            //Getting the score from the Cognitive Service and determining the sentiment
             double score = await req.Content.ReadAsAsync<double>();
             if(score < 0.3){
                 Sentiment = "NEGATIVE";
             }
             else if(score < 0.6){
                 Sentiment = "NEUTRAL";
             }
             return req.CreateResponse(System.Net.HttpStatusCode.OK,Sentiment);
        }
    }
}
And the source code can be found here. Then , you can deploy the function App to Azure with simple command using Ctrl+Shift+P and deploy to Function App.
Step 3: Create the Azure Cognitive Service to determine the sentiment of the tweet text
As we discussed above, lets create the cognitive service to determine the sentiment score of the tweet. Go to the same resource group and search for cognitive service and create a new service as follows,
In my application, i have made this step optional as i don't need to save the tweet data for historical analysis. But you can definitely use cosmosdb to store the tweets to process later. As how you created the Cognitive service create a new cosmosdb account and a database to store the data as follows,
Cosmosdb to store tweets data
Step 5: Create PowerBI dataset to visualize the data
Navigate to PowerBI portal and create a new dataset to visualize the data we collected as follows,
Create new Streaming Data set in the work space
Select API in the new streaming data set option
Configure the fields as above.
Step 6: Create the Logic App and configure the Flow
This is the core part of the application as we are going to link together the above component as one flow. You can connect these flows using designer as well as using YAML code. I will be using Designer to create the flow.
As denoted above the first step we need to add the twitter connector which you can pick from the available list of connector named "when a new tweet is posted"
Connector when new tweet is posted
You need to configure the search text which you want to get the tweets , in this case i am going to use the Hashtag "#WFH" and set the interval as 30 seconds.
Look for new tweets on every 30 seconds
The second step is to pass the tweet to Azure cognitive service to analyse the sentiment of the tweet and get the score as output
Select detect sentiment as the next step
You need to provide the key and the URL which could be obtained from the cognitive service you created above.
Configure the detect sentiment of the tweet with the input as the tweet text
The third step is to pass the score obtained above to Azure function which we already deployed to determine the sentiment of the tweet, select the azure function from the connector list as follows,
Select Azure Function which will display the functions already deployed to azure
Configure score from the Cognitive service as an input to the Azure function
Next step is to stream the data set to powerBI so that it will be readily available for the visualization. Select the below connector as next step
Configure Add rows to a dataset to insert data to PowerBI
We are almost done with the configuration, as the last step you need to map the data fields from the above steps to insert into the dataset and the final configuration looks as below.
Mapping the dataset with the outputs from the previous steps
Now we have configured all the steps required in the logic app, navigate to PowerBI and select the data set from which you want to create the report/dashboard. In this case we will select the data set which we have already created as follows,
Select the dataset
Rest is yours, you can create lot of usual charts/visualizations according to the way you need. I have created four basic metrics to see how world reacts to "work from home"
Indicate the total number of unique tweets
Distribution of sentiments using a pie chart
Table which displays all the data (user,location,sentiment,score and the tweet)
Worldmap which shows how distribution of sentiments look like
and this is how my application/dashboard look like.
Final Dashboard with RealTime Tweets
As you can see the tweets and the sentiments are being inserted to the data set and most of the sentiments are being Positive(Looks green !!!). You can replicate the same architecture for your scenarios ( Brands/ Public opinion etc).
As you see some complex scenarios/problems can be easily sorted out with the help of serverless computing and that is the power of Azure. Cheers!
For those who are interested you can view the Live dashboard.
I've been gaming since 2003 till now.I remember those sleepless nights and how much fun i had playing PC games. I always wanted to be a game designer since my childhood days and have built lot of small games during my university days. After a very long time i invested some time and built a simple game using Python and Azure cosmosdb. I wanted to write how to build the game "Corona escape" with others in this blog post.
The coronavirus is fairly new that has taken the world by shock. It’s been two months since the outbreak started and it has shown that it isn’t as deadly as the SARS virus. This game "Corona Escape" is built using Pygame which is a library for beginners to cut their teeth on to get comfortable with learning programming and the process of game development and feel successful in making games. It's also a great rapid prototyping tool. This game is very similar to any jump game. The idea is that to escape from the virus as much as you can, user will be provided with a capsule to make the move fast and a mask to escape from the virus. I will not go in detail on the logic side of it as the source code is published here.
Corona Escape Game
Architecture below is fairly easy, its just a diagram with Cosmosdb to store the data and application insights to gather the user details (type of device,location etc). If you have plan to expand the game, you could add other components in the architecture such as azure functions etc.
Highest score is pushed to a text file and Azure cosmosdb for sharing the score across the users in the world. The related code resides in the cosmos.py which as follows,
def getLeaderBoard(self):
        options = {}
        options['enableCrossPartitionQuery'] = False
        options['maxItemCount'] = 100
        query = {'query': 'SELECT * FROM server s'}

        results = self.client.QueryItems(self.container['_self'], query, options)

        for result in results:
            print(result['message'])


def pushData(self,username,highscore):
        data = self.client.CreateItem(self.container['_self'], {
            "username": str(username),
            "highscore": str(highscore),
            "message" : str(username) + " got " + str(highscore)
        })
Make sure to create a cosmosdb account with the SQL API and pass those credentials under config.
Many times you would have wanted to have one view/dashboard of all the Github issues created for your open source repositories. I have almost 150 repositories and it becomes really hard to find which are the priority ones to be fixed. In this post we will see how you can create a one dashboard/report to view all your github issues in a page using Azure Function(3.X with Typescript) and Azure CosmosDB.
You will need to have an Azure Subscription and a Github Account. If you do not have an Azure subscription you can simply create one with free trial. Free trial provides you with 12 months of free services. We will use Azure Function and CosmosDB to build this solution.
To store the related data of the GitHub issue we need to create a CosmosDB account. To Create CosmosDB account, navigate to the Azure portal and click the Create Resource. Search for Azure Cosmosdb on the market place and create the account as follows.
If you have noticed my previous blog, i have mentioned about how to create an Azure function. Here is an image of the Function App i created.
Creating Function App
Create Typescript Function:
As you see i have selected Runtime stack as Node.js which will be used to run the function written with Typescript. Open Visual Studio Code(Make sure you have already installed the VSCode with the function core tools and extension). Select Ctrl + Shif + P to create a new Function Project and select the language as Typescript.
Create Typescript Function
Select the template as Timer trigger as we need to run every 5 minutes and you need to configure the cron expression (0 */5 * * * *) as well. (You can have custom time)
Give the function name as gitIssueReport, You will see the function getting created with the necessary files.
Let's try to add the necessary dependencies to the project. We will use bluebird as a dependency to handle the requests. Also gh-issues-api library to interact with Github and get the necessary issues. You need to add the dependencies in the package.json folder under dependencies.
Once the deployment is succesfful, Navigate to Azure portal and open the function app to make sure that everything looks good. If you dont see the dependencies make sure to install the dependencies manually by navigating to the Kudu Console of the function App.
Note : Make sure to stop the Function app before you head over to Kudu.
ick on the Platform Features tab. Under Development Tools, click Advanced tools (Kudu). Kudu will open on it’s own in a new window.
Navigate to KUDU console
In the top menu of the Kudu Console, click Debug Console and select CMD
In the command prompt, we’ll want to navigate to D:\home\site\wwwroot. You can do so by using the command cd site\wwwroot and press enter on your keyboard. Once you’re in wwwroot, run the command npm i bluebird to install the package. Also do the same for gh-issues-api
As you could see in the above code, we are setting two environment variables to read the repository name and the repository owner which are needed to fetch the issues information. You can set those variable son the Azure portal as follows.
Navigate to the Overview tab for your function and click Configuration. As you can see below I've configured those values.
Just to make sure that our settings in the function.json has been reflected or not navigate to the Functions and select the Function and make sure all the binding values are correct. If not create a new binding to cosmosdb account you created as mentioned in the step Step 3 (Instead of Twilio select Cosmosdb)
Now its time to see the function app running and issues being reported. Navigate to your function app and click Run. You can see the Function Running as shown below.
If everything goes well, you can navigate to Cosmosdb Account and open the collection with the data Explorer.
Data Explorer Cosmosdb
You will see that there are many documents inserted in the collection.
Cosmosdb collection with Github repository Issues
Now you can modify this function to retrieve the issues from all of your repositories and use the data stored in the cosmosdb collection to build a dashboard to show the issues with priority. Also you can make use of this post to send a notification to someone about the issue as well.
Hope this simple function will help someone to build a dashboard out of the data collected and make them more productive.Cheers!