Overview
This is my 2nd post about a Chatbot solution to address the world wide problem "CoronaVirus" panademic. As it is now spreading across the world and its really vital to provide all citizens of the countries with up-to-date information. As we know it has come to a level that certain countries are in lockdown mode , more and more people are started to practice social distancing and work from home. As we have seen in the previous blog about the sentiment analysis of employees working form home, in this blog i will explain about how to build a chat bot to provides answers to most of the queries related to health information and latest learning. Chatbot is a platform which can be integrated with Web inteface or any collaboration tools such as MS Teams, Slack or Telegram and it can be operated 24*7 without any downtime.
Prerequisites:
You will need to have an Azure Subscription. If you do not have an Azure subscription you can simply create one with free trial.
How to Build:
If you are new to building Chatbot, it is extremely easy and you can enable access to knowledge base via bot in few minutes.
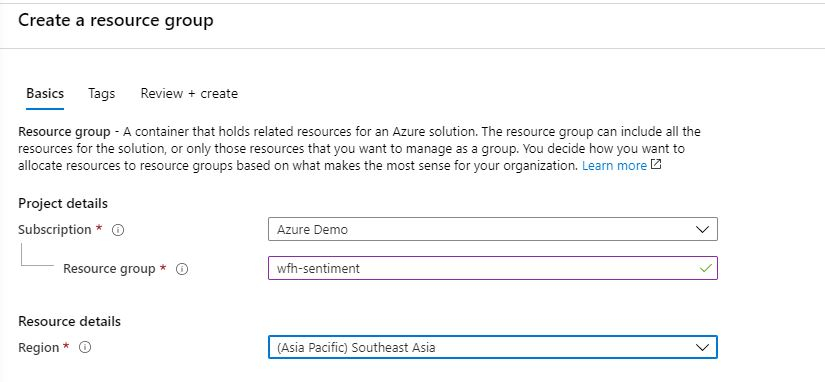
Step 1: Create the Resource Group
As the first step, we need to create the resource group that contains all the resources needed. Navigate to Azure Portal and create the resource group named “rg-chatbot”

Create Resource Group
Step 2: Create a knowledge base
As the next step, navigate to QnA maker,sign-in with your Microsoft account and then click "Create a knowledge base" option

QnA maker
click "Create a QnA service" button in "Step 1" as shown below;

Create QnA service
You will be re-directed to Azure portal. Fill in the template form, and make sure to set pricing tier for "QnA Maker service" to F0, and for the supporting Azure Search service to F, if you want to host your Bot components for free. Then click "Create" button;

Create QnA service
As you could see in the portal Deployment of the relevant resources in your target resource group. If successful, you should get notification as resources deployed. As you will see the following resources under the particular resource group

Resources in QnA
Click on the App Service Plan you created
Note : By Default when you create, App Service Plan for the website is set to S1 pricing tier. You need to change it to the F1 tier if you don't want to have much cost incur on your subscription. You can do this by navigating to Scale Up(App Service Plan) and then select Dev/Test tab and select F1 and Apply.

Change the AppService plan
Step 3 : Connect your QnA service to your KB.
Navigate to the QnA maker again and click 'Refresh" button in "Step 2"

Click on Refresh and select the bot we created
Give a meaningful name to your Knowledge Base (KB)

Name your KB
Step 4 : Populate Knowledge base from different sources
You can specify different sources to feed your knowledge base. It can be populated uploaded from files (e.g., in PDF, MS Word, MS Excel, etc. formats) or typed manually or from Web sites (containing FAQ). For this example, we will be using the recommended standard Knowledge base with Covid-19 FAQs from the Centers for Disease Control and Prevention and World Health Organisation Web sites.

Knowledge Base Sources
Also in the next step chit-chat" section you may choose "personality" for your bot, so that it can answer some additional small talk questions. This option will enrich the knowledge base with additional question/answer details, so you bot may respond to various greetings.

Populate KB
Now you can create your KB with a simple button click to setup your knowledge base and populate it with the data from the different configured sources.

Select the way it should answer small-talk questions
Once it successfuly created, you will see a window as follows,

Create the knowledge base
Step 5: Test bot's knowledge base
It's time to test bot'ts knowledge base , by clicking -> Test button, then type a question and enter,

Test Knowledge base
If you are happy with bot's responses, just go ahead and click "Save and train", then switch to "Publish " tab and publish the Knowledge base

Publish the Knowledge base
Step 6: Create Bot
Once it got successfully published, you can click on Create Bot as follows,

Create Bot
You will be re-directed to Azure portal where you can set the pricing tier of your Azure Bot Service to F0 (free one) , and you can pick SDK language as the one you are familiar with (either C# or Node) and the click "Create" button;

Create Web Bot
You can obtain the QnA authKey by clicking on it and from the deployment details,

Obtaining AuthKey
Once we filled everything, just hit Create button. Once it get deployed you will be able to see it from the notification.
Once Web App Bot is deployed , you may verify its functionality by selecting "Test in Web Chat" in the left navigation bar and then typing your messages in the Test window.

Test in Web Chat
If you get replies similar to what is shown on the screenshot above, congratulations - you have successfully completed setup and training of your bot !
Next step would be to make it accessible in your platform of choice.
Step 7 : Embed your bot into any web site of yours
Azure Web App Bot can communicate with external world via so called "channels". The channels are built for the relevant collaborating platforms, e.g. Skype,MS teams or Telegram. To find out more about supported channels, please consult Microsoft documentation here. By default, Web App Bot has "Web Chat" channel activated. It means that you can easily start using it on your Web site.
Navigate to Channels on the blade of created bot, then click "Get bot embedded codes" and finally click "Click here to open Web Chat configuration page" link.

Web Chat
Now click the "Show" link to reveal one of the secret keys. Use it to replace the <YOUR_SECRET_CODE> placeholder in the provided embedded code sample.
You can now paste this embedded code into the source code of your target website.
Now you can embed this into a Web sites can be built using various Web development frameworks: be it Angular,React,Vue,Angular or anything else.

Copy the code and embed in your site
Simply clone the repository, then replace the <PUT_YOUR_SECRET_CODE> placeholder on line 1059 with the secret code from your Web Chat configuration page (as described above).
You will then have a fully functional web page with an embedded QnA chatbot.
In this case, i already have built an Covid Tracker application with Angular and this how it looks when i embed the code what we got from the portal.

Covid tracker with BOT in place
Step 8: Enable Chatbot in Microsoft Teams
Say if you want to serve internal audience such as employees and if you are widely using Microsoft Teams in this crisis situation, you would nee to activate relvant channel in the bot's configuration.
Open Web App bot resource in the Azure portal again and select "Channels" option from the blade and click Microsoft Teams icon and press Save button

Select the channel you want to integrate with
Once it got successfully published, you can navigate to Channels blade again and see the Microsoft Teams channel in running state.

MS teams on running state
Now, switch to Microsoft Teams client, select "App Studio" from the left navigation bar if you dont have App studio, just install it from here
Click "Manifest Editor" tab and then click "Create a new app" button.

Create a new App on teams
Fill all the details which are necessary and mandatory,

Add the details and make sure you get through all validation
Next in Capabilities -> Bots" choose your Azure bot from "Existing bot" tab's drop-down list and then define its scope in MS Teams, e.g. "Personal" and "Team" for your users to chat with the bot directly and within specific teams.

Setup the bot
Finish -> Test and distribute", use "Install" button (if you have MS Teams administrator access) or "Download" button (to send .ZIP package with the manifest details to your MS Teams administrator) to make your bot available in your MS Teams environment.

We're adone
If successful, then you should be able to chat now with your bot directly from within MS Teams.

BOT in Lit Mode
The above can be integrated into any social media platform listed in the channels and its quite easy
You can also consider using HealthCare Bot if you are focused to have the chatbot to handle related scenario only and he is a detailed article on how to build the same.
Things to add/Improve:
Modify your bot with lot more cool features with images and more content via the code (either c#/Node)
Keep the knowledge base upto date : As shown aove it is important to keep your bot's knowledge base up to date. You can just navigate to the QnA maker website and click on Save and Train button and publish as we shown above.
I am sure this would be useful to those who have built COVID trackers , you can just create and embed this chat bot within your web application, and for others to support employees who are working from home you can extend this bot on the respective collaboration tool. Let's fight against COVID with these cool technology and make this world a better place. Cheers!